기능 추가
pyannote/speaker-diarization-3.1
- 해당 모델도 음성을 텍스트로 변환해주는 모델인데, 음성에서 나오는 대상을 구분하여 나타낼 수 있다는 차이점이 있다.
- 사용하기위해서는 HuggingFace에 접속하여, 회원가입 및 로그인 후 우측 상단의 프로필을 클릭하여
Access Token항목을 들어가서 토큰을 발급해야 한다.(아직 발급하지말고 아래 읽고 진행) - 토큰 발급시
https://huggingface.co/pyannote/segmentation-3.0,https://huggingface.co/pyannote/speaker-diarization-3.1,https://huggingface.co/pyannote/speaker-diarization-community-1에 접속하여 소속 기관 및 웹사이트 정보를 입력해야 하는데, 연습용 이므로 [company/university]부분에Personal, [WebSite]에Nothing이라고 적어둔다. - 이후,
Access Token메뉴에 들어가서
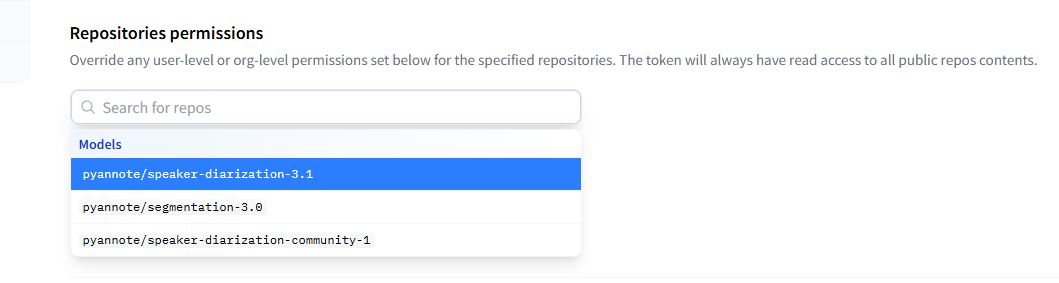
사진과 같이 보이는 부분을 모두 선택한 후 발급을 마친다. - 발급을 마치면 토큰은 저장해야 한다.
코드 작성
- 예제 코드
# instantiate the pipeline
from pyannote.audio import Pipeline
pipeline = Pipeline.from_pretrained(
  "pyannote/speaker-diarization-3.1",
  use_auth_token="HUGGINGFACE_ACCESS_TOKEN_GOES_HERE")

# run the pipeline on an audio file
diarization = pipeline("audio.wav")

# dump the diarization output to disk using RTTM format
with open("audio.rttm", "w") as rttm:
diarization.write_rttm(rttm)- 내가 작성한 코드(예제와 다르니 참고)
# instantiate the pipeline
from pyannote.audio import Pipeline
import torch
pipeline = Pipeline.from_pretrained(
  "pyannote/speaker-diarization-3.1",token=token
  )

if torch.cuda.is_available() :
  pipeline.to(torch.device("cuda"))
  print('use cuda')
else :
  print("not use cuda")
# pydub을 이용한 변환 예시 (설치: pip install pydub)
from pydub import AudioSegment

audio = AudioSegment.from_file(<파일경로>)
audio = audio.set_frame_rate(16000).set_channels(1) # 16kHz, 모노로 변환
audio.export("temp_audio.wav", format="wav")

# 이후 pipeline에는 변환된 파일을 넣습니다.
diarization = pipeline("temp_audio.wav")
ann = diarization.speaker_diarization
# dump the diarization output to disk using RTTM format
with open("audio.rttm", "w", encoding='utf-8') as rttm:
ann.write_rttm(rttm)- 오류 해결
user_auth_token부분도 오류가 발생해서token으로 변경 후 해결..mp3파일을 그대로 사용하려 했으나file resulted in 439895 samples instead of the expected 441000 samples.오류가 지속적으로 발생하여.wav파일로 변환하여 진행하였다.AttributeError: 'DiarizeOutput' object has no attribute 'write_rttm'오류 발생. 내가 사용하는pyannote.audio버전이4.0.4이다.
해당 버전은 파이프라인이DiarizeOutput객체를 반환한다.
그래서 DiarizeOutput으로 부터Annotation을 가져올 수 있도록 코드를 수정했다.
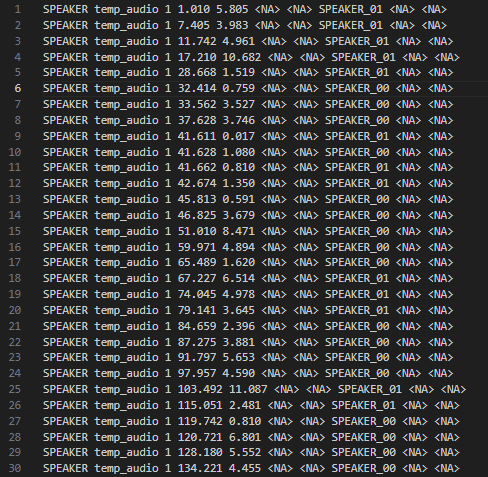
- 결과
실제로 아래와 같이 결과가 정상적으로 나오는 걸 볼 수 있다.
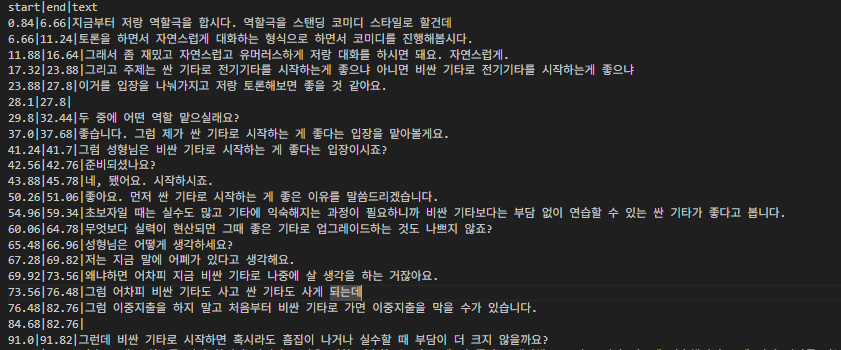
화자별 텍스트 나누기
- 지금까지 작성한 내용을 바탕으로 음성파일에서 텍스트를 추출하고, 화자를 나누어 알맞은 텍스트를 csv 형태로 생성하도록 한다.
import os
import pandas as pd
from pathlib import Path
os.environ["PATH"] += os.pathsep + r"D:\systems\ffmpeg-7.1.1-full_build-shared\bin"
os.add_dll_directory(str(Path(r"D:\systems\ffmpeg-7.1.1-full_build-shared\bin")))

from dotenv import load_dotenv
import torch
from transformers import AutoModelForSpeechSeq2Seq, AutoProcessor, pipeline
from pyannote.audio import Pipeline
from pydub import AudioSegment
# from datasets import load_dataset

load_dotenv()
token = os.getenv("HF_TOKEN")

def whisper_stt(audio_file_path:str, output_file_path:str = "./output.csv") :
    device = "cuda:0" if torch.cuda.is_available() else "cpu"
    torch_dtype =  torch.float32

    model_id = "openai/whisper-large-v3-turbo"

    model = AutoModelForSpeechSeq2Seq.from_pretrained(
        model_id, torch_dtype=torch_dtype, low_cpu_mem_usage=True, use_safetensors=True
    )
    model.to(device)

    processor = AutoProcessor.from_pretrained(model_id)

    pipe = pipeline(
        "automatic-speech-recognition",
        model=model,
        tokenizer=processor.tokenizer,
        feature_extractor=processor.feature_extractor,
        torch_dtype=torch_dtype,
        device=device,
        return_timestamps=True
    )

    # dataset = load_dataset("distil-whisper/librispeech_long", "clean", split="validation")


    result = pipe(audio_file_path)
    print(result["text"])

    df = whisper_to_dataframe(result, output_file_path)

    return result, df

def whisper_to_dataframe(result, output_file_path) :
    start_end_text = []

    for chunk in result['chunks'] :
        start = chunk["timestamp"][0]
        end = chunk["timestamp"][1]
        text = chunk["text"].strip()
        start_end_text.append([start, end,text])
        df = pd.DataFrame(start_end_text, columns=["start", "end", "text"])
        df.to_csv(output_file_path, index=False, sep="|")

    return df

def speaker_diarization(audio_file_path:str, output_rttm_file_path:str, output_csv_file_path:str) :

    pipeline = Pipeline.from_pretrained(
        "pyannote/speaker-diarization-3.1",token=token
    )

    if torch.cuda.is_available() :
        pipeline.to(torch.device("cuda"))
        print('use cuda')
    else :
        print("not use cuda")

    audio = AudioSegment.from_file(audio_file_path)
    audio = audio.set_frame_rate(16000).set_channels(1) # 16kHz, 모노로 변환
    audio.export("temp_audio.wav", format="wav")

    # 이후 pipeline에는 변환된 파일을 넣습니다.
    diarization = pipeline("temp_audio.wav")
    ann = diarization.speaker_diarization
    # dump the diarization output to disk using RTTM format
    with open(output_rttm_file_path, "w", encoding='utf-8') as rttm:
        ann.write_rttm(rttm)


    df_rttm = pd.read_csv(output_rttm_file_path,
                        sep=' ',
                        header=None,
                        names=['type', 'file', 'chnl', 'start', 'duration', 'C1', 'C2', 'speaker_id', 'C3', 'C4'])

    df_rttm['end'] = df_rttm['start'] + df_rttm['duration']
    df_rttm['number'] = None

    df_rttm.at[0, "number"] = 0

    for i in range(1, len(df_rttm)) :
        if df_rttm.at[i, "speaker_id"] != df_rttm.at[i-1, "speaker_id"]:
            df_rttm.at[i, "number"] = df_rttm.at[i-1, "number"] + 1
        else :
            df_rttm.at[i, "number"] = df_rttm.at[i-1, "number"]


    df_rttm_grouped = df_rttm.groupby("number").agg(
        start=pd.NamedAgg(column='start', aggfunc='min'),
        end=pd.NamedAgg(column='end', aggfunc='max'),
        speaker_id=pd.NamedAgg(column='speaker_id', aggfunc='first')
    )

    df_rttm_grouped["duration"] = df_rttm_grouped["end"] + df_rttm_grouped["start"]

    df_rttm_grouped.to_csv(
        output_csv_file_path,
        index=False,
        encoding='utf-8'
    )

    return df_rttm_grouped


def stt_to_rttm(
        audio_file_path: str,
        stt_output_file_path: str,
        rttm_file_path: str,
        rttm_csv_file_path: str,
        final_output_csv_file_path: str
    ):

    result, df_stt = whisper_stt(
        audio_file_path,
        stt_output_file_path
    )

    df_rttm = speaker_diarization(
        audio_file_path,
        rttm_file_path,
        rttm_csv_file_path
    )

    df_rttm["text"] = ""

    for i_stt, row_stt in df_stt.iterrows():
        overlap_dict = {}
        for i_rttm, row_rttm in df_rttm.iterrows():
            overlap = max(0, min(row_stt["end"], row_rttm["end"]) - max(row_stt["start"], row_rttm["start"]))
            overlap_dict[i_rttm] = overlap

        max_overlap = max(overlap_dict.values())
        max_overlap_idx = max(overlap_dict, key=overlap_dict.get)

        if max_overlap > 0:
            df_rttm.at[max_overlap_idx, "text"] += row_stt["text"] + "\n"

    df_rttm.to_csv(
        final_output_csv_file_path,
        index=False,    # 인덱스는 저장하지 않음
        sep='|',
        encoding='utf-8'
    )  # ④
    return df_rttm

if __name__ == "__main__" :

    audio_file_path = r"초기 입력 음성 데이터"
    stt_otuput_file_path = r"./stt.csv"
    rttm_file_path = "./stt.rttm"
    rttm_csv_file_path='stt_rttm.csv'
    final_csv_file_path = "final.csv"

    # result, df = whisper_stt(audio_file_path, "./stt.csv")
    # df_rttm = speaker_diarization(audio_file_path, rttm_file_path, rttm_csv_file_path)
    # print(df_rttm)

    df_rttm = stt_to_rttm(
        audio_file_path,
        stt_otuput_file_path,
        rttm_file_path,
        rttm_csv_file_path,
        final_csv_file_path
    )

print(df_rttm)- 결과

조금씩 앞으로