Authorize HttpServletRequests
Spring Security는 요청 수준에서 권한을 모델링할 수 있도록 지원합니다. 예를 들어, Spring Security를 사용하면 /admin 경로 아래의 모든 페이지는 특정 권한이 필요하고, 다른 모든 페이지는 단순히 인증만 필요하도록 설정할 수 있습니다.
기본적으로 Spring Security는 모든 요청이 인증을 필요로 한다고 요구합니다. 따라서 HttpSecurity 인스턴스를 사용할 때는 항상 권한 부여 규칙을 선언해야 합니다.
HttpSecurity 인스턴스를 사용할 경우 최소한 다음을 설정해야 합니다:
authorizeHttpRequests 사용
Java
http
    .authorizeHttpRequests((authorize) -> authorize
        .anyRequest().authenticated()
    );
위 코드는 애플리케이션의 모든 엔드포인트가 최소한 인증된 보안 컨텍스트를 요구하도록 Spring Security에 알리는 설정입니다.
대부분의 경우, 권한 부여 규칙은 위보다 더 복잡할 수 있습니다. 따라서 다음의 사용 사례를 고려해 보세요:
authorizeRequests를 사용하는 앱을authorizeHttpRequests로 마이그레이션하고 싶습니다.AuthorizationFilter컴포넌트가 작동하는 방식을 이해하고 싶습니다.- 정규식을 사용해 요청을 패턴 기반으로 매칭하고 싶습니다.
- 요청을 매칭하고 Spring MVC를 기본 서블릿 이외의 다른 것으로 매핑하고 싶습니다.
- 요청을 권한 부여하고 싶습니다.
- 프로그래밍 방식으로 요청을 매칭하고 싶습니다.
- 프로그래밍 방식으로 요청에 권한을 부여하고 싶습니다.
- 정책 에이전트에 요청 권한 부여를 위임하고 싶습니다.
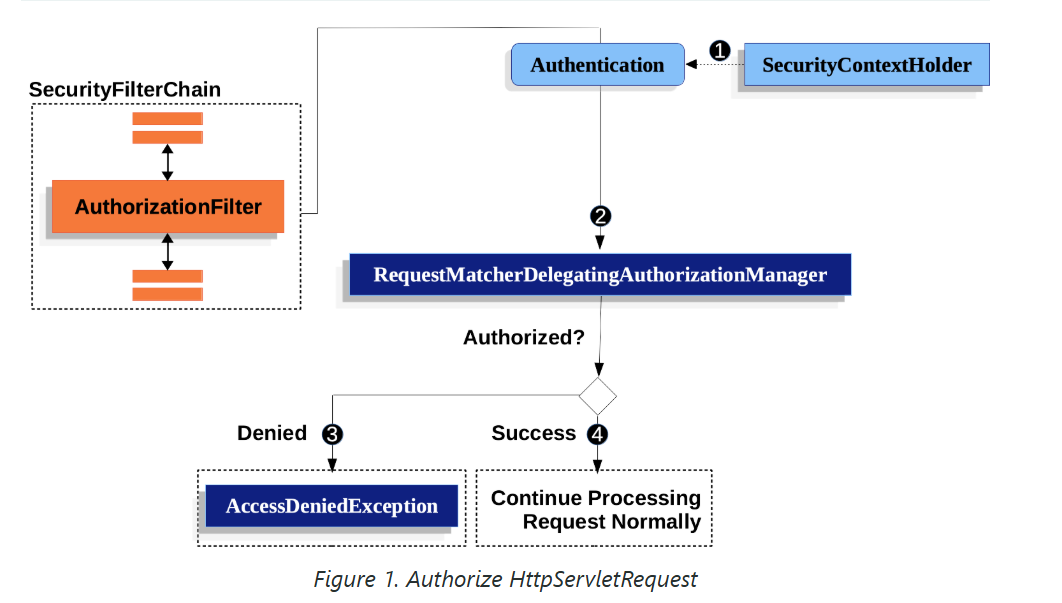
Spring Security의 요청 권한 부여 컴포넌트 작동 방식
Spring Security는 요청(Request) 수준에서 권한 부여를 관리하는 구조를 갖고 있습니다. 이를 구현하는 핵심 요소 중 하나가 AuthorizationFilter입니다. 아래에서 AuthorizationFilter가 요청을 어떻게 처리하는지 자세히 살펴보겠습니다.
1️⃣ AuthorizationFilter의 기본 흐름
AuthorizationFilter는 요청이 들어올 때 요청에 대한 권한 부여 과정을 관리합니다. 다음 단계별로 작동합니다.
1단계: Authentication 가져오기
- AuthorizationFilter는 요청을 처리하기 위해 SecurityContextHolder에서
Authentication객체를 가져오는 Supplier를 생성합니다. Authentication객체는 현재 사용자 또는 시스템의 인증 상태를 나타내며, 사용자의 권한(Authorities) 정보도 포함합니다.
2단계: AuthorizationManager로 전달
- AuthorizationFilter는
Supplier<Authentication>와HttpServletRequest를 AuthorizationManager에 전달합니다. - AuthorizationManager는
authorizeHttpRequests메서드로 설정된 패턴과 요청을 매칭합니다.- 예:
/admin/**경로는ROLE_ADMIN권한이 필요하다고 설정할 수 있습니다. - AuthorizationManager는 요청이 해당 패턴에 부합하는지 확인하고, 해당 규칙(권한)을 실행합니다.
- 예:
3단계: 권한 거부 처리
- 만약 권한이 부여되지 않으면:
AuthorizationDeniedEvent이벤트가 발행됩니다.AccessDeniedException예외가 발생합니다.- 이 예외는 Spring Security의
ExceptionTranslationFilter에 의해 처리됩니다.- 기본적으로 이 필터는 사용자에게 403 Forbidden 응답을 반환합니다.
- 요청 처리가 종료됩니다.
4단계: 권한 허용 처리
- 권한이 부여된 경우:
AuthorizationGrantedEvent이벤트가 발행됩니다.- AuthorizationFilter는 필터 체인(FilterChain)을 계속 진행하며, 요청은 애플리케이션의 다음 단계로 전달됩니다.
- 예: 컨트롤러 메서드로 전달되어 비즈니스 로직을 수행할 수 있습니다.
2️⃣ AuthorizationFilter의 기본 위치
Spring Security는 AuthorizationFilter를 필터 체인의 마지막에 위치시킵니다.
이 설계는 다음과 같은 의미를 가집니다:
1. Spring Security의 인증 필터
- 인증(Authentication) 필터나 보안 취약점 보호 필터(예: CSRF 보호)는 권한 부여가 필요하지 않습니다.
- 즉, 이 필터들은 AuthorizationFilter 이전에 실행되므로 추가적인 권한 부여 없이 동작합니다.
2. 사용자 정의 필터
- 사용자가 AuthorizationFilter 이전에 필터를 추가하면 해당 필터도 권한 부여 없이 실행됩니다.
- 반대로 AuthorizationFilter 이후에 필터를 추가하면, 해당 필터는 AuthorizationFilter의 규칙에 따라 동작합니다.
3️⃣ Spring MVC 엔드포인트와 권한 설정
Spring Security에서 Spring MVC의 엔드포인트는 DispatcherServlet을 통해 처리됩니다.
하지만 DispatcherServlet은 AuthorizationFilter 이후에 실행되므로, 엔드포인트에 접근하려면 별도로 권한 규칙을 정의해야 합니다.
예시: /admin 경로 설정
http
    .authorizeHttpRequests((authorize) -> authorize
        .requestMatchers("/admin/**").hasRole("ADMIN")  // /admin 경로에 ROLE_ADMIN 필요
        .anyRequest().authenticated()  // 나머지 요청은 인증 필요
    );
만약 설정하지 않으면?
- Spring Security는 기본적으로 모든 요청에 대해 인증을 요구합니다.
/admin경로가authorizeHttpRequests에 포함되지 않았다면, 요청은 기본 규칙에 따라 인증만 요구하게 됩니다.
4️⃣ AuthorizationFilter 동작 시나리오
- 사용자가
/admin/dashboard로 요청을 보냅니다. - SecurityContextHolder에서 사용자의 인증 정보를 가져옵니다.
- 요청이
/admin/**패턴과 매칭되며,ROLE_ADMIN권한이 있는지 확인합니다.- 사용자가
ROLE_ADMIN권한이 없으면 403 Forbidden 응답을 반환합니다.
- 사용자가
- 사용자가
ROLE_ADMIN권한을 가지고 있으면, 요청은 필터 체인을 계속 진행하며 컨트롤러로 전달됩니다.
5️⃣ 정리: 중요한 설계 포인트
- AuthorizationFilter는 필터 체인의 마지막에 위치한다.
- 기본적으로 인증만 요구되는 필터가 먼저 실행됩니다.
- 추가적인 권한 부여 로직은 AuthorizationFilter에서 처리됩니다.
authorizeHttpRequests로 요청 권한을 세밀하게 설정할 수 있다.- 요청 패턴별로 권한을 설정하여 유연하게 관리할 수 있습니다.
- Spring MVC 엔드포인트는 반드시 권한 규칙에 포함해야 한다.
- DispatcherServlet 이후에 실행되므로, 명시적으로 규칙을 작성해야 접근 가능합니다.
Spring Security에서 엔드포인트에 권한 부여하기
Spring Security를 사용하면 특정 엔드포인트에 대해 세밀한 권한 설정을 할 수 있습니다. 이 과정은 패턴(경로)과 규칙(필요 권한)을 쌍으로 작성하여 이루어지며, 규칙은 우선순위에 따라 적용됩니다. 아래에서 단계별로 자세히 설명합니다.
1️⃣ 기본 권한 설정 예제
코드
@Bean
public SecurityFilterChain web(HttpSecurity http) throws Exception {
    http
        .authorizeHttpRequests((authorize) -> authorize
            .requestMatchers("/endpoint").hasAuthority("USER") // /endpoint는 USER 권한 필요
            .anyRequest().authenticated() // 나머지 요청은 인증만 필요
        )
        // 추가적인 보안 설정...
        .and()
        .formLogin(); // 로그인 페이지 설정
    return http.build();
}
설명
-
requestMatchers("/endpoint"):/endpoint경로에 대해 특정 권한(USER)이 필요합니다.- 이는 "USER 권한을 가진 사용자만 접근 가능"이라는 의미입니다.
-
anyRequest().authenticated():- 그 외의 모든 요청은 인증된 사용자라면 접근 가능합니다.
- 권한이 아니라 인증(로그인)만 요구됩니다.
-
규칙 처리 순서:
- Spring Security는 설정된 규칙을 위에서 아래로 처리합니다.
- 처음으로 일치하는 규칙만 적용되며, 나머지는 무시됩니다.
- 예를 들어,
/endpoint는 첫 번째 규칙에서 처리되므로, 이후의anyRequest()규칙에는 영향을 받지 않습니다.
2️⃣ 규칙 처리 순서의 중요성
Spring Security의 규칙은 우선순위에 따라 처리됩니다. 이를 고려하지 않으면 예상치 못한 동작이 발생할 수 있습니다.
예제
@Bean
public SecurityFilterChain web(HttpSecurity http) throws Exception {
    http
        .authorizeHttpRequests((authorize) -> authorize
            .anyRequest().authenticated() // 모든 요청을 인증 요구
            .requestMatchers("/endpoint").hasAuthority("USER") // /endpoint는 USER 권한 필요
        );
    return http.build();
}
결과
- 위 코드에서
/endpoint도anyRequest()규칙에 의해 단순 인증만 요구됩니다. /endpoint에USER권한을 요구하려면anyRequest()보다 앞에 배치해야 합니다.
3️⃣ 테스트를 통한 권한 검증
Spring Security는 애플리케이션의 권한 설정을 테스트할 수 있는 도구를 제공합니다. 아래는 /endpoint에 대한 권한 검증을 테스트하는 코드입니다.
테스트 코드
@WithMockUser(authorities = "USER")
@Test
void endpointWhenUserAuthorityThenAuthorized() {
    this.mvc.perform(get("/endpoint"))
        .andExpect(status().isOk()); // USER 권한이 있으면 200 OK
}

@WithMockUser
@Test
void endpointWhenNotUserAuthorityThenForbidden() {
    this.mvc.perform(get("/endpoint"))
        .andExpect(status().isForbidden()); // USER 권한 없으면 403 Forbidden
}

@Test
void anyWhenUnauthenticatedThenUnauthorized() {
    this.mvc.perform(get("/any"))
        .andExpect(status().isUnauthorized()); // 인증되지 않은 경우 401 Unauthorized
}
테스트 동작 설명
-
@WithMockUser(authorities = "USER"):USER권한을 가진 가상의 사용자를 시뮬레이션합니다./endpoint요청 결과는 200 OK여야 합니다.
-
@WithMockUser:- 기본 권한(
ROLE_USER)만 가진 가상의 사용자를 시뮬레이션합니다. /endpoint요청은USER권한이 없으므로 403 Forbidden을 반환합니다.
- 기본 권한(
-
인증되지 않은 요청:
- 인증되지 않은 상태로 요청을 보냅니다.
- 인증이 필요하므로
/any요청은 401 Unauthorized를 반환합니다.
4️⃣ 패턴과 규칙 설정의 유연성
Spring Security는 다양한 패턴과 규칙을 제공하며, 필요에 따라 사용자 정의 규칙도 추가할 수 있습니다.
지원되는 패턴의 예
- 정확한 경로 매칭:
requestMatchers("/exact/path") - 와일드카드 사용:
requestMatchers("/admin/**") // /admin 하위 모든 경로 - HTTP 메서드별 규칙:
requestMatchers(HttpMethod.POST, "/create").hasAuthority("ADMIN") - 정규식 매칭:
requestMatchers(Pattern.compile("/regex/.*"))
5️⃣ 커스텀 권한 로직 작성
Spring Security는 기본 제공 규칙 외에도 프로그래밍 방식으로 사용자 정의 권한 로직을 작성할 수 있습니다.
예제: 커스텀 권한 로직
@Bean
public SecurityFilterChain web(HttpSecurity http) throws Exception {
    http
        .authorizeHttpRequests((authorize) -> authorize
            .requestMatchers("/custom").access((authentication, object) -> {
                // 사용자 정의 로직
                return authentication.get().getAuthorities().stream()
                    .anyMatch(grantedAuthority -> grantedAuthority.getAuthority().equals("CUSTOM_ROLE"));
            })
        )
        .anyRequest().authenticated();
    return http.build();
}
요약
-
규칙 설정 시 우선순위가 중요:
- 첫 번째로 일치하는 규칙이 적용됩니다.
- 예외 처리를 피하려면, 더 세부적인 규칙을 상단에 배치하세요.
-
Spring Security는 다양한 패턴과 규칙을 지원:
- 기본 제공 패턴 외에, 정규식이나 HTTP 메서드 기반 매칭도 가능합니다.
- 필요에 따라 프로그래밍 방식으로 커스텀 권한 로직을 작성할 수도 있습니다.
-
테스트를 통해 설정 검증:
@WithMockUser를 사용해 다양한 사용자 권한을 시뮬레이션할 수 있습니다.- 각 요청에 대한 예상 응답 상태(200, 403, 401)를 테스트해 설정의 정확성을 확인하세요.
-
간단한 규칙 예제:
http
    .authorizeHttpRequests((authorize) -> authorize
        .requestMatchers("/admin/**").hasRole("ADMIN")
        .requestMatchers(HttpMethod.POST, "/create").hasAuthority("USER")
        .anyRequest().authenticated()
    );
Spring Security는 규칙의 유연성과 강력한 테스트 지원을 통해 권한 관리를 효과적으로 처리할 수 있습니다.
요청 매칭
위에서 이미 요청을 매칭하는 두 가지 방법을 보았습니다.
첫 번째는 모든 요청을 매칭하는 가장 간단한 방법입니다.
두 번째는 URI 패턴을 사용하여 매칭하는 방법입니다. Spring Security는 URI 패턴 매칭을 위해 두 가지 언어를 지원합니다:
Ant 스타일 패턴(위에서 본 것처럼)과 정규식(Regular Expressions)입니다.
Spring Security에서 Ant를 사용한 요청 매칭
Spring Security는 요청 매칭을 위해 기본적으로 Ant 스타일 패턴을 사용합니다. Ant는 직관적이고 간단한 방식으로 특정 경로(엔드포인트) 또는 디렉토리 구조를 매칭할 수 있도록 설계되었습니다. 또한, 요청에서 경로 값을 추출하거나 HTTP 메서드별로 매칭을 세분화할 수 있습니다.
1️⃣ Ant 패턴의 기본 동작
Ant 스타일 패턴 구성
?: 한 글자를 대체.- 예:
/file?.txt→/file1.txt,/file2.txt매칭.
- 예:
*: 경로의 일부를 대체.- 예:
/files/*→/files/a.txt,/files/b.png매칭.
- 예:
- ``**: 경로의 여러 계층을 대체.
- 예:
/files/**→/files/a.txt,/files/subdir/b.png등 모든 하위 경로 매칭.
- 예:
2️⃣ 단일 디렉토리 및 하위 디렉토리 매칭
예제: /resource 하위 모든 경로 매칭
http
    .authorizeHttpRequests((authorize) -> authorize
        .requestMatchers("/resource/**").hasAuthority("USER")
        .anyRequest().authenticated()
    );
동작
/resource또는/resource하위 경로(/resource/file,/resource/subdir/file등)에 대한 요청은USER권한을 요구합니다.- 그 외의 모든 요청은 인증만 요구됩니다.
해석
위 코드는 다음과 같이 읽을 수 있습니다:
"요청이 /resource 또는 하위 디렉토리라면 USER 권한이 필요하며, 나머지 요청은 인증만 필요하다."
3️⃣ 경로 값 추출 및 조건 추가
Spring Security에서는 요청 경로에서 경로 변수(Path Variable) 값을 추출해 사용할 수 있습니다. 이를 통해 요청 조건을 세밀하게 설정할 수 있습니다.
예제: 요청 경로에서 name 값을 추출
http
    .authorizeHttpRequests((authorize) -> authorize
        .requestMatchers("/resource/{name}")
        .access(new WebExpressionAuthorizationManager("#name == authentication.name"))
        .anyRequest().authenticated()
    );
동작
- 요청 경로
/resource/{name}에서{name}값을 추출합니다. #name == authentication.name:- 현재 인증된 사용자(
authentication.name)와 요청 경로의name값이 동일한 경우만 접근 허용.
- 현재 인증된 사용자(
해석
위 코드는 다음과 같이 읽을 수 있습니다:
"요청 경로 /resource/{name}에서 {name} 값이 인증된 사용자의 이름과 일치하면 요청을 허용한다."
4️⃣ HTTP 메서드 매칭
특정 HTTP 메서드(GET, POST 등)에 대해서만 조건을 설정할 수 있습니다.
예제: POST 요청만 허용
http
    .authorizeHttpRequests((authorize) -> authorize
        .requestMatchers(HttpMethod.POST, "/resource/**").hasAuthority("USER")
        .anyRequest().authenticated()
    );
동작
/resource경로와 하위 경로에서 POST 요청은USER권한을 요구합니다.- GET, PUT 등 다른 HTTP 메서드는 이 규칙에 적용되지 않습니다.
5️⃣ 테스트를 통한 검증
Spring Security는 설정된 권한이 제대로 동작하는지 확인하기 위해 테스트 도구를 제공합니다.
테스트 코드 예제
@WithMockUser(authorities = "USER")
@Test
void endpointWhenUserAuthorityThenAuthorized() {
    this.mvc.perform(get("/endpoint/jon"))
        .andExpect(status().isOk()); // USER 권한이 있으면 200 OK
}

@WithMockUser
@Test
void endpointWhenNotUserAuthorityThenForbidden() {
    this.mvc.perform(get("/endpoint/jon"))
        .andExpect(status().isForbidden()); // USER 권한 없으면 403 Forbidden
}

@Test
void anyWhenUnauthenticatedThenUnauthorized() {
    this.mvc.perform(get("/any"))
        .andExpect(status().isUnauthorized()); // 인증되지 않은 경우 401 Unauthorized
}
설명
-
@WithMockUser(authorities = "USER"):USER권한을 가진 가상의 사용자를 생성합니다./endpoint/jon요청이 200 OK인지 테스트합니다.
-
@WithMockUser:- 기본 권한(ROLE_USER)을 가진 가상의 사용자를 생성합니다.
/endpoint/jon요청이USER권한 부족으로 403 Forbidden을 반환하는지 테스트합니다.
-
인증되지 않은 요청:
- 인증되지 않은 상태로
/any요청을 보냅니다. - 인증이 필요하므로 401 Unauthorized를 반환하는지 테스트합니다.
- 인증되지 않은 상태로
6️⃣ 쿼리 파라미터 매칭
Spring Security는 기본적으로 요청의 경로(Path)만 매칭합니다.
쿼리 파라미터(Query Parameters)를 매칭하려면 사용자 정의 요청 매처(Custom Request Matcher)를 작성해야 합니다.
예: 쿼리 파라미터 매칭
http
    .authorizeHttpRequests((authorize) -> authorize
        .requestMatchers(new CustomRequestMatcher()) // 사용자 정의 매처 사용
        .anyRequest().authenticated()
    );
CustomRequestMatcher 예제
public class CustomRequestMatcher implements RequestMatcher {
    @Override
    public boolean matches(HttpServletRequest request) {
        String param = request.getParameter("param");
        return "value".equals(param); // 특정 파라미터 조건
    }
}
요약
-
Ant 패턴은 직관적인 매칭 도구
*,**,{name}등을 사용해 단순하거나 계층적인 경로를 매칭 가능.- 경로 변수 추출 및 조건 추가 가능.
-
HTTP 메서드별 세부 조건 설정
- 특정 메서드(GET, POST 등)에 대해서만 권한을 설정할 수 있습니다.
-
쿼리 파라미터 매칭은 기본적으로 지원하지 않음
- 사용자 정의
RequestMatcher를 작성해 구현 가능합니다.
- 사용자 정의
-
테스트로 설정 검증
- Spring Security의 테스트 도구를 활용해 설정의 정확성을 검증하세요.
Spring Security는 유연한 요청 매칭 방식과 다양한 확장 가능성을 제공해 애플리케이션 보안을 정밀하게 제어할 수 있습니다.
정규식을 사용한 요청 매칭
Spring Security는 요청을 정규식(Regular Expression)을 사용해 매칭하는 기능을 지원합니다. 이는 ``**을 사용하는 디렉토리 매칭보다 더 엄격한 매칭 기준을 적용해야 할 때 유용합니다.
예제: 알파벳과 숫자로만 구성된 사용자 이름을 포함한 경로 매칭
사용자 이름이 반드시 영문자와 숫자로만 이루어져야 한다는 규칙이 있을 경우, 정규식을 사용해 이를 처리할 수 있습니다.
http
    .authorizeHttpRequests((authorize) -> authorize
        .requestMatchers(RegexRequestMatcher.regexMatcher("/resource/[A-Za-z0-9]+")).hasAuthority("USER") // 정규식 매칭
        .anyRequest().denyAll() // 그 외의 모든 요청은 거부
    );
설명
-
/resource/[A-Za-z0-9]+:/resource/뒤에 하나 이상의 영문자 또는 숫자가 오는 경로만 매칭합니다.- 예:
/resource/john123,/resource/abc123는 매칭됨. - 예:
/resource/john_123는 매칭되지 않음.
-
hasAuthority("USER"):- 매칭된 요청은
USER권한이 있어야만 접근 가능합니다.
- 매칭된 요청은
-
anyRequest().denyAll():- 다른 모든 요청은 거부됩니다.
HTTP 메서드를 사용한 요청 매칭
Spring Security에서는 HTTP 메서드(GET, POST 등)에 따라 권한을 설정할 수 있습니다.
특히, 읽기(read) 또는 쓰기(write)와 같은 권한에 따라 요청을 구분할 때 유용합니다.
예제: GET 요청은 읽기 권한, POST 요청은 쓰기 권한 필요
http
    .authorizeHttpRequests((authorize) -> authorize
        .requestMatchers(HttpMethod.GET).hasAuthority("read") // GET 요청은 read 권한 필요
        .requestMatchers(HttpMethod.POST).hasAuthority("write") // POST 요청은 write 권한 필요
        .anyRequest().denyAll() // 그 외의 요청은 거부
    );
설명
-
HttpMethod.GET:- GET 요청은
read권한을 요구합니다.
- GET 요청은
-
HttpMethod.POST:- POST 요청은
write권한을 요구합니다.
- POST 요청은
-
anyRequest().denyAll():- 그 외의 모든 요청은 기본적으로 거부됩니다.
- 요청을 기본적으로 거부하는 설정은 보안상 권장되는 안전한 설정 방식입니다.
규칙 해석
위 코드는 다음과 같이 읽을 수 있습니다:
- GET 요청:
read권한 필요. - POST 요청:
write권한 필요. - 그 외의 요청: 거부.
테스트로 HTTP 메서드 권한 검증
Spring Security의 테스트 지원 기능을 사용하여 권한 설정이 올바르게 동작하는지 확인할 수 있습니다.
테스트 코드 예제
@WithMockUser(authorities="read")
@Test
void getWhenReadAuthorityThenAuthorized() {
    this.mvc.perform(get("/any"))
        .andExpect(status().isOk()); // read 권한으로 GET 요청이 성공(200 OK)
}

@WithMockUser
@Test
void getWhenNoReadAuthorityThenForbidden() {
    this.mvc.perform(get("/any"))
        .andExpect(status().isForbidden()); // read 권한 없이 GET 요청이 거부(403 Forbidden)
}

@WithMockUser(authorities="write")
@Test
void postWhenWriteAuthorityThenAuthorized() {
    this.mvc.perform(post("/any").with(csrf()))
        .andExpect(status().isOk()); // write 권한으로 POST 요청이 성공(200 OK)
}

@WithMockUser(authorities="read")
@Test
void postWhenNoWriteAuthorityThenForbidden() {
    this.mvc.perform(post("/any").with(csrf()))
        .andExpect(status().isForbidden()); // read 권한으로 POST 요청이 거부(403 Forbidden)
}
테스트 동작 설명
-
@WithMockUser(authorities="read"):read권한을 가진 사용자로 GET 요청을 테스트합니다.- 성공하면 200 OK, 권한이 없으면 403 Forbidden 반환.
-
@WithMockUser(authorities="write"):write권한을 가진 사용자로 POST 요청을 테스트합니다.- 성공하면 200 OK, 권한이 없으면 403 Forbidden 반환.
-
CSRF 토큰 추가 (
.with(csrf())):- POST 요청에는 CSRF 토큰이 필요합니다. 이를 추가하지 않으면 요청이 실패할 수 있습니다.
요약
-
HTTP 메서드별 권한 설정:
- Spring Security는 GET, POST 등 특정 HTTP 메서드에 따라 권한을 설정할 수 있습니다.
- 요청의 허용 조건을 명확히 정의할 수 있습니다.
-
기본 거부 정책:
anyRequest().denyAll()를 사용해 기본적으로 요청을 거부하는 것은 보안상 권장됩니다.- 필요에 따라 허용 조건을 명시적으로 추가하는 허용 목록(Allow List) 방식을 따릅니다.
-
테스트로 검증:
- Spring Security의 테스트 지원 기능을 사용해 설정된 권한이 제대로 동작하는지 확인하세요.
@WithMockUser와 CSRF 토큰 설정을 활용하여 다양한 시나리오를 테스트할 수 있습니다.
Dispatcher Type으로 요청 매칭
이 기능은 현재 XML에서는 지원되지 않습니다.
앞서 설명한 것처럼, Spring Security는 기본적으로 모든 Dispatcher Type에 대해 권한을 검사합니다.
REQUEST 디스패치에서 설정된 보안 컨텍스트는 이후의 디스패치(FORWARD, ERROR 등)로도 전달되지만, 미묘한 불일치로 인해 예기치 않은 AccessDeniedException이 발생할 수 있습니다.
이를 해결하기 위해, Java 설정을 사용하여 FORWARD 및 ERROR와 같은 Dispatcher Type을 허용하도록 설정할 수 있습니다.
예제: Dispatcher Type 매칭
http
    .authorizeHttpRequests((authorize) -> authorize
        .dispatcherTypeMatchers(DispatcherType.FORWARD, DispatcherType.ERROR).permitAll() // FORWARD와 ERROR 허용
        .requestMatchers("/endpoint").permitAll() // 특정 엔드포인트 허용
        .anyRequest().denyAll() // 그 외의 요청은 거부
    );
설명
dispatcherTypeMatchers(DispatcherType.FORWARD, DispatcherType.ERROR):- FORWARD 및 ERROR 디스패치에 대해 요청을 허용합니다.
requestMatchers("/endpoint").permitAll():/endpoint요청을 모든 사용자에게 허용합니다.
anyRequest().denyAll():- 그 외의 모든 요청은 기본적으로 거부합니다.
MvcRequestMatcher 사용하기
일반적으로는 위에서 설명한 것처럼 requestMatchers(String)을 사용할 수 있습니다.
하지만 Spring MVC를 기본 경로(/)가 아닌 다른 서블릿 경로로 매핑하는 경우, 보안 설정에서 이를 고려해야 합니다.
예제 상황
Spring MVC가 기본 경로(/) 대신 /spring-mvc로 매핑된 경우,
/spring-mvc/my/controller와 같은 엔드포인트에 대해 권한을 설정하려면 아래와 같이 설정해야 합니다.
MvcRequestMatcher를 사용한 매칭
@Bean
MvcRequestMatcher.Builder mvc(HandlerMappingIntrospector introspector) {
    return new MvcRequestMatcher.Builder(introspector).servletPath("/spring-mvc"); // 서블릿 경로 지정
}

@Bean
SecurityFilterChain appEndpoints(HttpSecurity http, MvcRequestMatcher.Builder mvc) {
    http
        .authorizeHttpRequests((authorize) -> authorize
            .requestMatchers(mvc.pattern("/my/controller/**")).hasAuthority("controller") // 컨트롤러 경로 권한 설정
            .anyRequest().authenticated() // 나머지 요청은 인증만 필요
        );

    return http.build();
}
필요한 경우
다음과 같은 상황에서 MvcRequestMatcher를 사용할 필요가 생깁니다:
1. spring.mvc.servlet.path 속성을 사용해 기본 경로(/)를 다른 경로로 변경한 경우.
2. Spring MVC DispatcherServlet을 여러 개 등록하여 기본 경로가 아닌 경로를 사용하는 경우.
사용자 정의 RequestMatcher를 사용한 Spring Security 권한 설정
Spring Security에서 기본 제공 RequestMatcher 이외에도 사용자 정의 RequestMatcher를 만들어 특정 요청에 대해 권한 부여를 제어할 수 있습니다.
이는 요청의 특정 조건(예: 쿼리 파라미터 존재 여부)에 따라 권한을 동적으로 부여할 때 유용합니다.
1️⃣ RequestMatcher란?
RequestMatcher는 요청(HttpServletRequest)이 특정 조건을 만족하는지 확인하는 함수형 인터페이스입니다.
Spring Security의 authorizeHttpRequests() DSL에 전달하여 요청 조건을 기반으로 권한을 설정할 수 있습니다.
RequestMatcher 정의
@FunctionalInterface
public interface RequestMatcher {
    boolean matches(HttpServletRequest request);
}
matches(HttpServletRequest request):
요청이 특정 조건에 부합하는지 true/false를 반환합니다.
2️⃣ 사용자 정의 RequestMatcher 작성
람다 표현식 사용 예제
람다를 활용하여 간단히 RequestMatcher를 정의할 수 있습니다.
RequestMatcher printview = (request) -> request.getParameter("print") != null;

http
    .authorizeHttpRequests((authorize) -> authorize
        .requestMatchers(printview).hasAuthority("print") // print 파라미터가 있는 경우 print 권한 필요
        .anyRequest().authenticated() // 나머지 요청은 인증만 필요
    );
작동 방식
-
printviewMatcher:- 요청의 쿼리 파라미터에서
print가 있는지 확인합니다. - 예:
/any?print=1요청은matches()가 true를 반환.
- 요청의 쿼리 파라미터에서
-
requestMatchers(printview).hasAuthority("print"):printview조건을 만족하는 요청은print권한이 있어야만 접근 허용.
-
anyRequest().authenticated():- 나머지 요청은 인증만 요구.
구체 클래스 사용
보다 복잡한 조건을 처리하거나 상태를 유지해야 하는 경우, RequestMatcher를 구현한 구체 클래스를 작성할 수 있습니다.
public class PrintRequestMatcher implements RequestMatcher {
    @Override
    public boolean matches(HttpServletRequest request) {
        return request.getParameter("print") != null; // print 파라미터가 있는지 확인
    }
}
이후 설정:
RequestMatcher printview = new PrintRequestMatcher();

http
    .authorizeHttpRequests((authorize) -> authorize
        .requestMatchers(printview).hasAuthority("print")
        .anyRequest().authenticated()
    );
3️⃣ 테스트로 사용자 정의 RequestMatcher 검증
Spring Security는 요청 조건 및 권한 설정을 검증하기 위한 테스트 도구를 제공합니다.
테스트 코드 예제
@WithMockUser(authorities="print")
@Test
void printWhenPrintAuthorityThenAuthorized() {
    this.mvc.perform(get("/any?print")) // print 파라미터가 포함된 요청
        .andExpect(status().isOk()); // print 권한이 있으면 200 OK
}

@WithMockUser
@Test
void printWhenNoPrintAuthorityThenForbidden() {
    this.mvc.perform(get("/any?print")) // print 파라미터가 포함된 요청
        .andExpect(status().isForbidden()); // print 권한이 없으면 403 Forbidden
}
테스트 동작 설명
-
@WithMockUser(authorities="print"):print권한을 가진 가상의 사용자를 생성합니다.GET /any?print요청은 조건에 맞으므로 200 OK를 반환해야 합니다.
-
권한 없는 사용자 테스트:
@WithMockUser로 기본 권한 사용자 또는 권한 없는 사용자로 요청을 보냅니다.- 요청 조건은 충족하지만 권한이 없으므로 403 Forbidden을 반환해야 합니다.
-
CSRF 고려:
- POST나 PUT과 같은 요청은 CSRF 토큰이 필요할 수 있으므로
.with(csrf())를 추가해야 합니다.
- POST나 PUT과 같은 요청은 CSRF 토큰이 필요할 수 있으므로
4️⃣ RequestMatcher 활용 예제
쿼리 파라미터 검사
RequestMatcher adminParam = (request) -> "admin".equals(request.getParameter("role"));
http
    .authorizeHttpRequests((authorize) -> authorize
        .requestMatchers(adminParam).hasRole("ADMIN")
        .anyRequest().authenticated()
);- 요청에
?role=admin파라미터가 있을 때만 ADMIN 역할 필요.
HTTP 헤더 검사
RequestMatcher customHeader = (request) -> "special-value".equals(request.getHeader("X-Custom-Header"));
http
    .authorizeHttpRequests((authorize) -> authorize
        .requestMatchers(customHeader).hasAuthority("special")
        .anyRequest().authenticated()
);- 요청 헤더
X-Custom-Header에 특정 값이 있을 때만 권한 필요.
IP 주소 기반 필터링
RequestMatcher ipMatcher = (request) -> "192.168.1.1".equals(request.getRemoteAddr());
http
    .authorizeHttpRequests((authorize) -> authorize
        .requestMatchers(ipMatcher).permitAll() // 특정 IP에서의 요청은 모두 허용
        .anyRequest().authenticated()
    );
요약
-
RequestMatcher는 요청의 특정 조건을 기반으로 권한을 설정할 수 있는 인터페이스입니다.
- 람다 표현식으로 간단히 작성하거나 구체 클래스를 구현하여 복잡한 로직을 처리할 수 있습니다.
-
사용 사례
- 쿼리 파라미터, HTTP 헤더, IP 주소 등 요청의 세부적인 조건을 매칭 가능.
- 요청 매칭을 통해 동적으로 권한 부여 가능.
-
테스트 검증
- Spring Security의 테스트 지원을 활용하여 조건과 권한 설정이 제대로 동작하는지 확인할 수 있습니다.
-
보안 모범 사례
- 기본적으로 모든 요청을 거부하고, 필요한 요청만 명시적으로 허용하는 Allow List 방식을 따르세요.
요청 권한 부여
요청이 매칭되면, 이미 본 것처럼 여러 방식으로 권한을 부여할 수 있습니다. 예를 들어 permitAll, denyAll, hasAuthority를 사용할 수 있습니다.
DSL에 내장된 권한 부여 규칙 요약
-
permitAll:
- 요청에 권한이 필요하지 않은 공용 엔드포인트입니다.
- 이 경우, 인증 정보(Authentication)는 세션에서 조회되지 않습니다.
-
denyAll:
- 어떤 상황에서도 요청이 허용되지 않습니다.
- 이 경우에도 인증 정보(Authentication)는 세션에서 조회되지 않습니다.
-
hasAuthority:
- 요청은 GrantedAuthority가 주어진 값과 일치하는 인증 정보(Authentication)를 필요로 합니다.
-
hasRole:
- hasAuthority의 단축 표현으로, 기본적으로
ROLE_접두사(또는 설정된 접두사)를 추가합니다.
- hasAuthority의 단축 표현으로, 기본적으로
-
hasAnyAuthority:
- 요청은 GrantedAuthority가 주어진 값 중 하나와 일치하는 인증 정보(Authentication)를 필요로 합니다.
-
hasAnyRole:
- hasAnyAuthority의 단축 표현으로, 기본적으로
ROLE_접두사(또는 설정된 접두사)를 추가합니다.
- hasAnyAuthority의 단축 표현으로, 기본적으로
-
access:
- 요청은 이 커스텀 AuthorizationManager를 사용하여 접근을 결정합니다.
복합적인 권한 부여 예제
아래는 패턴과 규칙을 결합하여 작성된 더 복잡한 예제입니다:
import static jakarta.servlet.DispatcherType.*;
import static org.springframework.security.authorization.AuthorizationManagers.allOf;
import static org.springframework.security.authorization.AuthorityAuthorizationManager.hasAuthority;
import static org.springframework.security.authorization.AuthorityAuthorizationManager.hasRole;

@Bean
SecurityFilterChain web(HttpSecurity http) throws Exception {
	http
		// ...
		.authorizeHttpRequests(authorize -> authorize
            .dispatcherTypeMatchers(FORWARD, ERROR).permitAll() // FORWARD 및 ERROR 디스패치 허용
			.requestMatchers("/static/**", "/signup", "/about").permitAll() // 공용 URL
			.requestMatchers("/admin/**").hasRole("ADMIN") // /admin/ 경로에 ROLE_ADMIN 필요
			.requestMatchers("/db/**").access(allOf(hasAuthority("db"), hasRole("ADMIN"))) // db 권한과 ROLE_ADMIN 필요
			.anyRequest().denyAll() // 그 외의 요청은 거부
		);

	return http.build();
}
설명
-
여러 권한 규칙이 지정됨
- 규칙은 선언된 순서대로 평가됩니다.
-
FORWARD 및 ERROR 디스패치 허용
- Spring MVC가 뷰를 렌더링하거나 Spring Boot가 에러를 렌더링할 수 있도록 허용.
-
공용 URL 패턴
/static/로 시작하거나/signup,/about경로는 모든 사용자에게 허용.
-
/admin/경로ROLE_ADMIN역할을 가진 사용자만 접근 가능.hasRole을 호출하므로ROLE_접두사를 명시하지 않아도 됩니다.
-
/db/경로- 사용자에게
db권한이 부여되고, 동시에ROLE_ADMIN역할이 있어야 접근 가능. hasRole을 사용하므로ROLE_접두사를 명시하지 않아도 됩니다.
- 사용자에게
-
기본 거부
- 매칭되지 않은 모든 URL은 접근이 거부됩니다.
- 이는 권한 부여 규칙을 업데이트할 때 실수를 방지하기 위한 좋은 전략입니다.
SpEL(Spring Expression Language)을 사용한 권한 표현
Spring Security는 권한 부여를 설정할 때, 일반적으로 AuthorizationManager를 사용하는 것을 권장합니다. 하지만 특정 상황에서는 SpEL(Spring Expression Language)을 사용해 권한을 표현해야 할 때가 있습니다.
이러한 경우는 다음과 같습니다:
- XML 기반 설정에서
<intercept-url>을 사용하는 경우. - JSP Taglibs에서 권한 조건을 설정해야 하는 경우.
SpEL을 사용하면 표현식 기반으로 권한 조건을 유연하게 정의할 수 있습니다.
1️⃣ Spring Security와 SpEL
Spring Security는 권한 부여 표현식을 평가할 때 루트 객체(root object)를 제공합니다.
이 객체는 SpEL 표현식에서 사용할 수 있는 필드와 메서드를 포함하며, 주로 다음 두 가지 객체를 사용합니다:
-
SecurityExpressionRoot
- 가장 기본적인 루트 객체입니다.
- 권한 부여 표현식의 공통 필드와 메서드를 제공합니다.
-
WebSecurityExpressionRoot
- SecurityExpressionRoot를 확장한 객체로, 웹 요청과 관련된 필드와 메서드를 추가로 제공합니다.
- 예: 현재 요청 정보(HttpServletRequest), 인증 정보(Authentication) 등.
2️⃣ SpEL에서 사용 가능한 주요 필드와 메서드
Spring Security의 SpEL은 권한 부여 표현식을 평가하기 위해 다양한 필드와 메서드를 제공합니다.
아래는 SpEL에서 사용할 수 있는 주요 필드와 메서드입니다:
주요 필드
-
authentication- 현재 인증된 사용자의 정보를 제공합니다.
- 예:
authentication.name→ 사용자 이름.
-
principal- 인증된 사용자의 주체(Principal) 객체를 반환합니다.
- 예:
principal.username.
-
roles- 인증된 사용자가 가진 역할(Role)을 제공합니다.
- 예:
hasRole('ADMIN').
주요 메서드
-
hasRole(String role)- 특정 역할을 가진 사용자인지 확인합니다.
- 예:
hasRole('ADMIN').
-
hasAuthority(String authority)- 특정 권한을 가진 사용자인지 확인합니다.
- 예:
hasAuthority('WRITE_PRIVILEGE').
-
hasAnyRole(String... roles)- 여러 역할 중 하나를 가진 사용자인지 확인합니다.
- 예:
hasAnyRole('ADMIN', 'USER').
-
hasAnyAuthority(String... authorities)- 여러 권한 중 하나를 가진 사용자인지 확인합니다.
- 예:
hasAnyAuthority('READ_PRIVILEGE', 'WRITE_PRIVILEGE').
-
permitAll()/denyAll()- 모든 요청을 허용하거나 거부합니다.
-
isAuthenticated()- 사용자가 인증되었는지 확인합니다.
-
isAnonymous()- 사용자가 익명(Anonymous)인지 확인합니다.
-
isRememberMe()- 사용자가 "Remember Me"로 인증되었는지 확인합니다.
3️⃣ SpEL 표현식을 활용한 권한 설정 예제
XML 기반 <intercept-url> 설정
<http use-expressions="true">
    <intercept-url pattern="/admin/**" access="hasRole('ADMIN')" />
    <intercept-url pattern="/user/**" access="hasAuthority('READ_PRIVILEGE')" />
    <intercept-url pattern="/public/**" access="permitAll()" />
</http>
Java DSL 기반 설정
http
    .authorizeHttpRequests(authorize -> authorize
        .requestMatchers("/admin/**").access("hasRole('ADMIN')") // ADMIN 역할 필요
        .requestMatchers("/user/**").access("hasAuthority('READ_PRIVILEGE')") // READ_PRIVILEGE 권한 필요
        .requestMatchers("/public/**").access("permitAll()") // 모든 사용자 접근 허용
    );
JSP Taglibs에서 SpEL 사용
<sec:authorize access="hasRole('ADMIN')">
    <p>관리자만 볼 수 있는 내용</p>
</sec:authorize>

<sec:authorize access="isAuthenticated()">
    <p>로그인된 사용자만 볼 수 있는 내용</p>
</sec:authorize>
4️⃣ SpEL 표현식의 동작 원리
-
SecurityExpressionRoot 및 WebSecurityExpressionRoot 사용
- Spring Security는 권한 부여를 평가할 때
SecurityExpressionRoot또는WebSecurityExpressionRoot를 SpEL의 컨텍스트로 제공합니다. - SpEL 표현식은 이 컨텍스트 객체에서 메서드와 필드를 호출합니다.
- Spring Security는 권한 부여를 평가할 때
-
StandardEvaluationContext- SpEL은
StandardEvaluationContext를 사용하여 권한 부여 표현식을 평가합니다. - Spring Security는 이 컨텍스트에
SecurityExpressionRoot객체를 설정하여 평가를 수행합니다.
- SpEL은
5️⃣ 복합적인 SpEL 표현식 예제
복합 조건을 사용하는 경우
http
    .authorizeHttpRequests(authorize -> authorize
        .requestMatchers("/secure/**").access("hasRole('ADMIN') and hasAuthority('WRITE_PRIVILEGE')")
        .requestMatchers("/audit/**").access("hasRole('AUDITOR') or hasAuthority('VIEW_PRIVILEGE')")
    );
해석
-
/secure/**:ADMIN역할과WRITE_PRIVILEGE권한을 모두 가진 사용자만 접근 가능.
-
/audit/**:AUDITOR역할 또는VIEW_PRIVILEGE권한 중 하나를 가진 사용자는 접근 가능.
6️⃣ SpEL의 장점과 주의사항
장점
- 복잡한 조건을 간단히 표현 가능.
- XML, Java DSL, JSP 등 다양한 환경에서 활용 가능.
- 유연한 권한 부여 설정.
주의사항
- SpEL 표현식이 복잡해지면 가독성이 떨어질 수 있음.
- 잘못된 SpEL 표현식은 애플리케이션 실행 중 오류를 유발할 수 있음.
- SpEL 표현식 대신 AuthorizationManager 사용이 권장되며, SpEL은 제한적인 경우에만 사용하는 것이 바람직합니다.
요약
-
SpEL을 통해 복잡한 권한 조건 설정 가능
- 역할(Role), 권한(Authority), 인증 상태 등 다양한 조건 표현 가능.
-
다양한 환경에서 활용
- XML 설정, Java DSL, JSP Taglibs 등에서 SpEL을 사용해 권한을 정의.
-
복합 조건 처리
- AND, OR, NOT 등의 논리 연산자를 사용해 복합적인 권한 조건을 설정 가능.
-
사용 권장 상황
- XML 기반 설정이나 JSP와 같은 제한된 환경에서 권한 조건을 정의할 때 활용.
- 일반적으로는 SpEL보다 AuthorizationManager 사용을 권장.
SpEL의 Authorization Expression 필드와 메서드 사용하기
Spring Security는 SpEL(Spring Expression Language)을 활용하여 권한 부여를 유연하게 설정할 수 있습니다. 이를 위해 Authorization Expression 필드와 메서드를 제공합니다.
이 섹션에서는 SpEL에서 사용할 수 있는 주요 필드, 메서드와 복합적인 예제에 대해 설명합니다.
1️⃣ Authorization Expression 메서드
SpEL 표현식에서 자주 사용되는 메서드는 다음과 같습니다:
-
permitAll
- 요청이 공용 엔드포인트로, 인증이나 권한이 필요하지 않습니다.
- 이 경우, Authentication 객체는 세션에서 조회되지 않습니다.
-
denyAll
- 어떤 상황에서도 요청이 허용되지 않습니다.
- 이 경우, Authentication 객체는 세션에서 조회되지 않습니다.
-
hasAuthority(String authority)
- 요청은 GrantedAuthority가 주어진 값과 일치하는 사용자만 접근할 수 있습니다.
- 예:
hasAuthority('WRITE_PRIVILEGE').
-
hasRole(String role)
- hasAuthority의 단축 표현으로, 기본적으로
ROLE_접두사가 추가됩니다. - 예:
hasRole('ADMIN')→hasAuthority('ROLE_ADMIN').
- hasAuthority의 단축 표현으로, 기본적으로
-
hasAnyAuthority(String... authorities)
- 요청은 GrantedAuthority가 주어진 값 중 하나와 일치하는 사용자만 접근할 수 있습니다.
- 예:
hasAnyAuthority('READ_PRIVILEGE', 'WRITE_PRIVILEGE').
-
hasAnyRole(String... roles)
- hasAnyAuthority의 단축 표현으로, 기본적으로
ROLE_접두사가 추가됩니다. - 예:
hasAnyRole('ADMIN', 'USER')→hasAnyAuthority('ROLE_ADMIN', 'ROLE_USER').
- hasAnyAuthority의 단축 표현으로, 기본적으로
-
hasPermission(Object target, String permission)
- PermissionEvaluator를 통해 객체 수준의 권한 부여를 수행합니다.
- 예:
hasPermission(#document, 'read').
2️⃣ Authorization Expression 필드
SpEL에서 사용할 수 있는 주요 필드는 다음과 같습니다:
-
authentication
- 현재 요청과 관련된 Authentication 객체를 제공합니다.
- 예:
authentication.name→ 현재 사용자의 이름.
-
principal
- 현재 요청과 관련된 Authentication#getPrincipal 객체를 반환합니다.
- 예:
principal.username→ 현재 사용자의 사용자 이름.
3️⃣ 복합적인 SpEL 기반 권한 부여 예제
XML 설정 예제
<http>
    <intercept-url pattern="/static/**" access="permitAll"/>
    <intercept-url pattern="/admin/**" access="hasRole('ADMIN')"/>
    <intercept-url pattern="/db/**" access="hasAuthority('db') and hasRole('ADMIN')"/>
    <intercept-url pattern="/**" access="denyAll"/>
</http>
작동 방식
-
`/static/`**
/static/로 시작하는 모든 요청은 공용입니다.- 인증이나 권한 없이 누구나 접근 가능합니다.
-
`/admin/`**
/admin/로 시작하는 모든 요청은ROLE_ADMIN역할을 가진 사용자만 접근 가능합니다.hasRole메서드를 사용하므로ROLE_접두사를 명시하지 않아도 됩니다.
-
`/db/`**
/db/로 시작하는 요청은 다음 조건을 모두 충족해야 접근할 수 있습니다:db권한을 가진 사용자.ROLE_ADMIN역할을 가진 사용자.
-
기본 거부 (`/`)**
- 위에서 매칭되지 않은 모든 요청은 거부됩니다.
- 이는 보안 정책의 모범 사례로, 실수로 권한 규칙을 누락하는 상황을 방지합니다.
4️⃣ SpEL 권한 부여 로직의 이해
복합 조건 예제
<intercept-url pattern="/secure/**" access="hasAuthority('WRITE_PRIVILEGE') and hasRole('MANAGER')"/>- 조건:
WRITE_PRIVILEGE권한이 있어야 함.ROLE_MANAGER역할이 있어야 함.
- 결과:
- 위 두 조건을 모두 만족해야
/secure/경로에 접근 가능.
- 위 두 조건을 모두 만족해야
권한 부여 표현식의 순서
- Spring Security는 요청을 매칭하며, 조건이 처음으로 일치하는 규칙을 적용합니다.
- 우선순위에 따라 조건을 선언해야 예기치 않은 동작을 방지할 수 있습니다.
5️⃣ SpEL 권한 부여의 장점과 주의사항
장점
-
유연성:
- 단순 조건부터 복잡한 조건까지 표현 가능.
- 논리 연산자(
and,or,not)를 활용해 권한 조건을 결합 가능.
-
다양한 활용:
- XML 설정, Java DSL, JSP Taglibs 등 여러 환경에서 사용 가능.
-
객체 수준 권한 부여:
- PermissionEvaluator와 함께 사용하면 객체 수준 권한 검사를 구현할 수 있음.
주의사항
-
복잡성:
- 조건이 복잡해질수록 가독성이 떨어질 수 있음.
- 간단한 조건은 AuthorizationManager를 사용하는 것이 더 나음.
-
보안 문제:
- 잘못된 SpEL 표현식은 보안 취약점을 초래할 수 있으므로 정확히 작성해야 함.
요약
-
SpEL의 주요 메서드와 필드
- 메서드:
permitAll,denyAll,hasRole,hasAuthority,hasPermission등. - 필드:
authentication,principal.
- 메서드:
-
복합적인 조건 설정
- 논리 연산자(
and,or,not)를 활용해 여러 조건을 결합 가능.
- 논리 연산자(
-
보안 모범 사례
- 기본적으로 모든 요청을 거부(
denyAll)하고, 필요한 요청만 명시적으로 허용하는 Allow List 방식을 따르세요.
- 기본적으로 모든 요청을 거부(
-
적용 방식
- XML, Java DSL, JSP에서 SpEL을 활용해 권한을 정의할 수 있습니다.
- SpEL은 복잡한 조건을 간결하게 표현하는 데 유용합니다.
Spring Security에서 경로 변수(Path Parameters) 사용하기
Spring Security는 요청 경로에서 경로 변수(Path Parameters)를 추출하여 SpEL 표현식에서 사용할 수 있는 메커니즘을 제공합니다. 이를 통해 경로 변수의 값에 따라 동적으로 권한을 설정할 수 있습니다.
1️⃣ SpEL에서 경로 변수 사용 방법
예제
<http>
    <intercept-url pattern="/resource/{name}" access="#name == authentication.name"/>
    <intercept-url pattern="/**" access="authenticated"/>
</http>
작동 방식
-
/resource/{name}:- 요청 경로
/resource/{name}에서{name}값이 SpEL 표현식의#name으로 바인딩됩니다.
- 요청 경로
-
SpEL 조건:
#name == authentication.name:- 추출된 경로 변수 값(
#name)이 현재 인증된 사용자의 이름(authentication.name)과 동일해야 접근을 허용합니다.
- 추출된 경로 변수 값(
-
기본 규칙:
- `/`**:
- 위 규칙과 매칭되지 않는 모든 요청은 인증된 사용자(
authenticated)만 접근할 수 있습니다.
- 위 규칙과 매칭되지 않는 모든 요청은 인증된 사용자(
- `/`**:
2️⃣ SpEL 표현식의 동작 이해
Spring Security는 경로 변수를 SpEL에서 사용할 수 있도록 자동으로 제공하며, 이를 통해 경로 값 기반의 동적 권한 부여가 가능합니다.
경로 변수 처리 과정
- Spring Security는 요청 경로와 패턴(
/resource/{name})을 매칭합니다. - 매칭된 경로 변수
{name}의 값을 추출하여 SpEL 표현식의#name에 바인딩합니다. - SpEL 표현식에서
#name값을 사용해 권한 조건을 평가합니다.
3️⃣ 복합적인 조건 설정
예제
<http>
    <intercept-url pattern="/resource/{name}" access="#name == authentication.name and hasRole('USER')"/>
    <intercept-url pattern="/admin/{adminName}" access="#adminName == authentication.name and hasRole('ADMIN')"/>
    <intercept-url pattern="/**" access="authenticated"/>
</http>
조건 설명
-
/resource/{name}:- 경로 변수
name이 인증된 사용자의 이름(authentication.name)과 같아야 함. - 동시에
USER역할(ROLE_USER)을 가져야 접근 허용.
- 경로 변수
-
/admin/{adminName}:- 경로 변수
adminName이 인증된 사용자의 이름과 같아야 함. - 동시에
ADMIN역할(ROLE_ADMIN)을 가져야 접근 허용.
- 경로 변수
-
기본 조건:
- 그 외 모든 요청은 인증된 사용자만 접근 가능.
4️⃣ Java DSL 설정에서 경로 변수 사용
Spring Security에서 Java DSL을 사용하여 경로 변수 기반의 권한 설정을 정의할 수도 있습니다.
Java DSL 예제
http
    .authorizeHttpRequests(authorize -> authorize
        .requestMatchers("/resource/{name}").access("#name == authentication.name")
        .requestMatchers("/admin/{adminName}").access("#adminName == authentication.name and hasRole('ADMIN')")
        .anyRequest().authenticated()
    );
5️⃣ 사용 시 유의사항
-
SpEL 표현식의 정확성:
- SpEL 표현식이 잘못 작성되면, 애플리케이션 실행 중 오류가 발생할 수 있습니다.
- 표현식을 작성할 때 철저히 검증하세요.
-
권한 조건의 가독성:
- 복잡한 조건을 정의하면 코드의 가독성이 떨어질 수 있으므로, 적절히 주석을 추가하세요.
-
보안 모범 사례:
- 기본적으로 모든 요청을 거부(
denyAll)하고, 필요한 요청만 명시적으로 허용하는 방식을 따르세요.
- 기본적으로 모든 요청을 거부(
요약
-
경로 변수 추출:
- Spring Security는 요청 경로에서 경로 변수 값을 추출하여 SpEL 표현식에서 사용할 수 있습니다.
-
동적 권한 부여:
- 경로 변수 값과 인증 정보(
authentication)를 비교하여 조건부로 접근을 허용할 수 있습니다.
- 경로 변수 값과 인증 정보(
-
XML과 Java DSL 모두 지원:
- XML 설정 및 Java DSL에서 경로 변수 기반 권한 설정을 사용할 수 있습니다.
-
실제 사용 사례:
- 경로 변수 값이 현재 인증된 사용자와 일치하는지 확인.
- 역할(Role) 또는 권한(Authority) 조건을 결합해 복합적인 권한 부여 구현.
Spring Security의 경로 변수 활용은 경로 값 기반의 세밀한 보안 정책을 구현하는 데 매우 유용합니다.
외부 서비스, 정책 에이전트, 또는 데이터베이스를 사용한 권한 부여
Spring Security에서 권한 부여를 위해 별도의 서비스(예: 외부 정책 에이전트, 데이터베이스)를 사용할 수 있습니다. 이를 위해 커스텀 AuthorizationManager를 작성하여 권한 부여 로직을 정의하고 Spring Security에 통합할 수 있습니다.
1️⃣ 커스텀 AuthorizationManager 작성
Spring Security는 AuthorizationManager를 통해 권한을 결정합니다. 커스텀 AuthorizationManager를 작성하여 외부 서비스나 정책 에이전트를 활용할 수 있습니다.
예제: Open Policy Agent를 사용하는 AuthorizationManager
@Component
public final class OpenPolicyAgentAuthorizationManager implements AuthorizationManager<RequestAuthorizationContext> {
    @Override
    public AuthorizationDecision check(Supplier<Authentication> authentication, RequestAuthorizationContext context) {
        // Open Policy Agent에 요청을 보내 권한을 확인
        // 예: 외부 서비스에서 권한 확인 후 결과 반환
        boolean isAuthorized = makeRequestToPolicyAgent(authentication.get(), context);
        return new AuthorizationDecision(isAuthorized);
    }

    private boolean makeRequestToPolicyAgent(Authentication authentication, RequestAuthorizationContext context) {
        // 외부 서비스 호출 로직
        // 인증 정보와 요청 정보를 전달하여 권한 결과 확인
        return true; // 권한 부여 결과 반환
    }
}
설명
-
check메서드:- 권한을 부여하는 핵심 로직.
Authentication객체와 요청 컨텍스트를 사용하여 외부 서비스에 요청을 보냅니다.- 외부 서비스의 결과에 따라 AuthorizationDecision을 반환합니다.
-
makeRequestToPolicyAgent메서드:- 외부 정책 서비스 또는 데이터베이스에 인증 정보와 요청 정보를 전달하고, 권한 부여 결과를 확인합니다.
2️⃣ Spring Security에 AuthorizationManager 통합
AuthorizationManager 통합
커스텀 AuthorizationManager를 작성한 후, Spring Security의 권한 설정에 추가합니다.
@Bean
SecurityFilterChain web(HttpSecurity http, AuthorizationManager<RequestAuthorizationContext> authz) throws Exception {
	http
		.authorizeHttpRequests((authorize) -> authorize
            .anyRequest().access(authz) // 모든 요청을 커스텀 AuthorizationManager로 처리
		);
	return http.build();
}
설명
anyRequest().access(authz):- 모든 요청은 OpenPolicyAgentAuthorizationManager를 사용해 권한을 결정합니다.
3️⃣ 정적 리소스 처리 시 permitAll 사용 권장
정적 리소스(예: CSS, JS, 이미지 파일 등)를 처리할 때, 필터 체인에서 무시(ignore)하도록 설정할 수 있습니다. 그러나 Spring Security에서는 permitAll을 사용하는 것이 더 안전한 방법이라고 권장합니다.
정적 리소스를 permitAll로 허용
http
    .authorizeHttpRequests((authorize) -> authorize
        .requestMatchers("/css/**").permitAll() // CSS 파일에 대한 모든 요청 허용
        .anyRequest().authenticated()          // 나머지 요청은 인증 필요
    );
왜 permitAll이 더 안전한가?
-
보안 헤더 적용 가능:
- Spring Security는 요청을 무시하면 보안 헤더(XSS 보호, Content-Security-Policy 등)를 추가할 수 없습니다.
permitAll을 사용하면 보안 헤더가 정적 리소스에도 적용됩니다.
-
Spring Security 6에서 성능 개선:
- 과거에는 세션 확인 때문에 성능 저하가 발생할 수 있었으나, Spring Security 6부터는 권한 규칙에서 세션이 필요하지 않을 경우 세션을 조회하지 않습니다.
- 따라서 성능 저하 없이
permitAll을 사용할 수 있습니다.
4️⃣ 보안 설정의 모범 사례
정적 리소스 처리
- 정적 리소스를 필터 체인에서 무시하지 말고,
permitAll로 처리하세요.
외부 서비스와 통합
- 외부 서비스 또는 정책 에이전트를 사용할 경우, 권한 부여 로직을 커스텀 AuthorizationManager에 캡슐화하세요.
기본 거부 정책
- 매칭되지 않는 모든 요청은 기본적으로 거부하는 Deny All 방식을 사용하여 보안 설정의 실수를 방지하세요:
http
    .authorizeHttpRequests((authorize) -> authorize
        .anyRequest().denyAll()
    );
요약
-
커스텀 AuthorizationManager 작성
- 외부 정책 서비스, 데이터베이스와 연동하여 권한 부여 로직을 구현합니다.
- Spring Security의 AuthorizationManager 인터페이스를 구현합니다.
-
Spring Security 통합
- 작성한 AuthorizationManager를 필터 체인에 통합하여 권한 설정에 활용합니다.
-
정적 리소스 처리
- 정적 리소스는
permitAll을 사용해 허용하며, 보안 헤더를 적용합니다.
- 정적 리소스는
-
보안 설정
- 모든 요청을 명시적으로 처리하고, 매칭되지 않는 요청은 기본적으로 거부하는 Allow List 방식을 따르세요.
이 설정 방식은 권한 부여의 유연성과 보안을 모두 충족하는 데 효과적입니다.
authorizeRequests에서 authorizeHttpRequests로 마이그레이션
Spring Security는 authorizeHttpRequests를 도입하면서 기존의 authorizeRequests를 대체할 수 있는 더 간결하고 유연한 방식을 제공합니다. AuthorizationFilter는 기존의 FilterSecurityInterceptor를 대체하며, authorizeHttpRequests를 사용하면 보다 효율적이고 단순화된 권한 부여 구성을 구현할 수 있습니다.
1️⃣ authorizeHttpRequests의 특징
기존 방식과 차이점
authorizeHttpRequests는 다음과 같은 이점을 제공합니다:
-
간소화된 AuthorizationManager API 사용
- 기존의 메타데이터 소스(metadata sources), 구성 속성(config attributes), 의사 결정 관리자(decision managers), 및 투표자(voters)를 대체합니다.
- 재사용과 커스터마이징이 쉬워집니다.
-
Authentication 조회 지연
- 요청마다 인증(Authentication)을 조회하지 않습니다.
- 권한 부여 결정을 위해 인증이 필요할 때만 조회합니다.
- 성능 최적화에 기여합니다.
-
Bean 기반 구성 지원
- Java Config에서 Bean을 활용한 권한 설정을 더 쉽게 지원합니다.
기본 동작 변경
authorizeHttpRequests를 사용하면 AuthorizationFilter가 활성화됩니다.- AuthorizationFilter는 요청 수준에서 권한 부여를 처리합니다.
- 기존 방식에서는 FilterSecurityInterceptor가 사용되었습니다.
2️⃣ 기본 사용 예제
기존 방식 (authorizeRequests)
@Bean
SecurityFilterChain web(HttpSecurity http) throws Exception {
    http
        .authorizeRequests()
        .anyRequest().authenticated();
    return http.build();
}
새로운 방식 (authorizeHttpRequests)
@Bean
SecurityFilterChain web(HttpSecurity http) throws Exception {
    http
        .authorizeHttpRequests((authorize) -> authorize
            .anyRequest().authenticated() // 모든 요청은 인증 필요
        );
    return http.build();
}
3️⃣ SpEL 기반 표현식 마이그레이션
기존 SpEL 표현식
Spring Security에서는 SpEL을 사용하여 권한을 정의할 수 있습니다. 하지만 권장되는 방식은 타입 안전한 AuthorizationManager를 사용하는 것입니다.
WebExpressionAuthorizationManager로 마이그레이션
기존의 SpEL 표현식을 WebExpressionAuthorizationManager로 마이그레이션할 수 있습니다.
.requestMatchers("/test/**")
.access(new WebExpressionAuthorizationManager("hasRole('ADMIN') && hasRole('USER')"))WebExpressionAuthorizationManager는 기존 SpEL 표현식을 처리하기 위한 도우미 클래스입니다.- 표현식을 그대로 사용할 수 있으므로 이전 코드와의 호환성이 보장됩니다.
Bean 참조를 사용하는 경우
SpEL에서 Bean 참조를 포함하는 표현식을 사용하는 경우, Bean을 직접 호출하는 방식으로 변경하는 것이 권장됩니다.
기존 방식
.access("@webSecurity.check(authentication, request)")마이그레이션
.requestMatchers("/test/**")
    .access((authentication, context) ->
new AuthorizationDecision(webSecurity.check(authentication.get(), context.getRequest())))webSecurity.check: Bean 메서드를 직접 호출하여 권한 부여를 수행합니다.AuthorizationDecision: 권한 부여 결과를 캡슐화하여 반환합니다.
복잡한 표현식 처리
SpEL 표현식이 복잡하고 Bean 참조 및 기타 논리가 결합된 경우, 커스텀 AuthorizationManager를 구현하는 것이 좋습니다.
커스텀 AuthorizationManager 구현
public class CustomAuthorizationManager implements AuthorizationManager<RequestAuthorizationContext> {
    @Override
    public AuthorizationDecision check(Supplier<Authentication> authentication, RequestAuthorizationContext context) {
        // Bean 호출 및 기타 논리를 구현
        boolean result = someBean.check(authentication.get(), context.getRequest());
        return new AuthorizationDecision(result);
    }
}
Spring Security에 통합
.requestMatchers("/test/**").access(new CustomAuthorizationManager())4️⃣ DefaultHttpSecurityExpressionHandler 사용
표현식 핸들러 구성
SpEL 표현식에 Bean 참조가 포함되며 이를 직접 대체할 수 없는 경우, DefaultHttpSecurityExpressionHandler를 활용해 Bean 리졸버를 설정해야 합니다.
DefaultHttpSecurityExpressionHandler expressionHandler = new DefaultHttpSecurityExpressionHandler();
expressionHandler.setBeanResolver(applicationContext.getBeanResolver());

WebExpressionAuthorizationManager manager = new WebExpressionAuthorizationManager("expression");
manager.setExpressionHandler(expressionHandler);DefaultHttpSecurityExpressionHandler: SpEL 표현식에서 Bean을 찾을 수 있도록 구성.setExpressionHandler:WebExpressionAuthorizationManager에 핸들러를 설정.
5️⃣ 정적 리소스 처리
기존 무시 설정
정적 리소스(/css/**, /js/**)를 무시하도록 구성하는 방식:
http
    .ignoring()
.requestMatchers("/css/**", "/js/**");permitAll로 변경
더 안전한 방법은 permitAll로 처리하여 Spring Security의 보안 헤더가 적용되도록 하는 것입니다:
http
    .authorizeHttpRequests((authorize) -> authorize
        .requestMatchers("/css/**", "/js/**").permitAll()
        .anyRequest().authenticated()
);- 왜 더 안전한가?
- 요청을 무시하면 Spring Security가 보안 헤더를 추가하지 않습니다.
permitAll을 사용하면 정적 리소스에도 보안 헤더가 적용됩니다.
요약
-
authorizeHttpRequests도입authorizeRequests를 대체하며 더 간결하고 유연한 권한 설정을 지원.- AuthorizationFilter를 사용하여 권한 부여 처리.
-
SpEL 마이그레이션
- 기존 SpEL 표현식은
WebExpressionAuthorizationManager로 이전 가능. - Bean 참조는 직접 호출하거나, 복잡한 경우 커스텀 AuthorizationManager로 대체.
- 기존 SpEL 표현식은
-
정적 리소스 처리
- 필터 체인을 무시하지 말고
permitAll을 사용하여 보안 헤더를 적용.
- 필터 체인을 무시하지 말고
-
모범 사례
- 성능 최적화와 보안을 위해 인증 조회를 지연.
- 기본적으로 모든 요청을 거부(
denyAll)하고 필요한 요청만 명시적으로 허용하는 방식 권장.
Security Matchers와 RequestMatchers 사용하기
Spring Security에서 RequestMatcher는 요청이 특정 규칙과 일치하는지 판단하는 인터페이스입니다.
securityMatcher와 requestMatchers는 각각 다음을 결정하는 데 사용됩니다:
securityMatcher:- 주어진 요청에 대해 HttpSecurity 설정이 적용될지 여부를 결정합니다.
requestMatchers:- 주어진 요청에 대해 어떤 권한 규칙이 적용될지 결정합니다.
1️⃣ HttpSecurity와 Security Matcher
코드 예제
@Configuration
@EnableWebSecurity
public class SecurityConfig {

	@Bean
	public SecurityFilterChain securityFilterChain(HttpSecurity http) throws Exception {
		http
			.securityMatcher("/api/**")                             // /api/로 시작하는 URL에만 HttpSecurity 적용
			.authorizeHttpRequests(authorize -> authorize
				.requestMatchers("/user/**").hasRole("USER")       // /user/로 시작하는 요청은 USER 역할 필요
				.requestMatchers("/admin/**").hasRole("ADMIN")     // /admin/로 시작하는 요청은 ADMIN 역할 필요
				.anyRequest().authenticated()                      // 나머지 요청은 인증 필요
			)
			.formLogin(withDefaults());                             // 기본 로그인 설정
		return http.build();
	}
}
동작 설명
-
`securityMatcher("/api/")`**:
- HttpSecurity 설정은
/api/로 시작하는 URL에만 적용됩니다. /api/외의 요청은 이 설정에 영향을 받지 않습니다.
- HttpSecurity 설정은
-
`requestMatchers("/user/").hasRole("USER")`**:
/user/로 시작하는 요청은USER역할을 가진 사용자만 접근할 수 있습니다.
-
`requestMatchers("/admin/").hasRole("ADMIN")`**:
/admin/로 시작하는 요청은ADMIN역할을 가진 사용자만 접근할 수 있습니다.
-
anyRequest().authenticated():- 위 조건에 해당하지 않는 나머지 요청은 인증된 사용자만 접근할 수 있습니다.
2️⃣ RequestMatcher 구현 방식
Spring Security는 요청을 매칭하기 위해 다음 두 가지 기본 구현을 제공합니다:
-
AntPathRequestMatcher:- 경로 패턴 매칭에 적합.
- 예:
/user/**,/admin/*.
-
RegexRequestMatcher:- 정규식 기반의 경로 매칭에 적합.
- 예:
/admin/.*.
코드 예제: RequestMatcher 사용
@Configuration
@EnableWebSecurity
public class SecurityConfig {

	@Bean
	public SecurityFilterChain securityFilterChain(HttpSecurity http) throws Exception {
		http
			.securityMatcher(antMatcher("/api/**"))                              // AntPathRequestMatcher로 /api/** 매칭
			.authorizeHttpRequests(authorize -> authorize
				.requestMatchers(antMatcher("/user/**")).hasRole("USER")        // /user/**는 USER 역할 필요
				.requestMatchers(regexMatcher("/admin/.*")).hasRole("ADMIN")    // 정규식으로 /admin/* 매칭
				.requestMatchers(new MyCustomRequestMatcher()).hasRole("SUPERVISOR") // 사용자 정의 Matcher 적용
				.anyRequest().authenticated()                                   // 나머지는 인증 필요
			)
			.formLogin(withDefaults());
		return http.build();
	}
}
MyCustomRequestMatcher 예제
public class MyCustomRequestMatcher implements RequestMatcher {

    @Override
    public boolean matches(HttpServletRequest request) {
        // 커스텀 매칭 로직 구현
        String headerValue = request.getHeader("X-Custom-Header");
        return "special-value".equals(headerValue);
    }
}
설명
-
AntPathRequestMatcher
/user/**와/api/**처럼 와일드카드를 사용한 경로 패턴 매칭에 적합.
-
RegexRequestMatcher
/admin/.*처럼 복잡한 정규식을 이용한 매칭이 필요한 경우 사용.
-
MyCustomRequestMatcher
- 요청의 헤더, 쿼리 파라미터 등 특정 조건을 기반으로 요청을 매칭할 때 사용.
3️⃣ RequestMatcher 선택 기준
자동 선택
- Spring Security는 다음 기준에 따라 RequestMatcher 구현을 자동으로 선택합니다:
- Spring MVC가 클래스패스에 있는 경우:
- MvcRequestMatcher 사용.
- Spring MVC가 없는 경우:
- AntPathRequestMatcher 사용.
- Spring MVC가 클래스패스에 있는 경우:
직접 선택
특정 RequestMatcher를 사용하고 싶다면, securityMatcher 또는 requestMatchers 메서드에 직접 구현체를 전달할 수 있습니다.
직접 설정 예제
http
    .securityMatcher(antMatcher("/api/**"))                     // AntPathRequestMatcher 사용
    .authorizeHttpRequests((authorize) -> authorize
        .requestMatchers(antMatcher("/user/**")).hasRole("USER") // /user/**는 USER 역할 필요
        .requestMatchers(regexMatcher("/admin/.*")).hasRole("ADMIN") // /admin/*는 정규식 매칭
        .requestMatchers(new MyCustomRequestMatcher()).hasRole("SUPERVISOR") // 사용자 정의 Matcher
    );
4️⃣ 보안 설정 흐름
-
securityMatcher:
- 특정 요청이 HttpSecurity 설정의 대상인지 결정.
-
requestMatchers:
- 매칭된 요청에 대해 적용할 권한 규칙을 결정.
-
권한 규칙 처리:
- 지정된 역할(Role) 또는 권한(Authority)에 따라 요청을 허용하거나 거부.
-
기본 동작:
- 명시적으로 매칭되지 않은 모든 요청은 인증된 사용자만 접근 가능 (
anyRequest().authenticated()).
- 명시적으로 매칭되지 않은 모든 요청은 인증된 사용자만 접근 가능 (
5️⃣ 보안 설정의 모범 사례
-
최소 권한 부여:
- 특정 요청에 대해 필요한 최소한의 권한만 부여.
-
기본 거부 정책:
- 매칭되지 않은 요청은 기본적으로 거부하거나 인증된 사용자만 허용.
-
정적 리소스 처리:
- 정적 리소스는
permitAll을 사용해 처리.
- 정적 리소스는
-
RequestMatcher 활용:
- 경로 패턴, 정규식, 커스텀 조건에 따라 적합한 RequestMatcher를 선택.
요약
-
securityMatcher와requestMatchers:securityMatcher: 특정 요청이 HttpSecurity 설정의 대상인지 결정.requestMatchers: 요청에 대한 권한 규칙을 정의.
-
RequestMatcher 구현:
- AntPathRequestMatcher: 경로 패턴 기반 매칭.
- RegexRequestMatcher: 정규식 기반 매칭.
- CustomRequestMatcher: 사용자 정의 매칭 로직.
-
권한 규칙 적용 흐름:
securityMatcher로 설정 대상 요청 필터링 →requestMatchers로 권한 규칙 적용.
-
모범 사례:
- 최소 권한 부여 및 기본 거부 정책을 사용하여 보안 설정 강화.
- 정적 리소스에는
permitAll적용.
이 방식은 애플리케이션의 요청 흐름에 대해 세밀하고 유연한 보안 제어를 가능하게 합니다.