Servlet Authentication Architecture
Spring Security는 인증(Authentication)을 위한 포괄적인 지원을 제공합니다. 먼저 서블릿 인증 아키텍처(Servlet Authentication Architecture)에 대해 논의합니다. 예상할 수 있듯이, 이 부분은 구체적인 흐름에 대해 다루기보다는 아키텍처를 추상적으로 설명하는 데 초점을 맞추고 있습니다.
구체적인 사용자 인증 방법에 대해 알고 싶다면, 인증 메커니즘(Authentication Mechanisms)을 참고할 수 있습니다. 이 섹션들은 특정한 인증 방법에 집중하여 설명하며, 특정 흐름이 어떻게 작동하는지 설명하기 위해 다시 아키텍처 섹션을 참조합니다.
사용자 이름과 비밀번호 - 사용자 이름/비밀번호로 인증하는 방법
OAuth 2.0 로그인 - OpenID Connect와 비표준 OAuth 2.0 로그인(GitHub 등)을 사용하는 OAuth 2.0 로그인
SAML 2.0 로그인 - SAML 2.0 로그인
중앙 인증 서버(CAS) - 중앙 인증 서버(CAS) 지원
기억하기(Remember Me) - 세션 만료 이후에도 사용자를 기억하는 방법
JAAS 인증 - JAAS로 인증
사전 인증 시나리오 - SiteMinder나 Java EE 보안과 같은 외부 메커니즘으로 인증을 진행하면서도 Spring Security를 사용하여 권한 부여와 일반적인 공격에 대한 보호 제공
X509 인증 - X509 인증
이 논의는 서블릿 보안의 전반적인 개요(Servlet Security: The Big Picture)를 확장하여, 서블릿 인증에서 Spring Security에 사용되는 주요 아키텍처 구성 요소들을 설명합니다. 이러한 구성 요소들이 어떻게 맞물려 작동하는지에 대한 구체적인 흐름이 필요하다면, 인증 메커니즘별 섹션을 참고하세요.
SecurityContextHolder - Spring Security가 인증된 사용자에 대한 세부 정보를 저장하는 곳입니다.
SecurityContext - SecurityContextHolder에서 가져오며, 현재 인증된 사용자의 인증 정보를 포함합니다.
Authentication - AuthenticationManager에 사용자 인증을 위해 제공된 자격 증명으로 입력되거나, SecurityContext의 현재 사용자를 나타낼 수 있습니다.
GrantedAuthority - Authentication의 주체(principal)에게 부여된 권한(예: 역할, 범위 등)입니다.
AuthenticationManager - Spring Security의 필터가 인증을 수행하는 방법을 정의하는 API입니다.
ProviderManager - 가장 일반적인 AuthenticationManager 구현입니다.
AuthenticationProvider - ProviderManager에서 특정 유형의 인증을 수행할 때 사용됩니다.
Request Credentials with AuthenticationEntryPoint - 클라이언트로부터 자격 증명을 요청할 때 사용됩니다(예: 로그인 페이지로 리디렉션하거나 WWW-Authenticate 응답을 보내는 경우 등).
AbstractAuthenticationProcessingFilter - 인증을 위한 기본 필터입니다. 이 필터는 인증의 상위 수준 흐름과 여러 구성 요소가 어떻게 함께 작동하는지에 대한 개요를 제공합니다.
SecurityContextHolder는 Spring Security의 핵심 클래스 중 하나로, 인증된 사용자 정보를 저장하는 역할을 합니다. Spring Security는 애플리케이션 내에서 인증된 사용자가 누구인지 파악하기 위해 이 SecurityContextHolder를 참조합니다.
SecurityContextHolder의 구조와 역할
- SecurityContextHolder는 SecurityContext 객체를 가지고 있습니다. SecurityContext는 애플리케이션의 현재 요청(Request)이나 세션(Session)에서 사용자의 인증 정보를 담고 있습니다.
- SecurityContext 내부에는 Authentication 객체가 포함되는데, 이 객체는 현재 인증된 사용자의 정보와 권한에 대한 세부 사항을 저장합니다.
SecurityContextHolder의 주요 특징
- 유연성: Spring Security는 SecurityContextHolder가 어떻게 채워지는지에 구애받지 않습니다. 즉, SecurityContextHolder에 사용자 정보가 들어있기만 하면 그 정보를 현재 인증된 사용자로 간주합니다. 이렇게 함으로써 다양한 인증 방식을 쉽게 지원할 수 있습니다.
- 현재 사용자 정보 관리: SecurityContextHolder는 전역적으로 접근 가능한 형태로 관리됩니다. 이를 통해 애플리케이션의 어느 위치에서나 현재 인증된 사용자 정보를 손쉽게 가져올 수 있습니다.
사용 방법: SecurityContextHolder 직접 설정하기
SecurityContextHolder를 통해 사용자가 인증되었음을 나타내는 가장 간단한 방법은 SecurityContextHolder에 직접 인증 정보를 설정하는 것입니다. 이를 위해 Spring Security는 보통 인증 프로세스를 통해 SecurityContextHolder에 Authentication 객체를 설정하지만, 필요한 경우 코드에서 직접 설정할 수도 있습니다.
예를 들어, 다음과 같은 코드로 SecurityContextHolder에 현재 사용자를 인증된 사용자로 지정할 수 있습니다:
Authentication authentication = new UsernamePasswordAuthenticationToken(userDetails, null, userDetails.getAuthorities());
SecurityContextHolder.getContext().setAuthentication(authentication);
위 코드에서는 UsernamePasswordAuthenticationToken 객체를 사용하여 인증 토큰을 생성하고, SecurityContextHolder의 SecurityContext에 이를 설정합니다.
SecurityContextHolder의 활용 예시
- 현재 사용자 정보 조회: 애플리케이션 내의 다른 서비스나 컨트롤러에서
SecurityContextHolder.getContext().getAuthentication()를 호출하여 현재 사용자의 인증 정보를 가져올 수 있습니다. 이를 통해 사용자의 ID, 권한 정보 등을 확인할 수 있습니다. - 사용자 권한 검사: SecurityContextHolder에 설정된 Authentication 객체의 권한 정보를 조회하여, 특정 리소스나 기능에 접근할 수 있는 권한을 확인할 수 있습니다.
결론
SecurityContextHolder는 Spring Security에서 인증된 사용자 정보를 전역적으로 관리하는 핵심 클래스입니다. 애플리케이션 전반에서 현재 인증된 사용자 정보에 접근할 수 있도록 하고, 다양한 인증 방법에 유연하게 대응할 수 있게 합니다. SecurityContextHolder가 제대로 설정되어 있으면 Spring Security는 해당 사용자를 인증된 사용자로 인식하여 애플리케이션에서 인증 및 권한 부여가 자동으로 이루어지게 됩니다.
SecurityContextHolder 설정
SecurityContext context = SecurityContextHolder.createEmptyContext();
Authentication authentication =
    new TestingAuthenticationToken("username", "password", "ROLE_USER");
context.setAuthentication(authentication);

SecurityContextHolder.setContext(context);
우리는 먼저 빈 SecurityContext를 생성합니다. 여러 스레드에서 경합 조건(race condition)을 방지하기 위해 SecurityContextHolder.getContext().setAuthentication(authentication) 대신 새로운 SecurityContext 인스턴스를 생성하는 것이 좋습니다.
그다음, 새로운 Authentication 객체를 생성합니다. Spring Security는 SecurityContext에 어떤 종류의 Authentication 구현이 설정되는지에 대해 신경 쓰지 않습니다. 여기서는 단순한 TestingAuthenticationToken을 사용했습니다. 실제 프로덕션에서는 보통 UsernamePasswordAuthenticationToken(userDetails, password, authorities) 같은 방식이 더 일반적입니다.
마지막으로 SecurityContext를 SecurityContextHolder에 설정합니다. Spring Security는 이 정보를 사용하여 권한 부여를 수행합니다.
인증된 주체(principal)에 대한 정보를 얻기 위해서는 SecurityContextHolder에 접근해야 합니다.
현재 인증된 사용자에 접근하기
SecurityContext context = SecurityContextHolder.getContext();
Authentication authentication = context.getAuthentication();
String username = authentication.getName();
Object principal = authentication.getPrincipal();
Collection<? extends GrantedAuthority> authorities = authentication.getAuthorities();
기본적으로 SecurityContextHolder는 ThreadLocal을 사용하여 이러한 세부 정보를 저장합니다. 즉, SecurityContext가 명시적으로 메서드에 전달되지 않아도 동일한 스레드 내에서는 항상 SecurityContext에 접근할 수 있습니다. 이 방식은 현재 주체의 요청 처리가 완료된 후 해당 스레드를 정리해준다면 상당히 안전하게 사용할 수 있습니다. Spring Security의 FilterChainProxy는 SecurityContext가 항상 정리되도록 보장합니다.
일부 애플리케이션은 스레드와 상호작용하는 특성 때문에 ThreadLocal 사용이 적합하지 않을 수 있습니다. 예를 들어, Swing 클라이언트의 경우 Java 가상 머신 내의 모든 스레드가 동일한 보안 컨텍스트를 사용해야 할 수도 있습니다. 이 경우, SecurityContextHolder를 설정할 때 보안 컨텍스트가 저장되는 방식을 지정하는 전략을 설정할 수 있습니다.
독립 실행형 애플리케이션의 경우 SecurityContextHolder.MODE_GLOBAL 전략을 사용해야 합니다. 또 다른 애플리케이션은 보안 스레드에서 생성된 스레드가 동일한 보안 ID를 유지하도록 할 수도 있는데, 이는 SecurityContextHolder.MODE_INHERITABLETHREADLOCAL을 사용하여 달성할 수 있습니다.
기본 SecurityContextHolder.MODE_THREADLOCAL 모드를 변경하는 방법은 두 가지입니다. 첫 번째는 시스템 속성을 설정하는 것이고, 두 번째는 SecurityContextHolder에서 정적 메서드를 호출하는 것입니다. 대부분의 애플리케이션은 기본 모드를 변경할 필요가 없습니다. 하지만 변경이 필요한 경우 SecurityContextHolder의 JavaDoc을 참조하여 더 자세한 정보를 확인하는 것이 좋습니다.
SecurityContext는 SecurityContextHolder에서 얻어집니다. SecurityContext는 Authentication 객체를 포함하고 있습니다.
Authentication 인터페이스는 Spring Security에서 중요한 역할을 하는데, 이 인터페이스는 사용자의 인증 정보를 나타내며 다음 두 가지 주요 용도로 사용됩니다:
- AuthenticationManager로의 입력 값: 사용자가 인증을 시도할 때 AuthenticationManager에 Authentication 객체를 전달하여 인증을 요청합니다. 이 경우 사용자가 인증된 상태가 아니기 때문에, isAuthenticated() 메서드는 false를 반환합니다.
- 현재 인증된 사용자 정보: 인증이 완료된 후, 이 Authentication 객체는 현재 인증된 사용자를 나타내는 정보로 SecurityContext에 저장됩니다. 이로 인해 SecurityContext를 통해 언제든지 현재 사용자의 정보를 조회할 수 있습니다.
Authentication 객체의 주요 구성 요소
Authentication 객체는 세 가지 핵심 구성 요소로 이루어져 있습니다:
1. principal (사용자 식별자)
- principal은 인증된 사용자를 식별하는 정보입니다.
- 보통 UserDetails 인터페이스의 인스턴스로 구현되며, username을 포함하여 사용자의 고유 식별 정보가 담깁니다.
- 기본적으로 사용자 이름/비밀번호를 이용한 인증에서는 principal이 UserDetails 객체를 통해 관리되지만, OAuth2 같은 경우는 다른 인증 주체(principal) 형태를 가질 수도 있습니다.
2. credentials (자격 증명)
- credentials는 사용자의 자격 증명 정보를 포함하며, 주로 비밀번호가 들어갑니다.
- 보안을 위해 사용자가 인증된 후에는 credentials 필드가 비워지거나 초기화됩니다. 이는 비밀번호가 코드나 로그에 노출되는 것을 방지하기 위한 조치입니다.
- Spring Security는 사용자의 비밀번호를 평문으로 유지하지 않고 암호화된 형태로 처리하며, 인증 후에는 비밀번호 정보를 지워서 보안성을 유지합니다.
3. authorities (권한 정보)
- authorities는 사용자가 가진 권한 정보를 나타내는 GrantedAuthority 인스턴스의 컬렉션입니다.
- Spring Security에서는 ROLE_USER나 ROLE_ADMIN과 같은 역할(roles) 또는 특정 리소스에 대한 접근 범위(scopes) 등을 통해 권한을 정의할 수 있습니다.
- 이 권한 정보는 권한 부여 과정에서 중요한 역할을 하며, 사용자에게 어떤 리소스나 기능에 접근 권한이 있는지를 결정합니다.
Authentication 객체의 역할과 사용 예
- AuthenticationManager는 Authentication 객체를 이용해 사용자를 인증합니다. 예를 들어, UsernamePasswordAuthenticationToken을 사용하여 사용자 이름과 비밀번호로 인증할 수 있습니다.
- 사용자가 인증된 후, SecurityContext에 Authentication 객체가 저장되어 애플리케이션 전반에서 현재 사용자 정보를 조회할 수 있게 됩니다.
- 예를 들어, 컨트롤러나 서비스 메서드에서 현재 로그인한 사용자의 정보나 권한을 확인할 때,
SecurityContextHolder.getContext().getAuthentication()를 통해 현재 Authentication 객체를 가져올 수 있습니다.
인증 과정의 예시
- 로그인 요청: 사용자가 사용자 이름과 비밀번호로 로그인 요청을 보냅니다.
- Authentication 객체 생성: 요청을 처리하는 코드에서 UsernamePasswordAuthenticationToken과 같은 객체를 사용해 사용자의 자격 증명을 포함한 Authentication 객체를 생성합니다.
- 인증 처리: AuthenticationManager로 생성된 Authentication 객체를 전달하여 인증을 시도합니다.
- 인증 결과 저장: 인증이 성공하면 Authentication 객체를 SecurityContextHolder의 SecurityContext에 저장하여 애플리케이션 어디에서든 접근할 수 있도록 합니다.
이렇게 Authentication 객체는 사용자가 누구인지 식별하고, 어떤 권한을 가졌는지 관리하며, Spring Security에서 인증과 권한 부여를 처리하는 중요한 역할을 합니다.
GrantedAuthority는 Spring Security에서 사용자가 가지는 권한을 나타내는 중요한 요소입니다. GrantedAuthority 객체는 특정 사용자가 시스템 내에서 수행할 수 있는 작업을 정의하는 역할(roles) 또는 범위(scopes) 와 같은 상위 수준의 권한을 포함합니다. Spring Security의 권한 부여 시스템에서는 이 GrantedAuthority 객체를 사용하여 사용자가 접근할 수 있는 자원과 기능을 제어합니다.
GrantedAuthority의 역할과 구성 요소
GrantedAuthority 객체는 크게 두 가지 역할을 합니다:
1. 역할(Role) 부여: 사용자가 애플리케이션 내에서 가지는 역할을 나타냅니다. 예를 들어, ROLE_ADMINISTRATOR, ROLE_USER와 같은 역할이 GrantedAuthority 객체로 정의될 수 있습니다.
2. 범위(Scope) 부여: 특정 기능에 접근 가능한 범위를 지정할 수 있습니다. 예를 들어, OAuth2 인증에서는 특정 API에 접근할 수 있는 범위를 scope로 정의할 수 있습니다.
GrantedAuthority와 권한 부여 시스템의 관계
- GrantedAuthority 객체는 Authentication 객체의 getAuthorities() 메서드를 통해 가져올 수 있습니다. 이 메서드는 Collection 형태로 GrantedAuthority 객체들을 반환합니다.
- Authentication 객체에는 인증된 사용자의 권한 정보가 저장되어 있으며, 이를 통해 Spring Security는 사용자에게 허용된 작업을 판단하게 됩니다.
예를 들어, authentication.getAuthorities()를 호출하면 GrantedAuthority 목록이 반환되며, 이는 ROLE_ADMIN, ROLE_USER 등과 같은 값들을 포함할 수 있습니다. 이러한 권한은 다음과 같은 방식으로 Spring Security에서 사용됩니다:
1. 웹 권한 부여: Spring Security의 URL 접근 제어 설정에서 특정 URL에 접근할 수 있는 역할을 설정할 때 사용됩니다.
2. 메서드 권한 부여: 특정 메서드에 접근할 수 있는 권한을 설정할 때 사용됩니다. 예를 들어, @PreAuthorize("hasRole('ROLE_ADMIN')")와 같은 어노테이션을 사용하여 특정 역할을 가진 사용자만 메서드를 호출할 수 있도록 설정할 수 있습니다.
3. 도메인 객체 권한 부여: 특정 도메인 객체에 대한 접근 권한을 제어할 때 사용됩니다.
GrantedAuthority 객체는 애플리케이션 전체에 적용되는 권한으로 사용
- GrantedAuthority는 개별 도메인 객체에 대한 세부 권한이 아닌, 시스템 내에서 공통적으로 사용되는 권한을 나타냅니다.
- 예를 들어, 특정 직원(Employee) 객체에만 접근할 수 있는 권한을 GrantedAuthority로 정의하는 것은 비효율적입니다. 만약 수천 개의 GrantedAuthority 객체가 생성된다면, 메모리가 부족해지거나 사용자가 인증될 때 시간이 오래 걸릴 수 있습니다.
- Spring Security에서는 domain object security 기능을 통해 도메인 객체별 권한 부여를 효율적으로 관리할 수 있도록 하고 있습니다. 도메인 객체 권한 부여는 개별 객체에 대한 상세한 권한이 필요할 때 사용하며, GrantedAuthority는 애플리케이션 전체에서 공유되는 권한에 더 적합합니다.
GrantedAuthority 설정 예시
UserDetailsService에서 사용자를 로드할 때, 권한을 설정할 수 있습니다. 예를 들어:
public class CustomUserDetailsService implements UserDetailsService {
    @Override
    public UserDetails loadUserByUsername(String username) throws UsernameNotFoundException {
        // 사용자 정보 로드
        UserDetails user = findUser(username);

        // 권한 설정
        List<GrantedAuthority> authorities = new ArrayList<>();
        authorities.add(new SimpleGrantedAuthority("ROLE_USER"));
        authorities.add(new SimpleGrantedAuthority("ROLE_ADMIN"));

        return new User(user.getUsername(), user.getPassword(), authorities);
    }
}
위 예시에서 SimpleGrantedAuthority를 사용하여 ROLE_USER와 ROLE_ADMIN 권한을 부여합니다.
요약
- GrantedAuthority는 Spring Security에서 사용자가 가지는 역할과 범위를 나타내는 상위 수준의 권한입니다.
- 이 권한 정보는
Authentication.getAuthorities()를 통해 Collection 형태로 반환됩니다. - Spring Security는 GrantedAuthority를 사용하여 URL 접근 제어, 메서드 접근 제어, 도메인 객체 접근 제어를 수행합니다.
- GrantedAuthority는 애플리케이션 전체에서 사용되는 공통 권한에 적합하며, 개별 도메인 객체에 대한 권한은 domain object security를 통해 더 효율적으로 관리할 수 있습니다.
AuthenticationManager는 Spring Security에서 인증 과정을 수행하는 핵심적인 인터페이스입니다. 애플리케이션에서 인증이 필요한 요청이 발생했을 때, AuthenticationManager는 사용자의 자격 증명(예: 사용자 이름과 비밀번호 등)을 검사하고, 사용자가 신뢰할 수 있는 사용자인지 확인하는 역할을 합니다. 인증이 성공하면 인증된 사용자의 정보를 SecurityContextHolder에 저장하여 애플리케이션 전체에서 접근할 수 있도록 합니다.
AuthenticationManager의 역할
AuthenticationManager의 주요 역할은 Authentication 객체를 받아 이를 검증하고, 성공적으로 인증되었는지 여부를 판단하는 것입니다. AuthenticationManager는 authenticate() 메서드를 통해 인증을 수행합니다. 이 메서드는 인증이 성공하면 인증된 Authentication 객체를 반환하며, 인증이 실패하면 AuthenticationException을 발생시킵니다.
SecurityContextHolder와의 연계
- AuthenticationManager는 사용자가 제공한 인증 정보를 검증합니다.
- 인증이 성공하면 Authentication 객체가 생성되어 반환되고, 이 객체는 인증된 사용자의 정보를 포함합니다.
- SecurityContextHolder는 이 Authentication 객체를 받아서 SecurityContext에 설정합니다. 이를 통해 애플리케이션의 다른 부분에서도 현재 인증된 사용자 정보를 참조할 수 있습니다.
이 과정에서 SecurityContextHolder는 Spring Security의 필터가 사용자를 인증한 후에 Authentication 객체를 저장하는 곳이 됩니다. 필터가 SecurityContextHolder에 인증 정보를 설정함으로써, 애플리케이션 전체에서 인증된 사용자 정보를 쉽게 참조할 수 있게 됩니다.
일반적인 AuthenticationManager 구현: ProviderManager
AuthenticationManager의 다양한 구현 중에서 가장 일반적으로 사용되는 것이 ProviderManager입니다. ProviderManager는 여러 AuthenticationProvider를 이용하여 다양한 인증 방식에 대응할 수 있습니다.
- ProviderManager는 AuthenticationProvider 목록을 유지하며, 인증을 시도할 때 순차적으로 AuthenticationProvider에게 인증을 위임합니다.
- 각 AuthenticationProvider는 특정 유형의 인증을 담당합니다. 예를 들어, 사용자의 이름과 비밀번호를 검사하는 DaoAuthenticationProvider, OAuth2 인증을 처리하는 OAuth2AuthenticationProvider 등이 있습니다.
- ProviderManager는 목록에 있는 AuthenticationProvider 중 하나라도 인증에 성공하면 그 결과를 반환합니다. 만약 모든 AuthenticationProvider가 인증에 실패하면 AuthenticationException이 발생합니다.
AuthenticationManager를 직접 사용하지 않는 경우
일반적으로 Spring Security의 필터는 AuthenticationManager를 호출하여 인증을 수행하고, 인증에 성공한 Authentication 객체를 SecurityContextHolder에 설정합니다. 그러나 일부 애플리케이션에서는 AuthenticationManager를 직접 사용하지 않고도 인증할 수 있습니다.
이 경우 개발자가 SecurityContextHolder에 인증 정보를 직접 설정할 수 있습니다. 이는 주로 Spring Security의 표준 인증 흐름을 사용하지 않거나 사용자 정의 인증 방식을 사용할 때 발생합니다.
AuthenticationManager의 사용 예
일반적인 인증 흐름을 예시로 설명하겠습니다.
-
로그인 요청: 사용자가 로그인 요청을 보내면 UsernamePasswordAuthenticationToken 객체가 생성되어 사용자 이름과 비밀번호를 담게 됩니다.
-
AuthenticationManager 호출: 이 객체가 AuthenticationManager의
authenticate()메서드에 전달됩니다. ProviderManager와 같은 구현체가 이를 받아 적절한 AuthenticationProvider에게 인증을 위임합니다. -
인증 결과 반환: 인증이 성공하면 Authentication 객체가 반환되고, 이 객체는 SecurityContextHolder에 저장됩니다. 인증이 실패하면 예외가 발생하여 로그인 실패 처리를 진행합니다.
요약
- AuthenticationManager는 Spring Security에서 인증을 수행하는 API로, 사용자 인증 정보를 검증하여 애플리케이션에 인증된 사용자 정보를 제공합니다.
- SecurityContextHolder는 AuthenticationManager에서 반환된 인증 정보를 저장하여 애플리케이션 어디서든 현재 인증된 사용자 정보를 참조할 수 있도록 합니다.
- ProviderManager는 가장 일반적인 AuthenticationManager 구현체로, 다양한 AuthenticationProvider를 통해 여러 인증 방식을 지원합니다.
- 필요에 따라 AuthenticationManager를 사용하지 않고, 직접 SecurityContextHolder에 인증 정보를 설정할 수도 있습니다.
ProviderManager는 Spring Security의 AuthenticationManager 구현 중 가장 널리 사용되는 구현체로, 여러 AuthenticationProvider를 사용하여 다양한 인증 방식을 지원할 수 있도록 설계되었습니다. 이 ProviderManager는 AuthenticationProvider 목록을 순차적으로 탐색하면서 인증을 시도하고, 적절한 AuthenticationProvider가 인증을 수행합니다.
ProviderManager의 구조와 작동 방식
-
AuthenticationProvider 목록:
- ProviderManager는 AuthenticationProvider 목록을 유지하며, 이 목록에 포함된 각 AuthenticationProvider는 특정 인증 방식을 처리할 수 있습니다.
- 예를 들어, 사용자 이름과 비밀번호 인증을 처리하는 DaoAuthenticationProvider와 소셜 로그인 (OAuth2) 인증을 처리하는 OAuth2AuthenticationProvider가 함께 등록될 수 있습니다.
-
인증 흐름:
- ProviderManager는 인증 요청이 들어오면
authenticate()메서드를 호출하여, AuthenticationProvider 목록에 포함된 각 AuthenticationProvider에게 순차적으로 인증을 위임합니다. - AuthenticationProvider는 인증 정보를 검토하여 세 가지 응답을 할 수 있습니다:
- 성공: 인증이 성공하면 Authentication 객체를 반환하고, 인증 절차가 종료됩니다.
- 실패: 인증이 실패하면 예외를 발생시켜 즉시 인증을 중단합니다.
- 결정 불가: 현재 AuthenticationProvider가 이 인증 요청을 처리할 수 없음을 나타내고, ProviderManager는 다음 AuthenticationProvider로 인증을 위임합니다.
- ProviderManager는 인증 요청이 들어오면
-
인증 성공 및 실패 처리:
- AuthenticationProvider 중 하나라도 인증에 성공하면, ProviderManager는 인증된 Authentication 객체를 반환하고 인증 절차가 종료됩니다.
- 만약 모든 AuthenticationProvider가 인증을 수행할 수 없다고 응답하면, ProviderNotFoundException이 발생합니다. 이는 전달된 Authentication 유형을 지원하는 AuthenticationProvider가 구성되지 않았음을 의미합니다.
- 예를 들어, OAuth2 인증 요청이 들어왔으나 OAuth2AuthenticationProvider가 목록에 없다면 ProviderNotFoundException 예외가 발생하게 됩니다.
ProviderManager의 장점
ProviderManager의 가장 큰 장점은 다양한 인증 방식을 유연하게 조합할 수 있다는 점입니다. 다양한 AuthenticationProvider를 등록하여, 각 인증 방식에 따라 적절한 AuthenticationProvider가 인증을 수행하도록 할 수 있습니다. 이를 통해 애플리케이션이 여러 종류의 인증 방식을 지원하도록 확장할 수 있습니다.
ProviderManager의 예시
예를 들어, 사용자가 애플리케이션에 로그인할 때 사용자가 제공하는 자격 증명에 따라 다른 인증 방식을 적용할 수 있습니다.
- DaoAuthenticationProvider는 사용자가 입력한 사용자 이름과 비밀번호로 데이터베이스를 조회해 인증합니다.
- OAuth2AuthenticationProvider는 외부 소셜 로그인 제공자를 통해 인증을 수행합니다.
public class CustomAuthenticationManager extends ProviderManager {
    public CustomAuthenticationManager(List<AuthenticationProvider> providers) {
        super(providers);
    }
}

// 예시로 DaoAuthenticationProvider와 OAuth2AuthenticationProvider 추가
List<AuthenticationProvider> providers = Arrays.asList(new DaoAuthenticationProvider(), new OAuth2AuthenticationProvider());
AuthenticationManager authenticationManager = new CustomAuthenticationManager(providers);
이렇게 설정하면, ProviderManager는 DaoAuthenticationProvider와 OAuth2AuthenticationProvider를 이용해 적절한 인증 방식을 선택하여 인증을 수행합니다.
ProviderNotFoundException
모든 AuthenticationProvider가 인증 요청을 처리할 수 없는 경우 ProviderNotFoundException이 발생합니다. 이 예외는 인증 방식이 잘못 설정되었거나 필요한 AuthenticationProvider가 목록에 포함되지 않았음을 의미합니다. 예를 들어, API 인증에 필요한 APIKeyAuthenticationProvider가 설정되지 않았다면, 이 예외가 발생하여 인증이 실패하게 됩니다.
요약
- ProviderManager는 AuthenticationManager의 가장 흔한 구현체로, 여러 AuthenticationProvider를 통해 다양한 인증 방식을 처리합니다.
- 각 AuthenticationProvider는 인증 요청에 대해 성공, 실패, 또는 다음 AuthenticationProvider로 위임할지 결정할 수 있습니다.
- 모든 AuthenticationProvider가 인증에 실패하면 ProviderNotFoundException이 발생하며, 이는 구성 오류를 나타냅니다.
- ProviderManager를 통해 다양한 인증 방식을 조합하여 유연하게 확장 가능한 인증 시스템을 구축할 수 있습니다.
실제로 각 AuthenticationProvider는 특정 유형의 인증을 수행하는 방법을 알고 있습니다. 예를 들어, 하나의 AuthenticationProvider는 사용자 이름과 비밀번호를 검증할 수 있고, 다른 하나는 SAML 어설션을 통해 인증할 수 있습니다. 이를 통해 각 AuthenticationProvider는 매우 구체적인 유형의 인증만 처리하면서도 여러 종류의 인증을 지원할 수 있으며, 하나의 AuthenticationManager 빈을 노출합니다.
ProviderManager는 또한 선택적으로 부모 AuthenticationManager를 설정할 수 있습니다. 이는 어떤 AuthenticationProvider도 인증을 수행할 수 없을 때 참조됩니다. 부모는 어떤 유형의 AuthenticationManager든 될 수 있지만, 대개 ProviderManager의 인스턴스인 경우가 많습니다.
사실, 여러 ProviderManager 인스턴스가 동일한 부모 AuthenticationManager를 공유할 수 있습니다. 이는 일부 인증을 공통으로 가지면서도 (공유된 부모 AuthenticationManager), 서로 다른 인증 메커니즘(각기 다른 ProviderManager 인스턴스)을 사용하는 여러 SecurityFilterChain 인스턴스가 있는 시나리오에서 다소 일반적인 경우입니다.
이 내용은 Spring Security에서 ProviderManager와 AuthenticationManager의 계층적 구조를 설명하고 있습니다. 예를 들어, ProviderManager를 여러 개 설정하면서도, 각 ProviderManager가 동일한 부모 AuthenticationManager를 참조하는 구조를 만들 수 있다는 뜻입니다.
ProviderManager와 부모 AuthenticationManager의 관계
ProviderManager는 Spring Security에서 AuthenticationManager를 구현하는 대표적인 클래스이며, 애플리케이션에서 여러 AuthenticationProvider를 등록하여 다양한 인증 방식을 처리할 수 있습니다. 또한 ProviderManager는 부모 AuthenticationManager를 설정할 수 있어, 자신이 인증을 처리할 수 없는 경우 부모 AuthenticationManager에게 인증을 위임할 수 있습니다.
예시 상황: 다중 SecurityFilterChain
이제, 다중 SecurityFilterChain과 ProviderManager를 사용하는 시나리오를 생각해보겠습니다.
1. 다중 SecurityFilterChain
- Spring Security를 사용하는 애플리케이션에서는 상황에 따라 여러 SecurityFilterChain을 설정할 수 있습니다.
- 예를 들어, 하나의 필터 체인은 API 요청에 대해 인증을 처리하고, 다른 필터 체인은 사용자 웹 애플리케이션 요청에 대해 인증을 처리하도록 설정할 수 있습니다.
2. 공통된 부모 AuthenticationManager를 통한 인증 공유
각 SecurityFilterChain은 자신만의 ProviderManager를 가질 수 있습니다. 이 경우 다음과 같은 구조가 가능합니다:
- ProviderManager A: API 요청에 대해 사용자 이름과 비밀번호를 사용하는 인증을 처리합니다.
- ProviderManager B: 웹 애플리케이션 요청에 대해 SAML 인증이나 OAuth2 인증을 처리합니다.
- 부모 AuthenticationManager: 두 ProviderManager가 인증할 수 없는 경우, 예를 들어 기본적인 백업 인증 메커니즘을 제공합니다.
이 구조에서는 ProviderManager A와 ProviderManager B가 각기 다른 인증 방식(예: 사용자 이름/비밀번호와 SAML)을 처리하되, 둘 다 공통된 부모 AuthenticationManager를 참조할 수 있습니다. 이렇게 하면 각 ProviderManager가 자신이 처리할 수 없는 경우 부모 AuthenticationManager에게 인증을 위임할 수 있습니다.
요약
- 여러 ProviderManager 인스턴스를 설정해 각기 다른 인증 방식을 처리하게 할 수 있습니다.
- 이 ProviderManager들이 공통된 부모 AuthenticationManager를 참조할 수 있습니다. 이렇게 하면 각 ProviderManager가 자신이 처리할 수 없는 인증 요청을 부모 AuthenticationManager에 위임할 수 있습니다.
- 이 방식은 여러 SecurityFilterChain이 존재하면서, 일부 인증 메커니즘은 공유하고 일부는 구분해야 할 때 유용합니다.
이런 구조를 통해 다양한 인증 요구를 만족하면서도 관리하기 쉽게 설정할 수 있습니다.
ProviderManager는 기본적으로 인증이 성공적으로 이루어진 후 Authentication 객체에서 비밀번호와 같은 민감한 자격 증명 정보를 제거합니다. 이렇게 하는 이유는 보안 강화를 위해 비밀번호와 같은 정보가 HttpSession에 불필요하게 오래 저장되는 것을 방지하기 위함입니다.
ProviderManager의 자격 증명 삭제 동작
- eraseCredentialsAfterAuthentication 속성은 ProviderManager가 기본적으로 활성화하는 옵션입니다.
- 이 옵션은 성공적인 인증 후 Authentication 객체에서 비밀번호와 같은 자격 증명 정보를 삭제합니다.
- 이를 통해, 세션이나 메모리에서 비밀번호가 오래 남아있는 것을 방지하여 보안을 강화합니다.
캐시를 사용하는 경우 발생하는 문제
Stateless 애플리케이션 또는 캐시를 사용하는 애플리케이션에서는 이 동작이 문제가 될 수 있습니다.
예를 들어:
1. UserDetails 객체를 캐시에 저장해 두고, 성능을 개선하기 위해 캐시된 값을 사용하여 인증을 수행하는 경우를 생각해보겠습니다.
2. Authentication 객체가 캐시된 UserDetails 객체를 참조하고 있고, 인증이 성공한 후 자격 증명 정보(예: 비밀번호)가 ProviderManager에 의해 삭제됩니다.
3. 이렇게 되면 캐시에 저장된 UserDetails 객체에서도 비밀번호가 삭제되어, 이 객체로 다시 인증을 수행할 때 필요한 자격 증명 정보가 없어지게 됩니다.
이 문제는 캐시가 UserDetails와 같은 인증 정보 객체를 참조하고 있다가, 자격 증명이 삭제된 후 인증에 실패하는 상황을 초래합니다.
해결 방법
이 문제를 해결하는 몇 가지 방법이 있습니다.
1. 객체의 복사본 생성
- 가장 안전한 방법은 AuthenticationProvider나 캐시 구현에서 UserDetails 객체의 복사본을 만들어 사용하는 것입니다.
- 이 방법을 통해 캐시에 저장된 원본 객체는 자격 증명이 삭제되지 않은 상태로 유지되며, 필요 시 인증에 사용할 수 있습니다.
- 예를 들어, UserDetails 객체를 복사하여 Authentication 객체에 설정하고, 원본 UserDetails는 캐시에 저장하여 다시 사용할 수 있도록 하는 것입니다.
2. eraseCredentialsAfterAuthentication 비활성화
- ProviderManager의
eraseCredentialsAfterAuthentication속성을 false로 설정하여 자격 증명이 삭제되지 않도록 할 수도 있습니다. - 이렇게 하면 인증 후에도 Authentication 객체가 자격 증명을 유지하므로 캐시와의 충돌을 방지할 수 있습니다.
- 단, 이 방법은 보안 측면에서 신중하게 고려해야 합니다. 자격 증명이 메모리에 남아 있는 시간이 길어지기 때문에 보안 위험이 증가할 수 있습니다.
ProviderManager providerManager = new ProviderManager(authenticationProviders);
providerManager.setEraseCredentialsAfterAuthentication(false);  // 자격 증명 삭제 비활성화
요약
- ProviderManager는 기본적으로 인증 성공 후 자격 증명을 삭제하여 보안을 강화합니다.
- Stateless 애플리케이션이나 캐시를 사용하는 경우, 이 동작이 문제를 일으킬 수 있습니다.
- 이 문제는 UserDetails 객체의 복사본을 사용하거나, eraseCredentialsAfterAuthentication 옵션을 비활성화하는 방법으로 해결할 수 있습니다.
- 각 방법에는 장단점이 있으며, 보안 요구 사항과 성능을 고려하여 적절한 방법을 선택하는 것이 중요합니다.
AuthenticationProvider
ProviderManager에 여러 AuthenticationProvider 인스턴스를 주입할 수 있습니다. 각 AuthenticationProvider는 특정 유형의 인증을 수행합니다. 예를 들어, DaoAuthenticationProvider는 사용자 이름/비밀번호 기반의 인증을 지원하며, JwtAuthenticationProvider는 JWT 토큰을 통한 인증을 지원합니다.
AuthenticationEntryPoint는 Spring Security에서 인증이 필요할 때, 클라이언트에게 자격 증명을 요청하기 위한 HTTP 응답을 보내는 역할을 합니다. 즉, 클라이언트가 보호된 리소스에 접근하려고 할 때 인증되지 않은 상태라면 AuthenticationEntryPoint를 통해 로그인 페이지로 리다이렉트하거나 WWW-Authenticate 헤더를 사용하여 자격 증명을 요청할 수 있습니다.
AuthenticationEntryPoint의 작동 방식
Spring Security에서는 두 가지 경우에 따라 AuthenticationEntryPoint가 작동할 수 있습니다.
-
클라이언트가 자격 증명을 포함해 요청하는 경우
- 클라이언트가 사용자 이름과 비밀번호와 같은 자격 증명을 미리 포함하여 요청을 보내는 경우가 있습니다.
- 이 경우 Spring Security는 자격 증명 요청을 위한 HTTP 응답을 보낼 필요가 없습니다. 이미 자격 증명이 포함되어 있기 때문에 AuthenticationManager나 AuthenticationProvider가 이 자격 증명을 사용해 인증을 수행합니다.
-
클라이언트가 인증되지 않은 상태에서 요청하는 경우
- 클라이언트가 인증되지 않은 상태로 보호된 리소스에 접근하려고 할 때 AuthenticationEntryPoint가 작동합니다.
- 이때 AuthenticationEntryPoint는 클라이언트에게 자격 증명을 요청하는 방식으로 HTTP 응답을 보냅니다.
AuthenticationEntryPoint의 주요 기능
AuthenticationEntryPoint는 클라이언트에게 자격 증명을 요청할 때 여러 가지 방법으로 응답할 수 있습니다:
- 로그인 페이지로 리다이렉트: 브라우저 기반 애플리케이션에서는 로그인 페이지로 리다이렉트하여 사용자가 로그인하도록 유도할 수 있습니다. 이를 위해
HttpServletResponse.sendRedirect()메서드를 호출하여 특정 URL로 클라이언트를 리다이렉트합니다. - WWW-Authenticate 헤더 사용: REST API에서는 주로 WWW-Authenticate 헤더를 사용하여 클라이언트에게 인증이 필요함을 알립니다. 이 헤더는
401 Unauthorized상태 코드와 함께 반환되며, 클라이언트는 이 응답을 통해 자격 증명을 다시 제공할 수 있습니다. - 기타 커스텀 액션: 특정 인증 흐름이나 요구 사항에 맞게, AuthenticationEntryPoint를 커스터마이징하여 특정 HTTP 응답이나 추가 처리를 수행할 수도 있습니다.
예시 코드
Spring Security에서 AuthenticationEntryPoint를 설정하고, 로그인 페이지로 리다이렉트하는 간단한 예시를 보겠습니다:
@Component
public class CustomAuthenticationEntryPoint implements AuthenticationEntryPoint {
    @Override
    public void commence(HttpServletRequest request, HttpServletResponse response, AuthenticationException authException) throws IOException, ServletException {
        // 로그인 페이지로 리다이렉트
        response.sendRedirect("/login");
    }
}
위 코드에서는 AuthenticationEntryPoint 인터페이스를 구현한 CustomAuthenticationEntryPoint 클래스가 있습니다. 인증되지 않은 사용자가 보호된 리소스에 접근할 경우, commence 메서드가 호출되어 클라이언트를 /login 페이지로 리다이렉트합니다.
요약
- AuthenticationEntryPoint는 인증되지 않은 클라이언트가 보호된 리소스에 접근하려 할 때 자격 증명을 요청하는 역할을 합니다.
- 자격 증명을 요청하는 방법으로 로그인 페이지 리다이렉트, WWW-Authenticate 헤더 응답 등이 있습니다.
- 이 방식은 Spring Security가 HTTP 응답을 통해 클라이언트에게 인증 요청을 보내는 일반적인 패턴을 설명합니다.
REST API에서는 주로 WWW-Authenticate 헤더를 사용하여 클라이언트에게 인증이 필요함을 알리는 이유는 다음과 같습니다:
1. 표준화된 인증 요청 방식
WWW-Authenticate 헤더는 HTTP 표준에 정의된 방식으로, 클라이언트가 서버로부터 인증이 필요하다는 정보를 전달받는 표준적인 방법입니다. 이 헤더는 401 Unauthorized 상태 코드와 함께 전송되어, 클라이언트가 서버에 인증 자격 증명을 다시 제공해야 함을 명확히 알립니다. HTTP 표준을 따름으로써, 다양한 클라이언트(브라우저, 모바일 앱, 기타 API 소비자)가 서버의 요구사항을 예측 가능한 방식으로 처리할 수 있습니다.
2. REST API의 비상태성 및 클라이언트 주도 특성에 적합
REST API는 비상태적(stateless)으로 설계되는 것이 일반적입니다. 즉, 각 요청은 독립적으로 처리되며 서버는 클라이언트의 상태를 유지하지 않습니다. 이 특성에 따라, REST API는 클라이언트가 매 요청마다 인증 자격 증명을 명시적으로 포함해야 하는 방식으로 동작합니다. WWW-Authenticate 헤더는 이러한 인증 방식에 적합하여, 클라이언트에게 인증이 필요하다는 메시지를 전달하고 매 요청마다 필요한 인증 정보를 포함하도록 유도합니다.
3. RESTful 서비스에 적합한 사용자 경험
WWW-Authenticate 헤더를 사용하면 클라이언트 애플리케이션에서 사용자 경험을 유연하게 구성할 수 있습니다. 예를 들어, Bearer 방식의 JWT 토큰을 사용하는 경우 WWW-Authenticate 헤더는 클라이언트에게 "Bearer" 유형의 인증을 요구함을 전달할 수 있습니다. 클라이언트는 이를 해석하여, 인증 토큰을 포함한 후 다시 요청을 보낼 수 있습니다.
4. 브라우저와 비브라우저 환경에서의 호환성
WWW-Authenticate 헤더는 브라우저 기반 인증뿐만 아니라, 다양한 클라이언트 환경에서도 활용할 수 있습니다. REST API는 브라우저 외에도 모바일 앱, 서버 간 통신 등 다양한 클라이언트가 접근할 수 있는 환경에서 사용됩니다. WWW-Authenticate 헤더는 HTTP 표준 방식으로 모든 종류의 클라이언트가 일관된 방식으로 서버의 인증 요구를 해석할 수 있도록 합니다.
예시: WWW-Authenticate 헤더를 통한 인증 요청
HTTP/1.1 401 Unauthorized
WWW-Authenticate: Bearer realm="example"
위 예시는 서버가 클라이언트에게 Bearer 인증을 요구하는 방식으로, JWT 토큰과 같은 자격 증명을 요청합니다. 클라이언트는 이 응답을 받고 Authorization: Bearer <token> 형태로 다시 요청을 보낼 수 있습니다.
요약
WWW-Authenticate 헤더는 HTTP 표준에 따른 인증 요청 방식으로, REST API의 비상태성, 표준화된 인증 처리, 다양한 클라이언트와의 호환성 등을 위해 사용됩니다. 이를 통해 클라이언트는 서버가 요구하는 인증 유형을 이해하고 적절하게 대응할 수 있습니다.
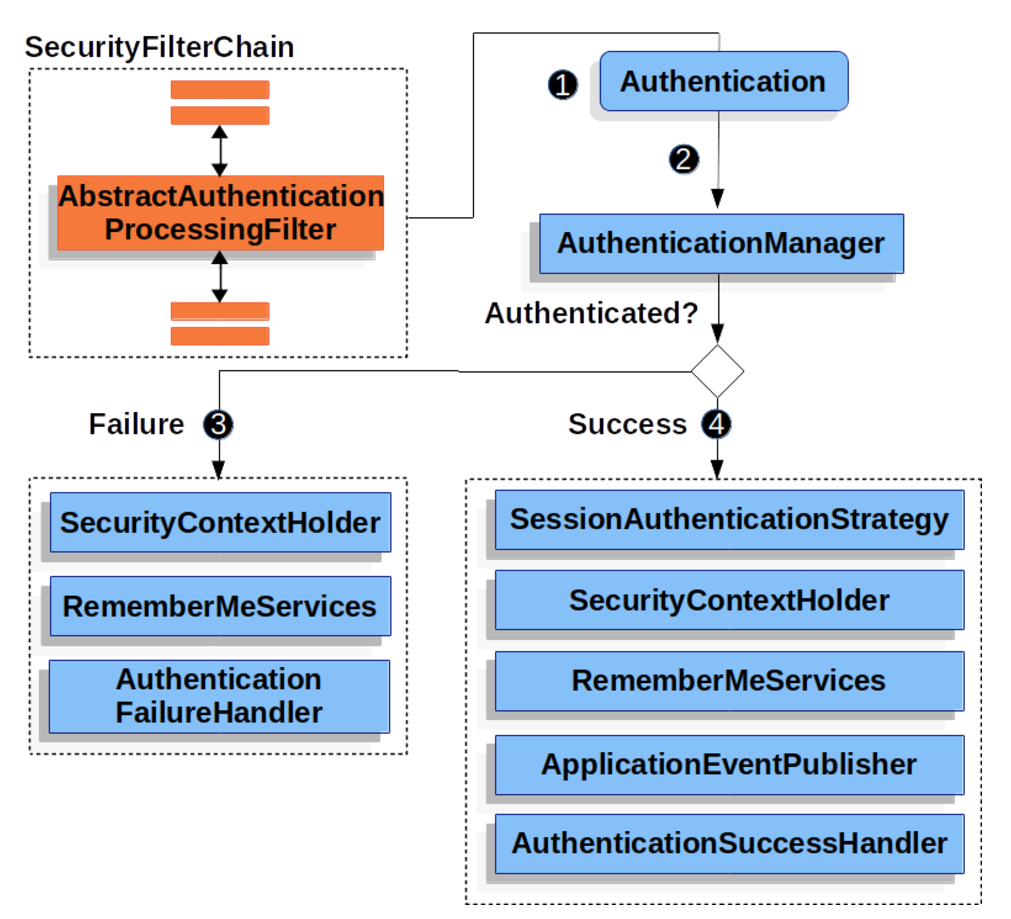
AbstractAuthenticationProcessingFilter는 Spring Security에서 사용자의 인증을 처리하는 기본 클래스입니다. 이 필터는 특정 URL 패턴에 대한 요청을 가로채고, 사용자의 자격 증명을 검사하여 인증을 수행합니다. 주로 사용자 이름과 비밀번호, 혹은 다른 자격 증명 정보를 기반으로 인증을 시도하는 구조의 기본 클래스입니다.
AbstractAuthenticationProcessingFilter의 주요 기능
-
자격 증명 요청 처리
- AbstractAuthenticationProcessingFilter는 Spring Security의 필터 체인에서 특정 URL 패턴에 매핑됩니다. 이 URL로 요청이 들어오면 필터는 그 요청을 가로채고, 인증 프로세스를 시작합니다.
- 일반적으로 사용자의 자격 증명(예: 사용자 이름과 비밀번호)을 제출하는 로그인 URL에 설정됩니다.
-
AuthenticationEntryPoint와의 연계
- 사용자가 보호된 리소스에 접근하려고 할 때 인증되지 않은 상태라면, AuthenticationEntryPoint가 작동하여 사용자에게 자격 증명을 입력하라는 요청을 보냅니다.
- 예를 들어, 브라우저에서는 로그인 페이지로 리다이렉트하거나, REST API에서는
401 Unauthorized상태 코드와 함께 WWW-Authenticate 헤더가 반환됩니다. - AuthenticationEntryPoint는 사용자가 자격 증명을 제출하도록 유도하는 역할을 하고, 이후에 AbstractAuthenticationProcessingFilter가 자격 증명을 처리하게 됩니다.
-
인증 처리
- 사용자가 자격 증명을 입력하고 요청을 보내면, AbstractAuthenticationProcessingFilter는 이를 받아 인증을 시도합니다.
- 이 필터는 내부적으로 AuthenticationManager를 호출하여 인증을 수행하며, 사용자가 제공한 자격 증명을 기반으로 Authentication 객체를 생성하고 이를 검증합니다.
- 인증이 성공하면, SecurityContextHolder에 인증된 Authentication 객체가 설정되어 애플리케이션의 다른 부분에서 인증된 사용자 정보에 접근할 수 있게 됩니다.
- 만약 인증이 실패하면, 예외를 발생시키거나 오류 응답을 반환합니다.
AbstractAuthenticationProcessingFilter 사용 예시
AbstractAuthenticationProcessingFilter는 추상 클래스이므로 직접 사용되기보다는 이를 확장한 구체적인 구현 클래스가 사용됩니다. 대표적인 예로 UsernamePasswordAuthenticationFilter가 있습니다. 이 클래스는 사용자가 제출한 사용자 이름과 비밀번호를 사용하여 인증을 처리하는 AbstractAuthenticationProcessingFilter의 구현체입니다.
AbstractAuthenticationProcessingFilter의 구성 요소
- requiresAuthentication(HttpServletRequest request, HttpServletResponse response): 필터가 요청을 가로채서 인증을 수행해야 하는지 판단하는 메서드입니다. 기본적으로 설정된 URL 패턴에 맞는 요청이 들어오면 필터가 작동합니다.
- attemptAuthentication(HttpServletRequest request, HttpServletResponse response): 실제 인증 로직을 수행하는 메서드입니다. 사용자가 제출한 자격 증명을 읽고, AuthenticationManager에 전달하여 인증을 시도합니다.
- successfulAuthentication(HttpServletRequest request, HttpServletResponse response, FilterChain chain, Authentication authResult): 인증이 성공했을 때 호출되는 메서드로, 인증된 Authentication 객체를 SecurityContextHolder에 설정합니다.
- unsuccessfulAuthentication(HttpServletRequest request, HttpServletResponse response, AuthenticationException failed): 인증이 실패했을 때 호출되는 메서드로, 실패한 이유를 클라이언트에 반환하거나 다른 처리를 수행할 수 있습니다.
예시 코드
public class CustomAuthenticationFilter extends AbstractAuthenticationProcessingFilter {

    public CustomAuthenticationFilter(String defaultFilterProcessesUrl) {
        super(defaultFilterProcessesUrl);
    }

    @Override
    public Authentication attemptAuthentication(HttpServletRequest request, HttpServletResponse response)
            throws AuthenticationException, IOException, ServletException {
        String username = request.getParameter("username");
        String password = request.getParameter("password");

        UsernamePasswordAuthenticationToken authRequest = new UsernamePasswordAuthenticationToken(username, password);
        return this.getAuthenticationManager().authenticate(authRequest);
    }
}
위 예제에서는 CustomAuthenticationFilter가 특정 URL로 들어오는 요청을 가로채고, attemptAuthentication 메서드를 통해 사용자의 자격 증명을 받아 인증을 수행합니다. defaultFilterProcessesUrl로 설정된 URL로 요청이 들어오면 필터가 작동하여 인증을 시도합니다.
요약
- AbstractAuthenticationProcessingFilter는 Spring Security에서 특정 URL 패턴에 대해 사용자의 자격 증명을 인증하는 필터의 기본 클래스입니다.
- AuthenticationEntryPoint가 먼저 자격 증명을 요청하고, 이후 AbstractAuthenticationProcessingFilter가 이를 받아 인증을 처리합니다.
- 인증에 성공하면 SecurityContextHolder에 인증된 Authentication 객체가 저장되며, 애플리케이션의 다른 부분에서도 사용자의 인증 상태를 참조할 수 있게 됩니다.
-
사용자가 자격 증명을 제출하면, AbstractAuthenticationProcessingFilter는 인증을 위해 HttpServletRequest에서 Authentication 객체를 생성합니다. 생성되는 Authentication 객체의 유형은 AbstractAuthenticationProcessingFilter의 하위 클래스에 따라 다릅니다. 예를 들어, UsernamePasswordAuthenticationFilter는 HttpServletRequest에서 제출된 사용자 이름과 비밀번호를 사용해 UsernamePasswordAuthenticationToken을 생성합니다.
-
다음으로, 생성된 Authentication 객체가 AuthenticationManager로 전달되어 인증을 수행합니다.
-
인증이 실패한 경우, Failure 절차가 진행됩니다.
- SecurityContextHolder가 초기화됩니다.
- RememberMeServices.loginFail이 호출됩니다. Remember me가 설정되지 않았다면 아무 작업도 수행되지 않습니다. 자세한 내용은 rememberme 패키지를 참조하세요.
- AuthenticationFailureHandler가 호출됩니다. 자세한 내용은 AuthenticationFailureHandler 인터페이스를 참조하세요.
-
인증에 성공한 경우, Success 절차가 진행됩니다.
- SessionAuthenticationStrategy가 새로운 로그인에 대해 알림을 받습니다. 자세한 내용은 SessionAuthenticationStrategy 인터페이스를 참조하세요.
- Authentication 객체가 SecurityContextHolder에 설정됩니다. 이후 요청에 SecurityContext가 자동으로 설정되도록 저장하려면 SecurityContextRepository#saveContext를 명시적으로 호출해야 합니다. 자세한 내용은 SecurityContextHolderFilter 클래스를 참조하세요.
- RememberMeServices.loginSuccess가 호출됩니다. Remember me가 설정되지 않았다면 아무 작업도 수행되지 않습니다. 자세한 내용은 rememberme 패키지를 참조하세요.
- ApplicationEventPublisher가 InteractiveAuthenticationSuccessEvent를 발행합니다.
- AuthenticationSuccessHandler가 호출됩니다. 자세한 내용은 AuthenticationSuccessHandler 인터페이스를 참조하세요.