[수업목표]
- 서버와 클라이언트의 역할에 대해 이해한다.
- HTML, CSS의 기초 지식을 이해한다. 부트스트랩을 가져다 쓸 줄 안다!
- Javascript 기초 문법을 익힌다.
1. 서버/클라이언트/웹의 동작 개념
(1)웹의 동작 개념 (HTML을 받는 경우)
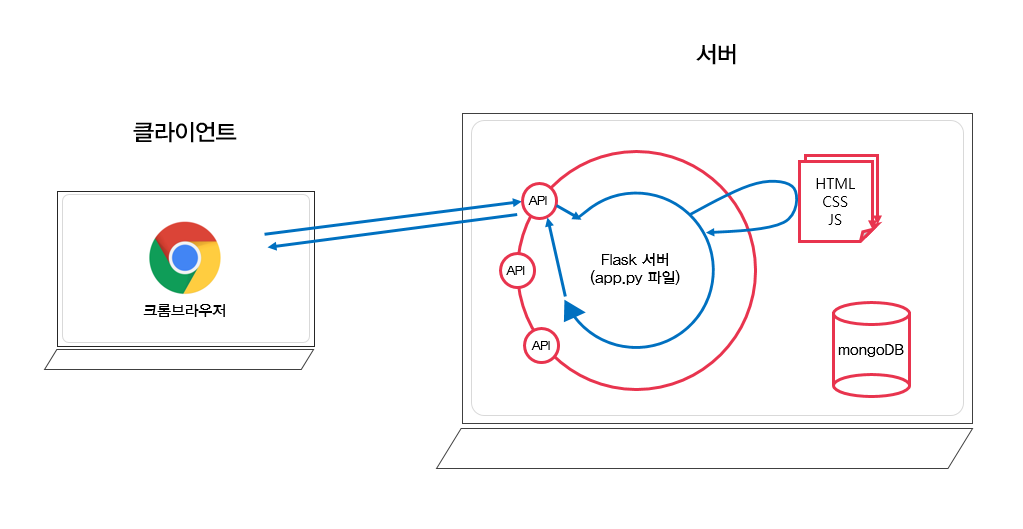
: 우리가 보는 웹페이지는 모두 서버에서 미리 준비해두었던 것을 "받아서","그려 주는" 것이다.
즉, 브라우저가 하는 일은
1) 요청을 보낸다.
(서버가 만들어 놓은 "API"라는 창구에 미리 정해진 약속대로 요청을 보내는 것)
    예) https://naver.com/
	→  "naver.com"이라는 이름의 서버에 있는, "/" 창구에 요청을 보낸 것
2) 받은 HTML 파일을 그려준다.

(2)웹의 동작 개념 (데이터만 받는 경우)
:그럼 항상 이렇게 HTML만 내려주는걸까? 데이터만 내려 줄 때가 더 많다.
 사실 HTML도 줄글로 쓰면 이게 다 '데이터'.

예) 공연 티켓을 예매하고 있는 상황을 상상해봅시다!
좌석이 차고 꺼질때마다 보던 페이지가 리프레시 되면 난감하겠죠ㅠ?

이럴 때! 데이터만 받아서 받아 끼우게 된답니다..png)
:데이터만 내려올 경우는,
이런 생김새를 JSON 형식이라고 한다.
.png)
2.HTML, CSS 기본 내용
1.HTML
(1)HTML과 CSS의 개념
- HTML은 뼈대, CSS는 꾸미기!
: HTML은 구역과 텍스트를 나타내는 코드로, CSS는 잡은 구역을 꾸며주는 것으로 생각 하자. HTML 내 style 속성으로 꾸미기를 할 수 있지만, 이것을 한데 모아 볼 수 있는 CSS 파일이 탄생하게 되었으니, HTML 코드 내에 CSS 파일을 불러와서 적용한다. - 또한 CSS를 잘 사용할 줄 아는 것과, '예쁘게' 만드는 것은 다른 영역
(2)HTML 기초
-
HTML은 크게 head와 body로 구성되며, head안에는 페이지의 속성 정보를, body안에는 페이지의 내용을 담는다.
-
head 안에 들어가는 대표적인 요소들: meta, script, link, title 등
(페이지의 속성을 정의하거나, 필요한 스크립트들을 부른다. 즉, 눈에 안 보이는 필요한 것들을 담는 것 ) -
body 안에 들어가는 대표적인 요소들
<!DOCTYPE html>
<html lang="en">

<head>
   <meta charset="UTF-8">
   <meta name="viewport" content="width=device-width, initial-scale=1.0">
   <title>스파르타코딩클럽 | HTML 기초</title>
</head>

 <body>
   <!-- 구역을 나누는 태그들 -->
   <div>나는 구역을 나누죠</div>
   <p>나는 문단이에요</p>
   <ul>
       <li> bullet point!1 </li>
       <li> bullet point!2 </li>
   </ul>

   <!-- 구역 내 콘텐츠 태그들 -->
   <h1>h1은 제목을 나타내는 태그입니다. 페이지마다 하나씩 꼭 써주는 게 좋아요. 그래야 구글 검색이 잘 되거든요.</h1>
   <h2>h2는 소제목입니다.</h2>
   <h3>h3~h6도 각자의 역할이 있죠. 비중은 작지만..</h3>
   <hr>
   span 태그입니다: 특정 <span style="color:red">글자</span>를 꾸밀 때 써요
   <hr>
   a 태그입니다: <a href="http://naver.com/"> 하이퍼링크 </a>
   <hr>
   img 태그입니다: <img src="https://www.google.com/images/branding/googlelogo/1x/googlelogo_color_272x92dp.png" />
   <hr>
   input 태그입니다: <input type="text" />
   <hr>
   button 태그입니다: <button> 버튼입니다</button>
   <hr>
   textarea 태그입니다: <textarea>나는 무엇일까요?</textarea>
 </body>

 </html>
Pycharm에서 자동정렬 단축키
- Windows: Ctrl + Alt + L
- macOS: option + command + L
(3)HTML 부모-자식 구조 살펴보기
- html 태그는, "누가 누구 안에 있느냐"를 이해하는 것이 가장 중요하다. 나를 감싸고 있는 태그가 바뀌면, 그 안의 내용물도 모두 영향을 받는다
빨간색 div 안에, 초록색/파란색 div가 들어있다. 아래와 같은 상황에서 빨간색 div를 가운데로 옮기면, 내용물인 초록/파란 div도 모두 함께 이동!
즉, 박스를 옮기면 안의 내용물도 함께 옮겨지는 것과 같은 원리!
같은 원리로, 초록 div의 글씨색을 바꾸면, 나는버튼1의 글씨색도 바뀐다!
.png)
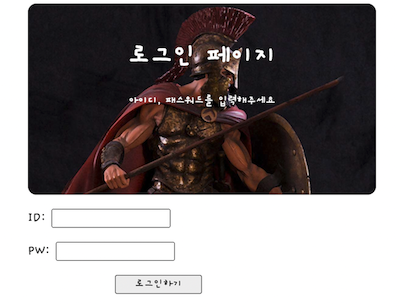
Q1.간단한 로그인 페이지 만들기

<!DOCTYPE html>
<html lang="en">
<head>
    <meta charset="UTF-8">
    <title>로그인페이지</title>
    <link href="https://fonts.googleapis.com/css2?family=Gaegu&display=swap" rel="stylesheet">
    <style>
        * {
            font-family: 'Gaegu', cursive;
        }
       .mytitle {
         background-color:  blue;
         width: 400px;
         height: 200px;

         color: white;
         text-align: center;

         background-image: url("https://www.ancient-origins.net/sites/default/files/field/image/Agesilaus-II-cover.jpg");
         background-size: cover;
         background-position: center;

         border-radius: 10px;

         padding-top: 20px;
       }
        .wrap {

            width: 300px;
            margin: auto;

        }
        .mybtn {
            width: 100px;
            margin: auto;
            display: block;
        }

    </style>

</head>
<body>
    <div class="wrap">
        <div class="mytitle">
          <h1 >로그인 페이지</h1>
          <h5>아이디, 패스워드를 입력해주세요</h5>
        </div>

          <p>ID: <input type="text" /></p>
          <p>PW: <input type="text" /></p>
          <button class="mybtn">로그인하기</button>
    </div>
</body>
</html>
2.CSS
-
CSS는 어떻게 사용?
:<head> ~ </head> 안에 <style> ~ </style>로 공간을 만들어 작성한다.예) mytitle라는 클래스를 가리킬 때, .mytitle { ... } 라고 써줘야 하는 것을 꼭! 기억!
-
자주 쓰이는 CSS
배경관련
background-color
background-image
background-size
background-position
사이즈
width
height
폰트
font-size
font-weight
font-famliy
color
border-radius
간격
margin
padding
(margin은 바깥 여백, padding은 내 안쪽 여백) -
CSS 파일 분리
<!-- style.css 파일을 같은 폴더에 만들고, head 태그에서 불러오기 -->
<link rel="stylesheet" type="text/css" href = "(css파일이름).css">
3.bootstrap
- 부트스트랩이란?
예쁜 CSS를 미리 모아둔 것 (CSS를 다룰 줄 아는 것과, 미적 감각을 발휘하여 예쁘게 만드는 것은 다른 이야기이기 때문에, 현업에서는 미리 완성된 부트스트랩을 가져다 쓰는 경우가 많다.) - bootstrap - 시작 템플릿
<!doctype html>
<html lang="en">

<head>
    <!-- Required meta tags -->
    <meta charset="utf-8">
    <meta name="viewport" content="width=device-width, initial-scale=1, shrink-to-fit=no">

    <!-- Bootstrap CSS -->
    <link rel="stylesheet" href="https://maxcdn.bootstrapcdn.com/bootstrap/4.0.0/css/bootstrap.min.css"
        integrity="sha384-Gn5384xqQ1aoWXA+058RXPxPg6fy4IWvTNh0E263XmFcJlSAwiGgFAW/dAiS6JXm" crossorigin="anonymous">

    <!-- Optional JavaScript -->
    <!-- jQuery first, then Popper.js, then Bootstrap JS -->
    <script src="https://ajax.googleapis.com/ajax/libs/jquery/3.5.1/jquery.min.js"></script>
    <script src="https://cdnjs.cloudflare.com/ajax/libs/popper.js/1.12.9/umd/popper.min.js"
        integrity="sha384-ApNbgh9B+Y1QKtv3Rn7W3mgPxhU9K/ScQsAP7hUibX39j7fakFPskvXusvfa0b4Q"
        crossorigin="anonymous"></script>
    <script src="https://maxcdn.bootstrapcdn.com/bootstrap/4.0.0/js/bootstrap.min.js"
        integrity="sha384-JZR6Spejh4U02d8jOt6vLEHfe/JQGiRRSQQxSfFWpi1MquVdAyjUar5+76PVCmYl"
        crossorigin="anonymous"></script>

    <title>스파르타코딩클럽 | 부트스트랩 연습하기</title>
</head>

<body>
    <h1>이걸로 시작해보죠!</h1>
</body>

</html>- 부트스트랩 컴포넌트 4.0
부트스트랩 컴포넌트 4.0
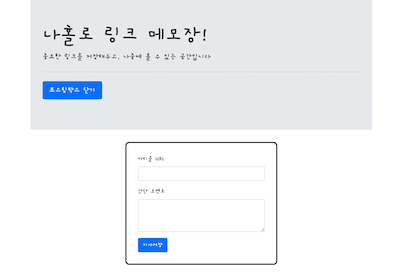
Q1.나홀로 메모장(포스팅 박스) 만들기

3.Javascript
(1)자바스크립트 - HTML 연결
<head> ~ </head>안에<script> ~ </script>로 공간을 만들어 작성한다.
<script> ~ </script>내에 자바스크립트를 작성하는 것
.png)
- 버튼에 함수를 연결하기. 버튼을 누르면 함수가 불린다.
<button onclick="hey()" type="button" class="btn btn-primary">기사저장</button>1주차 과제
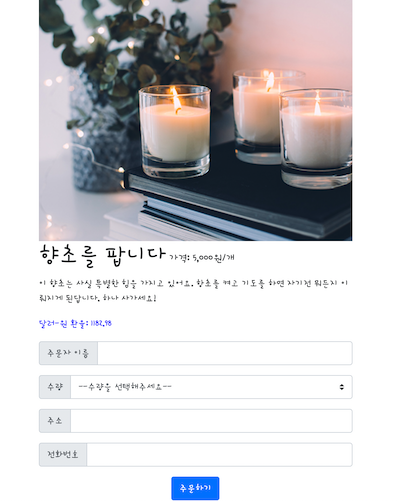
- 부트스트랩 또는 템플릿을 활용해서 나만의쇼핑몰의 메인 페이지를 완성하기

<!doctype html>
<html lang="en">

<head>
    <!-- Required meta tags -->
    <meta charset="utf-8">
    <meta name="viewport" content="width=device-width, initial-scale=1, shrink-to-fit=no">

    <!-- Bootstrap CSS -->
    <link rel="stylesheet" href="https://maxcdn.bootstrapcdn.com/bootstrap/4.0.0/css/bootstrap.min.css"
          integrity="sha384-Gn5384xqQ1aoWXA+058RXPxPg6fy4IWvTNh0E263XmFcJlSAwiGgFAW/dAiS6JXm" crossorigin="anonymous">

    <!-- Optional JavaScript -->
    <!-- jQuery first, then Popper.js, then Bootstrap JS -->
    <script src="https://ajax.googleapis.com/ajax/libs/jquery/3.5.1/jquery.min.js"></script>
    <script src="https://cdnjs.cloudflare.com/ajax/libs/popper.js/1.12.9/umd/popper.min.js"
            integrity="sha384-ApNbgh9B+Y1QKtv3Rn7W3mgPxhU9K/ScQsAP7hUibX39j7fakFPskvXusvfa0b4Q"
            crossorigin="anonymous"></script>
    <script src="https://maxcdn.bootstrapcdn.com/bootstrap/4.0.0/js/bootstrap.min.js"
            integrity="sha384-JZR6Spejh4U02d8jOt6vLEHfe/JQGiRRSQQxSfFWpi1MquVdAyjUar5+76PVCmYl"
            crossorigin="anonymous"></script>

    <title>스파르타코딩클럽 | 부트스트랩 연습하기</title>
    <link href="https://fonts.googleapis.com/css2?family=Dongle:wght@700&family=Gaegu:wght@400;700&family=Hi+Melody&display=swap" rel="stylesheet">
    <style>
        *{
            font-family: 'Hi Melody', cursive;
        }
        .wrap {
            width: 500px;
            margin: auto;
        }

        .image {
            width: 500px;
            height: 400px;

            background-image: url("https://thumb.mt.co.kr/06/2018/07/2018070411134940004_1.jpg");
            background-position: center;
            background-size: cover;
        }
        .mybtn {
            margin: auto;
            display: block;
        }

    </style>

</head>

<body>
<div class="wrap">
    <div class="image"></div>
    <div class="item">
        <h1>향초를 팝니다<span style="font-size:18px"> 가격: 5,000원/개</span></h1>
        <p>이 향초는 사실 특별한 힘을 가지고 있어요. 항초를 켜고 기도를 하면 자기전 뭐든지 이뤄지게 된답니다. 하나 사가세요!</p>
    </div>

    <div class="order">
        <div class="input-group mb-3">
            <div class="input-group-prepend">
                <span class="input-group-text" >주문자 이름</span>
            </div>
            <input type="text" class="form-control" placeholder="" aria-label="Username"
                   aria-describedby="basic-addon1">
        </div>
        <div class="input-group mb-3">
            <div class="input-group-prepend">
                <label class="input-group-text" for="inputGroupSelect01"> 수량 </label>
            </div>
            <select class="custom-select" id="inputGroupSelect01">
                <option selected>--수량을 선택해주세요--</option>
                <option value="1">One</option>
                <option value="2">Two</option>
                <option value="3">Three</option>
            </select>
        </div>
        <div class="input-group mb-3">
            <div class="input-group-prepend">
                <span class="input-group-text" >주소</span>
            </div>
            <input type="text" class="form-control" placeholder="" aria-label="Username"
                   aria-describedby="basic-addon1">
        </div>
        <div class="input-group mb-3">
            <div class="input-group-prepend">
                <span class="input-group-text" id="basic-addon1">전화번호</span>
            </div>
            <input type="text" class="form-control" placeholder="" aria-label="Username"
                   aria-describedby="basic-addon1">
        </div>
        <button type="button" class="btn btn-primary mybtn">주문하기</button>
    </div>
</div>
</body>

</html>