초기 기본 셋팅
-
cp env-example-relational .env: 샘플 env 를 복사 -
복사한 env 에서 아래 두 값을 환경에 맞게 변경한다. 이때 로컬에서 할것이기 떄문에 아래와 같이 변경했다.
DATABASE_HOST=postgres→DATABASE_HOST=localhost- Change
MAIL_HOST=maildev→MAIL_HOST=localhost
-
docker 컨테이너를 실행한다.
docker compose up -d postgres maildev -
의존성 설치
npm install -
Run app configuration
You should run this command only the first time on initialization of your project, all next time skip it.
If you want to contribute to the boilerplate, you should NOT run this command.
npm run app:config나는 여기서 Facebook 만 No 로하고 나머지는 Yes 으로 했다. (사유: No 인 경우 어떻게 되는지 궁금해서)
-
Run migrations
npm run migration:run -
Run seeds
npm run seed:run:relational -
Run app in dev mode
npm run start:dev -
Open http://localhost:3000/docs
이렇게 셋팅하고 swagger 를 열게되면 다음과 같다.
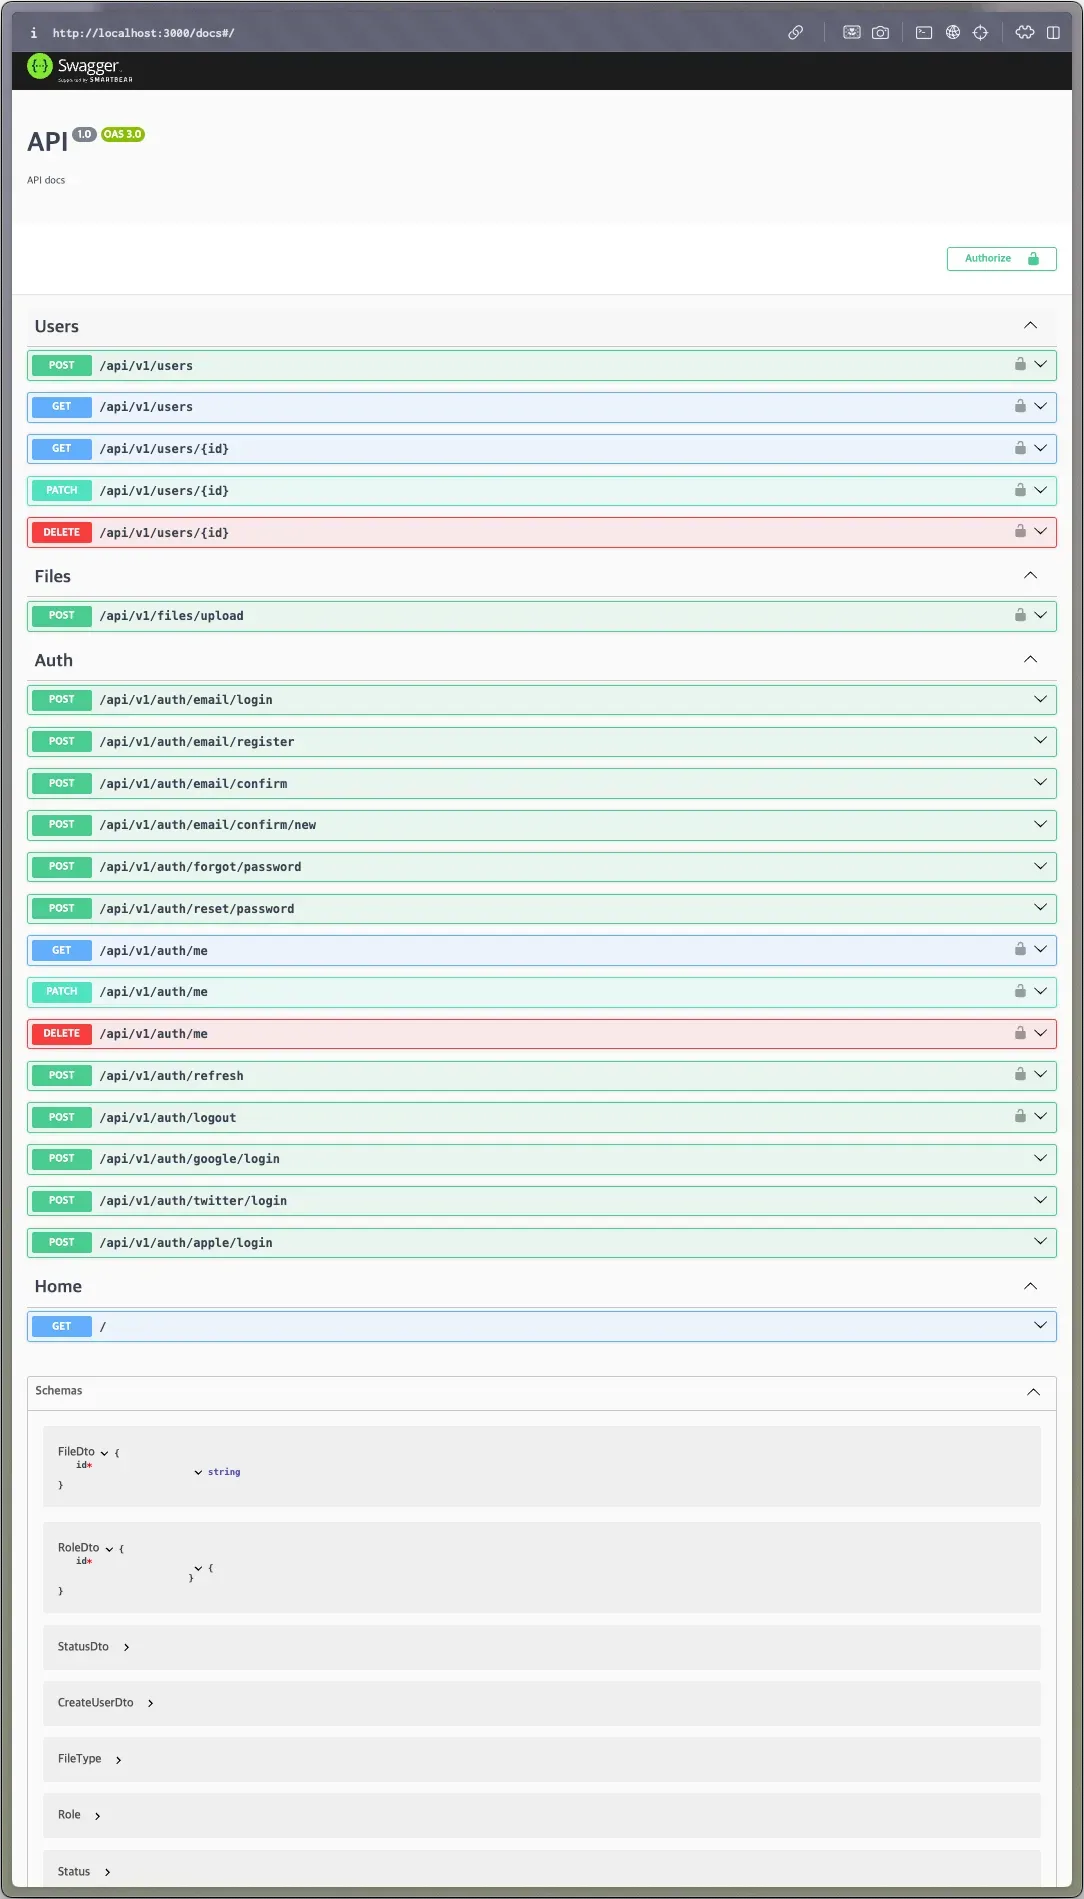
자 이제 실행 흐름에 대해서 분석해보자.
실행 명령어들 분석
앞에 기본적인 셋팅 (1번 ~ 4번 과정)은 건너뛰고 5번 부분 (npm run app:config) 부분부터 분석해보자. (사유: 1번 ~ 4번은 분석할 거리가 없음)
npm run app:config 흐름 분석
package.json 파일을 보면 npm run app:config 스크립트는 아래와 같이 정의되어있다.
"app:config": "ts-node -r tsconfig-paths/register ./.install-scripts/index.ts && npm install && npm run lint -- --fix"
위 스크립트를 보면 .install-scripts/index.ts 파일을 직접 실행한다. 자 여기서 tsconfig-paths/register 은 뭔가?
tsconfig-path/register란tsconfig-paths/register는 TypeScript 프로젝트에서 경로 별칭(path aliases)을 실행 시점에 해석할 수 있게 해주는 도구이다. 주요 기능:-
tsconfig.json에 정의된 경로 별칭을 런타임에서 사용 가능하게 함 -
절대 경로 임포트를 가능하게 함
예를 들어, tsconfig.json에서 다음과 같이 경로를 설정했다면:
{
  "compilerOptions": {
    "baseUrl": ".",
    "paths": {
      "@/*": ["src/*"],
      "@core/*": ["src/core/*"],
      "@shared/*": ["src/shared/*"]
    }
  }
}
코드에서 다음과 같이 임포트할 수 있습니다:
// 이렇게 상대 경로 대신
import { Something } from '../../../core/something';

// 이렇게 별칭을 사용할 수 있음
import { Something } from '@core/something';
ts-node -r tsconfig-paths/register는: -
ts-node로 TypeScript 파일을 직접 실행 -
r tsconfig-paths/register로 경로 별칭을 런타임에 등록이를 통해 빌드 없이 개발 시에도 경로 별칭을 사용할 수 있습니다.
-
자 이제 .install-scripts/index.ts 파일을 분석해보자.
import 부분을 보자
import prompts from 'prompts';
import removeFacebookAuth from './scripts/remove-auth-facebook';
import removeGoogleAuth from './scripts/remove-auth-google';
import removeAppleAuth from './scripts/remove-auth-apple';
import removeTwitterAuth from './scripts/remove-auth-twitter';
import removeInstallScripts from './scripts/remove-install-scripts';
import removePostgreSql from './scripts/remove-postgresql';
import removeMongoDb from './scripts/remove-mongodb';
import removeRelationalResourceGeneration from './scripts/resource-generation-scripts/remove-relational';
import removeDocumentResourceGeneration from './scripts/resource-generation-scripts/remove-document';
import removeAllDbResourceGeneration from './scripts/resource-generation-scripts/remove-all-db';
import removeAllDbPropertyGeneration from './scripts/property-generation-scripts/remove-all-db';
import removeDocumentPropertyGeneration from './scripts/property-generation-scripts/remove-document';
import removeRelationalPropertyGeneration from './scripts/property-generation-scripts/remove-relational';
import 를 쭉 보니 기존 셋팅되어있는 인증 관련 파일들 중에서 삭제하는 로직들이 들어있는것으로 추측된다. 근데 여기서 처음 보는 모듈이 있는데 바로 prompts 이다.
- https://www.npmjs.com/package/prompt
- Node.js에서 사용하는 대화형 커맨드라인 인터페이스(CLI) 라이브러리입니다. 사용자로부터 터미널에서 입력을 받을 수 있는 다양한 프롬프트 타입을 제공한다.
소스코드를 분석해보면 다음과 같이 mermaid 를 작성할 수 있다.
flowchart TD
    A[시작] --> B[데이터베이스 선택]
    B --> C{선택한 DB?}

    C -->|PostgreSQL + MongoDB| D[리소스 생성기 제거]
    C -->|MongoDB| E[PostgreSQL 제거]
    C -->|PostgreSQL| F[MongoDB 제거]

    D --> G[소셜 인증 설정]
    E --> G
    F --> G

    G --> H{Facebook 인증}
    H -->|No| I[Facebook 인증 제거]
    H -->|Yes| J{Google 인증}
    I --> J

    J -->|No| K[Google 인증 제거]
    J -->|Yes| L{Twitter 인증}
    K --> L

    L -->|No| M[Twitter 인증 제거]
    L -->|Yes| N{Apple 인증}
    M --> N

    N -->|No| O[Apple 인증 제거]
    N -->|Yes| P[설치 스크립트 제거]
    O --> P

    P --> Q[종료]
구조를 알았으니 일단 어떻게 내가 선택한것 외의 다른 필요 없는 파일을 삭제하는지 코드를 봐보자. 나는 postgresql 을 선택했기 때문에 mongodb 제거 부분의 함수들을 보자.
// MongoDB 관련 코드 전체 제거
removeMongoDb();

// MongoDB 문서 리소스 생성 관련 템플릿 제거
removeDocumentResourceGeneration();

// MongoDB 문서 속성 생성 관련 템플릿 제거
removeDocumentPropertyGeneration();

// 양쪽 DB 모두를 위한 리소스 생성 템플릿 제거
removeAllDbResourceGeneration();

// 양쪽 DB 모두를 위한 속성 생성 템플릿 제거
removeAllDbPropertyGeneration();
위 함수명을 보니 MongoDB 를 삭제하면서 관련 document 기반 DB 정보들을 모두 삭제하는 것으로 보인다.
removeMongoDb: 거의 shell script 처럼 되어있다. 관련 파일들 일일히 삭제하고.. 내부 코드 replace 시켜준다. replace 일부 코드는 다음과 같다
이걸 보고 든 생각이.. 파일 구조를 처음에 잘 잡아놔서 이런 스크립트여도 꽤 괜찮게 보이긴 하지만..처음 만들때는 귀찮고 테스트 많이 했겠다 싶은 생각이 든다.. (일일히 하나씩 바꾸기 때문에 누락된 부분이 테스트 하면서 존재했을지도..)replace({ path: path.join(process.cwd(), 'src', 'app.module.ts'), actions: [ { find: /\/\/ <database-block>.*\/\/ <\/database-block>/gs, replace: `const infrastructureDatabaseModule = TypeOrmModule.forRootAsync({ useClass: TypeOrmConfigService, dataSourceFactory: async (options: DataSourceOptions) => { return new DataSource(options).initialize(); }, });`, }, { find: /\s*import \{ MongooseModule \} from .*/g, replace: '', }, { find: /\s*import \{ MongooseConfigService \} from .*/g, replace: '', }, { find: /\s*import \{ DatabaseConfig \} from .*/g, replace: '', }, ], }); ... filesToRemove.map((file) => { fs.rmSync(file, { recursive: true, force: true, }); });
- 템플릿 제거
위 함수들 중에서// MongoDB 문서 리소스 생성 관련 템플릿 제거 removeDocumentResourceGeneration(); // MongoDB 문서 속성 생성 관련 템플릿 제거 removeDocumentPropertyGeneration(); // 양쪽 DB 모두를 위한 리소스 생성 템플릿 제거 removeAllDbResourceGeneration(); // 양쪽 DB 모두를 위한 속성 생성 템플릿 제거 removeAllDbPropertyGeneration();removeDocumentResourceGeneration함수를 예시로 살펴보자. 다른 함수들도 로직은 동일하기 때문! 이 함수는 아래 두 역할을 한다.-
.hygen/generate/document-resource/디렉토리의 템플릿 제거 -
MongoDB 문서 생성을 위한 생성기 제거
자 여기서 .hygen 이 뭘까?
-
generate/document-resource/module.ejs.t--- to: src/<%= h.inflection.transform(name, ['pluralize', 'underscore', 'dasherize']) %>/<%= h.inflection.transform(name, ['pluralize', 'underscore', 'dasherize']) %>.module.ts --- import { Module } from '@nestjs/common'; import { <%= h.inflection.transform(name, ['pluralize']) %>Service } from './<%= h.inflection.transform(name, ['pluralize', 'underscore', 'dasherize']) %>.service'; import { <%= h.inflection.transform(name, ['pluralize']) %>Controller } from './<%= h.inflection.transform(name, ['pluralize', 'underscore', 'dasherize']) %>.controller'; import { Document<%= name %>PersistenceModule } from './infrastructure/persistence/document/document-persistence.module'; @Module({ imports: [ // import modules, etc. Document<%= name %>PersistenceModule, ], controllers: [<%= h.inflection.transform(name, ['pluralize']) %>Controller], providers: [<%= h.inflection.transform(name, ['pluralize']) %>Service], exports: [<%= h.inflection.transform(name, ['pluralize']) %>Service, Document<%= name %>PersistenceModule], }) export class <%= h.inflection.transform(name, ['pluralize']) %>Module {} -
해석
이 파일은 Hygen 템플릿으로, MongoDB 리소스의 모듈 파일을 자동 생성하는 템플릿입니다. 상세 분석해보겠습니다:

```tsx
---
to: src/<%= h.inflection.transform(name, ['pluralize', 'underscore', 'dasherize']) %>/<%= h.inflection.transform(name, ['pluralize', 'underscore', 'dasherize']) %>.module.ts
---

```

첫 부분은 Hygen 메타데이터:

- `to:` - 생성될 파일의 경로를 지정
- `h.inflection.transform()` - 문자열 변환 유틸리티
    - `pluralize`: 복수형으로 변환 (예: user → users)
    - `underscore`: 카멜케이스를 언더스코어로 변환 (예: userName → user_name)
    - `dasherize`: 언더스코어를 대시로 변환 (예: user_name → user-name)

예를 들어 `name: "User"`를 입력하면:

```
src/users/users.module.ts
```

경로에 파일이 생성됩니다.

```tsx
@Module({
  imports: [
    Document<%= name %>PersistenceModule,
  ],
  controllers: [<%= h.inflection.transform(name, ['pluralize']) %>Controller],
  providers: [<%= h.inflection.transform(name, ['pluralize']) %>Service],
  exports: [<%= h.inflection.transform(name, ['pluralize']) %>Service, Document<%= name %>PersistenceModule],
})
export class <%= h.inflection.transform(name, ['pluralize']) %>Module {}

```

이 부분은 NestJS 모듈 생성:

- `name: "User"`인 경우 다음과 같이 변환:

    ```tsx
    @Module({
      imports: [
        DocumentUserPersistenceModule,
      ],
      controllers: [UsersController],
      providers: [UsersService],
      exports: [UsersService, DocumentUserPersistenceModule],
    })
    export class UsersModule {}

    ```
결국 코드는 간단하다.
const removeDocumentResourceGeneration = async () => {
  const filesToRemove = [
    path.join(process.cwd(), '.hygen', 'generate', 'document-resource'),
  ];

  replace({
    path: path.join(process.cwd(), 'package.json'),
    actions: [
      {
        find: /\s*\"generate:resource:document\":.*/g,
        replace: '',
      },
      {
        find: /\s*\"postgenerate:resource:document\":.*/g,
        replace: '',
      },
    ],
  });

  filesToRemove.map((file) => {
    fs.rmSync(file, {
      recursive: true,
      force: true,
    });
  });
};
코드 보면
.hygen파일 삭제하고package.json파일의 관련 스크립트를replace시킨다.
-
- 인증 코드 삭제
prompt으로 나는 Facebook 을 사용하지 않는 설정을 넣었다. 함수는removeFacebookAuth이다. 내부 코드 자체는 역시 별거 없었다. replace 으로app.module.ts, package.json, config.type.ts파일에 관련 코드들을 삭제하는 것이다.import replace from '../helpers/replace'; import path from 'path'; import fs from 'fs'; const removeFacebookAuth = async () => { replace({ path: path.join(process.cwd(), 'src', 'app.module.ts'), actions: [ { find: /\s*AuthFacebookModule\,.*/g, replace: '', }, { find: /\s*facebookConfig\,.*/g, replace: '', }, { find: /\s*import \{ AuthFacebookModule \} from '\.\/auth\-facebook\/auth\-facebook\.module'\;.*/g, replace: '', }, { find: /\s*import facebookConfig from '\.\/auth\-facebook\/config\/facebook\.config'\;.*/g, replace: '', }, ], }); replace({ path: path.join(process.cwd(), 'package.json'), actions: [ { find: /\s*\"fb\":.*/g, replace: '', }, { find: /\s*\"@types\/facebook\-js\-sdk\":.*/g, replace: '', }, ], }); replace({ path: path.join(process.cwd(), 'src', 'config', 'config.type.ts'), actions: [ { find: /\s*facebook\: FacebookConfig.*/g, replace: '', }, { find: /\s*import \{ FacebookConfig \}.*/g, replace: '', }, ], }); fs.rmSync(path.join(process.cwd(), 'src', 'auth-facebook'), { recursive: true, force: true, }); }; export default removeFacebookAuth; app:config스크립트 삭제 .install-scripts 파일과 package.json 의 스크립트를 삭제한다.
처음 셋팅할때의 npm run app:config 에서는 셋팅에 필요한 파일과 코드, 스크립트만 남기는 스크립트인것이다. 확실히 구조를 처음부터 잘 잡아놓아져 있어서 그런지 명확한 replace와 파일 삭제 만으로도 가능하구나 라는 생각이 들었다.
npm run migration:run
package.json:"npm run typeorm -- --dataSource=src/database/data-source.ts migration:run"
위와 같이 정의 되어져 있다. data-source.ts 파일은 어떻게 되어있을까?
import 'reflect-metadata';
import { DataSource, DataSourceOptions } from 'typeorm';

export const AppDataSource = new DataSource({
  type: process.env.DATABASE_TYPE,
  url: process.env.DATABASE_URL,
  host: process.env.DATABASE_HOST,
  port: process.env.DATABASE_PORT
    ? parseInt(process.env.DATABASE_PORT, 10)
    : 5432,
  username: process.env.DATABASE_USERNAME,
  password: process.env.DATABASE_PASSWORD,
  database: process.env.DATABASE_NAME,
  synchronize: process.env.DATABASE_SYNCHRONIZE === 'true',
  dropSchema: false,
  keepConnectionAlive: true,
  logging: process.env.NODE_ENV !== 'production',
  entities: [__dirname + '/../**/*.entity{.ts,.js}'],
  migrations: [__dirname + '/migrations/**/*{.ts,.js}'],
  cli: {
    entitiesDir: 'src',

    subscribersDir: 'subscriber',
  },
  extra: {
    // based on https://node-postgres.com/api/pool
    // max connection pool size
    max: process.env.DATABASE_MAX_CONNECTIONS
      ? parseInt(process.env.DATABASE_MAX_CONNECTIONS, 10)
      : 100,
    ssl:
      process.env.DATABASE_SSL_ENABLED === 'true'
        ? {
            rejectUnauthorized:
              process.env.DATABASE_REJECT_UNAUTHORIZED === 'true',
            ca: process.env.DATABASE_CA ?? undefined,
            key: process.env.DATABASE_KEY ?? undefined,
            cert: process.env.DATABASE_CERT ?? undefined,
          }
        : undefined,
  },
} as DataSourceOptions);
소스코드에서는 특별한 점은 없었다. 그리고 migration 또한 특별한 것은 없었으며 실행하면 아래와 같은 구조를 가진다.
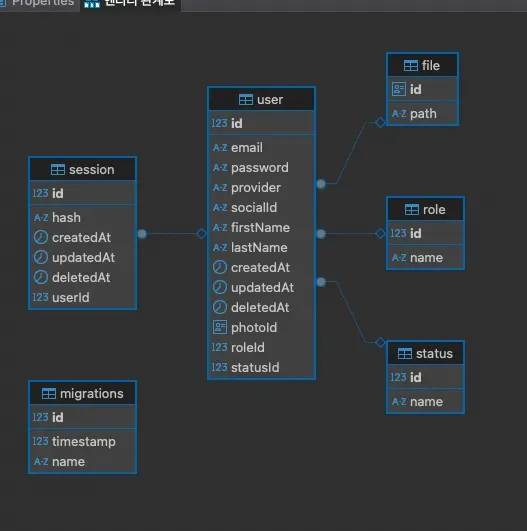
내가 배워야 할 점은 폴더 구조로 보인다.
// src/database 폴더 하위
├── config
│   ├── database-config.type.ts
│   └── database.config.ts
├── data-source.ts
├── migrations
│   └── 1715028537217-CreateUser.ts
├── seeds
│   └── relational
│       ├── role
│       │   ├── role-seed.module.ts
│       │   └── role-seed.service.ts
│       ├── run-seed.ts
│       ├── seed.module.ts
│       ├── status
│       │   ├── status-seed.module.ts
│       │   └── status-seed.service.ts
│       └── user
│           ├── user-seed.module.ts
│           └── user-seed.service.ts
└── typeorm-config.service.ts
이렇게 폴더 구조를 가져가니까 DB 관련 설정과 seed 를 모두 깔끔하게 관리 할 수 있어 보인다.
npm run seed:run:relational
package.json: "ts-node -r tsconfig-paths/register ./src/database/seeds/relational/run-seed.ts"
오 src/database 폴더 하위에 있는 run-seed.ts 를 실행하는 것으로 보인다. DB 모듈에 대한 구조는 다음과 같다.
graph TD
    A[NestJS Application] --> B[Database Module]

    B --> F[TypeORM Config]
    B --> G[Seeds]
    B --> H[Migrations]

    G --> I[Relational Seeds]
    G --> J[Document Seeds]

    I --> K[Role Seed]
    I --> L[Status Seed]
    I --> M[User Seed]

    subgraph "Database Configurations"
        F --> Q[database.config.ts]
        F --> R[typeorm-config.service.ts]
        F --> S[data-source.ts]
    end
자 그럼 소스코드를 한번 보자. run-seed.ts 코드는 다음과 같다.
import { NestFactory } from '@nestjs/core';
import { RoleSeedService } from './role/role-seed.service';
import { SeedModule } from './seed.module';
import { StatusSeedService } from './status/status-seed.service';
import { UserSeedService } from './user/user-seed.service';

const runSeed = async () => {
  const app = await NestFactory.create(SeedModule);

  // run
  await app.get(RoleSeedService).run();
  await app.get(StatusSeedService).run();
  await app.get(UserSeedService).run();

  await app.close();
};

void runSeed();
Role, Status, User 에 대한 seeding 서비스를 실행하는구나를 볼 수 있다.
- Role
// role-seed.module.ts import { Module } from '@nestjs/common'; import { TypeOrmModule } from '@nestjs/typeorm'; import { RoleSeedService } from './role-seed.service'; import { RoleEntity } from '../../../../roles/infrastructure/persistence/relational/entities/role.entity'; @Module({ imports: [TypeOrmModule.forFeature([RoleEntity])], providers: [RoleSeedService], exports: [RoleSeedService], }) export class RoleSeedModule {} // role-seed.service.ts import { Injectable } from '@nestjs/common'; import { InjectRepository } from '@nestjs/typeorm'; import { Repository } from 'typeorm'; import { RoleEntity } from '../../../../roles/infrastructure/persistence/relational/entities/role.entity'; import { RoleEnum } from '../../../../roles/roles.enum'; @Injectable() export class RoleSeedService { constructor( @InjectRepository(RoleEntity) private repository: Repository<RoleEntity>, ) {} async run() { const countUser = await this.repository.count({ where: { id: RoleEnum.user, }, }); if (!countUser) { await this.repository.save( this.repository.create({ id: RoleEnum.user, name: 'User', }), ); } const countAdmin = await this.repository.count({ where: { id: RoleEnum.admin, }, }); if (!countAdmin) { await this.repository.save( this.repository.create({ id: RoleEnum.admin, name: 'Admin', }), ); } } } - Statue
// status-seed.service.ts import { Module } from '@nestjs/common'; import { TypeOrmModule } from '@nestjs/typeorm'; import { StatusSeedService } from './status-seed.service'; import { StatusEntity } from '../../../../statuses/infrastructure/persistence/relational/entities/status.entity'; @Module({ imports: [TypeOrmModule.forFeature([StatusEntity])], providers: [StatusSeedService], exports: [StatusSeedService], }) export class StatusSeedModule {} // status-seed.service.ts import { Injectable } from '@nestjs/common'; import { InjectRepository } from '@nestjs/typeorm'; import { Repository } from 'typeorm'; import { StatusEntity } from '../../../../statuses/infrastructure/persistence/relational/entities/status.entity'; import { StatusEnum } from '../../../../statuses/statuses.enum'; @Injectable() export class StatusSeedService { constructor( @InjectRepository(StatusEntity) private repository: Repository<StatusEntity>, ) {} async run() { const count = await this.repository.count(); if (!count) { await this.repository.save([ this.repository.create({ id: StatusEnum.active, name: 'Active', }), this.repository.create({ id: StatusEnum.inactive, name: 'Inactive', }), ]); } } } - User
// user-seed.module.ts
import { Module } from '@nestjs/common';
import { TypeOrmModule } from '@nestjs/typeorm';

import { UserSeedService } from './user-seed.service';
import { UserEntity } from '../../../../users/infrastructure/persistence/relational/entities/user.entity';

@Module({
  imports: [TypeOrmModule.forFeature([UserEntity])],
  providers: [UserSeedService],
  exports: [UserSeedService],
})
export class UserSeedModule {}

// user-seed.service.ts
import { Injectable } from '@nestjs/common';
import { InjectRepository } from '@nestjs/typeorm';

import { Repository } from 'typeorm';
import bcrypt from 'bcryptjs';
import { RoleEnum } from '../../../../roles/roles.enum';
import { StatusEnum } from '../../../../statuses/statuses.enum';
import { UserEntity } from '../../../../users/infrastructure/persistence/relational/entities/user.entity';

@Injectable()
export class UserSeedService {
  constructor(
    @InjectRepository(UserEntity)
    private repository: Repository<UserEntity>,
  ) {}

  async run() {
    const countAdmin = await this.repository.count({
      where: {
        role: {
          id: RoleEnum.admin,
        },
      },
    });

    if (!countAdmin) {
      const salt = await bcrypt.genSalt();
      const password = await bcrypt.hash('secret', salt);

      await this.repository.save(
        this.repository.create({
          firstName: 'Super',
          lastName: 'Admin',
          email: 'admin@example.com',
          password,
          role: {
            id: RoleEnum.admin,
            name: 'Admin',
          },
          status: {
            id: StatusEnum.active,
            name: 'Active',
          },
        }),
      );
    }

    const countUser = await this.repository.count({
      where: {
        role: {
          id: RoleEnum.user,
        },
      },
    });

    if (!countUser) {
      const salt = await bcrypt.genSalt();
      const password = await bcrypt.hash('secret', salt);

      await this.repository.save(
        this.repository.create({
          firstName: 'John',
          lastName: 'Doe',
          email: 'john.doe@example.com',
          password,
          role: {
            id: RoleEnum.user,
            name: 'Admin',
          },
          status: {
            id: StatusEnum.active,
            name: 'Active',
          },
        }),
      );
    }
  }
}
코드는 별거 없지만 구조가 너무 이쁘다..처음 레퍼런스를 이 보일러플레이트로 삼을껄…이라는 생각까지 들 정도..
다음 글에서는 이 오픈소스의 구조 위주로 살펴볼 예정이다.