개요
NestJS Boilerplate 프로젝트에서는 아래와 같이 로그인 기능을 지원하고 있다.
- email & password
- SSO
- Apple
각각 어떻게 구현해놨을까? 궁금해서 한번 보고싶었다.
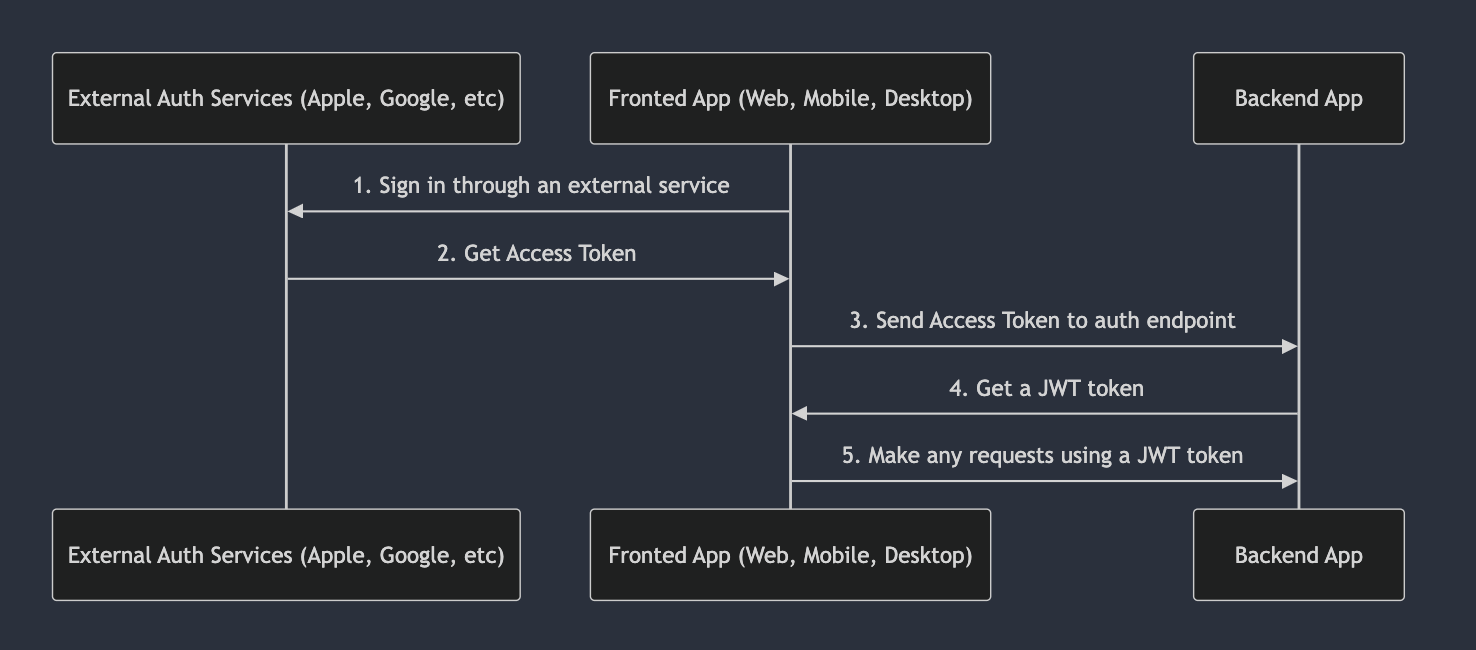
네트워크 통신 flow 는 다음과 같다.
SSO - apple
대표 구현으로 apple 의 sso 구현 방식을 한번 보려고 한다. 일단 폴더 구조를 보니 각 SSO 업체 별로 폴더를 구별해놨다.

auth-apple 의 세부 폴더 구조는 다음과 같다.
├── auth-apple.controller.ts
├── auth-apple.module.ts
├── auth-apple.service.ts
├── config
│   ├── apple-config.type.ts
│   └── apple.config.ts
└── dto
    └── auth-apple-login.dto.ts
음.. 생각보다 별거 없네..? 라고 생각이 들면서 한편으로는 외부 API 를 쓸거니..내부 코드 구조는 단순하겠다 싶다.
로그인
컨트롤러를 보니 로그인 API 만 있었다. 하긴 회원가입은 해당 SSO 계정 가서 해야되니 로그인 API 만 있는게 맞는것 같다. 로그아웃은 세선 데이터만 삭제하면 되니 별도 SSO 별로 로그아웃 API 는 필요 없어보이기도 하고..
자 이제 컨트롤러를 먼저 보자
// src/auth-apple/auth-apple.controller.ts
  @ApiOkResponse({
    type: LoginResponseDto,
  })
  @SerializeOptions({
    groups: ['me'],
  })
  @Post('login')
  @HttpCode(HttpStatus.OK)
  async login(@Body() loginDto: AuthAppleLoginDto): Promise<LoginResponseDto> {
    const socialData = await this.authAppleService.getProfileByToken(loginDto);

    return this.authService.validateSocialLogin('apple', socialData);
  }
코드를 보니 request body 로는 AuthAppleLoginDto 이고 response body 는 LoginResponseDto 임을 알 수 있다. request body 를 보니 아래 데이터가 필요하다.
- idToken, firstName, lastName
보니까 idToken 이라는 새로운 데이터가 필요하다. SSO 로그인 후에 받은 idToken 값을 백엔드에 전달하는 방식으로 이루어져 있다. 첫번째로 진행하는 서비스 로직은 토큰 검증이다. 서비스 코드는 다음과 같다.
// **src/auth-apple/auth-apple.service.ts**
import { Injectable } from '@nestjs/common';
import appleSigninAuth from 'apple-signin-auth';
import { ConfigService } from '@nestjs/config';
import { SocialInterface } from '../social/interfaces/social.interface';
import { AuthAppleLoginDto } from './dto/auth-apple-login.dto';
import { AllConfigType } from '../config/config.type';

@Injectable()
export class AuthAppleService {
  constructor(private configService: ConfigService<AllConfigType>) {}

  async getProfileByToken(
    loginDto: AuthAppleLoginDto,
  ): Promise<SocialInterface> {
    const data = await appleSigninAuth.verifyIdToken(loginDto.idToken, {
      audience: this.configService.get('apple.appAudience', { infer: true }),
    });

    return {
      id: data.sub,
      email: data.email,
      firstName: loginDto.firstName,
      lastName: loginDto.lastName,
    };
  }
}
애플 인증 관련 모듈이 있구나?!
애플 로그인 구현할때 이 모듈을 써야겠다.
그 다음은 SSO 로그인 서비스 로직이다. 코드는 다음과 같다.
// src/auth/auth.service.ts
  async validateSocialLogin(
    authProvider: string,
    socialData: SocialInterface,
  ): Promise<LoginResponseDto> {
    let user: NullableType<User> = null;
    const socialEmail = socialData.email?.toLowerCase();
    let userByEmail: NullableType<User> = null;

    if (socialEmail) {
      userByEmail = await this.usersService.findByEmail(socialEmail);
    }

    if (socialData.id) {
      user = await this.usersService.findBySocialIdAndProvider({
        socialId: socialData.id,
        provider: authProvider,
      });
    }

    if (user) {
      if (socialEmail && !userByEmail) {
        user.email = socialEmail;
      }
      await this.usersService.update(user.id, user);
    } else if (userByEmail) {
      user = userByEmail;
    } else if (socialData.id) {
      const role = {
        id: RoleEnum.user,
      };
      const status = {
        id: StatusEnum.active,
      };

      user = await this.usersService.create({
        email: socialEmail ?? null,
        firstName: socialData.firstName ?? null,
        lastName: socialData.lastName ?? null,
        socialId: socialData.id,
        provider: authProvider,
        role,
        status,
      });

      user = await this.usersService.findById(user.id);
    }

    if (!user) {
      throw new UnprocessableEntityException({
        status: HttpStatus.UNPROCESSABLE_ENTITY,
        errors: {
          user: 'userNotFound',
        },
      });
    }

    const hash = crypto
      .createHash('sha256')
      .update(randomStringGenerator())
      .digest('hex');

    const session = await this.sessionService.create({
      user,
      hash,
    });

    const {
      token: jwtToken,
      refreshToken,
      tokenExpires,
    } = await this.getTokensData({
      id: user.id,
      role: user.role,
      sessionId: session.id,
      hash,
    });

    return {
      refreshToken,
      token: jwtToken,
      tokenExpires,
      user,
    };
  }
로직을 보니 토큰 검증 하고 난 다음은 email & password 와는 크게 다른게 없다. (password 가 없는거 빼고)
이메일 검증하고, 세션 아이디 DB 에 있는지 검증하고, 유저 있으면 update, 없으면 생성하고.. 그리고 마지막엔 세션 생성, 토큰 생성해서 return 한다.
결론
SSO 구현은 역시 코드상에서는 크게 코드가 없다. 하지만 간단하면서 강력한 기능은 맞다..