개요
NestJS Boilerplate 프로젝트에서는 아래와 같이 로그인 기능을 지원하고 있다.
- email & password
- SSO
- Apple
각각 어떻게 구현해놨을까? 궁금해서 한번 보고싶었다.
Email & Password
이메일 & 패스워드 방식의 인증은 이 보일러플레이트에서 default auth 이다. 그럼 email 을 통한 인증 플로우를 보자.
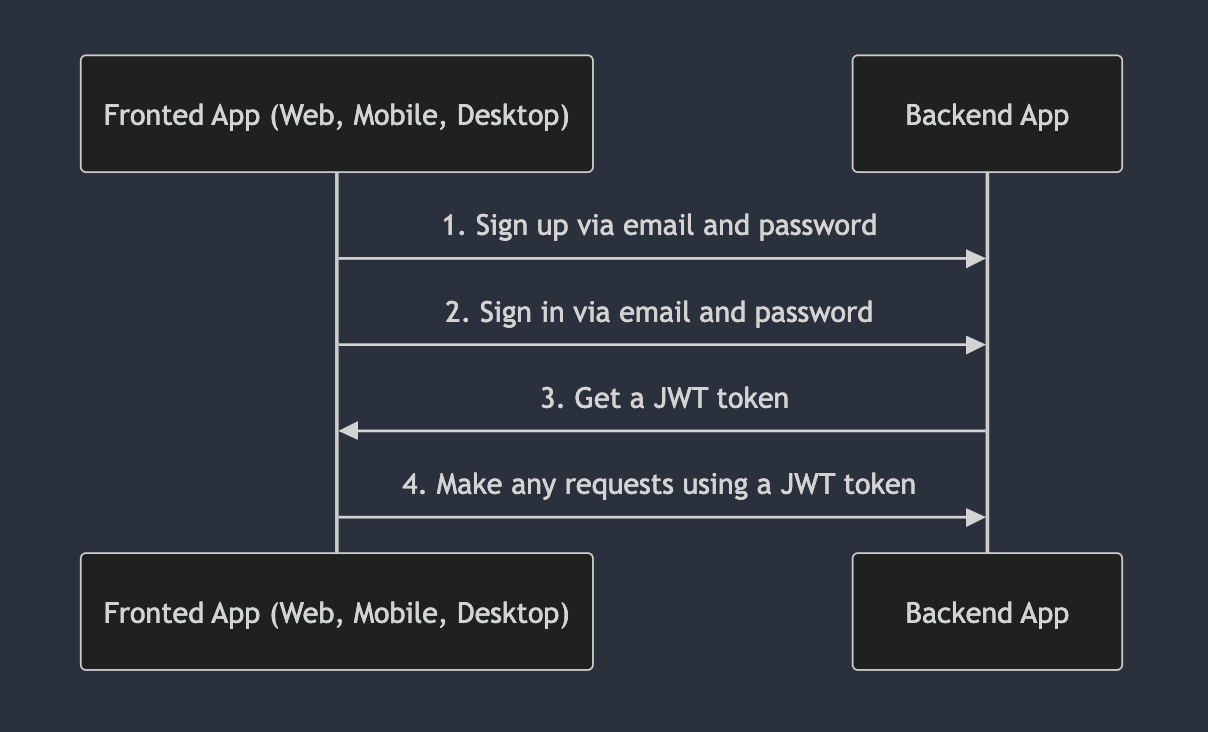
음…상당히 간단하다. 즉 회원가입 하고, 로그인 하면 JWT 토큰을 줄거고. 이후에 너는 JWT 토큰 가지고 API 호출 할 수 있다는 것이다. 그럼 단계별로 뜯어보자.
회원가입
- API:
POST /api/v1/auth/email/register
자 분석을 위해서는 먼저 Controller 를 봐보자.
//  src/auth/auth.controller.ts
  @Post('email/register')
  @HttpCode(HttpStatus.NO_CONTENT)
  async register(@Body() createUserDto: AuthRegisterLoginDto): Promise<void> {
    return this.service.register(createUserDto);
  }
보니까 두가지를 보면 될듯 한데, 첫번째로는 @HttpCode(HttpStatus.NO_CONTENT) 으로 본문은 없고 응답만 보낼껀데 이때 response code 는 204 인걸 볼 수 있다.
두번째로는 request dto 이다.
// src/auth/dto/auth-register-login.dto.ts
import { ApiProperty } from '@nestjs/swagger';
import { IsEmail, IsNotEmpty, MinLength } from 'class-validator';
import { Transform } from 'class-transformer';
import { lowerCaseTransformer } from '../../utils/transformers/lower-case.transformer';

export class AuthRegisterLoginDto {
  @ApiProperty({ example: 'test1@example.com', type: String })
  @Transform(lowerCaseTransformer)
  @IsEmail()
  email: string;

  @ApiProperty()
  @MinLength(6)
  password: string;

  @ApiProperty({ example: 'John' })
  @IsNotEmpty()
  firstName: string;

  @ApiProperty({ example: 'Doe' })
  @IsNotEmpty()
  lastName: string;
}
dto 를 보니까 아래 부분들을 볼 수 있다.
- email 은 무조건 소문자로 저장하는구나!
// src/utils/transformers/lower-case.transformer.ts import { TransformFnParams } from 'class-transformer/types/interfaces'; import { MaybeType } from '../types/maybe.type'; export const lowerCaseTransformer = ( params: TransformFnParams, ): MaybeType<string> => params.value?.toLowerCase().trim(); - 비밀번호는 최대 6자리까지만 지원하는구나!
- email, password, firstName, lastName 모두 필수 값이네?
이부분에서 새롭게 안 사실은 class-transformer 의 @Transform 에 입력되는 조건을 별도의 파일로 관리하는 것을 얻었다. 분리해서 관리하니 재사용성이 높아보인다.
자 이제 서비스 함수를 보자 .
// src/auth/auth.service.ts
async register(dto: AuthRegisterLoginDto): Promise<void> {
const user = await this.usersService.create({
...dto,
email: dto.email,
role: {
id: RoleEnum.user,
},
status: {
id: StatusEnum.inactive,
},
});
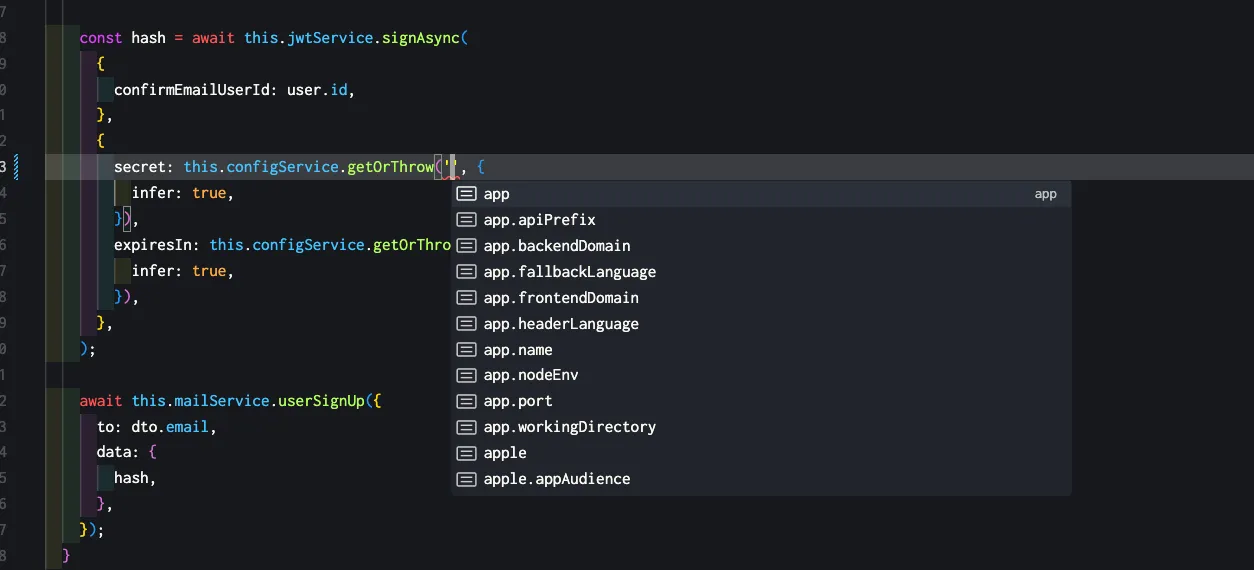
const hash = await this.jwtService.signAsync(
{
confirmEmailUserId: user.id,
},
{
secret: this.configService.getOrThrow('auth.confirmEmailSecret', {
infer: true,
}),
expiresIn: this.configService.getOrThrow('auth.confirmEmailExpires', {
infer: true,
}),
},
);
await this.mailService.userSignUp({
to: dto.email,
data: {
hash,
},
});- 유저를 생성
- 설정을 가져와서 유저 id 값으로 서명값 생성.
- 유저 이메일로 해시값 전달
첫번째로 유저를 생성하는 함수이다. usersService 에서 DI 해서 create 함수를 호출한다.
  async create(createUserDto: CreateUserDto): Promise<User> {
    // Do not remove comment below.
    // <creating-property />

    let password: string | undefined = undefined;

    if (createUserDto.password) {
      // 비밀번호를 해싱한다.
      const salt = await bcrypt.genSalt();
      password = await bcrypt.hash(createUserDto.password, salt);
    }

    let email: string | null = null;

    if (createUserDto.email) {
      // 이메일 중복 체크
      const userObject = await this.usersRepository.findByEmail(
        createUserDto.email,
      );
      if (userObject) {
        // 이메일이 이미 존재하면 예외를 발생시킨다.
        // 422 상태 코드를 반환한다.
        throw new UnprocessableEntityException({
          status: HttpStatus.UNPROCESSABLE_ENTITY,
          errors: {
            email: 'emailAlreadyExists',
          },
        });
      }
      email = createUserDto.email;
    }

    let photo: FileType | null | undefined = undefined;

    if (createUserDto.photo?.id) {
      const fileObject = await this.filesService.findById(
        createUserDto.photo.id,
      );
      if (!fileObject) {
        throw new UnprocessableEntityException({
          status: HttpStatus.UNPROCESSABLE_ENTITY,
          errors: {
            photo: 'imageNotExists',
          },
        });
      }
      photo = fileObject;
    } else if (createUserDto.photo === null) {
      // 회원가입할 경우는 여기 로직을 수행
      photo = null;
    }

    let role: Role | undefined = undefined;

    if (createUserDto.role?.id) {
      // 권한 유효성 검사
      const roleObject = Object.values(RoleEnum)
        .map(String)
        .includes(String(createUserDto.role.id));
      if (!roleObject) {
        // 권한이 존재하지 않으면 예외를 발생시킨다.
        // 422 상태 코드를 반환한다.
        throw new UnprocessableEntityException({
          status: HttpStatus.UNPROCESSABLE_ENTITY,
          errors: {
            role: 'roleNotExists',
          },
        });
      }

      role = {
        id: createUserDto.role.id,
      };
    }

    let status: Status | undefined = undefined;

    if (createUserDto.status?.id) {
      // 상태 유효성 검사
      const statusObject = Object.values(StatusEnum)
        .map(String)
        .includes(String(createUserDto.status.id));
      if (!statusObject) {
        // 상태가 존재하지 않으면 예외를 발생시킨다.
        // 422 상태 코드를 반환한다.
        throw new UnprocessableEntityException({
          status: HttpStatus.UNPROCESSABLE_ENTITY,
          errors: {
            status: 'statusNotExists',
          },
        });
      }

      status = {
        id: createUserDto.status.id,
      };
    }

    return this.usersRepository.create({
      // Do not remove comment below.
      // <creating-property-payload />
      firstName: createUserDto.firstName,
      lastName: createUserDto.lastName,
      email: email,
      password: password,
      photo: photo,
      role: role,
      status: status,
      provider: createUserDto.provider ?? AuthProvidersEnum.email,
      socialId: createUserDto.socialId,
    });
  }
그 다음으로는 서명 값을 생성하는 부분인데, 여기서 내가 배워야할 부분은 this.configService.getOrThrow 에서의 타입 추론이다.
어떻게 설정 했길래 환경설정 값에 대한 타입을 이렇게 직관적으로 할수 있을까? app.module.ts 에서 ConfigModule 설정을 한번 보자.
// src/app.module.ts
import databaseConfig from './database/config/database.config';
import authConfig from './auth/config/auth.config';
import appConfig from './config/app.config';
import mailConfig from './mail/config/mail.config';
import fileConfig from './files/config/file.config';
import googleConfig from './auth-google/config/google.config';
import twitterConfig from './auth-twitter/config/twitter.config';
import appleConfig from './auth-apple/config/apple.config';

@Module({
  imports: [
    ConfigModule.forRoot({
      isGlobal: true,
      load: [
        databaseConfig,
        authConfig,
        appConfig,
        mailConfig,
        fileConfig,
        googleConfig,
        twitterConfig,
        appleConfig,
      ],
      envFilePath: ['.env'],
    }),
auth 부분을 보고있으니 authConfig 를 한번 보자.
import { registerAs } from '@nestjs/config';

import { IsString } from 'class-validator';
import validateConfig from '../../utils/validate-config';
import { AuthConfig } from './auth-config.type';

class EnvironmentVariablesValidator {
  @IsString()
  AUTH_JWT_SECRET: string;

  @IsString()
  AUTH_JWT_TOKEN_EXPIRES_IN: string;

  @IsString()
  AUTH_REFRESH_SECRET: string;

  @IsString()
  AUTH_REFRESH_TOKEN_EXPIRES_IN: string;

  @IsString()
  AUTH_FORGOT_SECRET: string;

  @IsString()
  AUTH_FORGOT_TOKEN_EXPIRES_IN: string;

  @IsString()
  AUTH_CONFIRM_EMAIL_SECRET: string;

  @IsString()
  AUTH_CONFIRM_EMAIL_TOKEN_EXPIRES_IN: string;
}

export default registerAs<AuthConfig>('auth', () => {
  validateConfig(process.env, EnvironmentVariablesValidator);

  return {
    secret: process.env.AUTH_JWT_SECRET,
    expires: process.env.AUTH_JWT_TOKEN_EXPIRES_IN,
    refreshSecret: process.env.AUTH_REFRESH_SECRET,
    refreshExpires: process.env.AUTH_REFRESH_TOKEN_EXPIRES_IN,
    forgotSecret: process.env.AUTH_FORGOT_SECRET,
    forgotExpires: process.env.AUTH_FORGOT_TOKEN_EXPIRES_IN,
    confirmEmailSecret: process.env.AUTH_CONFIRM_EMAIL_SECRET,
    confirmEmailExpires: process.env.AUTH_CONFIRM_EMAIL_TOKEN_EXPIRES_IN,
  };
});
wow 너무 깔끔한 구조라서 내가 오히려 기분이 좋아진다… ConfigModule 에 등록하기 위한 registerAs 메소드를 사용을 했고. 이때 구분값을 'auth' 으로 하겠다고 명시를 해두었다. 이런 구조로 ConfigModule 에 등록을 해두니 ConfigModule 에서 환경변수 값을 꺼내서 쓸때 아름답게 타입 추론이 되는거였다.
이제 마지막으로 회원가입한 사용자에게 서명값을 이메일로 전송한다. 세부 서비스 코드는 이메일 전송이다보니 굳이 분석하지 않았다.
로그인
회원가입을 마쳤으면 사용자는 이메일을 통해 받은 서명값을 가지고 있을것이다. 로그인 코드도 한번 뜯어보자.
  // src/auth/auth.controller.ts
  @SerializeOptions({
    groups: ['me'],
  })
  @Post('email/login')
  @ApiOkResponse({
    type: LoginResponseDto,
  })
  @HttpCode(HttpStatus.OK)
  public login(@Body() loginDto: AuthEmailLoginDto): Promise<LoginResponseDto> {
    return this.service.validateLogin(loginDto);
  }
여기서 내가 처음 보는게 바로 SerializeOptions 이다. SerializeOption 데코레이터는 뭘까?
SerializeOption: 응답 데이터 직렬화 옵션 데코레이터.
응답 데이터 직렬화 옵션 데코레이터..? 말이 너무 어렵다. “직렬화”란 뭘까?
💡직렬화란?
객체나 데이터를 전송하거나 저장하기 위해 일련의 바이트로 변환하는 과정이다.
NestJS 에서 직렬화의 역할은 뭘까
NestJS 에서는 직렬화를 통해 컨트롤러의 응답 데이터를 클라이언트에 전송하기 전에 “가공”한다. 주로 보안, 데이터 구조 정리, 데이터 필터링을 목적으로 사용된다.
자 다시 돌아와서 SerializeOption 의 기능을 구체적으로 보자.
- 응답 데이터의 직렬화 제어
- 응답 데이터를 직렬화할 떄 특정 옵션을 설정할 수 있다. 예를 들어, 데이터 필터링, 순환 참조 제거, 깊이 제한 등을 설정 가능하다.
class-transformer와 통합- NestJS는
class-transformer를 사용하여 DTO를 기반으로 응답 데이터를 직렬화 한다.
- NestJS는
- 핸들러 또는 클래스 수준에서 사용
- 컨트롤러 클래스에 적용하면 해당 클래스의 모든 핸들러에 동일한 직렬화 옵션이 적용 가능하다.
- 특정 핸들러에만 적용하려면 핸들러 메서드에 데코레이터를 추가한다.
이런거면 이 프로젝트에서는 어떻게 사용하고 있을까? response DTO 인 LoginResponseDto 를 살펴보자.
// login-response.dto.ts
import { ApiProperty } from '@nestjs/swagger';
import { User } from '../../users/domain/user';

export class LoginResponseDto {
...
  @ApiProperty({
    type: () => User,
  })
  user: User;
}
// user.ts
import { Exclude, Expose } from 'class-transformer';
import { FileType } from '../../files/domain/file';
import { Role } from '../../roles/domain/role';
import { Status } from '../../statuses/domain/status';
import { ApiProperty } from '@nestjs/swagger';
const idType = Number;
export class User {
...
@ApiProperty({
type: String,
example: 'john.doe@example.com',
})
@Expose({ groups: ['me', 'admin'] }) // <-- serialize 에서 "me", "admin" 그룹이 아니면
email: string | null;
@Exclude({ toPlainOnly: true })
password?: string;
@ApiProperty({
type: String,
example: 'email',
})
@Expose({ groups: ['me', 'admin'] })
provider: string;
@ApiProperty({
type: String,
example: '1234567890',
})
@Expose({ groups: ['me', 'admin'] })
socialId?: string | null;
..
}
dto 를 보니 User 클래스에 Expose 데코레이터가 설정되어 있었다. 즉 직렬화를 하는데 groups 옵션에서 “me” 가 설정되어있으니까 User 클래스에 셋팅된 socialId , provider , email 값이 포함되서 response 된다.
자 이제 로그인 서비스 코드를 봐보자.
  async validateLogin(loginDto: AuthEmailLoginDto): Promise<LoginResponseDto> {
    const user = await this.usersService.findByEmail(loginDto.email); // 이메일 존재 여부 확인

    if (!user) {
      // 유저가 없으면 예외 발생
      throw new UnprocessableEntityException({
        status: HttpStatus.UNPROCESSABLE_ENTITY,
        errors: {
          email: 'notFound',
        },
      });
    }

    if (user.provider !== AuthProvidersEnum.email) {
      // 인증 제공 방식이 이메일이 아니면 제공하는 방식이 아님으로 예외 처리 방식
      throw new UnprocessableEntityException({
        status: HttpStatus.UNPROCESSABLE_ENTITY,
        errors: {
          email: `needLoginViaProvider:${user.provider}`,
        },
      });
    }

    if (!user.password) {
      // 비밀번호가 없으면 예외 발생
      throw new UnprocessableEntityException({
        status: HttpStatus.UNPROCESSABLE_ENTITY,
        errors: {
          password: 'incorrectPassword',
        },
      });
    }

    const isValidPassword = await bcrypt.compare(
      loginDto.password,
      user.password,
    ); // 비밀번호 검증

    if (!isValidPassword) {
      // 비밀번호가 틀리면 예외 발생
      throw new UnprocessableEntityException({
        status: HttpStatus.UNPROCESSABLE_ENTITY,
        errors: {
          password: 'incorrectPassword',
        },
      });
    }

    const hash = crypto
      .createHash('sha256')
      .update(randomStringGenerator())
      .digest('hex');

    const session = await this.sessionService.create({
      user,
      hash,
    }); // 세션 생성

    const { token, refreshToken, tokenExpires } = await this.getTokensData({
      id: user.id,
      role: user.role,
      sessionId: session.id,
      hash,
    }); // 토큰 생성

    return {
      refreshToken, // 리프레시 토큰
      token, // 토큰
      tokenExpires, // 토큰 만료 시간
      user, // 유저
    };
  }
서비스 로직은 별거 없었다. 다만 구조에 맞게 DI 를 설정하고 메소드를 가져와서 쓴다는 것이다. DI 구조는 다음과 같다.
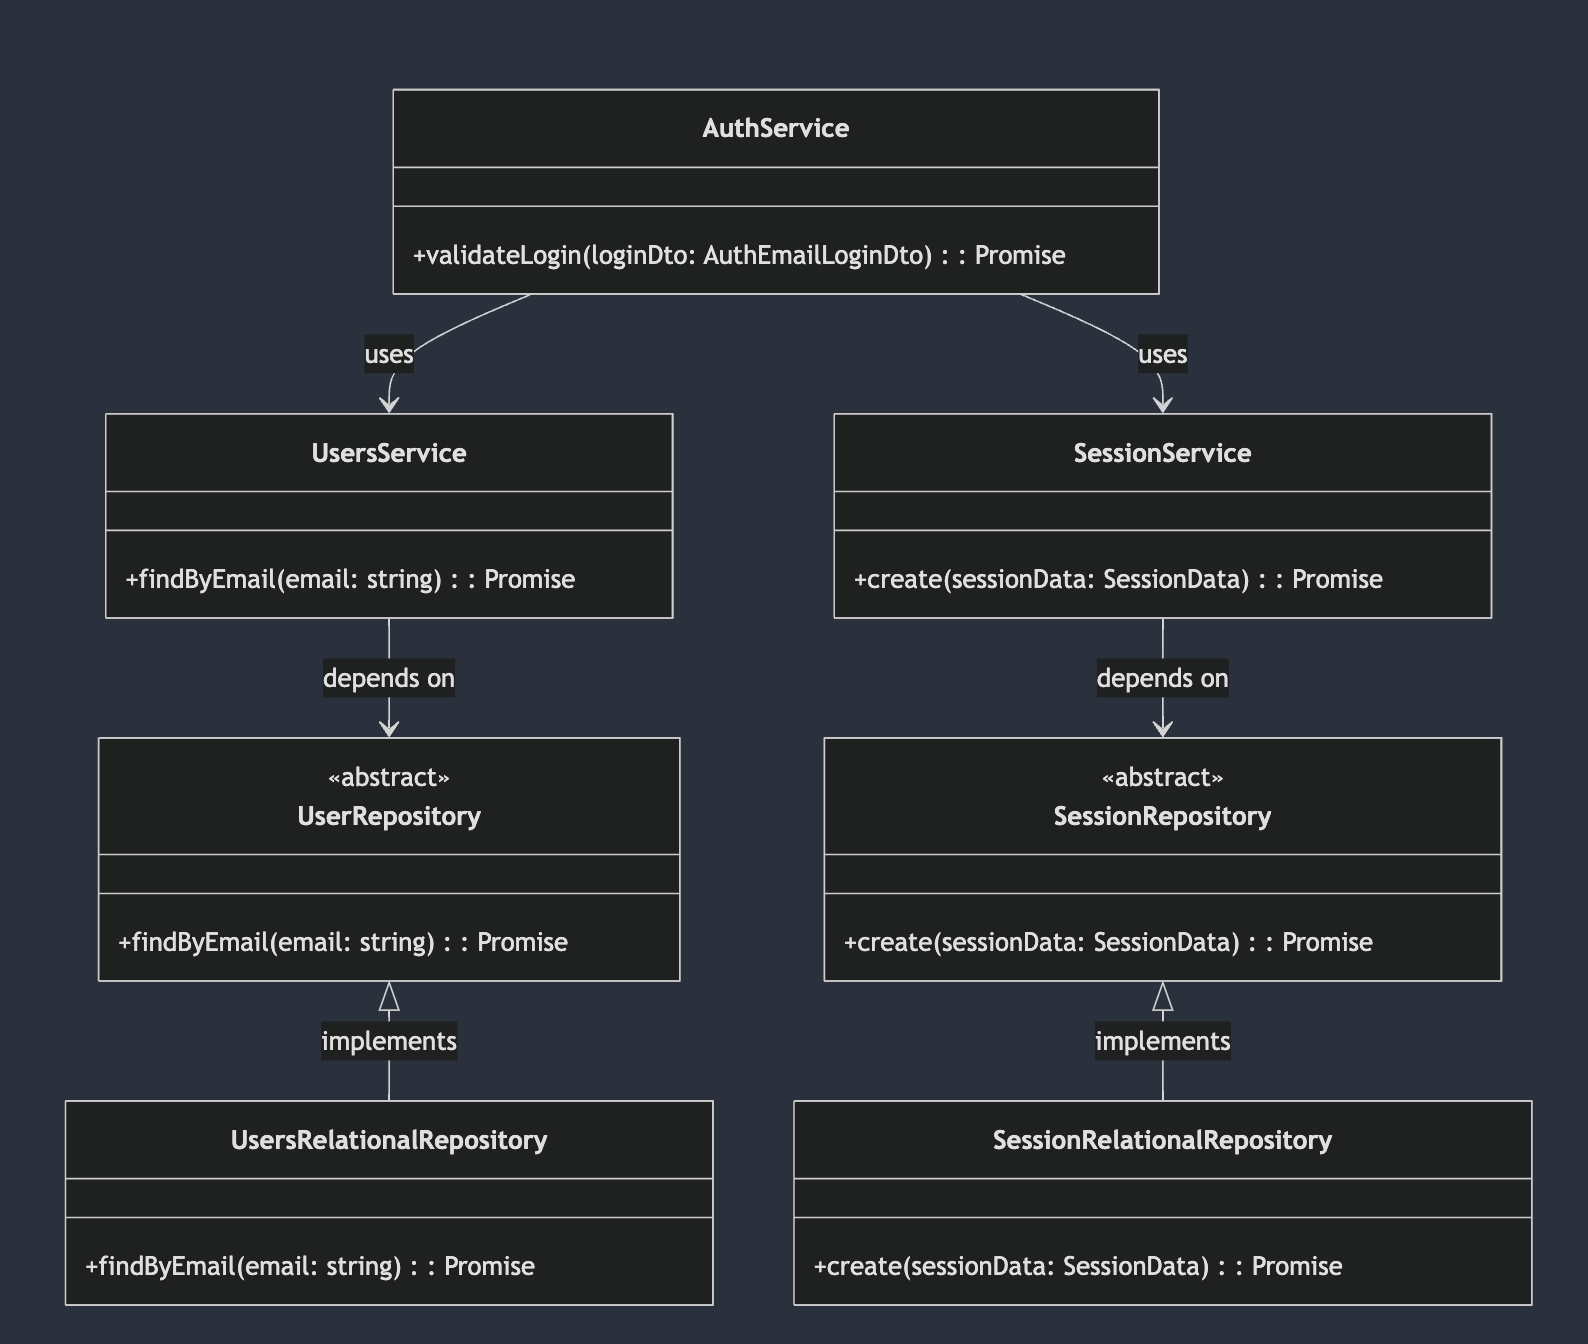
오 근데 여기서 보니 로그인할때 세션 데이터를 DB 에 저장하고 있다.
로그아웃
  @ApiBearerAuth()
  @Post('logout')
  @UseGuards(AuthGuard('jwt'))
  @HttpCode(HttpStatus.NO_CONTENT)
  public async logout(@Request() request): Promise<void> {
    await this.service.logout({
      sessionId: request.user.sessionId,
    });
  }
로그아웃은 로직이 간단하다. 그저 DB의 세션 데이터를 삭제하는 로직으로 되어있다. 매우 간단하니 서비스 로직 설명은 생략한다.
결론
email & password 로그인 로직들을 보니 내가 새롭게 알게된 것들이 존재했다,.
ConfigModule의 중요성SerializeOptions