Adding Headers and Footers to Table Sections
"Differentiate groups of rows visually by adding header and footer views to your table view’s sections."
테이블 뷰 섹션에 헤더 및 footer 뷰를 추가해서 행 그룹을 시각적으로 구분합니다.
Overview
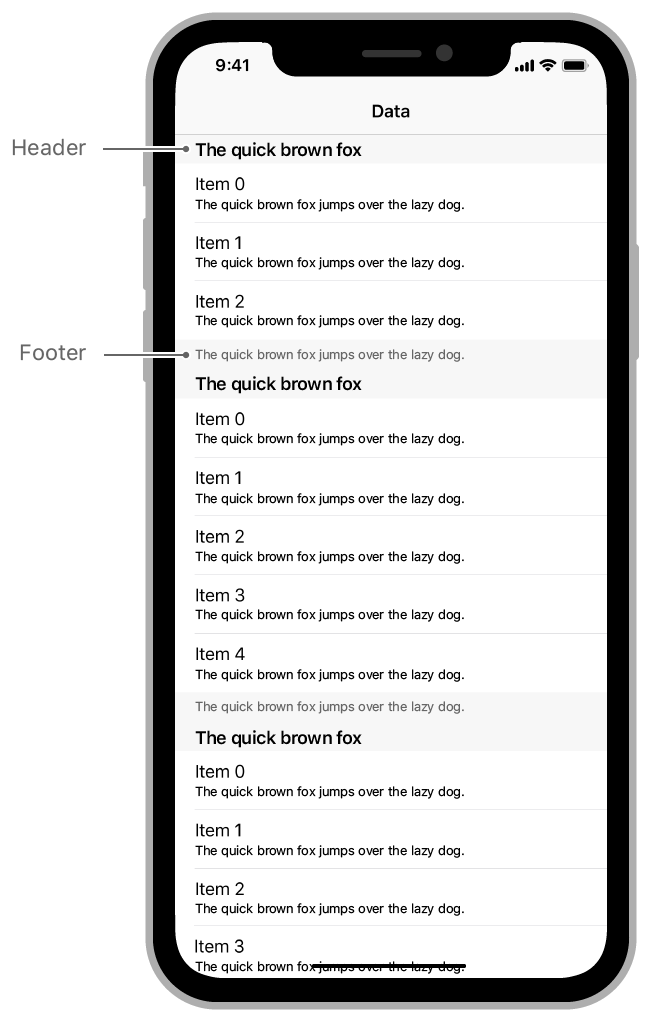
섹션의 시작과 끝에 시각적 표시로써 헤더 및 footer 뷰를 사용할 수 있습니다. 헤더와 footer 뷰는 선택적이며, 원하는 수준으로 커스터마이징이 가능합니다.

텍스트 레이블을 갖는 기본 헤더 혹은 footer를 생성하려면 테이블의 데이터 소스 객체 메소드인 tableView(_:titleForHeaderInSection:) 혹은 tableView(_:titleForFooterInSection:)를 오버라이드하시기 바랍니다. 테이블 뷰는 표준 헤더 혹은 footer를 생성하고 구체화한 위치에서 테이블 네브로 삽입합니다.
// Create a standard header that includes the returned text.
override func tableView(_ tableView: UITableView, titleForHeaderInSection
                            section: Int) -> String? {
   return "Header \(section)"
}

// Create a standard footer that includes the returned text.
override func tableView(_ tableView: UITableView, titleForFooterInSection
                            section: Int) -> String? {
   return "Footer \(section)"
}
Note
헤더와 footer는 하나의 섹션에 적용하지만 테아블 뷰의tableHeaderView혹은tableFooterView속성을 사용해서 전체 테이블에 하나의 헤더 혹은 footer를 제공할 수 있습니다. 전역 헤더는 테이블 컨텐트의 상단에 나타나며, 전역 footer는 하단에 나타납니다.
Customize the Header and Footer Views
커스텀 헤더와 footer 뷰는 테이블 섹션에 고유한 모양을 제공합니다. 커스텀 헤더와 footer를 사용하면 원하는 뷰를 구체화할 수 있고, 할당된 공간 내의 어느 곳이라도 위치시킬 수 있습니다. 테이블 섹션마다 다른 헤더 혹은 footer를 제공할 수도 있습니다.
커스텀 헤더 혹은 footer 뷰를 생성하려면 아래처럼 해야 합니다.
- 헤더 및 footer의 모양을 결정하기 위해
UITableViewHeaderFooterView객체를 사용합니다. - 테이블 뷰에
UITableViewHeaderFooterView객체를 등록합니다. - 뷰를 생성하고 설정하기 위해 테이블 뷰 딜리게이트 객체 내부에
the tableView(_:viewForHeaderInSection:)와tableView(_:viewForFooterInSection:)메소드를 구현합니다.
헤더 및 footer에 대해 항상 UITableViewHeaderFooterView 객체를 사용하시기 바랍니다. 이 뷰는 모든 시점마다 뷰를 생성하는 것 대신 재활용할 수 있도록 해주면서 셀을 사용하는 동일한 재사용 모델을 지원합니다. 헤더 혹은 footer 뷰를 등록한 후 해당 뷰의 인스턴스를 요청하기 위해 테이블 뷰의 dequeueReusableHeaderFooterView(withIdentifier:) 메소드를 사용하시기 바랍니다. 재활용된 헤더 혹은 footer 뷰가 사용 가능하다면 테이블 뷰는 새로운 것을 생성하기 전에 사용 가능한 것을 우선적으로 반환합니다.
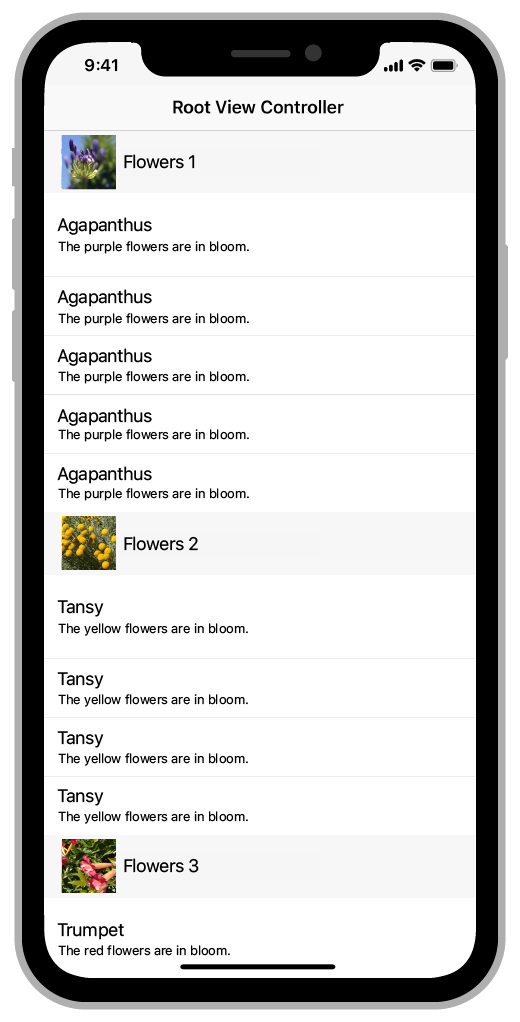
UITableViewHeaderFooterView 객체를 있는 그대로 사용할 수 있고, contentView 속성에 뷰를 추가할 수 있습니다. 혹은 서브클래싱 후 뷰를 추가할 수도 있슨비다. 스택 뷰 혹은 오토 레이아웃 제약을 사용해서 컨텐트 뷰 내부에 하위뷰를 위치시킬 수 있습니다. 컨텐트 뒤의 백그라운드를 변경하려면 헤더, footer 뷰의 backgroundView 속성을 수정해야 합니다. 아래 예시 코드는 생성 시점에 이미지 및 레이블 뷰를 위치시키는 커스텀 헤더 뷰를 보여주고 있습니다.
class MyCustomHeader: UITableViewHeaderFooterView {
    let title = UILabel()
    let image = UIImageView()

    override init(reuseIdentifier: String?) {
        super.init(reuseIdentifier: reuseIdentifier)
        configureContents()
    }

    func configureContents() {
        image.translatesAutoresizingMaskIntoConstraints = false
        title.translatesAutoresizingMaskIntoConstraints = false

        contentView.addSubview(image)
        contentView.addSubview(title)

        // Center the image vertically and place it near the leading
        // edge of the view. Constrain its width and height to 50 points.
        NSLayoutConstraint.activate([
            image.leadingAnchor.constraint(equalTo: contentView.layoutMarginsGuide.leadingAnchor),
            image.widthAnchor.constraint(equalToConstant: 50),
            image.heightAnchor.constraint(equalToConstant: 50),
            image.centerYAnchor.constraint(equalTo: contentView.centerYAnchor),

            // Center the label vertically, and use it to fill the remaining
            // space in the header view.
            title.heightAnchor.constraint(equalToConstant: 30),
            title.leadingAnchor.constraint(equalTo: image.trailingAnchor,
                   constant: 8),
            title.trailingAnchor.constraint(equalTo:
                   contentView.layoutMarginsGuide.trailingAnchor),
            title.centerYAnchor.constraint(equalTo: contentView.centerYAnchor)
        ])
    }
}
테이블 뷰 설정의 부분으로 헤더 뷰를 등록합니다.
override func viewDidLoad() {
   super.viewDidLoad()

   // Register the custom header view.
   tableView.register(MyCustomHeader.self,
       forHeaderFooterViewReuseIdentifier: "sectionHeader")
}
딜리게이트의 tableView(_:viewForHeaderInSection:) 메소드에서 커스텀 뷰를 생성하고 설정해야 합니다. 아래 코드는 등록된 커스텀 헤더를 디큐하고 제목 및 이미지 속성을 설정하고 있습니다.
override func tableView(_ tableView: UITableView,
        viewForHeaderInSection section: Int) -> UIView? {
   let view = tableView.dequeueReusableHeaderFooterView(withIdentifier:
               "sectionHeader") as! MyCustomHeader
   view.title.text = sections[section]
   view.image.image = UIImage(named: sectionImages[section])

   return view
}
아래 이미지는 헤더의 결과를 보여주고 있습니다.

Change the Height of Headers and Footers
테이블 뷰는 헤더 및 footer를 나타내는 뷰로부터 개별적으로 섹션 헤더 및 footer의 높이를 추적합니다. UITableView는 두 아이템 모두에 기본값 크기를 제공합니다. 모든 헤더(혹은 모든 footer)가 같은 높이를 갖는 경우 테이블 뷰의 sectionHeaderHeight 및 sectionFooterHeight 속성을 사용해서 높이를 구체화해야 합니다. 혹은 테이블 뷰가 제공하는 기본값을 사용해야 합니다.
헤더 혹은 footer의 모든 높이가 같지 않거나 동적으로 변하는 경우 딜리게이트 객체의 tableView(_:heightForHeaderInSection:) 및 tableView(_:heightForFooterInSection:)을 사용해서 높이를 제공하시기 바랍니다. 이 메소드를 구현할 때 테이블에 있는 모든 헤더와 footer에 값을 제공해야 합니다. 테이블 뷰는 오직 시각화되는 헤더 및 footer의 높이만을 요청합니다. 사용자가 스크롤하면 테이블 뷰는 헤더 및 footer가 나타날 때 각각에 대한 높이를 제공하길 요청하며, 이는 스크린 박으로 이동하거나 스크린으로 되돌아오는 경우도 포함합니다.
See Also
Cells, Headers, and Footers
Configuring the Cells for Your Table
스토리보드에서 하나 혹은 하나 이상의 프로토타입 셀을 정의해 테이블 행의 모양 및 컨텐트를 구체화합니다.
https://developer.apple.com/documentation/uikit/views_and_controls/table_views/configuring_the_cells_for_your_table
https://velog.io/@panther222128/Configuring-the-Cells-for-Your-Table
UITableViewCell
테이블 뷰에 있는 한 행의 시각적 표현입니다.
https://developer.apple.com/documentation/uikit/uitableviewcell
https://velog.io/@panther222128/UITableViewCell
UITableViewHeaderFooterView
섹션에 추가적인 정보를 표시하기 위해 테이블 섹션의 상단 혹은 하단으로 위치시키는 재사용 가능한 뷰입니다.
https://developer.apple.com/documentation/uikit/uitableviewheaderfooterview
https://velog.io/@panther222128/UITableViewHeaderFooterView
Related Documentation
Estimating the Height of a Table's Scrolling Area
스크롤링이 컨텐트 크기를 정확하게 반영할 수 있도록 하기 위해 테이블 뷰의 헤더, footer, 행에 대한 높이 추정값을 제공합니다.
https://developer.apple.com/documentation/uikit/views_and_controls/table_views/estimating_the_height_of_a_table_s_scrolling_area
https://velog.io/@panther222128/Estimating-the-Height-of-a-Tables-Scrolling-Area
