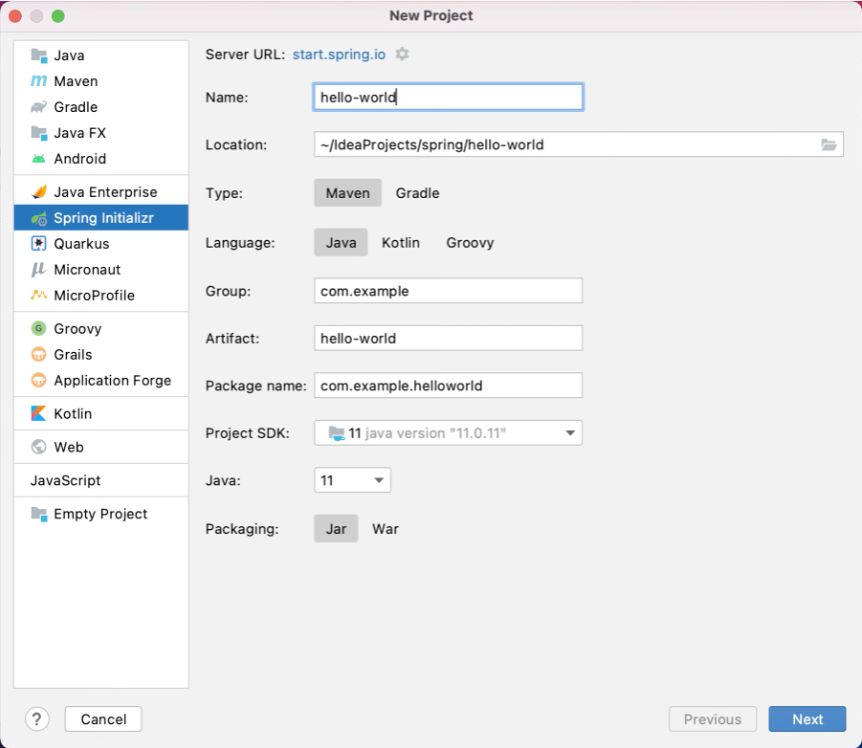
Spring Boot 프로젝트 시작
Spring Boot 요청 요약
- 서블릿이 필요없는 통합 컴포넌트 모델
- 개발자가 애플리케이션 설정을 위해 하나의 설정 모델만 학습하면 되는 환경
- public static void main으로 실행/종료 단순화
- 단순한 자바 클래스로딩 구조
- 단순한 개발툴
회신
- 스프링 프레임워크를 부분적으로, Spring Boot라는 프로젝트를 시작
- 이 요청은 Spring Boot의 기원이라고 할 수 있다.
Spring Boot Release
Spring Boot 1.5.X.RELEASE (2017.01 - EOL)
- java 8 이상 지원
- Spring Framework 4.3
- Tomcat 8.5, Hibernate 5.0 Configuration Properties에 JSR303 지원
Spring Boot 2.0.X
- Java Base line : java 8 (java 7 이하를 지원하지 않음)
- Spring Framework 5.0
- Default Datasource : HikariCP
Spring Boot 2.3.X.RELEASE(2020.05)
- java 14 지원
- gracefuol shutdown 지원
- graceful shutdown : 서비스 요청이 들어왔을 때 요청이 끝날 때까지 기다려주는 것
- spring-boot-starter-validation이 spring-boot-starter-web에서 제외됨
Spring Boot 2.4(2020.11)
- java 15 지원
- 새로운 버전 스킴 적용 (2.3.5.RELEASE --> 2.4.0)
- Docker Image Building 지원(jar)
Spring Boot 2.5(2021.05)
- java 16 지원
- 환경변수 Prefix
- Docker Image Building 지원(war)
Spring Boot 2.6(2021.11)
- java 16의 record를 @ConfigurationProperties로 사용가능
- 순환참조 빈은 금지가 기본 (spring.main.allow-circular-references)
Spring Boot 2.7(2022.05)
- auto configuration 파일 위치 변경
- spring.factories --> META-INF/spring/org.springframework.boot.autoconfigure.AutoConfiguration.imports
Spring Boot 3.0.0(2022.11)
- java 17 지원 (java 17 이상부터 사용가능)
- Spring Framework 6
스프링 부트의 Major 버전이 변경될 때, Spring Framework, Java 버전이 변경된다.
Major버전.Minor버전.Patch버전
Spring Boot 목표-1
Java -jar 로 실행이 가능
- java [-options] class [args...] (클래스 실행)
- java [-options] -jar jarfile [args...]
Spring Boot 목표-2
- 빠르고 광범위한 getting-started 경험
- 별도의 설정 없이 바로 사용 (out-of-box)
- out-of-box : box에서 꺼내서 바로 쓸 수 있는 상태
- 비기능 요구사항 기본 제공
- 비기능 요구사항은 로그가 잘 남아야 하거나 속도가 빨라야 하는 것 등이 있다.
- 코드 생성이나 XML 설정이 필요 없음
Spring Boot의 기능
단독으로 실행가능한 애플리케이션
- 실행형 jar, 실행형 war
내장형 웹 애플리케이션 서버 지원
- Tomcat, Jetty, Undertow, Netty for WebFlux
기본 설정된 Starter 모듈
- 의존성 (library dependency)
- 버전 호환성 보장 (dependencyManagement)
- 자동 설정 (Auto Configuration)
상용화에 필요한 통계, 상태점검 외부 설정 지원
- Actuator (Health, metrics)
- 외부 설정
Spring Framework과의 비교
- 라이브러리 의존성을 pom.xml 직접 설정해야 한다.
- spring boot에서는 spring-boot-starter-{module}만 설정하면 필요한 라이브러리 설정 완료
- 버전 정보를 직접 설정하고 테스트 해야 한다.
- spring-boot-starter-parent에서 spring 모듈의 버전 및 3rd Party 라이브러리 버전도 제공
- 런타임에만 확인 가능한 성가신 작업
- Web Application Server에 배포해야 한다.
- spring boot에서는 내장형 Web Application Server를 제공하기 때문에 서버를 구매하거나 설정할 필요가 없다.
spring-boot-starter-parent
- spring-boot-starter-parent의 버전 정보가 전체 프로젝트의 버전 정보를 관리한다.
- BOM(Bill of Materials - 자재 명세서)
- BOM에 기술된 정보로 3rd Party 라이브러리 호환성을 보장할 수 있다.
- 프로젝트의 dependency에는 버전 정보를 기술하지 않는다.
spring-boot-starter
- spring-boot-starter의 이름은 항상 spring-boot-starter으로 시작한다.
- 스프링의 다른 기능을 사용하고 싶으면 spring-boot-starter-{기술명}으로 대부분 작성할 수 있다.
SpringApplication
- spring-boot 실행의 시작점
- static method인 run으로 실행한다.
- SpringApplication의 객체를 생성 후 실행하거나 SpringApplicationBuilder로 실행 가능
@SpringBootApplication
public class StudentApplication {
    public static void main(String[] args) {
        SpringApplication.run(StudentApplication.class, args);
    }
}
@SpringBootApplication
다음 Annotation을 포함한 Meta Annotation
- @EnableAutoConfiguration
- 자동 설정 기능을 활성화 한다.
- 클래스 패스에 라이브러리가 존재하면 자동으로 Bean을 설정한다.
- @ComponentScan
- basePackage 하위의 컴포넌트를 스캔하여 Bean으로 등록한다.
- @SpringBootConfiguration
- 설정된 클래스 파일은 설정(java config)으로 사용할 수 있다.
Spring boot test
- @SpringBootTest를 선언하여 모든 설정을 로딩할 수 있다.
@SpringBootTest
class NhnStudentServiceTest {
  @Autowired
  StudentService studentService;

  @Test
  void testGetStudents() {
    // when
    List<Student> actual = studentService.getStudents();
    // then
    Assertions.assertThat(actual).hasSize(2);
  }
}
JPA Maven 라이브러리 의존성 추가
- pom.xml에 다음 라이브러리 의존성 추가
- in memory 데이터베이스인 h2 database를 사용
<dependency>
    <groupId>org.springframework.boot</groupId>
    <artifactId>spring-boot-starter-data-jpa</artifactId>
</dependency>

<dependency>
    <groupId>com.h2database</groupId>
    <artifactId>h2</artifactId>
    <scope>runtime</scope>
</dependency>
MySql 사용
MySql 준비
- 다음 명령어로 MySql을 실행한다.
$ docker run --name edu-mysql -e MYSQL_ROOT_PASSWORD=test -d -p3306:3306 mysql:5.7.35 --character-set-server=utf8 --collation-server=utf8_general_ci- 접속 테스트
$ mysql -u root -p -P3306 -h 127.0.0.1- 데이터베이스 생성
mysql> create database student_test;- 3306 포트가 사용중일 때 방법
sudo lsof -i:3306
sudo kill -9 {PID}
dependency 추가
- h2 삭제
- mysql-connector-java 추가
<dependency>
    <groupId>mysql</groupId>
    <artifactId>mysql-connector-java</artifactId>
    <version>5.1.48</version>
</dependency>
application.properties 수정
- JPA 테이블 생성 및 SQL 로깅
spring.jpa.generate-ddl=true
spring.jpa.show-sql=true- datasource
spring.datasource.driver-class-name=com.mysql.jdbc.Driver
spring.datasource.url=jdbc:mysql://localhost:3306/student_test?useSSL=false&serverTimezone=UTC&characterEncoding=UTF-8

spring.jpa.hibernate.naming.physical-strategy=org.hibernate.boot.model.naming.PhysicalNamingStrategyStandardImpl

spring.datasource.username=root
spring.datasource.password=test
RestApi 개발
의존성 변경
- spring-boot-starter를 spring-boot-starter-web으로 변경
Service에서 정보를 가져올 때는 @Transactional(readOnly = true)로 설정하고 commit/rollback을 해야하는 경우 @Transactional 사용
Spring Boot 프로젝트의 생성지원
Spring Boot initializer
Intellij IDEA Ultimate
- community edition에서는 지원하지 않음
Spring Tools 4 for Eclipse
- eclipse 프로젝트 기반
- 이클립스 스프링부트 프로젝트 생성 도구
Spring Tools 4 for Visual Studio Code
- Spring Boot 확장팩 설치 후 사용가능
- Spring Boot support in Visual Studio Code
Spring Boot Initializer
- 웹기반 Spring Boot 프로젝트 생성 도구
- 선택 옵션
- build tool
- language
- spring-boot version
- java version
- 라이브러리 의존성(dependency)
- Spring Boot 프로젝트팀 통계 수집

Intellij IDEA Ultimate
- 통합개발도구(IDE)
- Spring Boot | IntelliJ IDEA (jetbrains.com)
- 배포판에 포함된 Spring and SpringBoot 플러그인 사용
- Spring Boot initializr 사용
- actuator endpoint 도구 제공
- Bean 조회 도구 제공
Spring Tools 4 for Visual Studio Code
- 통합개발도구(IDE)
- Visual Studio Code IDE 기반
- spring 프로젝트에서 제공 Spring | Tools
- 확장팩 설치 후 사용
- Spring Boot Extension Pack - Visual Studio Marketplace

Spring Boot 프로젝트의 실행
Executable Jar/War
- 실행가능한 jar, war 생성
Build Tool
- maven, gradle로 직접 실행
Unix/Linux Services
- init.d Service
- systemd Service
Docker/Kubernetes
- Docker Image 생성 지원
Excutable Jar/War
- maven 또는 gradle로 실행가능한 jar 또는 war를 빌드한다.
- spring boot의 maven plugin이나 gradle plugin을 사용한다면 자동으로 생성할 수 있다.
$ mvn package //gradle bootjar$ java –jar target/student-0.0.1-SNAPSHOT.jarBuild Tool 사용
- maven 또는 gradle로 직접 실행한다.
- 로컬, 개발환경에서 사용할 수 있다.
$ mvn spring-boot:run$ gradle bootRunLinux Services (CentOS, Ubuntu)
- Linux Service 에서 실행하려면 완전 실행가능한 jar 를 빌드한다.
- maven, gradle에서 아래와 같이 spring-boot plugin 설정을 수정한다.
<plugin>
    <groupId>org.springframework.boot</groupId>
    <artifactId>spring-boot-maven-plugin</artifactId>
    <configuration>
        <executable>true</executable>
    </configuration>
</plugin>
bootJar {
launchScript()
}init.d
- init.d Service 설정 및 실행
$ sudo ln -s /var/app/student.jar /etc/init.d/student$ service student startsystemd
- systemd Service 설정 및 실행
- /etc/systemd/system/student.service 파일을 생성한다.
[Unit]
Description=student
After=syslog.target

[Service]
User=irteam
ExecStart=/var/app/student.jar
SuccessExitStatus=143

[Install]
WantedBy=multi-user.target
systemctl enable student.serviceDocker 실행
- Dockerfile을 직접 만들거나 빌드툴로 Docker 이미지를 생성한다.
$ mvn spring-boot:build-image –Dspring-boot.build-image.imageName=student$ gradle bootBuildImage --imageName=student- Docker로 컨테이너 실행
$ docker run –p8080:8080 student:latestK8s 실행
- tag 설정 및 registry 설정
$ docker tag student:0.0.1-SNAPSHOT registry.op.internal.dooray.io/nhn-edu/student:latest
$ docker push registry.op.internal.dooray.io/nhn-edu/student:latest- k8s 배포용 YAML 작성
$ kubectl create deployment student \
  --image=registry.op.internal.dooray.io/nhn-edu/student:latest \
--dry-run=client -o yaml > student.yaml- k8s deployment 배포
$ kubectl apply -f student.yaml
deployment.apps/student created- 8080 포트 노출
$ kubectl expose deployment student --type=NodePort --name=student-service --port 8080Spring-Boot의 View
Spring-boot의 View 지원
- spring boot에서 Thymeleaf, FreeMarker, Mustache, Groovy Templates, Velocity를 View template으로 제공한다.
Thymeleaf
- Spring Boot는 Thymeleaf를 기본 지원하여 간단한 설정으로 사용 가능
- html 문법 내에서 view를 구현할 수 있는 장점
Thymeleaf의 사용
- spring-boot-starter-thymeleaf 의존성 추가
<dependency>
 <groupId>org.springframework.boot</groupId>
 <artifactId>spring-boot-starter-thymeleaf</artifactId>
</dependency>- 프로젝트 루트의 /src/main/resource 경로에 templates 디렉토리를 생성하고 템플릿 작성
<!DOCTYPE html>
 <html xmlns:th="http://www.thymeleaf.org">
 <head> <meta charset="utf-8"> <title>welcome</title>
 </head>
 <body>
   <h1>Name</h1>
   <h2 th:text="${student.name}"></h2>
   <h1>Score</h1>
   <h2 th:text="${student.score}"></h2>
 </body>
</html>- view template을 사용하려면 @Controller를 사용
- /src/main/java 경로의 com.nhnent.edu.springboot 패키지에 StudentWebController 작성
- getStudent가 반환하는 student는 view template의 경로 중 일부
@Controller
public class StudentWebController {
    @GetMapping("/web/students/{id}")
    public String getStudent(@PathVariable Long id,
                              Model model){
        model.addAttribute("student", new Student("zbum", 100));
        return "student";
    }
}- view template의 경로 변경
- 만약, application.properties에 아래와 같이 설정되어 있고 getStudent 메서드가 "student"를 반환한다면 템플릿은 "/src/main/resources/templates/main/student.html"에 위치해야 한다.
spring.thymeleaf.enabled=true
spring.thymeleaf.prefix=classpath:/templates/main/
spring.thymeleaf.suffix=.html
JSP의 사용
- spring-boot에서 JSP를 사용할 수 있지만 권장하지는 않는다.
Spring-Boot에서 JSP 제약
- war 패키징 된 경우에만 사용이 가능 (실행형 war 또는 tomcat에서 동작)
- 실행형 jar에서는 동작하지 않음
- undertow는 JSP를 지원하지 않음
패키징 변경
- jar에는 WEB-INF를 포함하지 않기 때문에 war로 패키징한다.
- JSTL지원 및 JSP 컴파일을 위해서 두 개의 라이브러리를 추가한다.
<packaging>war</packaging>라이브러리 의존성
  <!-- JSTL for JSP -->
  <dependency>
    <groupId>javax.servlet</groupId>
    <artifactId>jstl</artifactId>
  </dependency>
  <!-- Need this to compile JSP -->
  <dependency>
    <groupId>org.apache.tomcat.embed</groupId>
    <artifactId>tomcat-embed-jasper</artifactId>
    <scope>provided</scope>
  </dependency>
main 클래스 변경
- war로 패키징 한 경우, main 클래스가 SpringBootServletInitializer을 상속받도록 수정해야 한다.
@SpringBootApplication
public class StudentApplication extends SpringBootServletInitializer {
  public static void main(String[] args) {
    SpringApplication.run(StudentApplication.class);
  }
  @Override
  protected SpringApplicationBuilder configure(SpringApplicationBuilder builder) {
    return builder.sources(StudentApplication.class);
  }
}
JSP 파일 작성
- 프로젝트에 /src/main/webapp/WEB-INF/jsp 디렉토리를 생성하고 jsp file 작성
<!DOCTYPE html>
<html lang="ko">
<head>
  <meta charset="utf-8">
  <title>welcome</title>
</head>
<body>
  <h1>JSP Sample</h1>
  <h2>${message}</h2>
</body>
</html>
Controller 클래스 생성
- /src/main/java 경로의 com.nhn.edu.springboot 패키지에 Controller 클래스를 작성
- 화면에 표시할 attribute는 Map 객체를 사용
@Controller
public class WelcomeController {
  @GetMapping("/welcome")
  public String welcome(Map model) {
    model.put("message", "Welcome to the world!");
    return "welcome";
  }
}
JSP의 경로 변경
- 만약, application.properties에 아래와 같이 설정되어 있고 welcome 메서드가 "welcome"를 반환한다면 jsp 파일은 "/src/main/webapp/WEB-INF/jsp/welcome.jsp"에 위치해야 한다.
spring.mvc.view.prefix=WEB-INF/jsp/
spring.mvc.view.suffix=.jsp
JSP를 사용하는 Spring-Boot 애플리케이션의 실행
- Executable War를 이용한 실행
$ mvn clean package
$ java -jar target/student-1.0.0-SNAPSHOT.war - spring-boot maven plugin을 이용한 실행
$ mvn spring-boot:run- 또는, tomcat 등 Web application Server에 deploy
스프링 부트가 제공하는 Spring MVC 설정
- ContentNegotiatingViewResolver, BeanNameViewResolver
- 정적 리소스 서비스 지원
- Converter, Formatter 빈 자동 등록
- HttpMessageConverters
- MessageCodesResolver
@EnableWebMvc 사용
- 스프링부트가 제공하는 Spring MVC 자동설정을 모두 비활성
@EnableWebMvc
@Configuration
public class WebMvcConfiguration implements WebMvcConfigurer {
  //...
}
@Configuration 사용
- 스프링부트가 제공하는 Spring MVC 자동설정에 필요한 설정을 추가 할 때 사용
@Configuration
public class WebMvcConfiguration implements WebMvcConfigurer {
  //...
}
Dependency management
Spring Boot Stater
- Spring Framework 관련 기술을 사용하기 위한 의존성 관리 세트
- 40개 이상의 Spring Boot stater를 Spring Boot에서 제공
- 3rd Party에서 제공
| Stater 이름 | 설명 |
|---|---|
| spring-boot-stater-parent | spring boot 프로젝트에서 상속 받아야 할 pom |
| spring-boot-starter | Auto Configuration을 포함한 핵심 stater, loggin, yaml 지원 |
| spring-boot-stater-web | RESTful, Web 애플리케이션 구축을 위한 stater, 내장 tomcat 포함 |
| spring-boot-stater-amqp | Spring AMQP, Rabbit MQ 사용을 위한 설정 |
| spring-boot-starter-mail | Java mail을 사용하기 위한 설정, spring framework의 메일 발송기능 |
Spring Boot Starter
- Pivotal Software사의 공식 stater는 spring-boot-stater-* 패턴으로 명명한다.
- spring-boot-stater-*의 라이브러리 의존성을 추가하는 것 만으로도 기본 설정으로 기능이 동작한다.
- 공식 stater가 아닌 경우는 spring-boot로 시작하지 않아야 한다. 보통 {function}-spring-boot-starter과 같이 명명
spring-boot-starter-parent
- spring-boot-starter-parent는 spring-boot-dependencies를 상속
- spring-boot 버전별로 지원하는 라이브러리 의존성 목록(Bills of Materials)
- spring-boot 버전을 업그레이드하면 라이브러리 의존성도 모두 자동 업그레이드
<parent>
    <groupId>org.springframework.boot</groupId>
    <artifactId>spring-boot-dependencies</artifactId>
    <version>2.7.6</version>
    <relativePath>../../spring-boot-dependencies</relativePath>
</parent>
spring-boot-dependencies
- 사용하는 라이브러리의 버전을 property로 관리
<properties>
    <activemq.version>5.16.5</activemq.version>
    <antlr2.version>2.7.7</antlr2.version>
    <appengine-sdk.version>1.9.98</appengine-sdk.version>
    <artemis.version>2.19.1</artemis.version>
    <aspectj.version>1.9.7</aspectj.version>
    <assertj.version>3.22.0</assertj.version>
    <atomikos.version>4.0.6</atomikos.version>
    <awaitility.version>4.2.0</awaitility.version>
</properties>- dependencyManagement로 사용할 라이브러리의 버전을 미리 지정
<dependencymanagement>
  <dependencies>
    <dependency>
      <groupId>org.springframework.boot</groupId>
      <artifactId>spring-boot</artifactId>
      <version>2.7.6</version>
    </dependency>
    <dependency>
      <groupId>org.springframework.boot</groupId>
      <artifactId>spring-boot-web</artifactId>
      <version>2.7.6</version>
    </dependency>
...
  </dependencies>
</dependencymanagement>
spring-boot-starter-web
- spring-core, spring-web, spring-webmvc, 내장 tomcat 서버 및 관련 라이브러리 설정을 일괄처리
    <dependency>
      <groupId>org.springframework.boot</groupId>
      <artifactId>spring-boot-starter</artifactId>
      <version>2.7.6</version>
      <scope>compile</scope>
    </dependency>
    <dependency>
      <groupId>org.springframework.boot</groupId>
      <artifactId>spring-boot-starter-json</artifactId>
      <version>2.7.6</version>
      <scope>compile</scope>
    </dependency>
    <dependency>
      <groupId>org.springframework.boot</groupId>
      <artifactId>spring-boot-starter-tomcat</artifactId>
      <version>2.7.6</version>
      <scope>compile</scope>
    </dependency>
tomcat 대신 jetty로 실행하기 위해서는
- dependency안에 exclusions를 만들고 그 안에 exclusion을 만들어 tomcat을 작성하고
- 바깥 dependencies에 jetty의존성을 추가한다.
<dependency>
	<groupId>org.springframework.boot</groupId>
	<artifactId>spring-boot-starter-web</artifactId>
	<exclusions>
		<exclusion>
			<groupId>org.springframework.boot</groupId>
			<artifactId>spring-boot-starter-tomcat</artifactId>
		</exclusion>
	</exclusions>
</dependency>

<!-- jetty -->
<dependency>
	<groupId>org.springframework.boot</groupId>
	<artifactId>spring-boot-starter-jetty</artifactId>
</dependency>
spring-boot 프로젝트의 main 메서드
- public static void main 메서드에서 SpringApplication.run을 실행시킨다.
- args는 command 라인에서 보낸 인자를 전달한다. (--debug, --spring.profiles.active)
SpringApplication 사용 방법
- static method
- use construction
- use builder
Static 메서드
- 가장 일반적인 사용방법
@SpringBootApplication
public class StudentApplication {
   public static void main(String[] args) {
         SpringApplication.run(StudentApplication.class, args);
   }
}
생성자 사용
- static 메서드 내부에 동일한 구현이 있다.
@SpringBootApplication
public class StudentApplication {
   public static void main(String[] args) {
      SpringApplication application = new SpringApplication(StudentApplication.class);
      application.run(args);
   }
}
builder 사용
- 빌더로 여려 개의 web context를 구성할 수 있으며 parent-child의 계층구조로 설정가능
@SpringBootApplication
public class StudentApplication {

   public static void main(String[] args) {
    new SpringApplicationBuilder()
       .sources(StudentConfig.class).web(WebApplicationType.NONE)
       .child(FirstChildConfig.class).web(WebApplicationType.SERVLET)
       .sibling(SecondChildConfig.class).web(WebApplicationType.SERVLET)
       .run(args);
   }

}
Auto Configuration
@EnableAutoConfiguration
- Auto Configuration은 애플리케이션에서 필요한 Bean을 유추해서 구성해 주는 기능을 담당
- @EnableAutoConfiguration 설정은 spring-boot의 AutoConfiguration을 사용하겠다는 선언
- @SpringBootApplication에 포함
- java configuration은 auto configuration으로 동작할 수 있음
- java configuration이 auto configuration으로 동작하기 위해서 설정파일에 대상 Configuration이 설정되어야함
2.6.X 이전
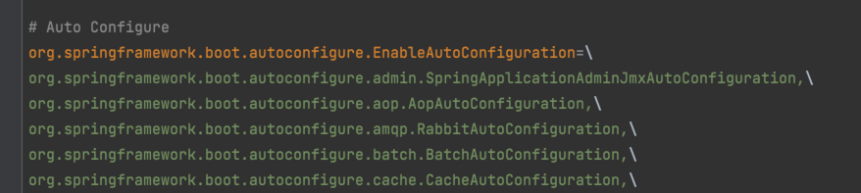
- spring-boot-autoconfigure/META-INF/spring.factories에 spring-boot가 제공하는 모든 AutoConfiguration이 설정되어 있음
2.7.X 이후
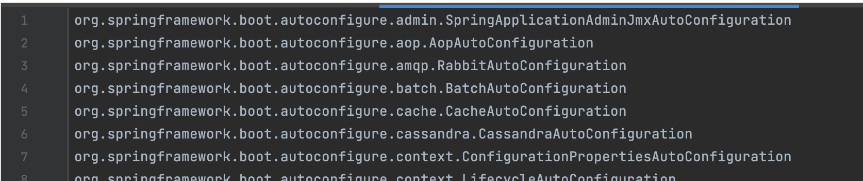
- spring-boot-autoconfigure/META-INF/spring/org.springframework.boot.autoconfigure.AutoConfiguration.imports
AutoConfiguration에서 제외
- auto configuration에서 설정을 제외하고 싶다면 @EnableAutoConfiguration의 exclude를 설정한다.
- @SpringBootApplication을 사용한 경우도 동일한 방법으로 제외할 수 있다.
@SpringBootApplication(exclude= RedisAutoConfiguration.class)
public class StudentApplication {
    public static void main(String[] args) {
        SpringApplication.run(StudentApplication.class, args);
    }
}
Auto Configuration 예
- @ConditionalOnClass, @ConditionalOnMissingBean 등의 애너테이션으로 설정 제어
- EmbeddedWebServerFactoryCustomizerAutoConfiguration.java
@AutoConfiguration
@ConditionalOnWebApplication
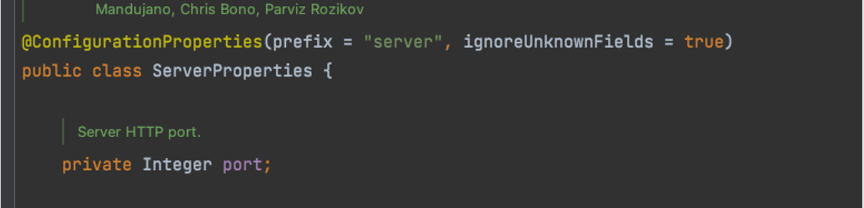
@EnableConfigurationProperties(ServerProperties.class)
public class EmbeddedWebServerFactoryCustomizerAutoConfiguration {
/**
* Nested configuration if Tomcat is being used.
*/
@Configuration(proxyBeanMethods = false)
@ConditionalOnClass({ Tomcat.class, UpgradeProtocol.class })
public static class TomcatWebServerFactoryCustomizerConfiguration {
@Bean
public TomcatWebServerFactoryCustomizer tomcatWebServerFactoryCustomizer(Environment environment,
ServerProperties serverProperties) {
return new TomcatWebServerFactoryCustomizer(environment, serverProperties);
}
}
/**
* Nested configuration if Jetty is being used.
*/
@Configuration(proxyBeanMethods = false)
@ConditionalOnClass({ Server.class, Loader.class, WebAppContext.class })
public static class JettyWebServerFactoryCustomizerConfiguration {
@Bean
public JettyWebServerFactoryCustomizer jettyWebServerFactoryCustomizer(Environment environment,
ServerProperties serverProperties) {
return new JettyWebServerFactoryCustomizer(environment, serverProperties);
}
}
// 생략
}@Conditional
- Spring Framework 4.0 부터 제공
- 설정된 모든 Condition 인터페이스의 조건이 true인 경우 동작
Conditional 애너테이션
@Retention(RetentionPolicy.RUNTIME)
@Target({ElementType.TYPE, ElementType.METHOD})
public @interface Conditional {
  /**
  * All {@link Condition}s that must {@linkplain Condition#matches match}
  * in order for the component to be registered.
  */
  Class? extends Condition[] value();
}
Condition.java
- matches 메서드의 반환 값이 true인 경우 동작
public interface Condition {

    boolean matches(ConditionContext context, AnnotatedTypeMetadata metadata);

}
spring-boot가 제공하는 @Conditional의 확장
| 구분 | 내용 | 비고 |
|---|---|---|
| @ConditionalOnWebApplication | 프로젝트가 웹 애플리케이션이면 설정 동작 | - |
| @ConditionalOnBean | 해당 Bean이 Spring Context에 존재하면 동작 | Auto configuration only |
| @ConditionalOnMissingBean | 해당 Bean이 Spring Context에 존재하지 않으면 동작 | Auto configuration only |
| @ConditionalOnClass | 해당 클래스가 존재하면 자동설정 등록 | - |
| @ConditionalOnMissingClass | 해당 클래스가 존재하지 않으면 자동설정 등록 | - |
| @ConditionalOnResource | 자원이(file 등) 존재하면 동작 | - |
| @ConditionalOnProperty | 프로퍼티가 존재하면 동작 | - |
| @ConditionalOnJava | JVM 버전에 따라 동작여부 결정 | - |
| @ConditionalOnWarDeployment | 전통적인 war 배포 방식에서만 동작 | - |
| @ConditionalOnExpression | SpEL의 결과에 따라 동작여부 결정 | - |
@ConditionalOnBean
- Bean이 이미 설정된 경우에 동작
- MyService 타입의 Bean이 BeanFactory에 이미 등록된 경우에 동작한다.
- Configuration이 AutoConfigurration에 등록된 경우에 사용할 수 있다.
	@Configuration
	public class MyAutoConfiguration {

    	@ConditionalOnBean
		@Bean
		public MyService myService() {
    		...
		}

	}
@ConditionalOnMissingBean
- BeanFactory에 Bean이 설정되지 않은 경우에 동작
- MyService 타입의 Bean이 BeanFactory에 등록되지 않은 경우에 동작한다.
- Configuration이 AutoConfiguration에 등록된 경우에 사용할 수 있다.
   @Configuration
   public class MyAutoConfiguration {

       @ConditionalOnMissingBean
       @Bean
       public MyService myService() {
           ...
       }

   }
Externalized Configuration
- spring-boot는 같은 소스코드로 여러 환경에서 동작할 수 있도록 외부화 설정을 제공한다.
- java properties, YAML, 환경변수, 실행 인자로 설정 가능
- 전체 프로젝트의 설정은 .properties, .yaml 중 하나만 사용하는 것을 권장
- 같은 곳에 application.properties, application.yaml이 동시에 존재하면 application.properties가 우선함
포트 변경
- application.properties
- 환경변수
- 실행 명령어 인자 (Command Line argument)
application.properties
server.port=8888환경변수
$ SERVER_PORT=8888 java –jar target/student.jar 실행 명령어 인자 (Command Line argument)
$ java –jar target/student.jar --server.port=8888포트 변경
- spring-boot가 제공하는 @ConfigurationProperties 바인딩으로 동작
- spring-boot-autoconfiguration.jar:org.springframework.boot.ServerProperties에서 @ConfigurationProperties 바인딩 제공
Externalized Configuration example
java property (application.properties)
nhn.student.name=sangsangYAML (application.yaml)
nhn:
	student:
    	name: sangsang
Externalized Configuration
- Spring Boot는 설정값을 바인딩 하기 위한 2가지 방법을 제공한다.
- @Value 바인딩
- @ConfigurationProperties 바인딩
@Value 바인딩
- 속성값(properties)을 @Value 애너테이션으로 바인딩하여 사용
@Component
public class MyBean {

  @Value("${nhn.student.name}")
  private String name;

  // ...
}
@ConfigurationProperties 바인딩
- 속성값(properties)을 @ConfigurationProperties로 바인딩하여 사용
- @ConfigurationProperties로 설정된 클래스는 Dependency Injection으로 참조하여 사용
@ConfigurationProperties(”nhn.student")
public class StudentProperties {
private String name;
// getters / setters...
}
Externalized Configuration 자동완성
- configuration metadata를 작성하면 IDE에서 "자동 완성" 기능을 사용할 수 있다.
- spring-boot-configuration-processor를 의존성에 설정하면 configuration metadata를 자동 생성한다.
maven
<dependency>
    <groupId>org.springframework.boot</groupId>
    <artifactId>spring-boot-configuration-processor</artifactId>
    <optional>true</optional>
</dependency>
gradle
dependencies {
 annotationProcessor "org.springframework.boot:spring-boot-configuration-processor"
}
@ConofigurationProperties의 Relaxed Binding
- 속성값을 @ConfigurationProperties 빈에 바인딩하기 위해 Relaxed Binding을 사용하기 때문에 이름이 정확히 일치할 필요는 없음
- @Value를 사용한 경우, Relaxed Binding을 지원하지 않음
ConfigurationProperties 구현 예
@ConfigurationProperties(”nhn-academy.student")
public class StudentProperties {
private String firstName;
// getters / setters...
}
바인딩 가능한 속성
- nhn-academy.student.first-name : 권장
- nhnAcademy.student.firstName : 카멜케이스 표현
- nhn_academy.student.first_name : 언더스코어 표현
- NHNACADEMY_STUDENT-FIRSTNAME : 대문자 형식 (시스템 환경변수에 권장)
@ConfigurationProperties 활성화
- @ConfigurationProperties를 활성화 하여 빈으로 등록해야 사용가능
@ConfigurationPropertiesScan
- @ConfigurationProperties는 @ConfigurationPropertiesScan을 사용하여 Bean으로 활성화 해야 함
- 설정한 클래스의 base package 하위의 모든 @ConfigurationProperties을 스캔
@SpringBootApplication
@ConfigurationPropertiesScan
public class StudentApplication {
    public static void main(String[] args) {
        SpringApplication.run(StudentApplication.class, args);
    }
}
@EnableConfigurationProperties
- @ConfigurationProperties는 @EnableConfigurationProperties를 사용하여 Bean으로 활성화 해야 함
- value에 지정한 ConfigurationProperties 클래스를 Bean으로 활성화
@SpringBootApplication
@EnableConfigurationProperties(value= SystemNameProperties.class)
public class StudentApplication {
    public static void main(String[] args) {
        SpringApplication.run(StudentApplication.class, args);
    }
}
spring-boot에서는 bean proxy method를 전부 기본을 false로 해놓았다.
이유는 대부분이 msa로 동작하므로 크기가 작아서 서버를 띄울 때 속도를 높이기 위해서 false로 해놓은 것이다.