spring profile
- 프로필 지정 설정파일은 spring.profiles.active 인자로 로딩 여부가 결정된다.
- 만약, prod 프로파일을 지정했다면, application.properties와 application-prod.properties를 모두 로딩한다.
$ java –jar target/student.jar --spring.profiles.active=prodExternalized Configuration 우선순위
- spring-boot는 다음 순서로 설정을 읽어 들인다. 중복되는 경우, 덮어쓰게 된다.(override)
application.properties (프로파일에 따라 순위 변경) > OS 환경 변수 > SPRING_APPLICATION_JSON (json 형식의 환경 변수) > 실행 명령어와 함께 전달된 인자 (java -jar student.jar --server.port=9999) > @TestPropertiesSource (테스트 코드에 포함된 애너테이션)
외부 설정은 실행 명령어 인자가 가장 우선순위가 높고 그 다음은 환경변수이고 그 다음으로 application.properties이다.
Application Properties 우선순위
- application.properties는 다음의 순서로 설정을 읽어 들인다.
- 실행 인자로 제공하는 spring.profiles.active 설정으로 application-{profile}.properties를 사용할 것인지 결정한다.
- 중복되는 경우, 덮어쓰게 된다.
application.properties (inside jar) > application-{profile}.properties (inside jar) > application.properties (outside jar) > application-{profile}.properties (outside jar)
Application Properties 우선순위
- application.properties 위치를 찾아가는 순서에 따라 최종 설정이 결정된다.
Classpath root > Classpath의 /config 패키지 > 실행 디렉토리 > 실행 디렉토리의 config 디렉토리
spring-boot 개발자 도구
spring-boot는 개발자 편의를 위한 툴을 제공한다.
- 자동재시작
- 라이브 리로드
- 전역 설정
- 원격 애플리케이션
spring-boot 개발자 도구 활성화
- spring-boot-devtools Module 의존성을 추가하여 개발자 도구 활성화
maven
<dependencies>
    <dependency>
        <groupId>org.springframework.boot</groupId>
        <artifactId>spring-boot-devtools</artifactId>
        <optional>true</optional>
    </dependency>
</dependencies>
gradle
dependencies {
    developmentOnly("org.springframework.boot:spring-boot-devtools")
}
개발자 도구 비활성화
- java -jar로 실행하면 상용 (Production) 환경으로 판단하고 비활성화됨
- 서블릿 컨테이너에서 동작하면 자동 비활성화 되지 않기 때문에 -Dspring.devtools.restart.enabled=false 설정 필요
- maven plugin의 repackaged로 생성된 바이너리 파일에는 자동으로 devtools가 제거됨
개발자 도구와 캐시(cache)
- 개발자 도구는 뷰 템플릿, 정적 리소스 캐시(cache)를 자동으로 비활성화 함
개발자 도구 - 자동 재시작
- 기본적으로 애플리케이션의 클래스 패스 내 파일이 변경되면 자동으로 재시작
- 정적 자원이나 뷰 템플릿은 재시작하지 않음
- IDE에서 코드 변경 후 잦은 테스트를 할 경우 유용함
keyMap에서 Build Project를 찾아서 사용하면 된다.
개발자 도구 - 라이브 리로드
- spring-boot-devtools에 라이브 리로드 서버가 포함
- 자동 재시작(Automatic Restart)될 시 브라우저 자동 새로고침
- 지원 브라우저 : Chrome, Firefox, Safari
- 브라우저에 확장팩을 설치해야 한다.
- 라이브 리로드
개발자 도구 - 전역 설정
- $HOME/.config/spring-boot 디렉토리에 다음을 파일을 추가하여 개발자 도구 설정
- spring-boot-devtools.properties
- spring-boot-devtools.yaml
- spring-boot-devtools.yml
- 개발자 도구를 사용하는 모든 애플리케이션에 설정 적용
- 예) 자동 재시작 트리거 파일 전역설정
spring.devtools.restart.trigger-file=.reloadtrigger개발자 도구 - 원격 애플리케이션
- 원격에서 동작하는 애플리케이션에서 개발자 도구의 자동 재시작 기능을 사용할 수 있음
- 신뢰할 수 있는 네트워크(trusted network)나 SSL 통신에서 사용해야함
- 활성화하려면 빌드가 개발자 도구를 포함하고, spring.devtools.remote.secret 속성을 설정
<build>
    <plugins>
        <plugin>
            <groupId>org.springframework.boot</groupId>
            <artifactId>spring-boot-maven-plugin</artifactId>
            <configuration>
                <excludeDevtools>false</excludeDevtools>
            </configuration>
        </plugin>
    </plugins>
</build>- IDE에서 다음의 순서로 설정
- +버튼 : application 선택
- 실행 main 클래스 : org.springframework.boot.devtools.RemoteSpringApplication
- program 인자 : 서비스 주소 예) http://localhost:8080
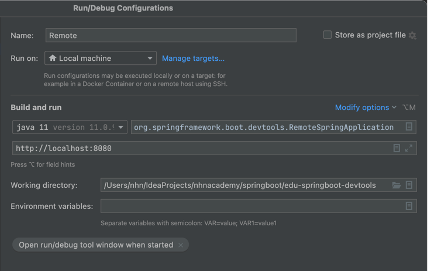
개발자 도구 - 원격 애플리케이션 클라이언트
- IDE 설정을 실행
- IDE에서 클래스 수정 및 빌드시 원격 서버로 전송 및 자동 재시작 동작
Spring Boot Actuator
- 상용화 준비(Production-Ready) 기능을 위한 Spring Boot 모듈
- 실행 중인 애플리케이션을 관리하고 정보를 수집하고 상태를 점검하는 진입점 제공
- HTTP 또는 JMX를 사용할 수 있음
Actuator 설치
maven
<dependencies>
  <dependency>
     <groupId>org.springframework.boot</groupId>
     <artifactId>spring-boot-starter-actuator</artifactId>
  </dependency>
</dependencies>
gradle
dependencies {
    compile("org.springframework.boot:spring-boot-starter-actuator")
}
Spring Boot Actuator - Endpoint
- Actuator 엔드포인트로 spring boot 애플리케이션의 모니터링 및 상호작용 가능
- 스프링 부트는 다양한 빌트인 엔트포인트를 제공
| ID | 설명 |
|---|---|
| autitevent | 응용시스템의 모든 감사 이벤트 목록을 제공, AuditEventRepository 빈 필요 |
| beans | 애플리케이션의 모든 빈의 목록을 제공 |
| caches | 가능한 캐시를 노출 |
| conditions | 설정 및 자동설정 클래스를 평가한 조건의 목록과 조건의 부합 여부에 대한 이유를 제공 |
| configprops | 값이 설정된 모든 @ConfigurationProperties의 목록을 제공 |
| env | 스프링의 ConfigurableEnvironment의 속성을 제공 |
| health | 애플리케이션의 health 정보를 제공 |
| httptrace | http의 요청, 응답 내용을 표시, (기본 설정으로 100개 까지만 제공, HttpTraceRepository 빈 필요) |
| info | 애플리케이션의 정보 제공 |
| shutdown | 애플리케이션의 셧다운 명령 |
| startup | startup 단계 데이터를 제공 (SpringApplication을 BufferingApplicationStartup으로 설정 필요) |
| threaddump | 쓰레드 덤프를 실행 |
threaddump를 사용하면 어디서 스레드가 돌고 있는지 알 수 있다.
Spring Boot Actuator - Endpoint 활성화
- 기본적으로 shutdown을 제외한 모든 end point는 활성화
- management.endpoint.{id}.enabled속성으로 활성화/비활성화 설정
모두 비활성화
management.endpoints.enabled-by-default=falseSpring Boot Actuator - Endpoint 노출방식(JMX, Web) 설정
- actuator는 민감한 정보를 노출하기 때문에 노출방식을 신중하게 결정해야 함
- Web은 health Endpoint만 제공함
health endpoint의 동작은 HealthContributor의 타입의 빈을 활용해서 전부 확인 후 하나라도 DOWN이면 DOWN이 리턴된다.
Spring Boot Actuator - Endpoint 노출방식(JMX, Web) 설정
- JMX는 모든 Endpoint를 노출하고, Web은 health만 노출하는 것이 기본 설정
- include, exclude 프로퍼티로 노출 방식을 활성화 할 수 있다.
| Property | 기본 설정 |
|---|---|
| management.endpoints.jmx.exposure.exclude | * |
| management.endpoints.jmx.exposure.include | * |
| management.endpoints.web.exposure.exclude | * |
| management.endpoints.web.exposure.include | health |
Spring Boot Actuator - Endpoint 노출방식(JMX, Web) 설정
- exclude 설정은 include 설정보다 우선한다.
- 예) health, info만 JMX에서 노출
management.endpoints.jmx.exposure.include=health,info- 예) env, bean을 제외한 모든 Endpoint를 web에서 노출
management.endpoints.web.exposure.include=*
management.endpoints.web.exposure.exclude=env,bean
Spring Boot Actuator 보안
Spring Security 설정
- spring-security가 클래스 패스에 존재하면 health를 제외한 모든 Endpoint는 기본 자동설정기능에 의해 보호된다.
- WebSecurityConfigurerAdapter 또는 SecurityFilterChain 빈을 설정하여 기본 자동설정을 제거하고 보안 설정을 정의할 수 있다.
@Configuration(proxyBeanMethods = false)
public class MySecurityConfiguration {

    @Bean
    public SecurityFilterChain securityFilterChain(HttpSecurity http) throws Exception {
        http.securityMatcher(EndpointRequest.toAnyEndpoint());
        http.authorizeHttpRequests((requests) -> requests.anyRequest().permitAll());
        return http.build();
    }

}
Endpoint 사용자 정의
- 다음의 애너테이션을 사용하여 사용자정의 Endpoint를 노출할 수 있다.
@Endpoint : Endpoint로 노출할 빈에 설정
- @WebEndpoint : HTTP Endpoint로만 노출할 때
- @JmxEndpoint : JMX Endpoint로만 노출할 때
@ReadOperation, @WriteOperation, @DeleteOperation
- HTTP의 GET, POST, DELETE 메서드
@EndpointWebExtension, @EndpointJmxExtension
- 이미 존재하는 Endpoint에 기술 전용 오퍼레이션을 추가할 때 사용
Endpoint 사용자 정의 예
- Counter를 관리하는 Endpoint 예
@Component
@Endpoint(id = "counter")
public class CounterEndpoint {
   private final AtomicLong counter = new AtomicLong();

   // curl -XGET http://localhost:8080/actuator/counter
   @ReadOperation
   public Long read() {
       return counter.get();
   }

   // curl –X POST -H"Content-Type: application/json" -d'{"delta":100}'  http://localhost:8080/actuator/counter
   @WriteOperation
   public Long increment(@Nullable Long delta) {
       if (delta == null) {
           return counter.incrementAndGet();
       }
       return counter.addAndGet(delta );
   }

   // curl –X DELETE http://localhost:8080/actuator/counter
   @DeleteOperation
   public Long reset() {
       counter.set(0);
       return counter.get();
   }
}
Endpoint 사용자 정의
- 이미 존재하는 Endpoint에 특정 기술에서 동작하는 Endpoint를 추가하고 싶으면 @EndpointWebExtension, @EndpointJmxExtension을 사용한다.
@EndpointWebExtension(endpoint = CounterEndpoint.class)
@Component
public class CounterWebEndPoint {
  private final CounterEndpoint target;
  public CounterWebEndPoint(CounterEndpoint target) {
    this.target = target;
  }
  @WriteOperation
  public WebEndpointResponse<Long> increment(@Nullable Long delta) {
    return new WebEndpointResponse<>(target.increment(delta));
  }
}
Health Endpoint
- 애플리케이션의 정상동작 정보를 제공한다.
- ApplicationContext 내의 HealthContributor 타입의 빈을 모두 활용해서 정보를 제공한다.
- HealthContributor는 HealthIndicator나 CompositeHealthContributor의 형태로 사용
- HealthIndicator : 실제 Health 정보 제공
- CompositeHealthContributor : HealthContributor들의 조합정보를 제공
- management.endpoint.health.show-details=always를 설정하면 각각의 HealthContributor 상세 정보를 볼 수 있다.
$ http://localhost:8080/actuator/healthSpring Boot의 기본 HealthIndicators
- Auto Configuration에 의해서 동작여부 결정
- CassandraDriverHealthIndicator : 카산드라 데이터베이스 상태 체크
- CouchbaseHealthIndicator : 카우치베이스 클러스터 상태 체크
- DiskSpaceHealthIndicator : 디스크 공간 체크
- DataSourceHealthIndicator : DataSource에서 커넥션을 얻을 수 있는지 체크
- RedisHealthIndicator : 레디스 서버의 상태 체크
Kubernetes용 HealthIndicators
| Key | Name | Description |
|---|---|---|
| livenessstate | LivenessStateHealthIndicator | "Liveness" 상태 |
| readinessstate | ReadinessStateHealthIndicator | "Readiness" 상태 |
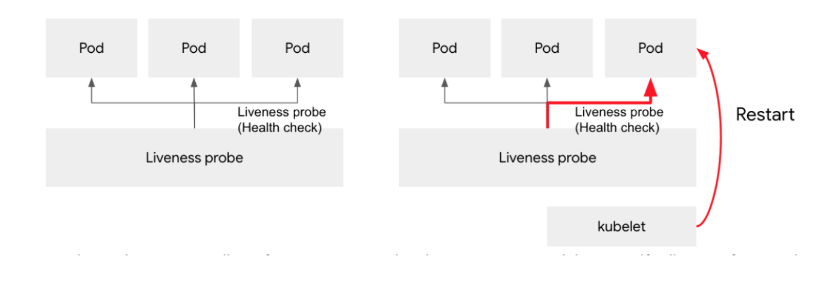
Liveness 상태 : 프로세스가 살아있는 상태
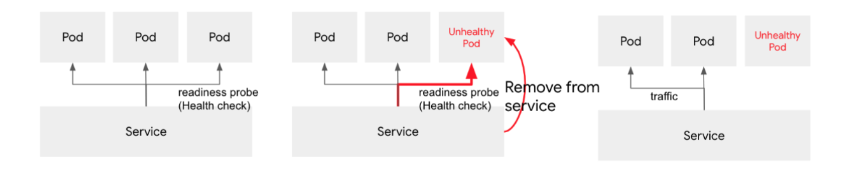
Readiness 상태 : 요청을 처리할 준비가 되어있는 상태
LivenessProbe
- 운영중에 Pod의 LivenessProbe을 점검하여 실패하면 Pod 삭제 후 다시 생성
ReadinessProbe
- 운영 중에 Pod의 ReadinessProbe을 점검하여 서비스에서 제외한다.
커스텀 HealthIndicator 작성
- 커스텀 health 정보를 제공하려면 HealthIndicator 인터페이스를 구현한다.
- health() 메서드에서 Health 응답을 반환한다.
@Component
public class MyHealthIndicator implements HealthIndicator {

    @Override
    public Health health() {
        int errorCode = check();
        if (errorCode != 0) {
            return Health.down().withDetail("Error Code", errorCode).build();
        }
        return Health.up().build();
    }

    private int check() {
        // perform some specific health check
        return ...
    }

}
info Endpoint
- 애플리케이션의 정보를 제공한다.
- ApplicationContext 내의 InfoContributor 타입의 빈을 모두 활용해서 정보를 제공한다.
http://localhost:8080/actuator/infoinfo Endpoint - EnvironmentInfoContributor
- info.* 형식의 모든 환경변수 정보 제공 (spring boot 2.6 이후 부터 기본 비활성화)
- 기존의 환경변수랑 충돌이 일어나는 경우가 있어서 제외되었다.
- application.properties 설정 추가
management.info.env.enabled=true
info.edu.springboot.version=10.1.1
info.edu.springboot.instructor=sangsang- info endpoint 호출 결과
{
   "edu": {
      "springboot": {
         "version": "10.1.1",
         "instructor": "manty"
      }
   },
   "app": {
      "java": {
         "source": "11"
      }
   }
}
info Endpoint - GitInfoContributor
- 클래스 패스상의 git.properties 정보 제공, 실행 중인 서비스의 git 정보 확인용
- maven, gradle 설정 필요
git init을 한 후 commit이 남겨져 있어야 확인이 가능하다.
maven
<build>
  <plugins>
    ...
    <plugin>
        <groupId>pl.project13.maven</groupId>
        <artifactId>git-commit-id-plugin</artifactId>
    </plugin>
  </plugins>
</build>
gradle
plugins {
      id "com.gorylenko.gradle-git-properties" version "1.5.1"
}- info endpoint 호출 결과
{
   "git": {
      "branch": "master",
      "commit": {
         "id": "077a397",
         "time": "2022-02-01T05:12:05Z"
      }
   }
}
info Endpoint - BuildInfoContributor
- 클래스 패스의 META-INF/build-info.properties 파일 정보 제공
- maven, gradle 설정 필요
maven
<plugin>
  <groupid>org.springframework.boot</groupid>
  <artifactid>spring-boot-maven-plugin</artifactid>
  <executions>
    <execution>
      <goals>
        <goal>build-info</goal>
      </goals>
    </execution>
  </executions>
</plugin>
gradle
springBoot {
     buildInfo()
}- info endpoint 호출 결과
{
   "build": {
      "artifact": "student",
      "name": "student",
      "time": "2022-02-01T07:07:41.030Z",
      "version": "0.0.1-SNAPSHOT",
      "group": "com.nhn.edu.springboot"
   }
}
info Endpoint - InfoContributor 사용자 정의
- InfoContributor 인터페이스의 구현체를 개발하여 빈으로 등록한다.
@Component
public class ExampleInfoContributor implements InfoContributor {
    @Override
    public void contribute(Info.Builder builder) {
        builder.withDetail("example", Map.of("key", "value"));
    }
}- 사용자 정의 InfoContributor
{
   "example": {
      "key": "value"
   }
}
Endpoint 경로변경
- Spring Boot Actuator의 기본 경로는 /actuator이다.
- management.endpoints.web.base-path 속성을 변경하여 경로를 변경할 수 있다.
actuator endpoint 경로변경
management.endpoints.web.base-path=/actuator2   # 2.x
management.context-path=/actuator2 				#1.x : Set /actuator
Endpoint Port 변경
- Spring Boot Actuator의 기본 포트는 서비스 포트와 동일하다.
- management.server.port 속성을 변경하여 포트를 변경할 수 있다.
management.server.port=8888Endpoint 경로변경과 Port 변경 중 완전히 숨길 수 있는 방법은 Port 변경이다.
Port 변경은 웹 서버 두개를 띄운다.
prometheus Endpoint
prometheus
- prometheus(https://prometheus.io)라는 시계열 데이터베이스에 데이터를 제공
- micrometer-registry-prometheus 라이브러리 의존성을 추가해야 함
- http://localhost:8080/actuator/prometheus 경로로 호출
<dependency>
   <groupId>io.micrometer</groupId>
   <artifactId>micrometer-registry-prometheus</artifactId>
</dependency>
prometheus 설치
- Docker로 설치
설치하고 싶은 위치로 가서
docker run \
    --platform=linux/arm64 \
    -d \
    --name prometheus \
    -p 9090:9090 \
    -v $(pwd)/config:/etc/prometheus \
    -v $(pwd)/data:/prometheus:rw \
    prom/prometheus:v2.33.4
위 코드를 실행
mac이 아닌 경우에는 --platform=linux/arm64 제거
설치를 하고 나면 config 폴더가 생기는데 그 안에 prometheus.yml을 생성하고
# my global config
global:
  scrape_interval:     15s # Set the scrape interval to every 15 seconds. Default is every 1 minute.
  evaluation_interval: 15s # Evaluate rules every 15 seconds. The default is every 1 minute.
  # scrape_timeout is set to the global default (10s).

# Alertmanager configuration
alerting:
  alertmanagers:
  - static_configs:
    - targets:
      # - alertmanager:9093

# Load rules once and periodically evaluate them according to the global 'evaluation_interval'.
rule_files:
  # - "first_rules.yml"
  # - "second_rules.yml"

# A scrape configuration containing exactly one endpoint to scrape:
# Here it's Prometheus itself.
scrape_configs:
  # The job name is added as a label `job=<job_name>` to any timeseries scraped from this config.
  - job_name: 'prometheus'

    # metrics_path defaults to '/metrics'
    # scheme defaults to 'http'.

    static_configs:
    - targets: ['localhost:9090']

  - job_name: 'student'
    metrics_path: actuator/prometheus
    static_configs:
    - targets: ['${pc ipaddress}:8080']
위 코드를 집어넣고 맨 밑에 targets 안에 pc ipaddress를 내 pc ipaddress로 넣어주면됨
그리고 prometheus 폴더로 나가서 data 디렉토리를 rwxrwxrwx권한으로 만들어주고 start.sh와 stop.sh을 만들어준다.
start.sh
#!/bin/bash

docker run \
    --platform=linux/arm64 \
    -d \
    --name prometheus \
    -p 9090:9090 \
    -v $(pwd)/config:/etc/prometheus \
    -v $(pwd)/data:/prometheus:rw \
    prom/prometheus:v2.33.4
stop.sh
#!/bin/bash

docker stop prometheus
docker rm prometheus
이렇게 만들어 놓은 뒤 start.sh와 stop.sh은 아직 실행 파일이 아니기 때문에 chmod로 +x를 사용해서 실행 권한을 추가해준다. 그리고 실행하면 정상적으로 돌아가는 것을 볼 수 있다.
HttpClient
RestTemplate
- HTTP 통신을 위한 도구로 RESTful API 웹 서비스와의 상호작용을 하기위해 제공하는 스프링 프레임워크의 클래스를 의미한다.
- 다양한 HTTP 메서드(GET, POST, PUT, DELETE 등)를 사용하며 원격 서버와 동기식 방식으로 JSON, XML 등의 다양한 데이터 형식으로 통신한다.
- 동기식 방식으로 요청을 보내고 응답을 받을 때까지 블로킹되며, 요청과 응답이 완료되기 전까지 다음 코드로 진행되지 않는다. 원격 서버와 통신할 때는 응답을 기다리는 동안 대기해야 한다.
RestTemplate 빈 설정
- ReadTimeout과 ConnectionTimeout은 기본 설정이 -1로 무제한이다. 만약, 기본 설정으로 사용하면 서버의 응답이 없는 경우, 무제한으로 대기하게 된다.
- 따라서, 적절한 대기시간을 설정해 주어야 한다.
@Configuration
public class WebConfiguration {
    @Bean
    public RestTemplate restTemplate(RestTemplateBuilder builder) {
        return builder
                .setReadTimeout(Duration.ofSeconds(5L))
                .setConnectTimeout(Duration.ofSeconds(3L))
                .build();
    }
}
RestTemplate 빈 사용
- GET 메서드 호출 예
	@Override
    public List<Student> getStudents() {
        HttpHeaders httpHeaders = new HttpHeaders();
        httpHeaders.setContentType(MediaType.APPLICATION_JSON);
        httpHeaders.setAccept(List.of(MediaType.APPLICATION_JSON));

        HttpEntity<String> requestEntity = new HttpEntity<>(httpHeaders);
        ResponseEntity<List<Student>> exchange = restTemplate.exchange("http://localhost:8080/students",
                HttpMethod.GET,
                requestEntity,
                new ParameterizedTypeReference<List<Student>>() {
                });
        return exchange.getBody();
} - POST 메서드 호출 예
	@Override
    public Student createStudent(Student student) {
        HttpHeaders httpHeaders = new HttpHeaders();
        httpHeaders.setContentType(MediaType.APPLICATION_JSON);
        httpHeaders.setAccept(List.of(MediaType.APPLICATION_JSON));

        HttpEntity<Student> requestEntity = new HttpEntity<>(student, httpHeaders);
        ResponseEntity<Student> exchange = restTemplate.exchange("http://localhost:8080/students",
                HttpMethod.POST,
                requestEntity,
                new ParameterizedTypeReference<>() {
                });
        return exchange.getBody();
    }
WebClient 설정
    @Bean
    WebClient webClient() {
        HttpClient httpClient = HttpClient.create()
                .option(ChannelOption.CONNECT_TIMEOUT_MILLIS, 3000)
                .responseTimeout(Duration.ofSeconds(3L))
                .doOnConnected(conn -> conn.addHandlerLast(new ReadTimeoutHandler(5000, TimeUnit.MILLISECONDS))
                        .addHandlerLast(new WriteTimeoutHandler(5000, TimeUnit.MILLISECONDS)));

        return WebClient.builder()
                .clientConnector(new ReactorClientHttpConnector(httpClient))
                .build();
    }
Spring Boot Testing
Spring Boot Testing 설치
- spring boot는 테스트를 위한 다양한 애너테이션과 유틸리티를 제공한다.
- 테스트 지원은 spring-boot-test, spring-boot-test-autoconfigure 모듈로 제공된다.
- 개발자는 spring-boot-starter-test 의존성을 추가하여 설치할 수 있다.
maven
<dependency>
    <groupId>org.springframework.boot</groupId>
    <artifactId>spring-boot-starter-test</artifactId>
    <scope>test</scope>
</dependency>
gradle
dependencies {
   testCompile("org.springframework.boot:spring-boot-starter-test")
}
spring-boot-starter-test로 제공하는 라이브러리
| 구분 | 설명 |
|---|---|
| JUnit5 | Java 애플리케이션 단위 테이스의 산업계 표준(de-facto standard) |
| Spring Test & Spring Boot Test | Spring Boot 애플리케이션 테스트 지원용 유틸리티와 통합테스트 지원 도구 |
| AssertJ | Assertion 라이브러리 |
| Hamcrest | Matcher 객체용 라이브러리 |
| Mockito | Mocking framework |
| JSONassert | JSON Assertion 용 |
assertThat은 AssertJ와 Hamcrest 둘 다 있지만 AssertJ를 사용하는 것이 더 좋고 Matcher를 사용할 때는 Hamcrest를 사용한다.
@SpringBootTest
- @SpringBootTest를 사용하면 spring boot의 기능을 사용하면서 통합 테스트 할 때 필요하다.
- 실제 애플리케이션 기동 시와 거의 유사하게 전체 빈 설정이 로딩된다.
주의
- JUnit4 : @RunWith(SpringRunner.class)추가
- JUnit5 : @ExtendWith(SpringExtension.class)는 이미 포함되어 있음
@SpringBootTest
- webEnvironment를 설정해서 서버를 실행할 수 있다.
SpringBootTest.webEnvironment
| 구분 | 설명 | 비고 |
|---|---|---|
| MOCK | MockMvc로 테스트 가능 | 기본 |
| RANDOM_PORT | Embedded WAS 실행, 임의의 포트로 실행, (rollback 동작하지 않음) | @LocalServerPort로 주입 |
| DEFINED_PORT | Embedded WAS 실행, 설정한 포트로 실행, (rollback 동작하지 않음) | server.port 속성으로 결정 |
| NONE | WEB이 아닌 일반 서비스 테스트용 | - |