페이스북 SNS 로그인을 연동하기 위해 필요한 작업과정을 설명한다.
본 내용 작성 시 작업 환경은 아래와 같다.
| 내용 | 버전 |
|---|---|
| react | 17.0.1 |
| react-native | 0.64.0 |
| @types/react | 17.0.3 |
| @types/react-native | 0.64.2 |
| react-native-fbsdk | 3.0.0 |
| 개발환경 | window 10 |
참고한 사이트는 여기 !!!
페이스북 SDK 설치
# npm install react-native-fbsdk --save

- for ios
# cd ios && pod install && cd ..
Integrate Facebook Login/Sign
페이스북 로그인을 사용하기 위해서 먼저 페이스북 개발자 콘솔(Facebook Console)에 앱 등록이 필요하다.
1. 개발자 콘솔에 접속하여 앱 만들기를 통해 앱을 만들자.
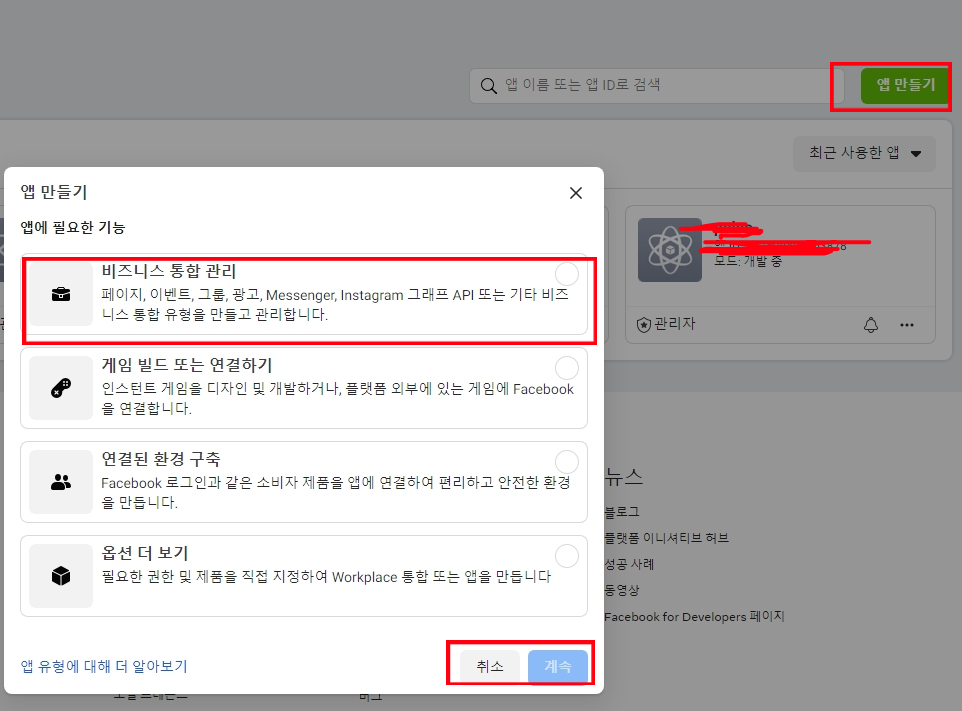
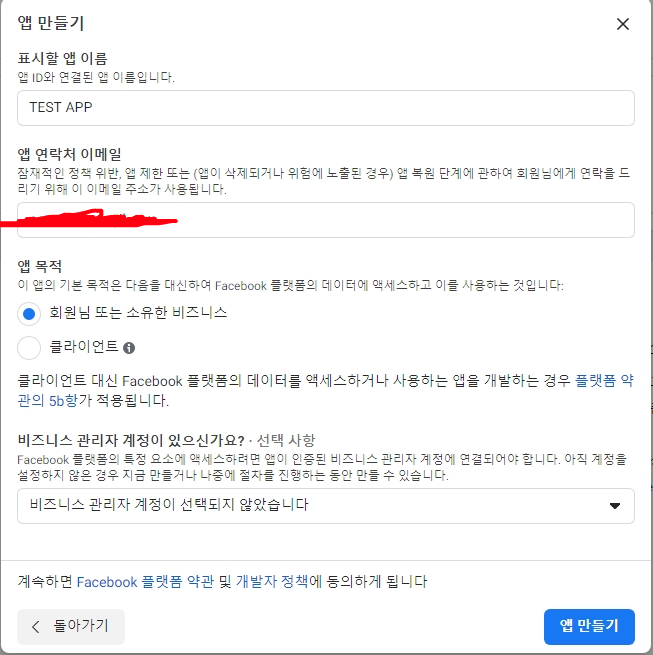
다음은 앱에 대한 기본 값을 설정해 주어야 한다.
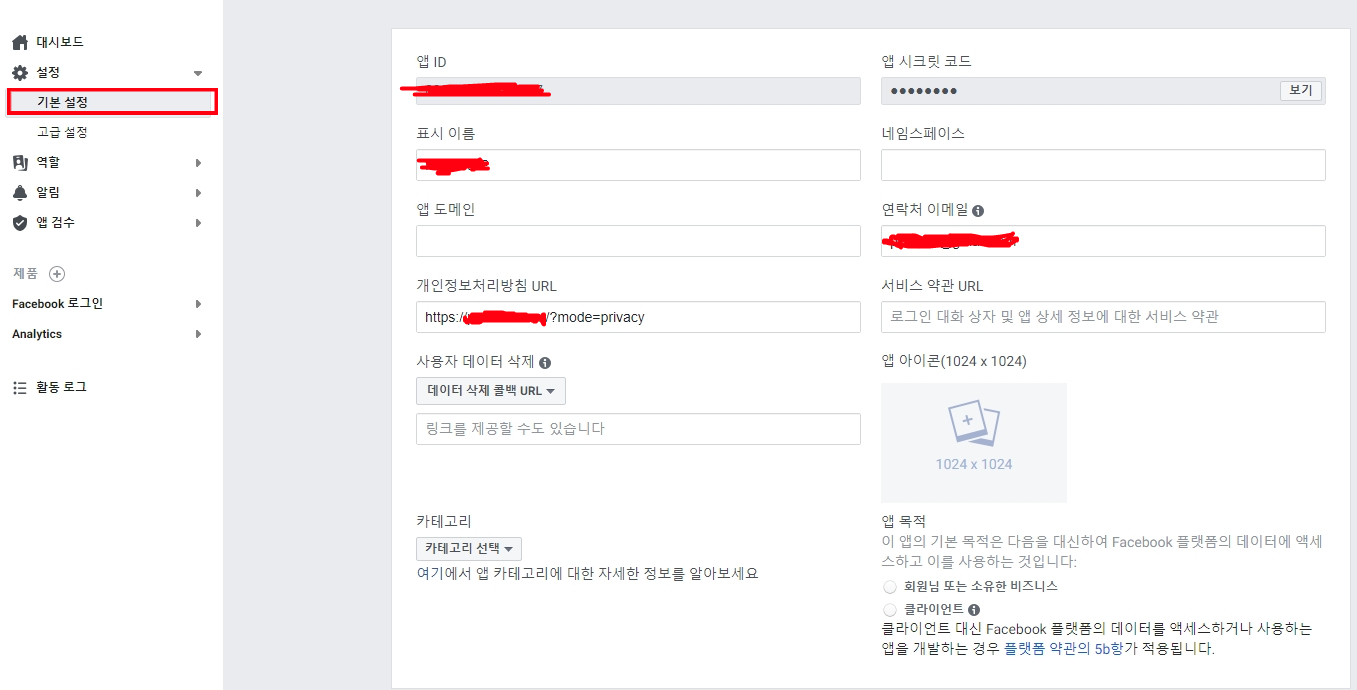
왼쪽 메뉴에서 설정 -> 기본설정 화면에 진입하여 아래 내용을 채워준다.
2. 플랫폼 추가를 통해 안드로이드, IOS의 정보를 등록해 주어야 한다.
2.1. 개발자 콘솔에 안드로이드 정보 추가
아래 화면은 플랫폼 추가 버튼을 통해 안드로이드를 추가한 화면이다.
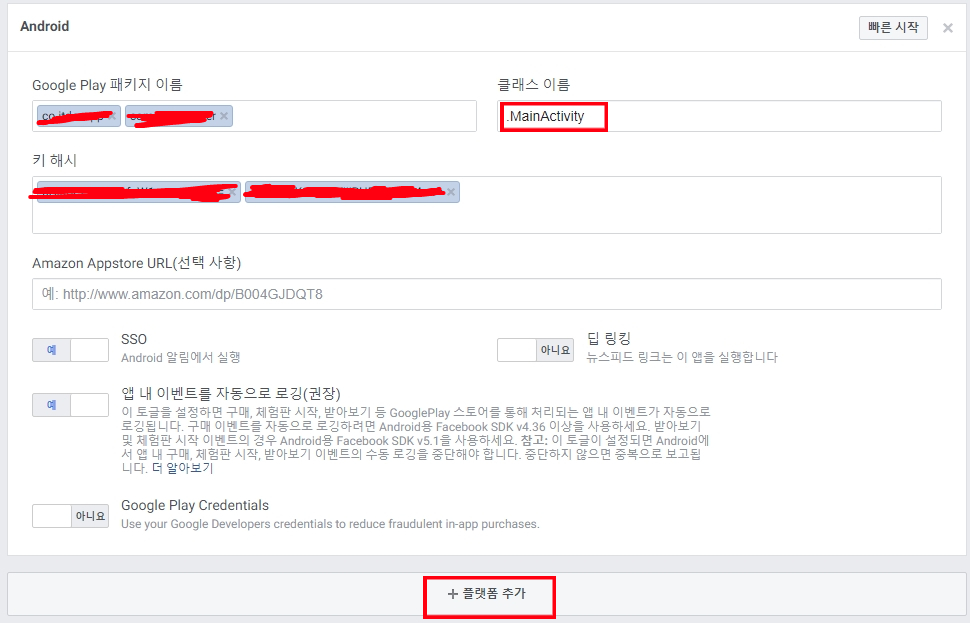
먼저 패키지 이름과 클래스 이름을 입력한다.
패키지 이름은 AndroidManifest.xml 파일의 package 부분을 확인하자.
다음으로 클래스에는 메인 엑티비티 명을 입력한다.
그리고 키 해시 값을 입력해야 한다. 해시 값을 구하는 방법은 여기를 참고하자.
Debug Key Hash
keytool -exportcert -alias androiddebugkey -keystore ~/.android/debug.keystore | openssl sha1 -binary | openssl base64리액트 네이티브의 경우 android/debug.keystore 부분은 프로젝트의 android/app 폴더에 있는 키를 연결하자.
Release Key Hash
keytool -exportcert -alias <RELEASE_KEY_ALIAS> -keystore <RELEASE_KEY_PATH> | openssl sha1 -binary | openssl base64이후 페이스북 콘솔 페이지 상단 부분의 버튼을 개발 중으로 설정하자.
추후 앱을 정식으로 등록 시에는 라이브 모드로 전환해야 한다.

2.2. 안드로이드 코드에 내용 추가
AndroidManifest.xml
<meta-data android:name="com.facebook.sdk.ApplicationId"
android:value="@string/facebook_app_id"/>
String.xml
<string name="facebook_app_id">{facebook app id}</string>2.3. 페이스북 개발자 콘솔에 IOS 정보 추가
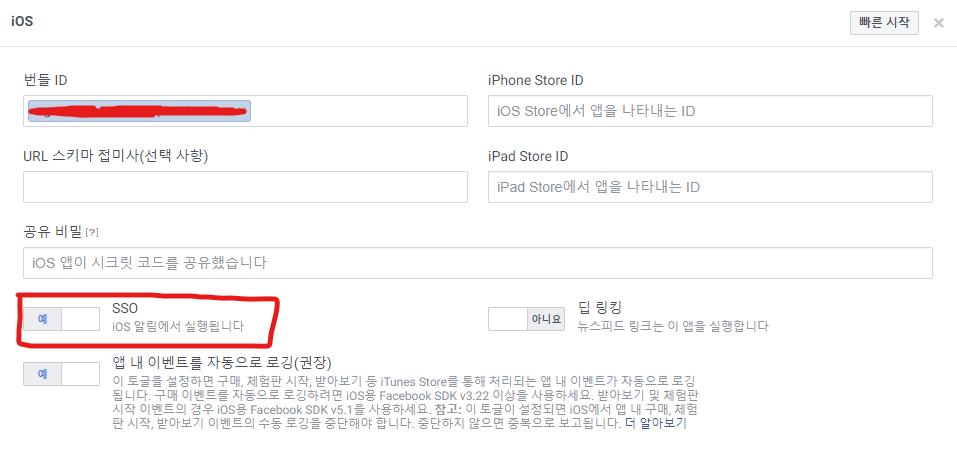
안드로이드와 마찬가지로 플랫폼 추가 버튼을 통해 IOS 정보를 입력한다.
추가로 SSO도 예로 설정하자.
2.4. IOS 코드 작성
- info.plist 수정
xcode에서 info.plist 를 선택 후 소스코드를 보자.
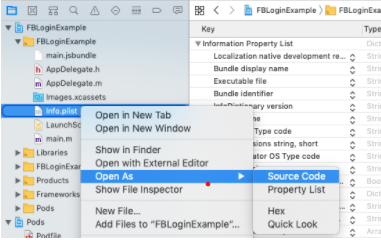
소스 코드에 아래 내용을 입력한다.
<key>CFBundleURLTypes</key>
<array>
  <dict>
    <key>CFBundleURLSchemes</key>
    <array>
      <string>fb(Replace Your Facebook ID)</string>
    </array>
  </dict>
</array>
<key>FacebookAppID</key>
<string>Replace Your Facebook ID</string>
<key>FacebookDisplayName</key>
<string>AboutReactLogin</string>
<key>LSApplicationQueriesSchemes</key>
<array>
  <string>fbapi</string>
  <string>fb-messenger-share-api</string>
  <string>fbauth2</string>
  <string>fbshareextension</string>
</array>
- PodProfile 에 내용 추가
  # _for_facebook_login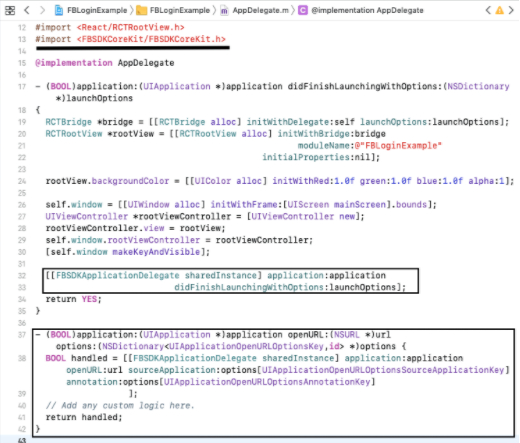
pod 'FBSDKLoginKit'- AppDelegate.m 에 내용 추가
#import <FBSDKCoreKit/FBSDKCoreKit.h>[[FBSDKApplicationDelegate sharedInstance] application:application
didFinishLaunchingWithOptions:launchOptions];- (BOOL)application:(UIApplication *)application openURL:(NSURL *)url options:(NSDictionary<UIApplicationOpenURLOptionsKey,id> *)options {
BOOL handled = [[FBSDKApplicationDelegate sharedInstance] application:application openURL:url sourceApplication:options[UIApplicationOpenURLOptionsSourceApplicationKey] annotation:options[UIApplicationOpenURLOptionsAnnotationKey]
];
// Add any custom logic here.
return handled;
}
만약 카카오 로그인과 같이 다른 애플리케이션이 있다면 아래와 같이 처리
- (BOOL)application:(UIApplication *)application
     openURL:(NSURL *)url
     options:(NSDictionary<UIApplicationOpenURLOptionsKey,id> *)options {

    // _for_kakao_login
    if([RNKakaoLogins isKakaoTalkLoginUrl:url]) {
      return [RNKakaoLogins handleOpenUrl: url];
    }

    // _for_facebook_login
    BOOL handled = [[FBSDKApplicationDelegate sharedInstance] application:application openURL:url sourceApplication:options[UIApplicationOpenURLOptionsSourceApplicationKey] annotation:options[UIApplicationOpenURLOptionsAnnotationKey]
    ];
    return handled;
//  return YES;
}
cd ios && pod install && cd ..
- swift와 object-c 에 따라 코드가 달라질 수 있다.
https://developers.facebook.com/docs/ios/getting-started/?sdk=cocoapods 을 참고하여 빌드 환경에 맞는 코드를 작성하자.
3. 실제 코드 작성
// Example of Facebook Sign In integration in React Native
// https://aboutreact.com/react-native-facebook-login/

// Import React in our code
import React, {useState} from 'react';

// Import all the components we are going to use
import {
  SafeAreaView,
  View,
  StyleSheet,
  Text,
  Image
} from 'react-native';

// Import FBSDK
import {
  LoginButton,
  AccessToken,
  GraphRequest,
  GraphRequestManager,
} from 'react-native-fbsdk';

const App = () => {
  const [userName, setUserName] = useState('');
  const [token, setToken] = useState('');
  const [profilePic, setProfilePic] = useState('');

  const getResponseInfo = (error, result) => {
    if (error) {
      //Alert for the Error
      alert('Error fetching data: ' + error.toString());
    } else {
      //response alert
      console.log(JSON.stringify(result));
      setUserName('Welcome ' + result.name);
      setToken('User Token: ' + result.id);
      setProfilePic(result.picture.data.url);
    }
  };

  const onLogout = () => {
    //Clear the state after logout
    setUserName(null);
    setToken(null);
    setProfilePic(null);
  };

  return (
    <SafeAreaView style={{flex: 1}}>
      <Text style={styles.titleText}>
        Example of Facebook Sign In integration in React Native
      </Text>
      <View style={styles.container}>
        {profilePic ? (
          <Image
            source={{uri: profilePic}}
            style={styles.imageStyle}
          />
        ) : null}
        <Text style={styles.textStyle}> {userName} </Text>
        <Text style={styles.textStyle}> {token} </Text>
        <LoginButton
          readPermissions={['public_profile']}
          onLoginFinished={(error, result) => {
            if (error) {
              alert(error);
              console.log('Login has error: ' + result.error);
            } else if (result.isCancelled) {
              alert('Login is cancelled.');
            } else {
              AccessToken.getCurrentAccessToken().then((data) => {
                console.log(data.accessToken.toString());
                const processRequest = new GraphRequest(
                  '/me?fields=name,picture.type(large)',
                  null,
                  getResponseInfo,
                );
                // Start the graph request.
                new GraphRequestManager()
                  .addRequest(processRequest).start();
              });
            }
          }}
          onLogoutFinished={onLogout}
        />
      </View>
      <Text style={styles.footerHeading}>
        Facebook Sign In integration in React Native
      </Text>
      <Text style={styles.footerText}>
        www.aboutreact.com
      </Text>
    </SafeAreaView>
  );
};

export default App;

const styles = StyleSheet.create({
  container: {
    flex: 1,
    backgroundColor: '#fff',
    alignItems: 'center',
    justifyContent: 'center',
  },
  textStyle: {
    fontSize: 20,
    color: '#000',
    textAlign: 'center',
    padding: 10,
  },
  imageStyle: {
    width: 200,
    height: 300,
    resizeMode: 'contain',
  },
  titleText: {
    fontSize: 20,
    fontWeight: 'bold',
    textAlign: 'center',
    padding: 20,
  },
  footerHeading: {
    fontSize: 18,
    textAlign: 'center',
    color: 'grey',
  },
  footerText: {
    fontSize: 16,
    textAlign: 'center',
    color: 'grey',
  },
});
4. 빌드 시 아래와 같은 에러가 발생한다면??
"linker command failed with exit code 1 (use -v to see invocation)"

And warnings:

ld: warning: Could not find auto-linked library 'swiftFoundation'

ld: warning: Could not find auto-linked library 'swiftDarwin'

ld: warning: Could not find auto-linked library 'swiftCoreFoundation'

ld: warning: Could not find auto-linked library 'swiftCore'

ld: warning: Could not find auto-linked library 'swiftCoreGraphics'

ld: warning: Could not find auto-linked library 'swiftObjectiveC'

ld: warning: Could not find auto-linked library 'swiftDispatch'

ld: warning: Could not find auto-linked library 'swiftSwiftOnoneSupport'- 해결방법
- Xcode로 프로젝트를 열자 (ios/YourAppName.xcodeproj)
- 프로젝트 명에 마우스 오른쪽 클릭하여 empty Swift 파일 생성
- Xcode가 "Create Bridging Header" 라고 물어면 "예"를 누르고 생성되는 파일을 삭제하면 안됨
- 다시 빌드 후 실행
facebook sns login facebook login