
💻 주요 선택자
: Type, (*), class, and ID
1. Type
태그 이름 선택자, 요소 선택자
span, p, img
2. class, id
.class, #id
💻 속성 선택자
: attr, attr^, attr$, attr*
1. attr
속성으로 ~ 을 가지고 있는 요소를 선택한다
<a href="http://example.com" target="_blank">a[target] /* target 속성을 가진 요소 */
a[href="https://example.com"] /* href 속성이 = 뒤의 값인 경우 */2. attr^, attr$, attr*
a[href^="https://"] /* 해당 내용으로 시작하는 */
a[href$=".com"] /* 해당 내용으로 끝나는 */
a[href^="example"] /* 해당 내용을 포함하는 */
💻 가상 클래스 선택자
- 가상클래스(Pseudo-Class): 별도의 class를 지정하지 않아도 지정한 것처럼 요소를 선택할 수 있다.
1. first-child, last-child, nth-child
selector로 인해 선택된 것들의 형제 요소들 중 첫, n, 마지막 요소를 나타낸다.
nth-child(num)
- num번째 자식 요소를 선택한다.
- 혹은 num 자리에 함수를 넣을 수 있다. (2n-1 등)
- odd(홀수), even(짝수)도 가능하다.
2. first-of-type, last-of-type, nth-of-type
nth-child와 달리 위에 나타난 특징을 상쇄해주는 선택자이다. nth-of-type은 해당 타입을 가지고 있는 요소의 몇 번째를 의미한다.
- 그런 이유로
-child보다 선호됨.
<div>a</div>
<p>b</p>
<p>c</p>
<div>d</div>p:first-child{} /* 해당하는 요소 없음 */
p:first-of-type{} /* b */3. not
<form action="">
  <input type="text" placeholder="id">
  <input type="email" placeholder="email">
  <input type="password" class="pw" placeholder="password">
  <input type="submit">
</form>
input:not(.pw) {}
input요소들 중class="pw"인 요소를 제외한 나머지를 뜻함.
input:not([placeholder]) {}
input요소들 중 placeholder 속성이 없는 요소만을 뜻함.
input:not([type="text"]) {}
input요소들 중type="text"인 요소를 제외한 나머지를 뜻함.
❗❗ 헷갈리는 부분 정리!
<div>
  <p id="first" class="sentence">This text is selected!</p>
  <p id="second" class="sentence">This text isn't selected.</p>
  <p id="third" class="sentence">This text isn't selected.</p>
</div>

<div>
  <h2>This text isn't selected: it's not a `p`.</h2>
  <p id="last">This text isn't selected.</p>
</div>
위와 같은 코드가 있다고 할 때, 각각의 선택자는 무엇을 선택할까?
1. p:first-child {}
p의 형제 요소 중 첫번 째인id="first"인 요소만 선택된다.
h2는p가 아니기 때문에 첫 요소임에도 선택 xid="last"인p도 첫 번째 요소가 아니라서 선택 x-child는 단순히 해당 속성을 가지고 있는 요소의 몇 번째를 의미하는 게 아니라, 해당 속성을 가지고 있는 요소의 형제들 중 몇 번째를 의미한다.
2. sentence:last-child {}
class="sentence"인 요소들의 형제 요소 중 마지막인id="third"가 선택된다.
- 아래와 같이
id="third"인 블럭에서 class 속성을 없앤다고 해서id="second"가 선택되지 않는다. 이 때는 해당하는 요소가 사라지게 된다.<p id="first" class="sentence">This text isn't selected!</p> <p id="second" class="sentence">This text isn't selected.</p> <p id="third">This text was selected.</p>
3. div :last-child
id="third"인p와id="last"인p가 선택된다.
- 차이점은 공백의 유무이다.
div:last-child의 경우 두 번째div가 선택되었을 것이다. 하지만 공백은 그 내부 자식으로 넘어가기 때문에 div중 마지막 요소를 찾게 된다.
4. div p:not(.sentence)
id="last"인p가 선택된다.- 그런데 만약
div p :not(.class)라면,div안에p안에class를 갖지 않은 요소를 선택했을 것이다. 현재의 경우는 존재하지 않는다.
3. link, visited, hover, active, focus
마우스 움직임에 따라 반응하는 선택자
❗
:active는 뒤에 다른 링크 의사 클래스가 올 경우 덮어씌워진다. 따라서 제일 마지막에 배치할 것!
LVHA 순서를 지키는 게 중요함
link: 방문하기 전
visited: 방문 후
hover: 마우스를 올렸을 때
active: 누르고 있을 때
+focus: 해당 요소가 포커싱 됐을 때
4. 동작 가상클래스 선택자
: enabled, disabled, checked
해당 요소에 속성으로 위와 같은 속성이 적용됐을 때 적용
주로 input 에서 사용된다.
💻 가상요소 선택자
- 가상요소(Pseudo-Element)는, 가상클래스처럼 선택자(selector)에 추가되며, 존재하지 않는 요소를 존재하는 것처럼 부여하여 문서의 특정 부분 선택이 가능
- 실제 컨텐츠가 아닌 스타일적인 요소로 인식하기 때문에 드래그나 복사, 편집 등이 불가능
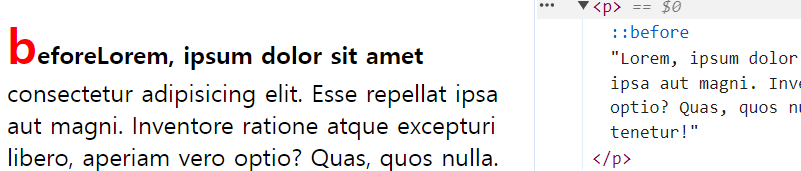
1. before, after
::before 요소의 콘텐츠 시작 부분에 추가
::after 끝부분에 생성된 콘텐츠 추가
content를 통해 생성될 내용 추가
<ul>
  <li>A</li>
  <li>B</li>
  <li>C</li>
</ul>
li {list-style: none; display: inline;}
li::after{content:"I"; padding-left: 5px;}
li:last-child::after{content:"";}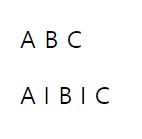
2. first-letter, first-line, selection
first-letter 첫 번째 글자
first-line 첫 번째 줄
<p>lorem, ipsum....</p>
<p>lorem, ipsum....</p>
p::first-letter { color: red; font-size: 2rem;}
p::first-line { font-weight: bold; }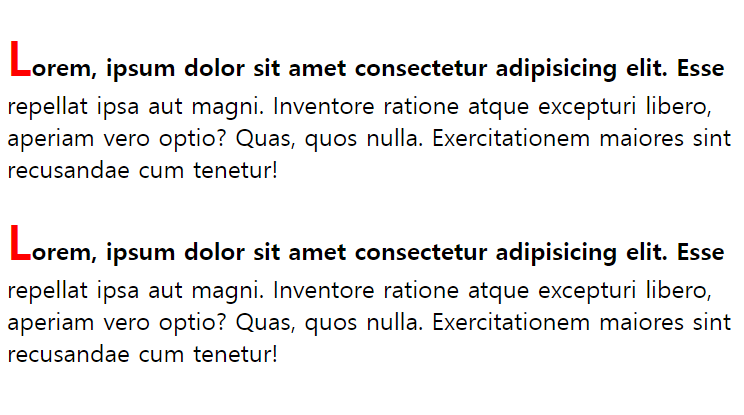
이때
::before가상 요소를 추가한다면, 스타일링 블럭이 앞에 있든 뒤에 있든 상관없이::before은 코드 가장 맨 앞에 추가되어 before에 css가 먹게 된다.
selection 요소를 드래그했을 때 반응하는 css
p:first-child::selection {background-color: yellow;}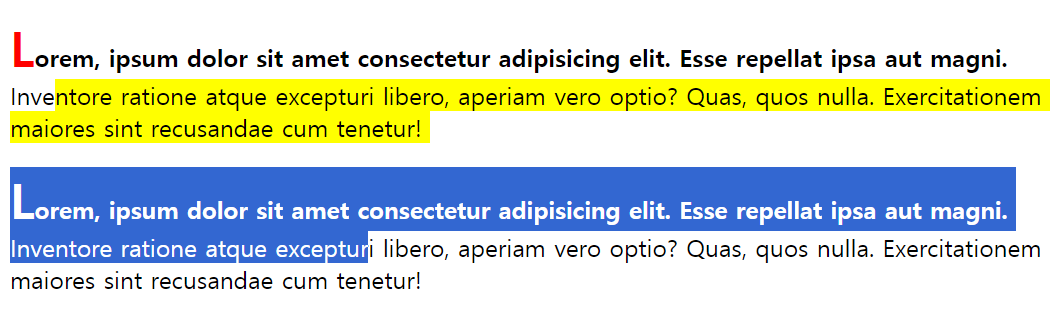
💻 선택자 결합
1. 하위 선택자
- 공백(space)으로 표현
- a 태그 내부에서 b 태그를 선택하기
- a 태그 내부에, 다른 태그가 있고, 그 태그 내부에 b 태그가 있어도 하위에 있기만 하면 만족함.
ul li :a
2. 자식 선택자
- 화살표(>)로 표현
- a 태그 내부에서, 바로 아래에 있는 b 태그만 선택
ul > li:a
3. 일반 형제 선택자 결합 (~)
선택한 코드의 형제 중 조건을 만족하고, 뒤에 있는 요소 선택
  <p>p1</p>
  <code>code</code>
  <p>p2</p>
  <span>span1</span>
code ~ p {color: red;}code 태그 뒤쪽에 있는 p 태그만 붉게 바꾼다.
4. 인접 형제 선택자 결합 (+)
- 선택한 코드 바로 뒤에 따라오는 형제를 선택
- 이때, -child처럼 해당 코드 바로 뒤 요소가 선택자의 타입과 맞지 않을 시 선택되지 않는다.
code + p {color:red;} /* 적용됨 */
code + span {color:red;} /* 적용 안 됨 */
5. 그룹화 (,)
다른 타입의 요소들에게 한번에 스타일을 주고 싶을 때 사용
p, span, div {color: red;}💻 범용 선택자 (*)
- 모든 요소를 선택
- css 스타일시트 최상단에 작성하기
- 우선 순위 최하!
- 선택자 결합과 함께 사용할 수 있다.
div > * {} /* div 하위의 모든 요소 */
div ~ * {} / div 아래에 있는 모든 요소
💻 상속 제어하기
1. inherit
- 대부분의 태그는 부모 요소의 style을 상속 받는다. (a 태그, background-color 등 제외)
- 하지만 태그 고유의 style이 있을 때 상속 속성이 무시되는데, 무조건 상속을 받도록 명령할 때 사용할 수 있다.
2. initial
- 상속을 끊어주는 역할을 한다.
child {color:initial} /* 부모의 스타일 적용 x */
child {all:initial} /* 모든 상속 x */
3. unset
부모로부터 상속받을 값이 존재할 때 inherit
부모로부터 상속받을 값이 없을 때initial
*나 상위의 상위 요소 등의 스타일은 모두 무시하고, 부모에게 직속 상속 받은 속성만 적용한다.
💻 우선 순위
- 선언된 순서대로 : 뒤의 내용이 덮음
- 적용 범위가 좁을 수록
- 코드의 위치
!important > 인라인 스타일(1000) > id(100) > class, attribute, pseudo-class(10) > 요소(또는 가상 요소)가 많은 순(1)
