Project | React - Webucks Clone Coding [Mission 5]
[Mission 5] 커피 상세 페이지 리뷰 달기 기능 구현하기
input창에 리뷰를 작성하고 엔터를 누르면 리뷰(댓글)이 추가되도록 구현해주세요.(엔터가 아니라 리뷰 추가 버튼을 구현하셔도 됩니다)
⭐️ My Thoughts
이전
Clone Coding Project에서와 마찬가지로React를 활용하여 구현하는 과정이다. 차이점이라면JavaScript를 통한 기능 구현이 아닌React Library를 통해 댓글을 구현하는 것이다. 컴포넌트의 단일적인 속성을 이용해 구현한다면JavaScript만을 이용했을 때보다 더 쉽게 구현이 가능할 것이라고 생각했고 정말 그렇게 되어 신기했던 단계였다.
📲 구현 코드
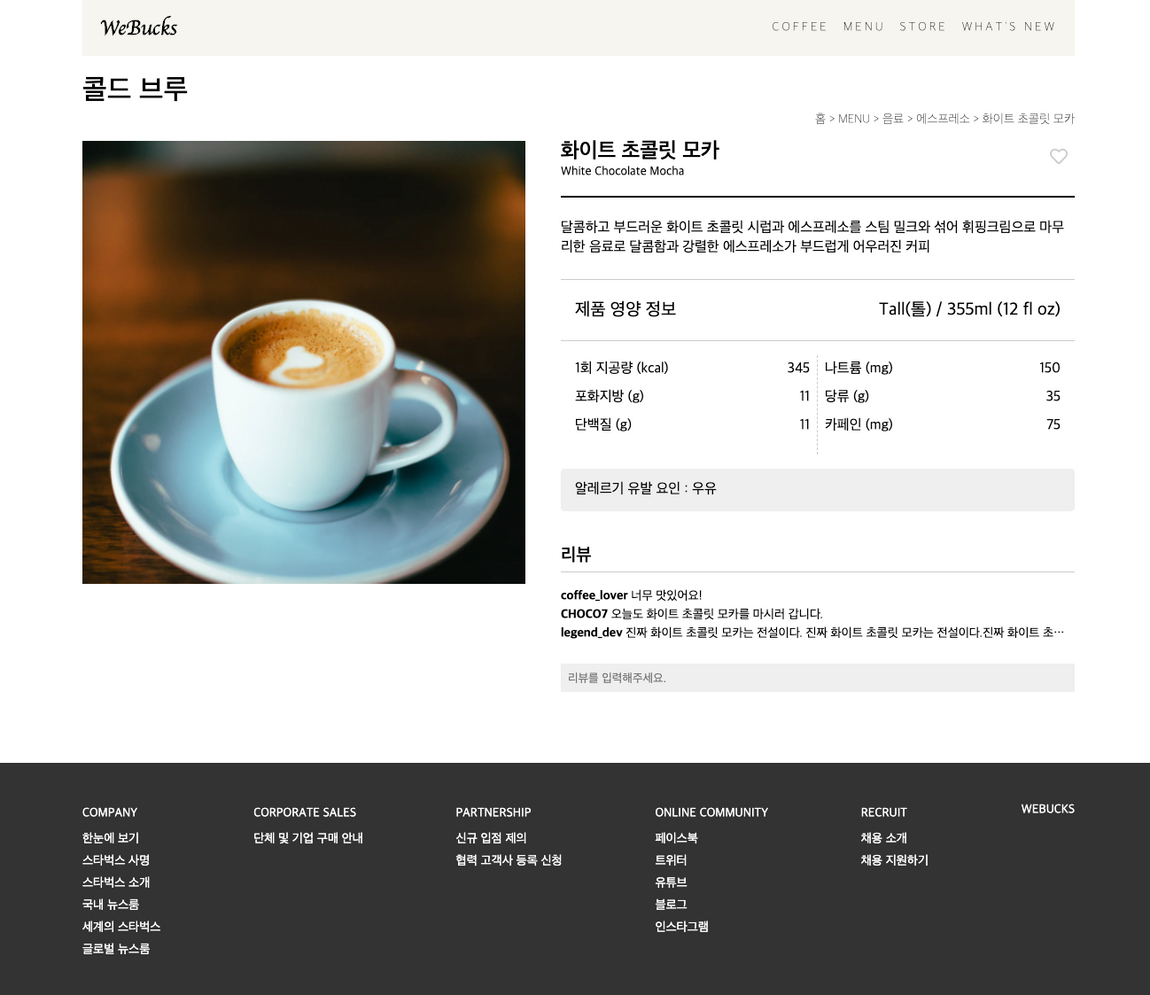
- 기존 댓글과 추가될 댓글
=> commentdata.json
[
    {
        "id": "Kanye West",
        "ment": "안녕하세요"
    },
    {
        "id": "Jay-Z",
        "ment": "커피 맛좋네요"
    },
    {
        "id": "BTS RM",
        "ment": "군만두 먹고싶다"
    }
]
=> Detail.js 댓글 데이터 반환 과정
function Detail() {
    const [normalComment, normalCommentSet] = useState();
    useEffect(() => {
        fetch('http://localhost:3000/data/commentdata.json')
            .then(res => res.json())
            .then(res =>
                normalCommentSet(res));
    }, []) // 기존 댓글 fetch /  public/data 내에 있는 json 데이터를 통해 fetch


    const [commentData, commentAdder] = useState([]);
    const enter = (e) => {
        if (e.key === 'Enter') {
            let newArr = [...commentData];
            newArr.push(e.target.value);
            commentAdder(newArr);
            e.target.value = '';
        }
    } // 새로운 댓글 추가 기능 / 이벤트 키가 'Enter'일 경우 deep copy 후 새로운 댓글 push
기존 댓글의 데이터(유저 ID, 댓글 내용)를 json파일에 저장해서
fetch해주고, 반환해주는 단계에서 사용되는 코드이다.
=> SingleComment.js (추가될 댓글의 컴포넌트)
import React from "react"
import { FontAwesomeIcon } from "@fortawesome/react-fontawesome";
import { faHeart as regularHeart } from "@fortawesome/free-regular-svg-icons";
import { faHeart as solidHeart } from "@fortawesome/free-solid-svg-icons";
import { useState } from "react";

function SingleComment(props) {
    const [heartshape, heartshapeChange] = useState(regularHeart);
    function click() {
        if (heartshape === regularHeart) {
            heartshapeChange(solidHeart);
        }
        else {
            heartshapeChange(regularHeart);
        }
    } // 댓글마다의 하트 기능을 위한 function (하트를 누를 때마다 모양이 변함)

    return (
        <div className="comment">
            <div class="longment">
                <span className="id">{props.id}</span> // 댓글 작성자의 id
                <span className="ment">{props.e} // 댓글 내용
                </span>
            </div>
            <div class="longment-button">
                <button className="deletebutton" onClick={(e) => { e.target.parentElement.parentElement.remove(); }}>삭제</button>
              // 후반부 단계에 구현할 댓글 삭제 내용 (후반 포스팅에서 다룰 내용)
                <a href="#" className="commentheart" id={props.index}>
                    <FontAwesomeIcon
                        icon={heartshape}
                        onClick={click}
                    /> // 댓글 내의 하트버튼
                </a>
            </div>
        </div >
    )
}
반복되는 댓글을
Component형식으로 따로 만들어주어,React Library의 장점을 살릴 수 있으며, 여러 개의 댓글도Component로 찍어내주기만 하면 되서JavaScript보다 훨씬 간편하게 프로젝트를 진행할 수 있었다. (댓글 내의 하트와 삭제버튼 모두 한 개의 컴포넌트마다 작동되기에 정말 편리했다.)
=> Detail.js (추가될 댓글의 컴포넌트)
			<div className="Allcomment">
                            {
                                normalComment && normalComment.map((e, i) => {
                                    return (
                                        <SingleComment
                                            id={e.id}
                                            e={e.ment}
                                            index={i}
                                        />
                                    )
                                })
                            }
                        </div>
// <Single /> 컴포넌트를 불러와 props.properties를 적용해주고, map을 이용해 댓글을 연새적으로 찍어내줌 (기존 댓글 공간)

                        <div className="Allcomment">
                            {
                                commentData.map((e, i) => {
                                    return (
                                        <SingleComment
                                            id={"G-Dragon"}
                                            e={e}
                                            index={i}
                                        />
                                    )
                                })
                            }
                        </div>
// <Single /> 컴포넌트를 불러와 props.properties를 적용해주고, map을 이용해 댓글을 연새적으로 찍어내줌 (새로운 댓글 추가될 공간)
작성하였던 댓글의
Component와map함수를 활용하여 댓글 기능을 구현하는 과정. 확실히JavaScript를 사용할 때보다 쉽게 구현할 수 있다.
⛳️ 구현 화면
.gif)
🐳 느낀 점
React의Component의 장점을 말로만 듣고 체감하지 못한 단계였는데, 이번 프로젝트를 통해Component의 장점을 매우 크게 느꼈다. 또한Map함수를 와 상수데이터,Component를 활용한 댓글을 구현하면서 단일화된 작업을 간편하게 할 수 있다는 점이 매우 흥미로웠다. 하드코딩을 탈피하고 이러한Component의 활용같은 다양한 기능을 익히기 위해 더 공부를 열심히 해야겠다.