-
버튼
- click 이벤트 사용하기
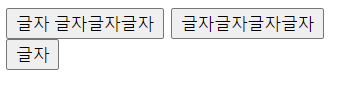
1번(button).
1번 결과.<!DOCTYPE html> <html lang="en"> <head> <meta charset="UTF-8"> <title>Document</title> <script> document.addEventListener('DOMContentLoaded', () => { const buttonA = document.querySelector('button') const buttonB = document.querySelector('input[type=button]') buttonA.addEventListener('click', (event) => { event.currentTarget.textContent += '글자' }) buttonB.addEventListener('click', (event) => { event.currentTarget.value += '글자' }) }) </script> </head> <body> <!-- click 이벤트 --> <button> 글자 </button> <input type="button" value="글자"> <!-- submit 이벤트 --> <form action=""> <input type="submit" value="글자"> </form> </body> </html>
글자라는 버튼이 생기고 누르면 버튼 안에 단어가 입력된다.
2번(submit).
※주의사항.<!DOCTYPE html> <html lang="en"> <head> <meta charset="UTF-8"> <title>Document</title> <script> document.addEventListener('DOMContentLoaded', () => { const form = document.querySelector('form') form.addEventListener('submit', () => { const text = document.querySelector('input[type=text]') if(text.value.indexOf('@') >= 0){ alert('정상적으로 제출') } else { alert('아메일 형식으로 입력해주세요.') event.preventDefault() } }) }) </script> </head> <body> <!-- submit 이벤트 --> <form action=""> <input type="text" name = "test" id =""> <input type="submit" value="글자"> </form> </body> </html>
아래와 같이 form태그에 button태그를 만들게 되면 submin처럼 작동을 하게 된다.
따라서 input type을 button으로 해줘야 버튼으로서 기능을 하게 된다.<form> //<button></button> <input type = "button"> </form>
- click 이벤트 사용하기
-
선택 상자
1번.<!DOCTYPE html> <html lang="en"> <head> <meta charset="UTF-8"> <title>Document</title> <script> document.addEventListener('DOMContentLoaded', () => { const select = document.querySelector('select') const p = document.querySelector('p') select.addEventListener('change', () => { const options = event.currentTarget.options // select에 있는 모든 옵션 불러옴. // const index = event.currentTarget.options.selectedIndex const index = options.selectedIndex p.textContent = `선택: ${options[index].textContent}` console.log(options) console.log(index) }) }) </script> </head> <body> <!-- submit 이벤트 --> <select name="" id=""> <option value="">떡볶이</option> <option value="">순대</option> <option value="">오뎅</option> <option value="">튀김</option> </select> <p>선택:떡볶이</p> </body> </html>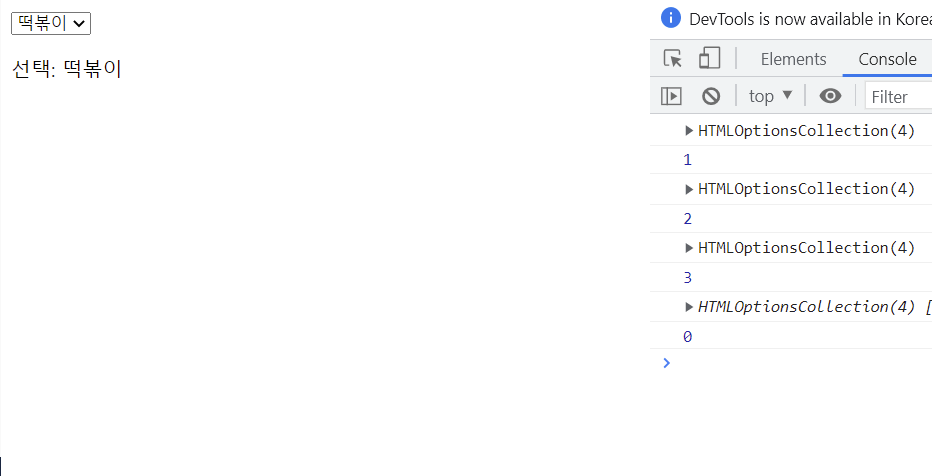
2번.
여러개 선택을 위해서 select 태그에 multiple을 추가.<!DOCTYPE html> <html lang="en"> <head> <meta charset="UTF-8"> <title>Document</title> <script> document.addEventListener('DOMContentLoaded', () => { const select = document.querySelector('select') const p = document.querySelector('p') select.addEventListener('change', () => { const options = event.currentTarget.options const list = [] for (const option of options){ if (option.selected){ list.push(option.textContent) } } p.textContent = `선택: ${options[index].textContent}` }) }) </script> </head> <body> <!-- submit 이벤트 --> <select name="" id="" multiple> <option value="">떡볶이</option> <option value="">순대</option> <option value="">오뎅</option> <option value="">튀김</option> </select> <p>선택:떡볶이</p> </body> </html>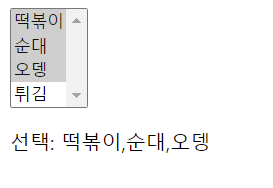
-
체크박스와 라디오 버튼
-
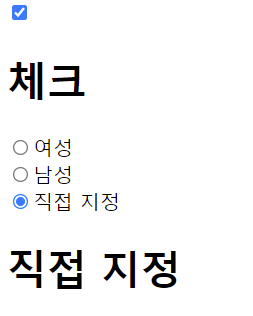
체크박스
어떤 대상이 true 또는 false를 나타낼 때 사용. -
라디오 버튼
여러 대상 중에서 하나를 선택.<!DOCTYPE html> <html lang="en"> <head> <meta charset="UTF-8"> <title>Document</title> <script> document.addEventListener('DOMContentLoaded', () => { const checkbox = document.querySelector('input[type=checkbox]') const checkboxlog = document.querySelector('h1#checkbox') checkbox.addEventListener('change', () => { if (checkbox.checked) { checkboxlog.textContent = '체크' } else { checkboxlog.textContent = '해제' } }) const radios = document.querySelectorAll('input[type=radio][name=gender]') const radioLog = document.querySelector('h1#radiobutton') radios.forEach((radio) => { radio.addEventListener('change', (event) => { radioLog.textContent = event.currentTarget.value }) }) }) //DOM6 참고 </script> </head> <body> <input type="checkbox" name="" id=""><br> <h1 id="checkbox"></h1> <input type="radio" name="gender" id="" value="여성">여성<br> <input type="radio" name="gender" id="" value="남성">남성<br> <input type="radio" name="gender" id="" value="직접 지정">직접 지정<br> <h1 id="radiobutton"></h1=> </body> </html>결과.
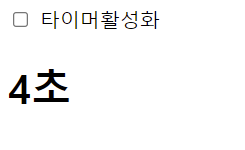
예제.<!DOCTYPE html> <html lang="en"> <head> <meta charset="UTF-8"> <title>Document</title> <script> document.addEventListener('DOMContentLoaded', () => { let seconds = 0 //현재시간 let timerId = 0 // let [seconds, timerId] = [0,0] // 다중할당 연산 const checkbox = document.querySelector('input[type=checkbox]') const timelog = document.querySelector('h1#checkbox') checkbox.addEventListener('change', () => { if (checkbox.checked) { timerId = setInterval(() => { seconds += 1 timelog.textContent = `${seconds}초` }, 1000) } else { clearInterval(timerId) } }) }) </script> </head> <body> <input type="checkbox"> 타이머활성화 <h1 id="checkbox">0초</h1> </body> </html>결과.
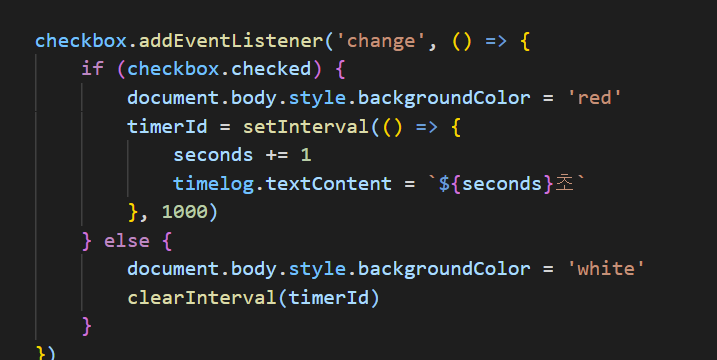
추가.
활성화 되었을 때 배경을 빨갛게, 비활성화 되었을 때는 하얗게 하고 싶다면document.body.style.backgroundColor사용
-

꼭 웹 퍼플리셔가 될거에요