
약속을 만들기 위해서는 많은 정보들이 필요하다. 언제, 어디서, 누가, 무엇을 할 것인지에 대한 정보가 말이다. 그리고 우리 프로젝트 기획에 따라 약속을 공개할 것인지, 만나서?온라인으로?, 멤버가 가득 찼는지에 대한 정보도 필요하다.
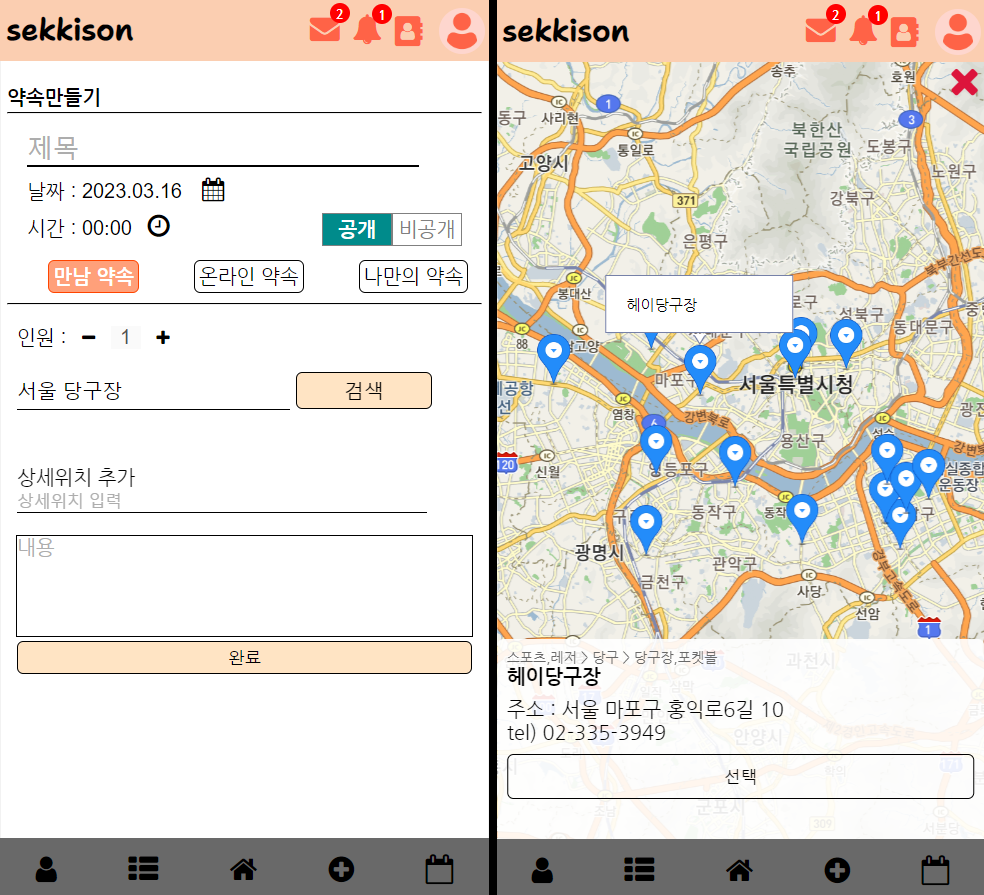
이러한 정보들을 담아 서버로 보낼 페이지를 다음과 같이 구성하였다.

다른 것들은 쉽게 구현할 수 있을 것이라 생각하고 datepicker, timepicker, 카카오맵에 대해 서술하도록 하겠다.
datepicker, timepicker
먼저,
https://jqueryui.com/themeroller/
에서 테마를 골라 jquery-ui를 다운받는다.
그리고 이 프로젝트에서는
https://www.jqueryscript.net/time-clock/user-friendly-time-picker.html
에서 받은 timepicker를 사용하였다.
head에 다음과 같이 세팅한다. 경로는 설치된 경로대로 하면 된다.
<link rel="stylesheet" href="../vendor/jquery/jquery-ui.min.css"/>
<link rel="stylesheet" href="../vendor/timepicker/timepicker.css"/>
<script src="../vendor/jquery/jquery-ui.min.js"></script>
<script src="../vendor/timepicker/timepicker.js"></script>
버튼으로 제어하기 위해 다음과 같이 html을 작성하였다.
날짜 : <input id="date" type="text" readonly><br>
시간 :
<label>
  <input id="time" class="bs-timepicker" readonly/>
  <i class="fa fa-clock-o"></i>
</label>
이후 js만 작성하면 잘 동작할 것이다
// date/time picker
$.datepicker.setDefaults({
   dateFormat: 'yy.mm.dd',
   prevText: '이전 달',
   nextText: '다음 달',
   monthNames: ['1월', '2월', '3월', '4월', '5월', '6월', '7월', '8월', '9월', '10월', '11월', '12월'],
   monthNamesShort: ['1월', '2월', '3월', '4월', '5월', '6월', '7월', '8월', '9월', '10월', '11월', '12월'],
   dayNames: ['일', '월', '화', '수', '목', '금', '토'],
   dayNamesShort: ['일', '월', '화', '수', '목', '금', '토'],
   dayNamesMin: ['일', '월', '화', '수', '목', '금', '토'],
   showMonthAfterYear: true,
   yearSuffix: '년'
});

$(function () {
   $('.bs-timepicker').timepicker();
   $('#date').datepicker({
      showOn:"button",
      buttonText: "",
      changeMonth:true,
      changeYear:true,
      minDate: "0"
   }).next('button').append('<i class="fa fa-calendar"></i>');
   $('#date').datepicker('setDate', 'today');
});
Kakao Map
이 페이지에서 카카오맵을 사용한 것은 키워드 검색으로 검색하면 지도에 마커가 표시되게 하기 위함이다.
먼저는 카카오 개발자 페이지에서 로그인 후 어플리케이션 만들기 및 설정을 진행해야 한다. 카카오 개발자 페이지 설정은 다른 글의 링크로 대체하겠다.
https://webty.tistory.com/95
head에 앱키와 함께 다음 코드를 넣는다.
<script type="text/javascript" src="//dapi.kakao.com/v2/maps/sdk.js?appkey=앱키입력&libraries=services"></script>
body 안에는 다음 코드를 추가한다.
<input id="kakaoMapSearch" type="text"/>
<button type="button" onclick="openSearch();">검색</button>
<div id="mapBox" style="width:100vw;height:100vh;">
  <div id="mapp" style="width:100%;height:100%;"></div>
  <div id="selectedInfo" style="width:100%; height:10rem; z-index:8; position:absolute; bottom:0; left:0;">
    <div id="placeTag"></div>
    <div id="placeName"></div>
    <div id="placeAddress"></div>
    <div id="placePhone"></div>
  </div>
</div>
그리고 body 아래에 다음 스크립트를 추가한다.
이 스크립트에서는 openSearch()라는 함수로 검색을 실행한다.<script> function openSearch() { let keyword = $("#kakaoMapSearch").val().trim(); ps.keywordSearch(keyword, placesSearchCB); } let infowindow = new kakao.maps.InfoWindow({zIndex:1}); let mapContainer = document.getElementById('mapp'), mapOption = { center: new kakao.maps.LatLng(37.566826, 126.9786567), level: 3 }; let map = new kakao.maps.Map(mapContainer, mapOption); let ps = new kakao.maps.services.Places(); function placesSearchCB (data, status, pagination) { if (status === kakao.maps.services.Status.OK) { var bounds = new kakao.maps.LatLngBounds(); for (var i=0; i<data.length; i++) { displayMarker(data[i]); bounds.extend(new kakao.maps.LatLng(data[i].y, data[i].x)); } map.setBounds(bounds); } } function displayMarker(place) { var marker = new kakao.maps.Marker({ map: map, position: new kakao.maps.LatLng(place.y, place.x) }); kakao.maps.event.addListener(marker, 'click', function() { console.log(place); $("#placeName").html(place.place_name); $("#placeAddress").html(`주소 : ${place.road_address_name == "" ? place.address_name : place.road_address_name} ${place.place_name}`); $("#placePhone").html(`tel) ${place.phone}`); $("#placeTag").html(place.category_name); infowindow.setContent(`<div>${place.place_name}</div>`); infowindow.open(map, marker); }); } </script>
설정을 잘못했거나 jquery를 사용하지 않는 경우만 아니라면 이 글을 따라하는 것으로 키워드 검색 및 지도 표시를 할 수 있을 것이다.