목적
- 과한 통신량을 받게 되면 Master는 혼자서 감당하기 힘들며 Master Node가 고장나면 전체 Kubernetes Cluster에 영향을 받게 되므로 고가용성으로 Cluster를 연결시켜 Load Balancing 및 고가용성을 유지할 수 있다.
- etcd가 외부에 노출된 것이 아닌 stacked(중첩된) etcd Topology를 구현할 예정이다.
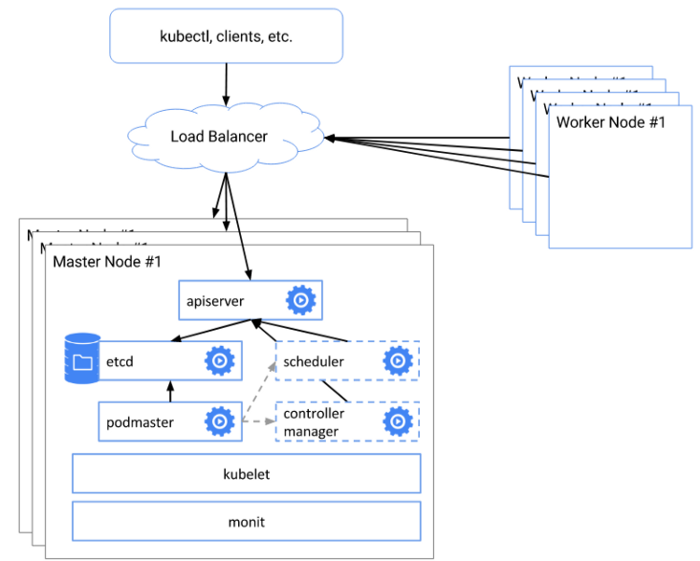
Architecture
-
kubectl을 통한 명령어나 Worker Node들이 Master Node와 통신을 하기 위해 Load Balancer를 통해 각 Master에 접근할 수 있게 된다.
-
Kube-apiserver는 Load Balancer에 의해 Worker Node로 노출이 된다.
⇒ 각 Control Plane 노드는 Local etcd 멤버를 생성하고 이 etcd 멤버는 오직 kube-apiserver와 통신한다.
-
kubeadm init과 kubeadm join - -control-plane으로 Control Plane Node에서 자동으로 etcd 멤버를 만들 수 있다.

실습 환경
-
Host Machine
OS : Ubuntu 20.04
CPU : 8개
RAM : 16GB
SSD : 256GB
-
Hypervisior : KVM
-
Network
- NAT : 192.168.100.0/24
-
VM 정보
- Master1 : 192.168.100.10/24, 2vCPU, RAM 3g
- Master2 : 192.168.100.11/24, 2vCPU, RAM 3g
- Master3 : 192.168.100.12/24, 2vCPU, Ram 3g
초기 작업
-
kubeadm Installation 하기 전 해줘야 할 초기 작업들이 있다.
- hostname 설정
- Docker 설치
- 방화벽 설정 (필요한 방화벽 포트를 열어주거나, 아예 방화벽을 해제하거나 둘중 하나)
- iptables 설정
- swap off
- SELinux 해제
-
hostname 설정 (아래와 같이 설정)
→ master1
→ master2
→ master3
-
각 Node에서 수행
# vi /etc/hosts

192.168.100.10          master1
192.168.100.11          master2
192.168.100.12          master3

# hostname 변경

# master1
hostnamectl set-hostname master1

# master2
hostnamectl set-hostname master2

# master3
hostnamectl set-hostname master3-
Docker 설치
( Docker가 이미 설치되었다면 생략해도 좋습니다. )
# vi docker-install.sh

#! /bin/bash
yum -y install yum-utils device-mapper-persistent-data lvm2
yum-config-manager --add-repo \
https://download.docker.com/linux/centos/docker-ce.repo
yum -y install docker-ce docker-ce-cli containerd.io
systemctl start docker && systemctl enable docker


# 실행 권한
chmod +x docker-install.sh

# 스크립트 실행
sh docker-install.sh

# 간단한 docker 명령어로 설치되었는지 확인
docker ps
docker version- Firewall 설정
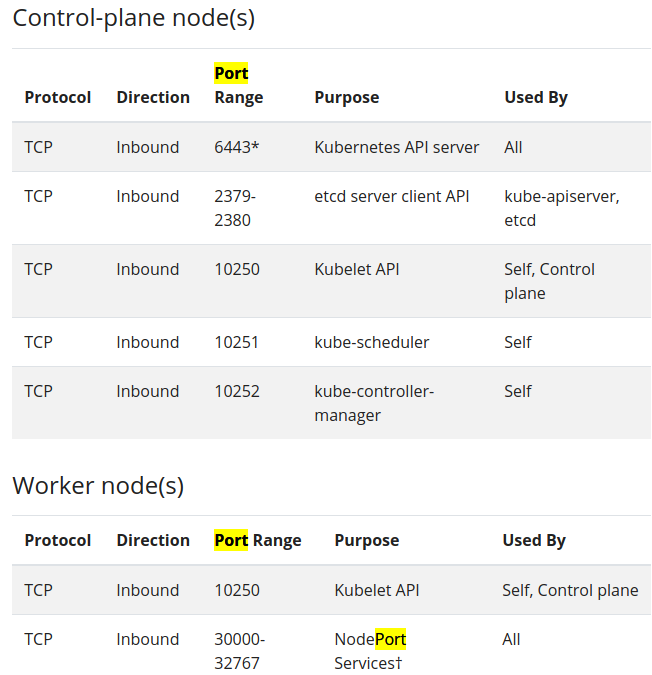
for port in 6443 2379-2380 6783 6784 10250-10252 26443
do
 firewall-cmd --add-port=$port/tcp --permanent
done

firewall-cmd --reload

# Check
firewall-cmd --list-all
public (active)
..
..
  services: dhcpv6-client dns http ssh
  ports: 6443/tcp 2379-2380/tcp 10250-10252/tcp 6783/tcp 6784/tcp 26443/tcp
..- iptables 설정
cat <<EOF >  /etc/sysctl.d/k8s.conf
net.bridge.bridge-nf-call-ip6tables = 1
net.bridge.bridge-nf-call-iptables = 1
EOF

sysctl --system- net.bridge.bridge-nf-call-iptables = 1 의 의미는?
CentOS와 같은 리눅스 배포판은 net.bridge.bridge-nf-call-iptables의 default값이 0이다.
=> 이는 bridge 네트워크를 통해 송수신 되는 패킷이 iptable 설정을 우회한다는 의미임.
하지만 컨테이너의 네트워크 패킷이 호스트머신의 iptable 설정에 따라 제어되도록 하는 것이 바람직하며, 이를 위해 1로 설정해주어야 한다.
- SELinux 해제
# Permissive Mode로 변경 (재부팅 되면 다시 돌아옴)
setenforce 0

# selinux 설정 파일에서 영구 설정
sed -i 's/^SELINUX=enforcing$/SELINUX=permissive/' /etc/selinux/config- SWAP 끄기
swapoff -a

# swap이 들어간 Line 주석 처리
vi /etc/fstab
#/dev/mapper/centos-swap swap                    swap    defaults        0 0
Kubeadm으로 Master Node 설치
- 순서는 아래와 같다.
- k8s repo 추가
- kubelet, kubeadm, kubectl 설치
- HAProxy 설치 및 설정 - Master 1 Node에만
- Clustering 작업
- CNI 적용 (weave)
이제 kubeadm을 사용하여 설치하기 위한 기초 작업은 마무리했으니, kubeadm을 이용하여 설치를 진행하겠다.
- k8s Repo 추가
cat <<EOF > /etc/yum.repos.d/kubernetes.repo
[kubernetes]
name=Kubernetes
baseurl=https://packages.cloud.google.com/yum/repos/kubernetes-el7-x86_64
enabled=1
gpgcheck=1
repo_gpgcheck=1
gpgkey=https://packages.cloud.google.com/yum/doc/yum-key.gpg https://packages.cloud.google.com/yum/doc/rpm-package-key.gpg
EOF- kubeadm, kubelet, kubectl 설치
- kubeadm : 클러스터를 Bootstrap하는 명령어
- kubelet : 클러스터의 모든 머신에서 실행되고 파드 및 컨테이너 시작과 같은 작업을 수행하는 구성 요소
- kubectl : 클러스터와 통신하기 위한 Command Line Utility
yum install -y kubelet kubeadm kubectl --disableexcludes=kubernetes

systemctl enable kubelet && systemctl start kubelet-
HAproxy 로드밸런서 설치 (주의 : 이 작업은 Master 1 에서만 작업할 것!! )
Test이기 때문에 Keepalive 및 Failover 기능 X
yum -y install haproxy- LB 설정
cat <<EOF >> /etc/haproxy/haproxy.cfg
frontend kubernetes-master-lb
bind 0.0.0.0:26443
option tcplog
mode tcp
default_backend kubernetes-master-nodes

backend kubernetes-master-nodes
mode tcp
balance roundrobin
option tcp-check
option tcplog
server master1 192.168.100.10:6443 check
server master2 192.168.100.11:6443 check
server master3 192.168.100.12:6443 check
EOF

systemctl restart haproxy && systemctl enable haproxy

systemctl status haproxy- Check
netstat -nltp | grep 26443
tcp        0      0 0.0.0.0:26443           0.0.0.0:*               LISTEN      2897/haproxy
clustering
-
클러스터 생성 시 --upload-certs, --control-plane-endpoint Flag를 추가해야 Certificate가 자동 배포되고 Master Node에 Join 명령어가 출력된다.
-
Cluster 생성 - Master 1에서 작업
kubeadm init --control-plane-endpoint "192.168.100.10:26443" \
--upload-certs \
--pod-network-cidr "10.244.0.0/16"

..
..
..

## 아래 출력물은 특정한 곳에 복붙 해놓을 것

Your Kubernetes control-plane has initialized successfully!

To start using your cluster, you need to run the following as a regular user:

  mkdir -p $HOME/.kube
  sudo cp -i /etc/kubernetes/admin.conf $HOME/.kube/config
  sudo chown $(id -u):$(id -g) $HOME/.kube/config

You should now deploy a pod network to the cluster.
Run "kubectl apply -f [podnetwork].yaml" with one of the options listed at:
  https://kubernetes.io/docs/concepts/cluster-administration/addons/

You can now join any number of the control-plane node running the following command on each as root:

  kubeadm join 192.168.100.10:26443 --token t69wl1.6iq2xfgp8thiz9bb \
    --discovery-token-ca-cert-hash sha256:b94dc94f3a249c237f39808a6ff2d1f68cbe058b9d4aef6d54173b5523976238 \
    --control-plane --certificate-key 91295ae74b07d78d46b4bdc29e62615d50b5644a97ff6f4453c39a574c1f9bb6

Please note that the certificate-key gives access to cluster sensitive data, keep it secret!
As a safeguard, uploaded-certs will be deleted in two hours; If necessary, you can use
"kubeadm init phase upload-certs --upload-certs" to reload certs afterward.

Then you can join any number of worker nodes by running the following on each as root:

kubeadm join 192.168.100.10:26443 --token t69wl1.6iq2xfgp8thiz9bb \
--discovery-token-ca-cert-hash sha256:b94dc94f3a249c237f39808a6ff2d1f68cbe058b9d4aef6d54173b5523976238- kubectl 명령어 사용
mkdir -p $HOME/.kube
sudo cp -i /etc/kubernetes/admin.conf $HOME/.kube/config
sudo chown $(id -u):$(id -g) $HOME/.kube/config- Cluster 연결 - Master 2,3에서 작업
kubeadm join 192.168.100.10:26443 --token t69wl1.6iq2xfgp8thiz9bb \
--discovery-token-ca-cert-hash sha256:b94dc94f3a249c237f39808a6ff2d1f68cbe058b9d4aef6d54173b5523976238 \
--control-plane --certificate-key 91295ae74b07d78d46b4bdc29e62615d50b5644a97ff6f4453c39a574c1f9bb6

# 중간에 아래와 같은 경고문이 나온다. 6443과 10250 Port가 Open 되어있어야 한다는 뜻
[WARNING Firewalld]: firewalld is active, please ensure ports [6443 10250] are open or your cluster may not function correctly- kubectl 명령어 사용
mkdir -p $HOME/.kube
sudo cp -i /etc/kubernetes/admin.conf $HOME/.kube/config
sudo chown $(id -u):$(id -g) $HOME/.kube/config- Test
[root@master1 ~]# kubectl get nodes
NAME      STATUS     ROLES    AGE     VERSION
master1   NotReady   master   8m27s   v1.19.2
master2   NotReady   master   60s     v1.19.2
master3   NotReady   master   55s     v1.19.2

[root@master2 ~]# kubectl get nodes
NAME      STATUS     ROLES    AGE     VERSION
master1   NotReady   master   8m27s   v1.19.2
master2   NotReady   master   60s     v1.19.2
master3   NotReady   master   55s     v1.19.2

[root@master3 ~]# kubectl get nodes
NAME      STATUS     ROLES    AGE     VERSION
master1   NotReady   master   8m27s   v1.19.2
master2   NotReady   master   60s     v1.19.2
master3   NotReady   master   55s     v1.19.2
⇒ NotReady는 CNI가 설치되어 있지 않아서이다. CNI 설치를 해주자.
CNI (가상 Network) 적용
- Calico, Canal, Clilum, Flannel, Weave등 다양항 CNI가 있다.
- weave를 적용시킬 예정
kubectl apply -f "https://cloud.weave.works/k8s/net?k8s-version=$(kubectl version | base64 | tr -d '\n')"-
CNI 적용 확인
kube-system 네임스페이스에서 Pod를 확인하면 생성중임을 확인할 수 있다.
[root@master1 ~]# kubectl get pods -n kube-system
NAME                              READY   STATUS              RESTARTS   AGE
coredns-f9fd979d6-2rh9s           0/1     Pending             0          10m
coredns-f9fd979d6-96wjl           0/1     Pending             0          10m
etcd-master1                      1/1     Running             0          10m
etcd-master2                      1/1     Running             0          3m23s
etcd-master3                      1/1     Running             0          3m8s
kube-apiserver-master1            1/1     Running             0          10m
kube-apiserver-master2            1/1     Running             0          3m25s
kube-apiserver-master3            1/1     Running             0          116s
kube-controller-manager-master1   1/1     Running             1          10m
kube-controller-manager-master2   1/1     Running             0          3m25s
kube-controller-manager-master3   1/1     Running             0          109s
kube-proxy-d27sv                  1/1     Running             0          2m42s
kube-proxy-n8hp7                  1/1     Running             0          10m
kube-proxy-slbjt                  1/1     Running             0          3m28s
kube-scheduler-master1            1/1     Running             1          10m
kube-scheduler-master2            1/1     Running             0          3m27s
kube-scheduler-master3            1/1     Running             0          115s
weave-net-5w7cw                   1/2     Running             0          34s
weave-net-6l92n                   0/2     ContainerCreating   0          34s
weave-net-psnfk                   1/2     Running             0          34s
- kubectl get nodes
설치 완료
[root@master1 ~]# kubectl get nodes
NAME      STATUS   ROLES    AGE     VERSION
master1   Ready    master   11m     v1.19.2
master2   Ready    master   4m10s   v1.19.2
master3 Ready master 4m5s v1.19.2- Ref
https://danawalab.github.io/kubernetes/2020/01/28/kubernetes-ha-cluster.html
https://www.notion.so/Kubeadm-Install-80658c256d58413aa8de0be6decd4573