
🚀 Start
TypeScript에서 대해서 공부해봤으니, React에서는 어떻게 사용되는지 간단한 게임프로젝트들을 구현해보며 알아보자. 그리고 tailewind CSS를 이용하여 UI를 구현해보자.
✔️ React + Webpack + TS
그전에 CRA(Creact Reat App) 없이 webpack을 설정하여 프로젝트 환경을 세팅해보자.
1️⃣ 작업할 폴더에 package.json을 생성.
package.json: 현재 프로젝트에 관한 정보와 패키지 매니저(npm, yarn)을 통해 설치한 모듈들의 의존성을 관리하는 파일이다.
npm init2️⃣ typescript 설치
npm i typescript3️⃣ react를 사용하기 위한 기본적인 react 패키지들을 설치
npm i react react-dom react-router react-router-dom4️⃣ webpack 개발용으로 설치
webpack-cli: 터미널에서 웹팩 명령을 실행할 수 있게 해주는 도구webpack-dev-server: 개발용으로 실시간 Reload 서버를 실행
npm i webpack webpack-cli webpack-dev-server -D✚ package.json에서 scripts 설정
 "scripts": {
    "dev": "webpack"
  }
 //npm run dev 또는 npx webpack 명령어 사용 가능
💡 잠깐) 웹팩에 관한 좋은 자료
5️⃣ JS 문법으로의 변환을 위한 Loader를 설치
npm i ts-loader @types/webpack ts-node -D💡 잠깐)
ts-loader에 관한 좋은 자료
6️⃣ Definitely Typed 설치
npm i @types/react @types/react-dom @types/react-router @types/react-router-dom
💡 잠깐) definitly typed?
: JS의 수많은 라이브러리에 대한 타입들을 모두 설정할 수 없기 때문에 definitly type를 사용한다.
⭐️ 타입스크립트에서는 react패키지들의 타입 정보가 필요하다.
✅ 주의사항 - 버전 체크
"@types/react": "^18.0.24",
    "@types/react-dom": "^18.0.8",
    "react": "^18.2.0",
    "react-dom": "^18.2.0",
7️⃣ tsconfig.json 만들어서 기본 ts 설정
{
  "compilerOptions": {
    "strict": true,
    "lib": [
      "es5",
      "es2015",
      "es2016",
      "es2017",
      "es2018",
      "es2019",
      "es2020",
      "dom"
    ],
    "jsx": "react"
  }
}
💡 잠깐) About tsconfig.json
8️⃣ webpack.config.js 만들어서 웹팩 설정
entry,module,plugins,output설정
const path = require("path");
const webpack = require("webpack");

module.exports = {
  mode: "development", // production(배포)
  devtool: "eval", // hidden - source - map
  resolve: {
    extensions: [".jsx", ".js", ".tsx", ".ts"],
  },

  entry: {
    app: "./client",
  },
  module: {
    rules: [
      {
        test: /\.tsx?$/,
        loader: "ts-loader",
      },
    ],
  },
  plugins: [
    // new webpack.LoaderOptionsPlugin({debug: true}),
  ],
  output: {
    filename: "app.js",
    path: path.join(__dirname, "dist"),
    publicPath: "/dist",
  },
};
9️⃣ webpack 실행
👉 명령어 입력
npx webpack or npm run dev 👉 webpack.config.js의 entry의 내용대로 client.js가 진입점이 된다.
entry: 웹 자원을 변환하기 위해 필요한 최초 진입점
import * as React from "react";
import * as ReactDOM from "react-dom";

import GuGuDan from "./GuGuDan";
ReactDOM.render(<GuGuDan />, document.querySelector("#root"));
👉 webpack.config.js의 output의 내용대로 dist폴더안에 번들링된 app.js가 생성된다.
👉 브라우저에 실제로 보여질 index.html을 생성하고 script 경로를 app.js로 설정
<index.html>
...
    <script src="./dist/app.js"></script>
...💡Tip ) webpack-dev-server
webpack-dev-server패키지를 사용하여서 코드를 수정할때마다 매번 빌드 명령어를 입력하지 않아도 된다.
설치
npm i -D "webpack-dev-server" @types/webpack-dev-server"세팅
<Package.json> "scripts": { "dev": "webpack serve --env development" },<webpack.config.ts> output: { ... publicPath: "/dist", ... },사용
npm run dev명령어 입력 시 자동 빌드로 인하여port8000으로 접속하면 코드가 수정될 때마다 브라우저가 자동 렌더링 되어 수정사항이 바로 보인다.
💡 잠깐) 왜 ts 환경에서는 react import 가 바로 안될까?
import React from react // (x)
import * as React from react //(O))
React는export default가 아닌namespace의 형태로export되고 있다.그렇기 때문에
import React from 'react'형태로는 불러올 수가 없다.
default export가 없으니 어떤 것을 기본으로 받아와야 하는 지 모르기 때문에 오류가 뜨는 것이다.✅ 따라서
namespace형태로부터 받아오기 위해* as React라고 사용하는 것!
리액트에서의 타입스크립트 타이핑
:https://react-typescript-cheatsheet.netlify.app/docs/basic/getting-started/context
✔️ ESLint
✅ 타입스크립트 및 문법 검사, 코드 정리 도구 라이브러리를 추가하자!
npm i -D typescript @babel/core @babel/preset-env @babel/preset-typescript @typescript-eslint/eslint-plugin @typescript-eslint/parser eslint prettier eslint-plugin-prettier✅ 프로젝트 폴더 바로 아래에 ESLint 설정 파일 추가
// .eslintrc.js
module.exports = {
  root: true,
  env: {
    browser: true,
    node: true,
  },
  extends: [
    'eslint:recommended',
    'plugin:@typescript-eslint/eslint-recommended',
    'plugin:@typescript-eslint/recommended',
  ],
  plugins: ['prettier', '@typescript-eslint'],
  rules: {
    'prettier/prettier': [
      'error',
      {
        singleQuote: true,
        semi: true,
        useTabs: false,
        tabWidth: 2,
        printWidth: 80,
        bracketSpacing: true,
        arrowParens: 'avoid',
      },
    ],
  },
  parserOptions: {
    parser: '@typescript-eslint/parser',
  },
};
✅ ESLint ignore 파일 추가
// .eslintignore
node_modules
✅ VSCode 사용자 정의 파일인 settings.json 파일의 내용에 아래와 같이 ESLint 플러그인 관련 설정 추가.
{
// ... <-- 기존 내용을 꼭 유지한 상태에서 아래 내용을 추가하고 이 주석은 제거할 것
"editor.codeActionsOnSave": {
"source.fixAll.eslint": true
},
"eslint.alwaysShowStatus": true,
"eslint.workingDirectories": [
{"mode": "auto"}
],
"eslint.validate": [
"javascript",
"typescript"
],
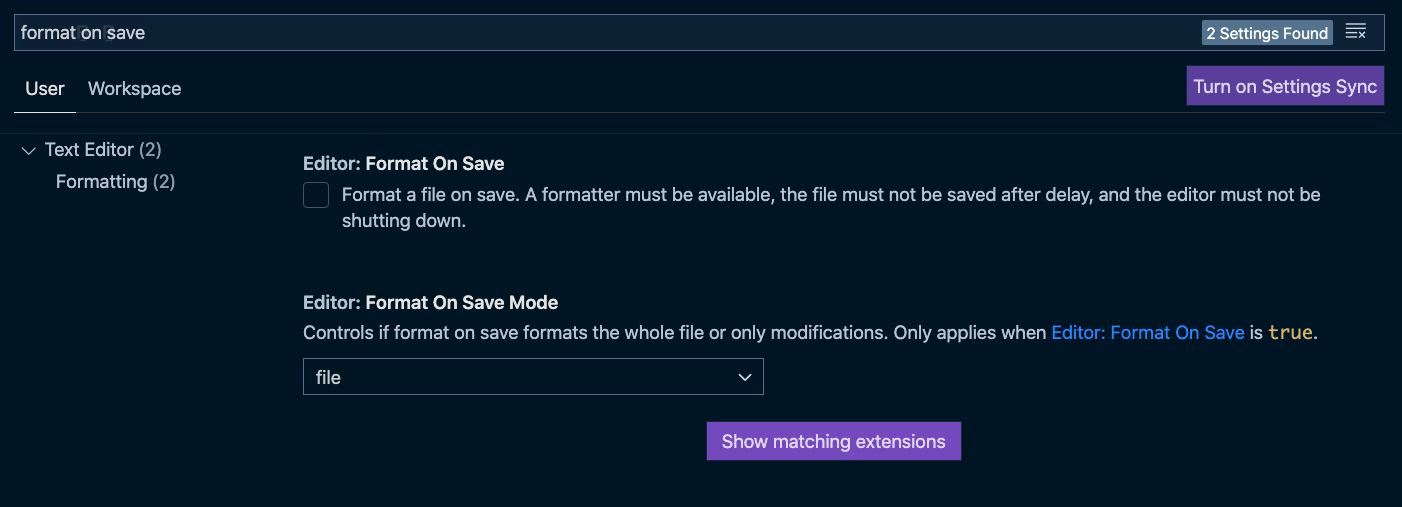
}✅ VSCode 설정 파일(Settings)에 들어간 후 format on save 검색. 아래와 같이 체크가 안되어 있는지 확인.
👍 위와 같은 과정을 통해서 이제 TS파일에서 설정한 값에 대해서 문법과 코드 정리가 실행된다.
✔️ tailwind CSS
Tailwind CSS는 Utility-First 컨셉을 가진 CSS 프레임워크다.
부트스트랩과 비슷하게 m-1, flex와 같이 미리 세팅된 유틸리티 클래스를 활용하는 방식으로 HTML 코드 내에서 스타일링을 할 수 있다.
자세한건 직접 구현해보며 알아보도록 하고 React, TS와 함께 사용할 수 있게 tailwind CSS를 세팅해보자.
💡 tailwind CSS를 자세히 알고 싶다면?
✅ 관련 플러그인, 패키지 설치
npm install -D tailwindcss postcss autoprefixer-
autoprefixer
- 공급업체 접두사를 각 속성별로 모두 외워 사용하는 것은 거의 불가능하기에 이를 자동으로 진행해주는 패키지.
- 마크업 시 CSS의 Class 앞에 -moz-, -webkit-, -o-, -ms- 와 같이 각 브라우저에서 판독 가능한 접두어를 붙여서 해당 브라우저에서 인식할 수 있게 하는 것
-
PostCSS
- Postcss가 빌드 시에 tailwindcss를 일반 css로 변환.
- 편리한 문법을 이용해서 css를 작성하고 추후에 다시 순수 css로 변환해 주는 것
- 프레임워크의 문법에 맞게 css를 작성하면 사용자에게 배포할 브라우저가 이해할 수 있는 css로 변환이 됨.
- CSS에 문제가없는지 미리 확인해서 에러로그를 준다.
- 지금 발전중인 CSS의 현대기술들을 브라우저에 호환되도록 자동 변환해준다.
✅ PostCSS 설정
// postcss.config.js

module.exports = {
  plugins: {
    tailwindcss: { config: './tailwind.config.js' },
    autoprefixer: {},
  },
};
✅ Tailwind CSS 설정
module.exports = {
  content: ['./*.{html,js,jsx,ts,tsx}'],
  theme: {
    extend: {},
  },
  plugins: [],
};
✅ Webpack 설정
- postcss를 통해 tailwindcss를 사용하고 있기 때문에 postcss를 webpack에 연결.
npm install -D postcss-loader css-loader style-loader- .css 파일을 postcss-loader가 처리한 후 css-loader 에게 넘긴다음 @import 구문 같은 것을 처리하고 style-loader 가 html에 붙여주기 때문에 오른쪽 부터 순서대로 해주는게 중요!
// webpack.config.ts
  ...
  module: {
    rules: [
     ...
      {
        test: /\.css?$/i,
        include: path.resolve(__dirname, './'),
        use: ['style-loader', 'css-loader', 'postcss-loader'],
      },
    ],
  },
 	...
✅ Tailwind CSS를 전역으로 사용하기 위해 아래와 같이 파일 생성
// ./tailwind.css

@tailwind base;
@tailwind components;
@tailwind utilities;
💡
@tailwind부분에 워닝표시가 뜬다면 vscode의postcss익스텐션을 사용하자!
✅ index.tsx(나의 경우 client.tsx) 즉, 최상위 파일에 tailwind CSS 파일 import
...
import './tailwind.css';

const container = document.getElementById('root') as HTMLElement;
const root = createRoot(container);
root.render(
  <React.StrictMode>
    <Games />
  </React.StrictMode>
);
✅ 작동 확인
// Games.tsx
const Games = () => {
  return (
    <>
       <h1 className="text-3xl font-bold underline">Hello world!</h1>

    </>
  );
};
✅ Tailwindcss를 위한 ESLint, Prettier설정
- 설치
npm install -D eslint-plugin-tailwindcss prettier-plugin-tailwindcss- 설정
// .eslintrc

...
"plugins": [
    ...
  "tailwindcss"
],
"extends": [
    ...
    "plugin:tailwindcss/recommended",
    ...
],
...
rules: {
    'prettier/prettier': [
      'error',
      {
       ...
        tailwindConfig: './tailwind.config.js',
      },
    ],
    'tailwindcss/classname-order': 'off',
},- 정상 작동

출처 및 참고하기 좋은 사이트