
참고강의🎈 : 인프런 => Vue.js 중급 강좌: https://www.inflearn.com/course/vue-pwa-vue-js-%EC%A4%91%EA%B8%89/dashboard
vue.js 프레임워크의 기본 구조와 코드를 분석
이 글에서 다루는 TodoApp 프로젝트는 Vuex를 적용시키기 전까지의 과정을 설명한다.
순서🏀
1. TodoApp 구현화면 및 동작 살펴보기
2. TodoApp 프로젝트 폴더 구조 분석
3. component별 코드 분석
4. 후기
1. TodoApp 구현 화면 🏀
TodoApp은 LocalStorage를 이용하여 Item의 추가, 조회, 변경, 삭제 기능을 구현한 간단한 App이다.
할 일 추가, 목록

- TodoInput 컴포넌트 : 할 일을 입력하는 공간이다.
- 1번칸에 입력된 값을 localStorage에 추가시켜준다.
- 추가된 목록 중에서 해당 Item을 삭제시킨다.
- Toggle 버튼을 활용해 해당 item을 완료, 미완료로 표현할 수 있다.
- clearAll 버튼을 눌러 모든 Item을 삭제 가능하다.
2. TodoApp 프로젝트 폴더 구조 분석 🏀
TodoApp프로젝트는 vue-cli를 이용하여 생성하였다.
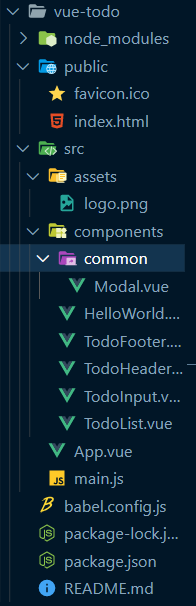
- node_modules/ : npm으로 설치되는 서드파트 라이브러리들이 모여 있는 디렉토리.
(서드파트 라이브러리란? : https://velog.io/@lazy_youn/3rd-party%EB%9E%80 ) - src/ : 실제 대부분의 코딩이 이루어지는 디렉토리.
- assets/ : 이미지 등 Application에서 사용되는 파일들이 모여있는 디렉토리.- components/ : Vue 컴포넌트들이 모여있는 디렉토리.
- components/TodoHeader.vue : 제목을 나타내는 부븐을 header컴포넌트로 분리하였다.
- components/TodoInput.vue : Item의 입력부분과 추가버튼을 TodoInput 컴포넌트로 분리했다.
- components/TodoList.vue : Items의 목록을 나타내는 부분으로 토글 버튼과 삭제 버튼이 있다.
- components/TodoFooter.vue : 전체삭제 버튼 기능을 Footer로 분리했다.
- components/common/Modal.vue : 아무것도 입력하지 않고 추가 버튼을 눌렀을 시에 모달창이 뜨도록 했다.
- router/ : vue-router 설정을 하는 디렉토리.
- App.vue : 가장 최상위의 컴포넌트.
- main.js : 가장 먼저 실행되는 js파일, Vue인스턴스를 생성하는 역할.
- index.html : Application의 뼈대가 되는 html파일
간단한 페이지 1개를 4개의 컴포넌트로 분리한 이유
- 뷰를 포함한 컴포넌트 기반 프레임워크에서 추구하는 재사용성과 연관이 있다.
3.코드 분석 🏀
이 글에서는 CSS 와 관련된 부분들은 표시하지 않을 것.
main.js
import Vue from 'vue'
import App from './App.vue'
Vue.config.productionTip = false // Vue 앱이 처음 실행될 때 나오는 경고문을 출력할 것인지 물어보는 내용이다.
new Vue({
  render: h => h(App),
}).$mount('#app')- 가장 먼저 실행되는 js파일이며 Vue 인스턴스를 생성하는 역할을 한다.
index.html
<!DOCTYPE html>
<html lang="">
  <head>
    <meta charset="utf-8">
    <meta http-equiv="X-UA-Compatible" content="IE=edge">
    <meta name="viewport" content="width=device-width,initial-scale=1.0">
    <link rel="icon" href="<%= BASE_URL %>favicon.ico">
    <link rel="shortcut icon" href="src/assets/favicon.ico" type="image/x-icon">
    <link rel="icon" href="src/assets/favicon.ico" type="image/x-icon">
    <link rel="stylesheet" href="https://pro.fontawesome.com/releases/v5.10.0/css/all.css" integrity="sha384-AYmEC3Yw5cVb3ZcuHtOA93w35dYTsvhLPVnYs9eStHfGJvOvKxVfELGroGkvsg+p" crossorigin="anonymous"/>
    <link rel="preconnect" href="https://fonts.gstatic.com">
    <link href="https://fonts.googleapis.com/css2?family=Ubuntu:wght@500&display=swap" rel="stylesheet">
    <title><%= htmlWebpackPlugin.options.title %></title>
  </head>
  <body>
    <noscript>    // 에러발생시 뜸
      <strong>We're sorry but <%= htmlWebpackPlugin.options.title %> doesn't work properly without JavaScript enabled. Please enable it to continue.</strong>
    </noscript>
    <div id="app"></div>
    <!-- built files will be auto injected -->
  </body>
</html>
- 앱의 템플릿파일, Vue App은 이 Html 페이지로부터 실행된다.
- Application의 레이아웃을 관리하는 템플릿이 아니다. Vue 앱 외부의 정적 HTML을 제어하는 템플릿이다.
App.vue
- 최상위 컴포넌트로 생성한 4개의 컴포넌트를 등록한다.
<template>
  <div id="app">
    <TodoHeader></TodoHeader>
    <TodoInput v-on:addTodoItem="addOneItem"></TodoInput>
    <TodoList v-bind:propsdata="todoItems"
     v-on:removeItem="removeOneItem"
     v-on:toggleItem="toggleOneItem"></TodoList>
    <TodoFooter v-on:clearAll="clearAllItems"></TodoFooter>
  </div>
</template><script>
// 컴포넌트 내용을 불러오기 위한 import구문 (ES6)
import TodoHeader from './components/TodoHeader.vue'
import TodoInput from './components/TodoInput.vue'
import TodoList from './components/TodoList.vue'
import TodoFooter from './components/TodoFooter.vue'
export default {
data(){
return{
todoItems: []
}
},
methods: {
addOneItem(todoItem){ // 할일 추가
const obj = {completed: false, item: todoItem};
// 저장하는 로직
localStorage.setItem(todoItem, JSON.stringify(obj));
this.todoItems.push(obj);
},
// setItem!
removeOneItem(todoItem, index){ // 목록중 하나 선택 삭제
this.todoItems.splice(index,1); // 화면상에서 삭제
localStorage.removeItem(todoItem.item); //localStorage에서 삭제
},
toggleOneItem(todoItem, index){ //체크박스
this.todoItems[index].completed = !this.todoItems[index].completed;
localStorage.removeItem(todoItem.item);
localStorage.setItem(todoItem.item, JSON.stringify(todoItem));
},
clearAllItems(){ // 전체삭제
localStorage.clear(); //localStorage를 비운다.
this.todoItems = []; // 화면 상의 목록을 비운다.
}
},
created() {
if(localStorage.length >0){
for(let i=0; i<localStorage.length; i++){
if(localStorage.key(i) !== 'loglevel:webpack-dev-servier'){
// console.log(JSON.parse(localStorage.getItem(localStorage.key(i))));
this.todoItems.push(JSON.parse(localStorage.getItem(localStorage.key(i))));
}
}
}
},
components: {
TodoHeader,
TodoInput,
TodoList,
TodoFooter
}
}
</script>- setItem() API는 로컬스토리지에 데이터를 추가하는 API이다.
Components 🏀
TodoHeader Component
- 제목을 출력하는 간단한 컴포넌트이다.
<template>
    <header>
        <h1>TODO it!</h1>
    </header>
</template>

<script>
export default {
}
</script>
//
TodoInput Component
- 입력박스, 추가 버튼을 포함하고 있는 컴포넌트이다.
<template>
  <div class="inputBox shadow">
      <input type="text" v-model="newTodoItem" v-on:keyup.enter="addTodo"> // enter 키를 눌렀을 때 addTodo가 실행된다.
      <span class="addContainer" v-on:click="addTodo"> // 클릭했을 시 addTodo 실행
          <i class="fas fa-plus"></i>
      </span>

      <Modal v-if="showModal" @close="showModal = false"> // 모달 정보 나타내는 태그
        <h3 slot="header">경고!   // ModalHeader
          <i class="closeModalBtn fas fa-times" @click="showModal = false"></i>
        </h3>
        <div slot="body">아무것도 입력하지 않았습니다.</div> // ModalBody

      </Modal>
  </div>
</template>

<script>
import Modal from './common/Modal.vue'; // 해당 위치에서 모달의 정보를 가져온다.
export default {
   data(){
       return {
            newTodoItem: "",
            showModal: false // Modal 동작을 위한 플래그 값
       }
   },		//
   methods: {
       addTodo(){
           if(this.newTodoItem !==''){   //입력칸이 비어있지 않다면
             this.$emit('addTodoItem', this.newTodoItem);  // 'addTodoItem'에 입력칸의 정보를 전송
                this.clearInput(); // clearInput 호출
           }else{
             this.showModal = !this.showModal;  // 입력칸이 비어있다면 모달창
           }
        },
        clearInput: function() {
            this.newTodoItem = '';   // 입력칸을 빈칸으로
        }
   },
   components: {
    Modal,
   }
}
</script>- 입력창에 입력한뒤 추가버튼이나 'Enter'키를 누르면
값을 가지고 App.vue의 AddTodoItem으로 넘어가 로직을 수행한다.
TodoList Component
- 추가한 Item들의 목록을 나타내는 컴포넌트이다.
- v-for는 반복문이라고 생각하면 쉽다.
<template>
  <div>
    <transition-group name="list" tag="ul">
        <li v-for="(todoItem, index) in propsdata" v-bind:key="todoItem.item" class="shadow">
           <i class="checkBtn fas fa-check" v-bind:class="{checkBtnCompleted: todoItem.completed}"
           v-on:click="toggleComplete(todoItem,index)"></i>
           <span v-bind:class="{textCompleted: todoItem.completed}">{{ todoItem.item }}</span>
            <span class="removeBtn" v-on:click="removeTodo(todoItem, index)">
                <i class="removeBtn fas fa-trash-alt"></i>
            </span>
        </li>
    </transition-group>
  </div>
</template>

<script>
export default {
    props: ['propsdata'],
    methods: {
        removeTodo(todoItem, index){
            this.$emit('removeItem', todoItem, index); // $emit() - 이벤트를 트리거한다.
        },
        toggleComplete(todoItem, index) {
            this.$emit('toggleItem', todoItem, index);
        }
    }
}
TodoFooter Component
- 목록의 모든 item을 삭제하는 기능을 담은 컴포넌트이다.
<template>
  <div class="clearAllContainer">
    <span class="clearAllBtn" v-on:click="clearTodo">Clear All</span>
  </div>
</template>

<script>
export default {
  methods: {
    clearTodo: function(){
      this.$emit('clearAll');
    }
  },
}
</script>
후기 🏀
- 인프런 vue.js 중급 강의를 수강하며 공부했는데 Vue 나 javascript의 기본기를 연습할 수 있었던 것 같다.
간단한 App이었지만 vue의 흐름을 파악하는데 도움이 되었다. - 이후의 계획은 위 app에다 item 변경 기능을 추가해보는 것과
vuex를 적용시키는 것이다.

신입 프론트엔드 개발자