React에서 db로 불러온 직원 전체 목록을 Excel로 다운로드를 받고자 구현하였다.
엑셀 다운로드를 위해서는 xlsx-js-style을 사용해야 하고 이를 위해 아래와 같이 install 해야한다.
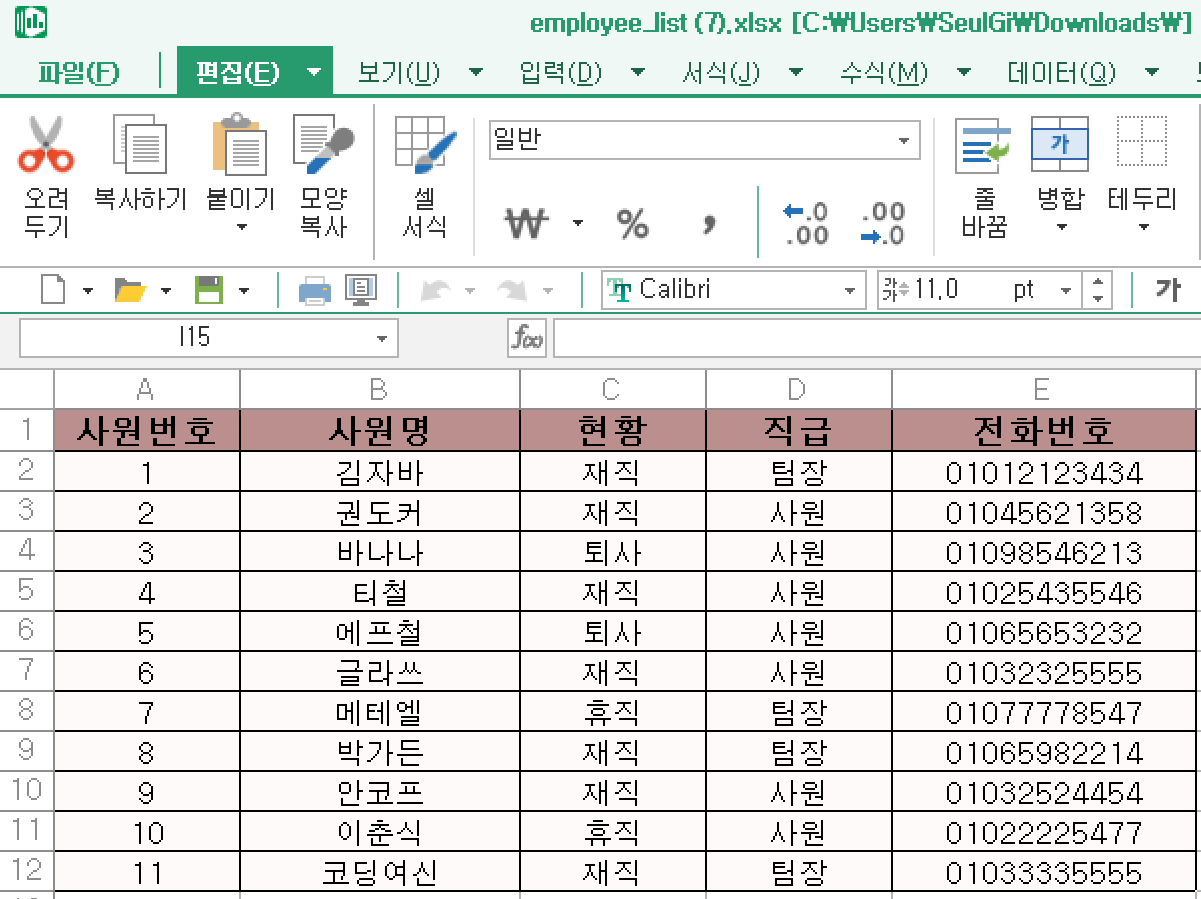
npm install xlsx-js-style👇 결과물
Ver.1 : 하나의 컴포넌트에서 구현
전체 직원목록을 조회하는 곳에 엑셀 다운로드 버튼을 생성하고 이 컴포넌트 안에서 엑셀 다운로드 되는 코드도 함께 작성하였다. 그로 인해 하나의 컴포넌트에 너무 많은 기능이 구현되어있어 코드 길이가 길어졌다.
import React, { useEffect, useState } from 'react';
import { empListDB } from "../../services/dbLogic";
import Table from 'react-bootstrap/Table';
import EmpRow from "./EmpRow";
import EmpDetail from './EmpDetail';
import { Button } from "react-bootstrap";
import XLSX from 'xlsx-js-style'; // xlsx-js-style를 사용하기 위해 추가
import styles from "./lsg.module.css";
const EmpListAll = () => {
const [gubun, setGubun] = useState('');
const [keyword, setKeyword] = useState('');
const [emps, setEmps] = useState([{}]);
const [selectedEmp, setSelectedEmp] = useState(null);
useEffect(() => {
empList();
}, []);
const empList = async () => {
console.log("empList 호출");
const gubun = document.querySelector("#gubun").value;
const keyword = document.querySelector("#keyword").value;
console.log(`${gubun}, ${keyword}`);
const emp = {
gubun: gubun,
keyword: keyword,
};
const res = await empListDB(emp);
document.querySelector("#gubun").value = '분류';
document.querySelector("#keyword").value = '';
console.log(res);
setEmps(res.data);
console.log(res.data);
}
const empSearch = (event) => {
console.log(`empSearch ==> ${event.key}`);
if (event.key === 'Enter') {
empList();
}
}
const handleEmpClick = (emp) => {
setSelectedEmp(emp);
};
const excelDown = async () => {
try {
console.log('excelDown 호출');
// 서버에서 직원 리스트 가져오기
const res = await empListDB();
const excelData = res.data;
console.log(excelData);
// Excel 파일 생성 및 다운로드
const wb = XLSX.utils.book_new();
const headerStyle = {
font: { bold: true, color: { rgb: '000000' }, name: '함초롱바탕', sz: 13 },
fill: { fgColor: { rgb: 'BC8F8F' } },
alignment: { horizontal: 'center', vertical: 'center' },
border: { left: { style: 'thin', color: { auto: 1 } }, right: { style: 'thin', color: { auto: 1 } }, top: { style: 'thin', color: { auto: 1 } }, bottom: { style: 'thin', color: { auto: 1 } } }
};
const dataStyle = {
font: { color: { rgb: '000000' }, name: '함초롱바탕', sz: 11 },
fill: { fgColor: { rgb: 'FFFAFA' } },
alignment: { horizontal: 'center', vertical: 'center' },
border: { left: { style: 'thin', color: { auto: 1 } }, right: { style: 'thin', color: { auto: 1 } }, top: { style: 'thin', color: { auto: 1 } }, bottom: { style: 'thin', color: { auto: 1 } } }
};
// 열의 폭을 정의
const colWidths = [80, 120, 80, 80, 130];
// cols 속성을 사용하여 각 열의 폭을 조절
const cols = colWidths.map(width => ({ wpx: width }));
const headerRow = [
{ v: '사원번호', t: 's', s: headerStyle },
{ v: '사원명', t: 's', s: headerStyle },
{ v: '현황', t: 's', s: headerStyle },
{ v: '직급', t: 's', s: headerStyle },
{ v: '전화번호', t: 's', s: headerStyle },
];
const dataRows = excelData.map(emp => [
{ v: emp.E_CODE, t: 's', s: dataStyle }, // 사원번호
{ v: emp.E_NAME, t: 's', s: dataStyle }, // 사원명
{ v: emp.E_CURRENT, t: 's', s: dataStyle }, // 현황
{ v: emp.E_RANK, t: 's', s: dataStyle }, // 직급
{ v: emp.E_PHONE, t: 's', s: dataStyle }, // 전화번호
]);
const rows = [headerRow, ...dataRows];
// 새로운 Sheet 객체 생성
const ws = XLSX.utils.aoa_to_sheet(rows);
// cols 속성 적용
ws['!cols'] = cols;
// workbook에 추가
XLSX.utils.book_append_sheet(wb, ws, '사원 목록');
// 파일 다운로드
XLSX.writeFile(wb, 'employee_list.xlsx');
console.log('Excel 파일 생성 및 다운로드 완료');
} catch (error) {
console.error('Error occurred while downloading Excel', error);
}
};
return (
<>
<div className={styles.container}>
<div className={styles.pageHeader}>
<h5>
직원목록
</h5>
<hr />
</div>
<div className={styles.row}>
<div className="col-3">
<select id="gubun" className="form-select" aria-label="분류">
<option defaultValue>분류</option>
<option value="e_name">사원명</option>
<option value="e_current">현황</option>
<option value="e_rank">직급</option>
</select>
</div>
<div className="col-6">
<input
type="text"
id="keyword"
className="form-control"
placeholder="검색어를 입력하세요"
aria-label="검색어를 입력하세요"
aria-describedby="btn_search"
onKeyUp={empSearch}
/>
</div>
<div className="col-1">
<Button variant="dark" id="btn_search" onClick={empList}>
검색
</Button>
</div>
</div>
<div className={styles.empList}>
<Table responsive>
<thead>
<tr>
<th>사원번호</th>
<th>사원명</th>
<th>현황</th>
<th>직급</th>
<th>전화번호</th>
</tr>
</thead>
<tbody>
{emps &&
emps.map((emp, key) => (
<EmpRow key={key} emp={emp} onClick={() => handleEmpClick(emp)} />
))}
</tbody>
</Table>
<hr />
<div className={styles.empListFooter}>
<div className="col-3">
<Button variant="success" id="btn_excelDown" onClick={excelDown}>
Excel Down
</Button>
</div>
<Button variant="secondary" onClick={empList}>
전체조회
</Button>
</div>
</div>
</div>
{/* EmpDetail 컴포넌트 추가 */}
<div className={styles.empDetails}>
{selectedEmp && <EmpDetail emp={selectedEmp} />}
</div>
</>
);
};
export default EmpListAll;Ver.2 : 컴포넌트 분리
전체 직원 목록을 출력하는 컴포넌트와 엑셀 다운로드를 구현하는 컴포넌트를 분리하였다. 이로써 엑셀 다운로드 구현 컴포넌트를 다른 페이지에서도 사용할 수 있어 재사용성이 높아졌다.
👇 empListAll.jsx
import React, { useEffect, useState } from 'react';
import Table from 'react-bootstrap/Table';
import EmpRow from "./EmpRow";
import EmpDetail from './EmpDetail';
import { Button } from "react-bootstrap";
import styles from "./lsg.module.css";
import ExcelForm from './ExcelForm';
const EmpListAll = ({ empList, oneRow, empDetail }) => {
const [searchedEmps, setSearchedEmps] = useState([]);
const [searchKeyword, setSearchKeyword] = useState('');
const handleSearch = () => {
const gubun = document.getElementById('gubun').value;
const filteredList = empList.filter((emp) => {
const value = emp[gubun];
return value && value.includes(searchKeyword.trim());
});
setSearchedEmps(filteredList);
console.log(filteredList);
};
// 전체조회 & 초기화 설정
const handleShowAll = () => {
setSearchedEmps([]); // 검색 결과 초기화
setSearchKeyword(''); // 검색어 초기화
}
return (
<>
<div className={styles.container} style={{ padding: '20px', borderLeft: '1px solid' }}>
<div className={styles.pageHeader}>
<h5>
직원목록
</h5>
<hr />
</div>
<div className={styles.row}>
<div className="col-3">
<select id="gubun" className="form-select" aria-label="분류">
<option defaultValue>분류</option>
<option value="e_name">사원명</option>
<option value="E_CURRENT">현황</option>
<option value="E_RANK">직급</option>
</select>
</div>
<div className="col-6">
<input
type="text"
id="keyword"
className="form-control"
placeholder="검색어를 입력하세요"
aria-label="검색어를 입력하세요"
aria-describedby="btn_search"
onChange={(e) => setSearchKeyword(e.target.value)}
value={searchKeyword}
/>
</div>
<div className="col-1">
<Button variant="dark" id="btn_search" onClick={handleSearch}>
검색
</Button>
</div>
</div>
<div className={styles.empList}>
<Table responsive>
<thead>
<tr>
<th>사원번호</th>
<th>사원명</th>
<th>현황</th>
<th>직급</th>
<th>전화번호</th>
</tr>
</thead>
<tbody>
{empList &&
empList.map((emp, key) => (
<EmpRow key={key} emp={emp} oneRow={oneRow} />
))}
</tbody>
</Table>
<hr />
<div className={styles.empListFooter}>
<div className="col-3">
<ExcelForm />
</div>
<Button variant="secondary" onClick={() => handleShowAll()}>
전체조회
</Button>
</div>
</div>
</div>
</>
);
};
export default EmpListAll;👇 ExcelForm.jsx
import React from 'react';
import { Button } from 'react-bootstrap';
import XLSX from 'xlsx-js-style';
import { empListDB } from '../../services/dbLogic';

const ExcelForm = () => {
  const excelDown = async () => {
    try {
      console.log('excelDown 호출');

      // 서버에서 직원 리스트 가져오기
      const res = await empListDB();
      const excelData = res.data;
      console.log(excelData);

      // Excel 파일 생성 및 다운로드
      const wb = XLSX.utils.book_new();
      const headerStyle = {
        font: { bold: true, color: { rgb: '000000' }, name: '함초롱바탕', sz: 13 },
        fill: { fgColor: { rgb: 'BC8F8F' } },
        alignment: { horizontal: 'center', vertical: 'center' },
        border: { left: { style: 'thin', color: { auto: 1 } }, right: { style: 'thin', color: { auto: 1 } }, top: { style: 'thin', color: { auto: 1 } }, bottom: { style: 'thin', color: { auto: 1 } } }
      };
      const dataStyle = {
        font: { color: { rgb: '000000' }, name: '함초롱바탕', sz: 11 },
        fill: { fgColor: { rgb: 'FFFAFA' } },
        alignment: { horizontal: 'center', vertical: 'center' },
        border: { left: { style: 'thin', color: { auto: 1 } }, right: { style: 'thin', color: { auto: 1 } }, top: { style: 'thin', color: { auto: 1 } }, bottom: { style: 'thin', color: { auto: 1 } } }
      };

      // 열의 폭을 정의
      const colWidths = [80, 120, 80, 80, 130];

      // cols 속성을 사용하여 각 열의 폭을 조절
      const cols = colWidths.map(width => ({ wpx: width }));

      const headerRow = [
        { v: '사원번호', t: 's', s: headerStyle },
        { v: '사원명', t: 's', s: headerStyle },
        { v: '현황', t: 's', s: headerStyle },
        { v: '직급', t: 's', s: headerStyle },
        { v: '전화번호', t: 's', s: headerStyle },
      ];

      const dataRows = excelData.map(emp => [
        { v: emp.E_CODE, t: 's', s: dataStyle },  // 사원번호
        { v: emp.E_NAME, t: 's', s: dataStyle },  // 사원명
        { v: emp.E_CURRENT, t: 's', s: dataStyle },  // 현황
        { v: emp.E_RANK, t: 's', s: dataStyle },  // 직급
        { v: emp.E_PHONE, t: 's', s: dataStyle },  // 전화번호
      ]);

      const rows = [headerRow, ...dataRows];

      // 새로운 Sheet 객체 생성
      const ws = XLSX.utils.aoa_to_sheet(rows);

      // cols 속성 적용
      ws['!cols'] = cols;

      // workbook에 추가
      XLSX.utils.book_append_sheet(wb, ws, '사원 목록');

      // 파일 다운로드
      XLSX.writeFile(wb, 'employee_list.xlsx');

      console.log('Excel 파일 생성 및 다운로드 완료');
    } catch (error) {
      console.error('Error occurred while downloading Excel', error);
    }
  };

  return (
    <div>
      <Button variant="success" id="btn_excelDown" onClick={excelDown}>
        Excel Down
      </Button>
    </div>
  );
};

export default ExcelForm;