엑셀 다운로드 기능을 하는 컴포넌트는 하나로 두고 다른 조원들도 자신의 테이블 컬럼을 입력한 컴포넌트를 만들어 공통 컴포넌트에 값을 props로 전달하면 엑셀 다운로드가 되도록 처리하였다.
공통 컴포넌트 이전 코드
import React from 'react';
import { Button } from 'react-bootstrap';
import XLSX from 'xlsx-js-style';
import styles from './empDetailInfo.module.css';

const ExcelForm = ({empList}) => {
  const excelDown = async () => {
    try {
      console.log('excelDown 호출');

      if (empList.length === 0) {
        throw new Error('직원 목록이 비어 있습니다.');
      }

      // Excel 파일 생성 및 다운로드
      const wb = XLSX.utils.book_new();
      const headerStyle = {
        font: { bold: true, color: { rgb: '000000' }, name: '함초롱바탕', sz: 13 },
        fill: { fgColor: { rgb: 'B588F7' } },
        alignment: { horizontal: 'center', vertical: 'center' },
        border: { left: { style: 'thin', color: { auto: 1 } }, right: { style: 'thin', color: { auto: 1 } }, top: { style: 'thin', color: { auto: 1 } }, bottom: { style: 'thin', color: { auto: 1 } } }
      };
      const dataStyle = {
        font: { color: { rgb: '000000' }, name: '함초롱바탕', sz: 11 },
        fill: { fgColor: { rgb: 'FFFFFF' } },
        alignment: { horizontal: 'center', vertical: 'center' },
        border: { left: { style: 'thin', color: { auto: 1 } }, right: { style: 'thin', color: { auto: 1 } }, top: { style: 'thin', color: { auto: 1 } }, bottom: { style: 'thin', color: { auto: 1 } } }
      };

      // 열의 폭을 정의
      const colWidths = [120 ,80, 120, 80, 80, 130];

      // cols 속성을 사용하여 각 열의 폭을 조절
      const cols = colWidths.map(width => ({ wpx: width }));

      const headerRow = [
        { v: '사원번호', t: 's', s: headerStyle },
        { v: '현황', t: 's', s: headerStyle },
        { v: '사원명', t: 's', s: headerStyle },
        { v: '부서', t: 's', s: headerStyle },
        { v: '직급', t: 's', s: headerStyle },
        { v: '전화번호', t: 's', s: headerStyle },
      ];

      const dataRows = empList.map(emp => [ // 중간에 값이 비어도 스타일 적용
        { v: emp.E_NO || '', t: 's', s: emp.E_NO ? dataStyle : dataStyle },  // 사원번호
        { v: emp.E_STATUS || '', t: 's', s: emp.E_STATUS ? dataStyle : dataStyle },  // 현황
        { v: emp.E_NAME || '', t: 's', s: emp.E_NAME ? dataStyle : dataStyle },  // 사원명
        { v: emp.DEPT_NAME || '', t: 's', s: emp.DEPT_NAME ? dataStyle : dataStyle },  // 부서
        { v: emp.E_RANK || '', t: 's', s: emp.E_RANK ? dataStyle : dataStyle },  // 직급
        { v: emp.E_PHONE || '', t: 's', s: emp.E_PHONE ? dataStyle : dataStyle },  // 전화번호
      ]);

      const rows = [headerRow, ...dataRows];

      // 새로운 Sheet 객체 생성
      const ws = XLSX.utils.aoa_to_sheet(rows);

      // cols 속성 적용
      ws['!cols'] = cols;

      // workbook에 추가
      XLSX.utils.book_append_sheet(wb, ws, '사원 목록');

      // 파일 다운로드
      XLSX.writeFile(wb, 'employee_list.xlsx');

      console.log('Excel 파일 생성 및 다운로드 완료');
    } catch (error) {
      console.error('Error occurred while downloading Excel', error);
      alert('Excel 파일 다운로드 중 오류가 발생했습니다. 다시 시도해주세요.');
    }
  };

  return (
    <div>
      <button className={styles.empSaveButton4} id="btn_excelDown" onClick={excelDown}>
        Excel Download
      </button>
    </div>
  );
};

export default ExcelForm;
공통 컴포넌트화 ver.1
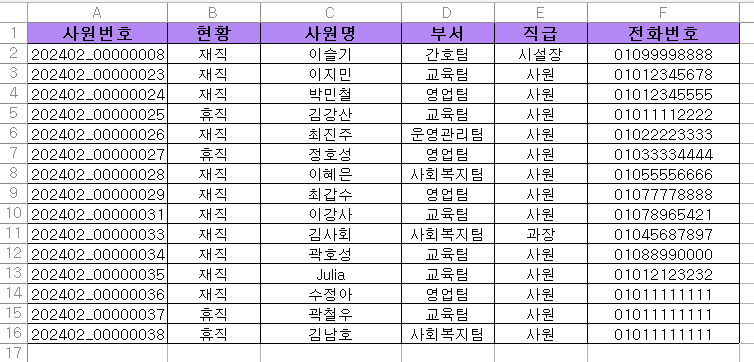
공통 컴포넌트와 테이블 컬럼을 담은 컴포넌트가 연결되기는 하였으나, 컬럼 값이 들어간 부분이 제외되고 엑셀이 다운로드 되는 문제가 발생하였다.
공통 컴포넌트 코드
import React from 'react';
import styled from 'styled-components';
import XLSX from 'xlsx-js-style';

const StyledButton = styled.button`
  margin-bottom: 10px;
  padding: 7px 10px;
  background-color: #477448;
  color: white;
  border: none;
  border-radius: 6px;
  cursor: pointer;
  box-shadow: 0px 4px 8px rgba(128, 0, 128, 0.2);
  transition: box-shadow 0.3s ease, transform 0.3s ease;
  white-space: nowrap;
  font-size: 0.75rem;
  transform: translateX(5%);

  &:hover {
    transform: translateX(5%) translateY(-3px);
    box-shadow: 0px 8px 16px rgba(0, 0, 0, 0.2);
  }
`;

const ExcelDownload = ({ data, columns, filename, buttonText, buttonStyle }) => {
    const excelDown = async () => {
        try {
            // 데이터가 비어 있는 지 확인
            if (data.length === 0) {
                throw new Error('데이터가 비어 있습니다.');
            }

            // 엑셀 워크북 생성
            const wb = XLSX.utils.book_new();

            // 엑셀 헤더 스타일 정의
            const headerStyle = {
                font: { bold: true, color: { rgb: '000000' }, name: '함초롱바탕', sz: 13 },
                fill: { fgColor: { rgb: 'B588F7' } },
                alignment: { horizontal: 'center', vertical: 'center' },
                border: { left: { style: 'thin', color: { auto: 1 } }, right: { style: 'thin', color: { auto: 1 } }, top: { style: 'thin', color: { auto: 1 } }, bottom: { style: 'thin', color: { auto: 1 } } }
            };

            // 엑셀 데이터 스타일 정의
            const dataStyle = {
                font: { color: { rgb: '000000' }, name: '함초롱바탕', sz: 11 },
                fill: { fgColor: { rgb: 'FFFFFF' } },
                alignment: { horizontal: 'center', vertical: 'center' },
                border: { left: { style: 'thin', color: { auto: 1 } }, right: { style: 'thin', color: { auto: 1 } }, top: { style: 'thin', color: { auto: 1 } }, bottom: { style: 'thin', color: { auto: 1 } } }
            };

            // 각 열의 폭 정의
            const colWidths = columns.map(width => ({ wpx: width }));
            const cols = colWidths.map(width => ({ wpx: width }));

            // 헤더 행 생성
            const headerRow = columns.map((column, index) => ({ v: column, t: 's', s: headerStyle }));

            // 데이터 행 생성
            const dataRows = data.map(item => columns.map(column => ({ v: item[column] || '', t: 's', s: item[column] ? dataStyle : dataStyle })));

            // 모든 행 결합
            const rows = [headerRow, ...dataRows];
            const ws = XLSX.utils.aoa_to_sheet(rows);

            // 열 너비 설정
            ws['!cols'] = cols;
            // 워크북에 시트 추가
            XLSX.utils.book_append_sheet(wb, ws, 'Sheet1');

            // 파일 다운로드
            XLSX.writeFile(wb, filename);

            console.log('Excel 파일 생성 및 다운로드 완료');
        } catch (error) {
            console.error('Excel 파일 다운로드 중 오류 발생', error);
            alert('Excel 파일 다운로드 중 오류가 발생했습니다. 다시 시도해주세요.');
        }
    };

    return (
        <StyledButton onClick={excelDown}>
            {buttonText}
        </StyledButton>
    );
};

export default ExcelDownload;
테이블 정의 컴포넌트 코드
import React from 'react';
import ExcelDownload from './ExcelDownload';

const EmpExcelDownload = ({ empList }) => {
    console.log("데이터 값: ", empList.toSorted());
    const columns = ['사원번호', '현황', '사원명', '부서', '직급', '전화번호'];
    const filename = 'employee_list.xlsx';
    const buttonText = 'Excel Download';

    // 각 데이터의 항목에 접근하여 적절한 값 가져오기
    const data = empList.map(emp => ({
        '사원번호': emp.E_NO || '',
        '현황': emp.E_STATUS || '',
        '사원명': emp.E_NAME || '',
        '부서': emp.DEPT_NAME || '',
        '직급': emp.E_RANK || '',
        '전화번호': emp.E_PHONE || '',
    }));

    return (
        <ExcelDownload
            data={data}
            columns={columns}
            filename={filename}
            buttonText={buttonText}
            buttonStyle={{ backgroundColor: '#4CAF50', border: 'none', color: 'white', padding: '10px 24px', textAlign: 'center', textDecoration: 'none', display: 'inline-block', fontSize: '16px', margin: '4px 2px', cursor: 'pointer' }}
        />
    );
};

export default EmpExcelDownload;
공통 컴포넌트화 ver.2
ver.1의 문제를 해결하고자 공통 컴포넌트 코드를 수정하였다.
또한 엑셀 다운로드 버튼의 디자인은 통일하되, 각자 사용하는 페이지에서 위치만 조정할 수 있도록 Styled를 사용하였다.
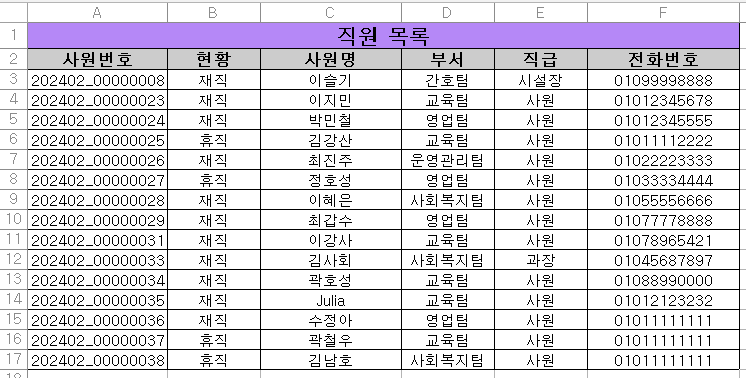
엑셀 다운로드 시, 정상적으로 값이 출력된다.
공통 컴포넌트 코드
import React from 'react';
import styled from 'styled-components';
import XLSX from 'xlsx-js-style';

const Button = styled.button`
    margin-bottom: 10px;
    padding: 7px 10px;
    background-color: #477448;
    color: white;
    border: none;
    border-radius: 6px;
    cursor: pointer;
    box-shadow: 0px 4px 8px rgba(128, 0, 128, 0.2);
    transition: box-shadow 0.3s ease, transform 0.3s ease;
    white-space: nowrap;
    font-size: 0.75rem;

    &:hover {
    transform: translateX(5%) translateY(-3px);
    box-shadow: 0px 8px 16px rgba(0, 0, 0, 0.2);
    }
`;

const ExcelDownload = ({ title, data, fileName, header, colWidths }) => {
    const excelDown = async () => {
        try {
            // 데이터가 비어 있는 지 확인
            if (data.length === 0) {
                throw new Error('데이터가 비어 있습니다.');
            }

            // 엑셀 워크북 생성
            const wb = XLSX.utils.book_new();

            // 엑셀 헤더 스타일 정의
            const headerStyle = {
                font: { bold: true, color: { rgb: '000000' }, name: '함초롱바탕', sz: 13 },
                fill: { fgColor: { rgb: 'B588F7' } },
                alignment: { horizontal: 'center', vertical: 'center' },
                border: { left: { style: 'thin', color: { auto: 1 } }, right: { style: 'thin', color: { auto: 1 } }, top: { style: 'thin', color: { auto: 1 } }, bottom: { style: 'thin', color: { auto: 1 } } }
            };

            // 엑셀 데이터 스타일 정의
            const dataStyle = {
                font: { color: { rgb: '000000' }, name: '함초롱바탕', sz: 11 },
                fill: { fgColor: { rgb: 'FFFFFF' } },
                alignment: { horizontal: 'center', vertical: 'center' },
                border: { left: { style: 'thin', color: { auto: 1 } }, right: { style: 'thin', color: { auto: 1 } }, top: { style: 'thin', color: { auto: 1 } }, bottom: { style: 'thin', color: { auto: 1 } } }
            };

            const headerRow = header.map((label, index) => ({ v: label, t: 's', s: headerStyle }));

            const dataRows = data.map(row => header.map(label => {
                const cellValue = typeof row[label] === 'object' ? Object.values(row[label])[0] : row[label];
                return { v: cellValue || '', t: 's', s: dataStyle };
            }));


            const rows = [headerRow, ...dataRows];

            const cols = colWidths.map(width => ({ wpx: width }));

            const ws = XLSX.utils.aoa_to_sheet(rows);
            ws['!cols'] = cols;

            XLSX.utils.book_append_sheet(wb, ws, 'Sheet1');

            XLSX.writeFile(wb, `${fileName}.xlsx`);
            } catch (error) {
                console.error('엑셀 다운로드 중 오류 발생', error);
                alert('엑셀 파일을 다운로드하는 중 오류가 발생했습니다. 다시 시도해주세요.');
            }
        };

    return (
        <Button onClick={excelDown}>
            Excel Download
        </Button>
    );
};

export default ExcelDownload;
테이블 정의 컴포넌트 코드
import React from 'react';
import ExcelDownload from './ExcelDownload';
import styled from 'styled-components';

const EmpContainer = styled.div`
    /* 필요 시, 각자 페이지에 맞는 위치 선정하세요. */
`

const EmpExcelDownload = ({ empList }) => {
    const header = ['사원번호', '현황', '사원명', '부서', '직급', '전화번호']; // 헤더 정보

    // 엑셀 다운로드에 필요한 데이터 준비
    const excelData = empList.map(emp => ({
        '사원번호': emp.E_NO,
        '현황': emp.E_STATUS,
        '사원명': emp.E_NAME,
        '부서': emp.DEPT_NAME,
        '직급': emp.E_RANK,
        '전화번호': emp.E_PHONE
    }));

    return (
        <EmpContainer>
            <ExcelDownload
            header={header} // 헤더 정보
            data={excelData} // 데이터
            fileName="직원목록" // 엑셀 파일명
            colWidths={[120, 80, 120, 80, 80, 130]} // 열의 폭 ==> 각자 정보에 맞게 너비 조정하세요.
            />
        </EmpContainer>
    );
};

export default EmpExcelDownload;
공통 컴포넌트화 ver.3
ver2. 에서 엑셀 다운로드를 받으면 최상단에 title을 붙이고자 하였다. title은 header 바로 위에 셀 병합하여 중앙 정렬되도록 설정하였다.
공통 컴포넌트 코드
import React from 'react';
import styled from 'styled-components';
import XLSX from 'xlsx-js-style';

const Button = styled.button`
    padding: 7px 10px;
    background-color: #477448;
    color: white;
    border: none;
    border-radius: 6px;
    cursor: pointer;
    box-shadow: 0px 4px 8px rgba(128, 0, 128, 0.2);
    transition: box-shadow 0.3s ease, transform 0.3s ease;
    white-space: nowrap;
    font-size: 0.75rem;

    &:hover {
    transform: translateX(5%) translateY(-3px);
    box-shadow: 0px 8px 16px rgba(0, 0, 0, 0.2);
    }
`;

const ExcelDownload = ({ title, data, fileName, header, colWidths }) => {
    const excelDown = async () => {
        try {
            // 데이터가 비어 있는 지 확인
            if (data.length === 0) {
                throw new Error('데이터가 비어 있습니다.');
            }

            // 엑셀 워크북 생성
            const wb = XLSX.utils.book_new();

            // 엑셀 헤더 스타일 정의
            const headerStyle = {
                font: { bold: true, color: { rgb: '000000' }, name: '함초롱바탕', sz: 13 },
                fill: { fgColor: { rgb: 'cccccc' } },
                alignment: { horizontal: 'center', vertical: 'center' },
                border: { left: { style: 'thin', color: { auto: 1 } }, right: { style: 'thin', color: { auto: 1 } }, top: { style: 'thin', color: { auto: 1 } }, bottom: { style: 'thin', color: { auto: 1 } } }
            };

            // 엑셀 데이터 스타일 정의
            const dataStyle = {
                font: { color: { rgb: '000000' }, name: '함초롱바탕', sz: 11 },
                fill: { fgColor: { rgb: 'FFFFFF' } },
                alignment: { horizontal: 'center', vertical: 'center' },
                border: { left: { style: 'thin', color: { auto: 1 } }, right: { style: 'thin', color: { auto: 1 } }, top: { style: 'thin', color: { auto: 1 } }, bottom: { style: 'thin', color: { auto: 1 } } }
            };


            // 엑셀 제목 스타일 정의
            const titleStyle = {
                font: { bold: true, color: { rgb: '000000' }, name: '함초롱바탕', sz: 15 },
                fill: { fgColor: { rgb: 'B588F7' } },
                alignment: { horizontal: 'center', vertical: 'center' },
                border: { left: { style: 'thin', color: { auto: 1 } }, right: { style: 'thin', color: { auto: 1 } }, top: { style: 'thin', color: { auto: 1 } }, bottom: { style: 'thin', color: { auto: 1 } } }
            };

            // 엑셀 시트 생성
            const ws = XLSX.utils.aoa_to_sheet([]);

            // A1 위치에 제목 넣기
            ws['A1'] = { v: title, s: titleStyle }; // 제목이 들어갈 셀 좌표 / 제목 값 및 스타일 적용
            const titleCellRange = { s: { r: 0, c: 0 }, e: { r: 0, c: header.length - 1 } }; // 제목이 들어갈 셀 범위
            ws['!merges'] = [{ s: titleCellRange.s, e: titleCellRange.e }]; // 제목이 들어간 셀 병합

            // A2 위치에 헤더 값 넣기
            const headerRow = header.map((label, index) => ({ v: label, t: 's', s: headerStyle }));
            XLSX.utils.sheet_add_aoa(ws, [headerRow], { origin: 'A2' });

            /* const dataRows = data.map(row => header.map(label => {
                const cellValue = typeof row[label] === 'object' ? Object.values(row[label])[0] : row[label];
                return { v: cellValue || '', t: 's', s: dataStyle };
            })); */

            // A2 위치에 데이터 값 넣기
            const dataRows = data.map(row => header.map(label => ({ v: row[label] || '', t: 's', s: dataStyle })));
            XLSX.utils.sheet_add_aoa(ws, dataRows, { origin: 'A3' });

            // 열의 폭 설정
            const cols = colWidths.map(width => ({ wpx: width }));

            //XLSX.utils.sheet_add_aoa(ws, rows);
            ws['!cols'] = cols;

            // 워크북에 시트 추가
            XLSX.utils.book_append_sheet(wb, ws, 'Sheet1');

            // 파일 다운로드
            XLSX.writeFile(wb, `${fileName}.xlsx`);
            } catch (error) {
                console.error('엑셀 다운로드 중 오류 발생', error);
                alert('엑셀 파일을 다운로드하는 중 오류가 발생했습니다. 다시 시도해주세요.');
            }
        };

    return (
        <Button onClick={excelDown}>
            Excel Download
        </Button>
    );
};

export default ExcelDownload;
테이블 정의 컴포넌트 코드 3-1
ver.2 까지는 개별 컴포넌트에서 header의 값을 excelData에 또 중복 코딩했다면 ver.3에서는 header 정보를 한 번만 선언하고 그 정보를 사용하여 excelData를 구성할 수 있도록 수정하였다. 이를 위해 엑셀 데이터를 구성할 때 헤더 정보를 참조하여 데이터를 매핑하였다.
이렇게 수정하면 헤더 정보와 데이터를 한 번만 선언하여 코드를 더욱 간결하게 만들 수 있다. 또한, ver.3에서는 다른 조원들이 공통 컴포넌트를 사용할 때 좀 더 간결하게 사용할 수 있다.
import React from 'react';
import ExcelDownload from './ExcelDownload';
import styled from 'styled-components';

const EmpContainer = styled.div`
    /* ===> 필요 시, 각자 페이지에 맞는 위치 선정하세요. */
`

const EmpExcelDownload = ({ empList }) => { /* ==> 엑셀 다운로드 받을 값 props로 가져오세요. */
    const title = '직원 목록'; // 엑셀 내 최상단 제목 ==> 원하는 제목으로 입력하세요.
    const header = ['사원번호', '현황', '사원명', '부서', '직급', '전화번호']; // 헤더 정보 ===> 원하는 헤더로 입력하세요.
    const fileName = 'Employee List' // 엑셀 파일명 ===> 원하는 엑셀 파일명으로 입력하세요.

    // 엑셀 다운로드하고 싶은 데이터 준비
    const excelData = empList.map(data => ({ /* ===> props 입력 : '__'.map */
        [header[0]]: data.E_NO, /* ===> 다운로드 받고 싶은 컬럼 입력하세요. header[x] : 배열 수 만큼 추가! */
        [header[1]]: data.E_STATUS,
        [header[2]]: data.E_NAME,
        [header[3]]: data.DEPT_NAME,
        [header[4]]: data.E_RANK,
        [header[5]]: data.E_PHONE
    }));

    return (
        <EmpContainer>
            <ExcelDownload
            title={title} // 엑셀 내 최상단 제목
            header={header} // 헤더 정보
            data={excelData} // 데이터
            fileName={fileName} // 엑셀 파일명
            colWidths={[150, 100, 120, 120, 120, 150]} // 열의 폭 ===> 필요 시, 각자 정보에 맞게 너비 조정하세요.
            />
        </EmpContainer>
    );
};

export default EmpExcelDownload;
테이블 정의 컴포넌트 코드 3-2
위 코드는 특정 값만 가져오고 싶다면 사용하는 방법이고,
아래 코드는 props로 가져오는 값 전체를 엑셀 다운로드로 출력하고 싶을 때 사용할 수 있는 방법이다.
import React from 'react';
import ExcelDownload from './ExcelDownload';
import styled from 'styled-components';

const EmpContainer = styled.div`
    /* 필요 시, 각자 페이지에 맞는 위치 선정하세요. */
`

const EmpExcelDownload = ({ empList }) => {

    // 데이터 리스트가 비어있을 경우 빈 배열 반환
    if (!empList || !empList.length) return null;

    // 데이터의 첫 번째 객체에서 키 값을 가져옴
    const keys = Object.keys(empList[0]);

    // 엑셀 다운로드에 필요한 데이터 준비
    const excelData = empList.map(item => {
        const row = {};
        keys.forEach(key => {
            row[key] = item[key];
        });
        return row;
    });

    return (
        <EmpContainer>
            <ExcelDownload
            title="직원목록" // 엑셀 내 최상단 제목
            header={keys} // 헤더 정보로 데이터의 키 값을 사용
            data={excelData} // 데이터
            fileName="직원목록" // 엑셀 파일명
            colWidths={[120, 80, 120, 80, 80, 130]} // 열의 폭 ==> 각자 정보에 맞게 너비 조정하세요.
            />
        </EmpContainer>
    );
};

export default EmpExcelDownload;