WPF 프로그램 개발 및 사이트 연동
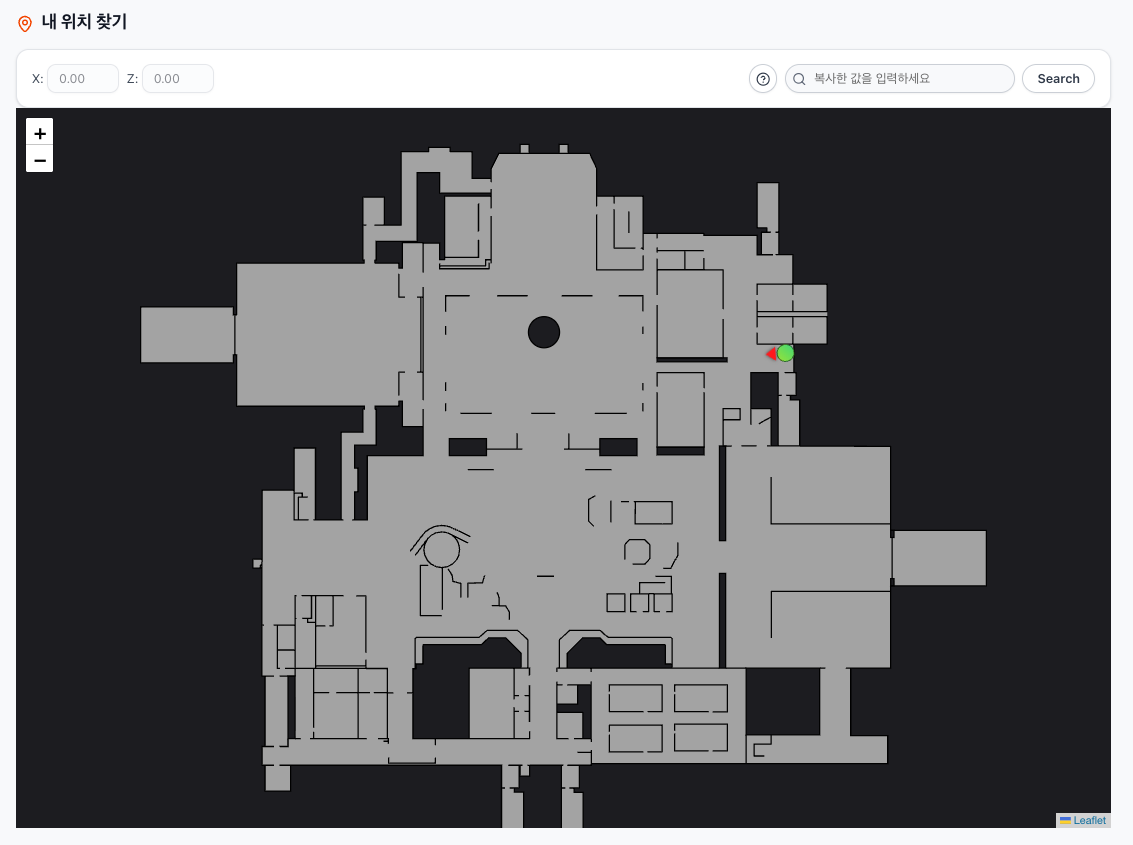
내 위치 찾기 라는 기능이 존재합니다.
게임이 시작되었을 시 내 위치를 지도에 표시해주는 기능입니다.
게임 안에서는 지도가 따로 없기에 기존 플레이어들은 주변 건물이나 지형을 보고 현재 어디에 있고, 어디를 가야할지를 유추하던 방식입니다.
어느정도 숙련된 사용자는 상관 없지만, 처음시작하는 사용자들에게는 너무 큰 진입장벽이기에 보조하는 기능을 만들었습니다.
초기 설계 및 수정 사항
초기 설계는 다음과 같습니다.
게임에 접속 후 스크린샷을 저장하면 파일 이름에 위치정보가 나오기에 이를 조합하여 제공하는 기능입니다.

이게 과정이 꽤 복잡한데, 사용자들 사이에서 빨리 이동해야 하는데 언제 이걸 다하냐는 말이 나왔습니다.
저도 똑같이 생각하였고 스크린샷을 촬영하면 자동으로 웹과 연동되게 하는 것을 목표로 수정했습니다.
수정된 동작입니다.

사용자는 외부프로그램에 로그인 후 스크린샷을 찍으면 뒷단에서 자동으로 감지와 API 호출을 하여, 화면에 표시하게 수정하였습니다.
구현
NextJS 먼저 작성하고 WPF내용으로 넘어가겠습니다.
NextJS에서는 Leaflet을 사용하여 지도를 띄우고 좌표가 입력되면 마커를 띄우는 방식으로 개발하였습니다.
검색해도 잘안나와서 구현이 엄청 힘들었습니다.
NextJS
핵심이 되는 코드만 발라내서 쓰겠습니다.
app/
- layout.tsx
- map-of-tarkov/
-- [id]/
--- _components/
---- FindLocation/
----- find-location.ts
----- find-location-controller.ts
----- find-location-inner.ts
lib/
- func/
-- leafletFunctions.ts
components/
- provider/
-- websocket-provider.tsx
store/
- wsStore.ts
Websocket 수정
기존에 사용하던 Websocket을 수정합니다.
알람 기능만 하던 것을 외부 프로그램과의 연동도 되게 수정하기 위해, Websocket Provider를 만들어 사용하였습니다.
또한 Websocket으로 받은 값을 store에 저장하여 사용합니다.
wsStore.ts
기존의 알람 데이터도 받게 해두었습니다.
import { NotificationDataTypes } from "@/components/custom/NavBar/nav-bar.types";
import { create } from "zustand";
import { persist } from "zustand/middleware";

interface WsState {
  notifications: NotificationDataTypes[];
  location: string;

  setNotifications: (
    updater:
      | NotificationDataTypes[]
      | ((prev: NotificationDataTypes[]) => NotificationDataTypes[])
  ) => void;

  setLocation: (n: string) => void;
}

export const wsStore = create<WsState>()(
  persist(
    (set) => ({
      notifications: [],
      location: "",

      setNotifications: (updater) =>
        set((state) => ({
          notifications:
            typeof updater === "function"
              ? updater(state.notifications)
              : updater,
        })),

      setLocation: (n) => set({ location: n }),
    }),
    {
      name: "ws-store",
      partialize: (state) => ({
        location: state.location,
      }),
    }
  )
);
websocket-provider.tsx
새로운 기능을 추가하는 것이니 key를 기준으로 메시지를 필터링 합니다.
그후 zustand store에 올려 사용합니다. 내 위치 찾기 페이지에서는 store를 확인하여 데이터를 감지합니다.
추가 기능이 생긴다면 기존 로직에서 zustand store에 값을 변경하고 동일한 방식으로 진행할 것 같습니다.
"use client";

import { useEffect, useRef } from "react";
import { useSession } from "next-auth/react";
import { wsStore } from "@/store/wsStore";
import { NotificationDataTypes } from "@/components/custom/NavBar/nav-bar.types";

export function WebSocketProvider({ children }: { children: React.ReactNode }) {
  const { data: session } = useSession();
  const setNotifications = wsStore((s) => s.setNotifications);
  const setWpfLocation = wsStore((s) => s.setLocation);
  const wsRef = useRef<WebSocket | null>(null);

  useEffect(() => {
    if (!session?.accessToken) return;

    // 토큰 변경 시 재연결
    if (wsRef.current) {
      wsRef.current.close();
      wsRef.current = null;
    }

    const ws = new WebSocket(
      `wss://${process.env.NEXT_PUBLIC_REDIS_HOST}/ws?token=${session.accessToken}`,
    );

    wsRef.current = ws;

    ws.onopen = () => {
      console.log("WebSocket connected");
    };

    ws.onmessage = (event) => {
      const parsed = JSON.parse(event.data);

      switch (parsed.type) {
        case "init": {
          const initial = parsed.notifications as NotificationDataTypes[];
          setNotifications(initial);
          break;
        }

        case "message": {
          const newNotification = parsed.data as NotificationDataTypes;
          setNotifications((prev = []) => [...prev, newNotification]);
          break;
        }

        case "wpf_location": {
          setWpfLocation(parsed.payload);
          break;
        }
      }
    };

    ws.onerror = (error) => {
      console.error("WebSocket error:", error);
    };

    ws.onclose = () => {
      console.log("WebSocket disconnected");
      wsRef.current = null;
    };

    // keep-alive ping
    const pingInterval = setInterval(() => {
      if (ws.readyState === WebSocket.OPEN) {
        ws.send("ping");
      }
    }, 30000);

    return () => {
      clearInterval(pingInterval);
      if (
        ws.readyState === WebSocket.OPEN ||
        ws.readyState === WebSocket.CONNECTING
      ) {
        ws.close();
      }
    };
  }, [session?.accessToken, setNotifications, setWpfLocation]);

  return <>{children}</>;
}
layout.tsx
이렇게 추가해줍니다.
import { WebSocketProvider } from "@/components/provider/websocket-provider";

async function RootLayoutContent({ children }: { children: React.ReactNode }) {
  const locale = await getLocale();

  return (
    <NextIntlClientProvider locale={locale}>
      <AuthProvider>
        <ThemeProvider
          attribute="class"
          defaultTheme="dark"
          enableSystem
          disableTransitionOnChange
        >
          <AppStoreProvider>
            <QueryProvider>
              <WebSocketProvider>
                <NavData />
                <ChatData />
                {children}
                <Footer />
              </WebSocketProvider>
            </QueryProvider>
          </AppStoreProvider>
        </ThemeProvider>
      </AuthProvider>
    </NextIntlClientProvider>
  );
}
Leaflet 구현
Leaflet 구현 부분입니다.
leafletFunctions.ts
leaflet 함수를 묶은 부분입니다.
좌표 변환 함수와, 마커의 디자인이 있습니다.
좌표 변환 함수에서 고려할 것이 통상적인 기준과는 다르다는 것입니다.
오른쪽으로 가면 X 증가 위로 가면 Y 증가가 보편적이지만, 게임에서는 뒤죽박죽으로 되어 있습니다.
그래서 맵 별로 좌표 변환을 수정해주어야 합니다.
이거 계산하는게 너무 힘들었습니다... AI도 잘 이해를 못하더군요
/* eslint-disable @typescript-eslint/no-explicit-any */

import { useMapEvent } from "react-leaflet";
import L from "leaflet";

export const dynamic = "force-dynamic";

export const MouseMoveEvent = ({
  onMove,
  mapId,
}: {
  onMove: (latlng: any) => void;
  mapId: string;
}) => {
  // 맵별 좌표 변환 함수 매핑
  const transformMap: Record<
    string,
    (latlng: { lat: number; lng: number }) => { lat: number; lng: number }
  > = {
    THE_LAB: ({ lat, lng }) => ({ lat: lng, lng: -lat }),
    FACTORY: ({ lat, lng }) => ({ lat: -lng, lng: lat }),
  };

  useMapEvent("mousemove", (e) => {
    const { lat, lng } = e.latlng;

    // 변환 함수 없으면 기본 변환 (그 외)
    const transform =
      transformMap[mapId] ?? (({ lat, lng }) => ({ lat: -lat, lng: -lng }));

    const latLng = transform({ lat, lng });

    onMove(latLng); // 마우스 위치 좌표 업데이트
  });

  return null;
};

export const PlayerIcon = (rotation: number) =>
  L.divIcon({
    className: "player-icon",
    html: `
      <div style="
        transform: rotate(${rotation}deg);
        width: 28px;
        height: 28px;
        position: relative;
      ">
        <!-- 몸통 (완전 둥글게, 20px) -->
        <div style="
          width: 20px;
          height: 20px;
          background: linear-gradient(135deg, #A3E635, #4ADE80);
          border-radius: 50%;
          position: absolute;
          top: 4px;
          left: 4px;
          border: 2px solid rgba(0,0,0,0.5);
          box-sizing: border-box;
        "></div>
        <!-- 앞부분 삼각형 화살표 -->
        <div style="
          width: 0;
          height: 0;
          border-left: 8px solid transparent;
          border-right: 8px solid transparent;
          border-bottom: 12px solid #FF0000; /* 빨강 */
          position: absolute;
          top: -8px; /* 몸통 위쪽 위치 조정 */
          left: 50%; /* 몸통 중앙 맞춤 */
          transform: translateX(-50%);
          filter: drop-shadow(0 0 2px rgba(0,0,0,0.6));
        "></div>
      </div>
    `,
    iconSize: [28, 28],
    iconAnchor: [14, 14], // 중앙 기준 회전
  });
find-location-controller.ts
컨트롤러입니다. 사용자 좌표가 들어오면 중점을 확인하며 지도 중간에 위치하게 해줍니다.
"use client";

import { useEffect } from "react";
import { useMap } from "react-leaflet";
import { FindLocationControllerTypes } from "../map-of-tarkov.types";

export default function FindLocationController({
  imageCoord,
  isViewWhere,
  default_zoom_level,
}: FindLocationControllerTypes) {
  const map = useMap();

  useEffect(() => {
    if (isViewWhere) {
      const newCenter: [number, number] = [-imageCoord.y, -imageCoord.x];
      map.setView(newCenter, default_zoom_level);
    }
  }, [imageCoord, isViewWhere, default_zoom_level, map]);

  return null;
}
find-location-inner.ts
inner 영역으로, 실제로 화면을 그리는 영역입니다.
"use client";

import { CRS } from "leaflet";
import { MapContainer, ImageOverlay, Marker, Tooltip } from "react-leaflet";
import { MouseMoveEvent, PlayerIcon } from "@/lib/func/leafletFunction";
import { FindLocationInnerTypes } from "../map-of-tarkov.types";
import FindLocationController from "./find-location-controller";
import { usePathname } from "next/navigation";

export default function FindLocationInner({
  findInfo,
  imageCoord,
  isViewWhere,
  setMousePosition,
}: FindLocationInnerTypes) {
  const pathname = usePathname();

  const getMarkerPosition = (
    mapId: string,
    coord: { x: number; y: number; yaw: number },
  ): [number, number] => {
    switch (mapId) {
      case "FACTORY":
        return [coord.x, -coord.y];
      case "THE_LAB":
        return [-coord.x, coord.y];
      default:
        return [-coord.y, -coord.x];
    }
  };

  const getMarkerYaw = (mapId: string, yaw: number) => {
    switch (mapId) {
      case "FACTORY":
        return (yaw + 270) % 360;
      case "THE_LAB":
        return (yaw + 90) % 360;
      default:
        return (yaw + 180) % 360;
    }
  };

  return (
    <MapContainer
      key={`${findInfo.id}-${pathname}`}
      center={[0, 0]}
      zoom={findInfo.default_zoom_level}
      zoomSnap={0.5}
      minZoom={-2}
      maxZoom={4}
      crs={CRS.Simple}
      className="w-full h-200"
      maxBounds={findInfo.map_bounds}
      maxBoundsViscosity={1.0}
      doubleClickZoom={false}
    >
      <FindLocationController
        imageCoord={imageCoord}
        isViewWhere={isViewWhere}
        default_zoom_level={findInfo.default_zoom_level}
      />
      <MouseMoveEvent onMove={setMousePosition} mapId={findInfo.id} />
      {isViewWhere && (
        <Marker
          position={getMarkerPosition(findInfo.id, imageCoord)}
          icon={PlayerIcon(getMarkerYaw(findInfo.id, imageCoord.yaw))}
        >
          <Tooltip direction="top" offset={[0, -10]} opacity={1}>
            플레이어 위치
          </Tooltip>
        </Marker>
      )}

      <ImageOverlay url={findInfo.image} bounds={findInfo.image_bounds} />
    </MapContainer>
  );
}
find-location.ts
양이 많아 jsx 부분은 제외하고 함수만 가져왔습니다.
기존의 복사 붙여넣기 기능도 유지하면서, 새로운 동작도 호환되게 개발 하였습니다.
"use client";

import dynamic from "next/dynamic";
import { useEffect, useRef, useState } from "react";
import { FindLocationTypes, LatLng } from "../map-of-tarkov.types";
import { wsStore } from "@/store/wsStore";

const FindLocationInner = dynamic(() => import("./find-location-inner"), {
  ssr: false,
});

export default function FindLocation({ findInfo }: FindLocationTypes) {
  const { location } = wsStore((state) => state);
  const [where, setWhere] = useState<string>("");
  const [isViewWhere, setIsViewWhere] = useState<boolean>(false);
  const [imageCoord, setImageCoord] = useState({ x: 0, y: 0, yaw: 0 });
  const [mousePosition, setMousePosition] = useState<LatLng>({
    lat: 0,
    lng: 0,
  });
  const prevLocationRef = useRef<string | null>(null);

  const parseWhereText = (text: string) => {
    if (!text || text.length === 0) return null;

    const splitStr = text.split("]_")[1];
    if (!splitStr) return null;

    const matches = splitStr.match(/[-+]?\d*\.\d+/g);
    if (!matches || matches.length < 7) return null;

    // 좌표
    const x = parseFloat(matches[0]);
    const y = parseFloat(matches[2]);

    // Quaternion
    const qx = parseFloat(matches[3]);
    const qy = parseFloat(matches[4]);
    const qz = parseFloat(matches[5]);
    const qw = parseFloat(matches[6]);

    // Quaternion → Yaw (Tarkov 기준)
    const siny_cosp = 2 * (qw * qy - qz * qx);
    const cosy_cosp = 1 - 2 * (qy * qy + qx * qx);

    let yaw = Math.atan2(siny_cosp, cosy_cosp);
    if (yaw < 0) yaw += 2 * Math.PI;

    const yawDegrees = (yaw * 180) / Math.PI;

    return { x, y, yaw: yawDegrees };
  };

  const onClickWhere = () => {
    const result = parseWhereText(where);

    setImageCoord(result ?? { x: 0, y: 0, yaw: 0 });
    setIsViewWhere(true);
  };

  const onClickWhereDirect = (text: string) => {
    const result = parseWhereText(text);

    setImageCoord(result ?? { x: 0, y: 0, yaw: 0 });
    setIsViewWhere(true);
  };

  const handlePaste = (e: React.ClipboardEvent<HTMLInputElement>) => {
    e.preventDefault();
    const pastedText = e.clipboardData.getData("text");
    setWhere(pastedText);

    // 상태 반영 기다릴 필요 없이 직접 전달
    setTimeout(() => {
      onClickWhereDirect(pastedText);
    }, 0);
  };

  useEffect(() => {
    if (!location) return;
    if (location === prevLocationRef.current) return;

    prevLocationRef.current = location;
    onClickWhereDirect(location);
  }, [location]);
}
WPF
WPF 개발 입니다.
사용자의 폴더를 감지하여, 스크린샷이 생성되면 해당 정보를 감지하고 로그인 시 사용한 이메일과 사진 이름을 API로 보내는 기능을 합니다.
흐름입니다.

사용자 폴더 감지가 보안에 걸릴까 싶었는데 문제 되는 것 같지는 않았습니다.
구현
디자인은 생각 안하고 기능만 충실하게 구현했습니다.
처음 사용해서 AI에만 의존해서 만들어서 이상한게 있을 수 있습니다.
기능
- 처음 진입시 이메일만 입력하여 사이트와 사용자 매핑
- 존재하는 사용자일시 다음 화면으로 이동
- 존재하지 않는 사용자인 경우 에러 표시
- 메인에서는 사용자의 시스템 경로를 파악하여 모든 ScreenShot 감지 경로를 수집
- 사용자가 스크린샷 실행
- 파일을 감지
- 파일 이름과 이메일 정보를 FastAPI로 전송
- FastAPI는 사용자 확인 후 Websocket 전달
- 화면에 표시
Models/
- CheckUserRequest.cs
Services/
- UserService.cs
ViewModels/
- ConfirmedUserViewModel.cs
- MainViewModel.cs
Views/
- ConfirmedUserView.xaml
- ConfirmedUserView.xaml.cs
- MainView.xaml
- MainView.xaml.cs
WPF 코드
해당 프로그램은 제가 별도로 저장소를 구축하여 진행하였기에 주소로 가시는 것이 편할 것 같습니다.
빌드 및 확인
해당 링크를 보고 빌드를 했습니다.
로그인 화면
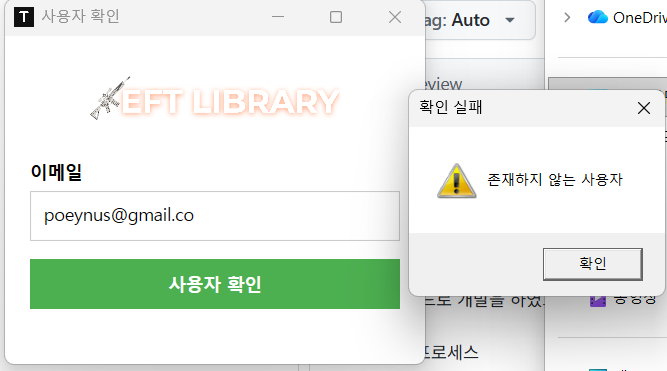
로그인 성공시
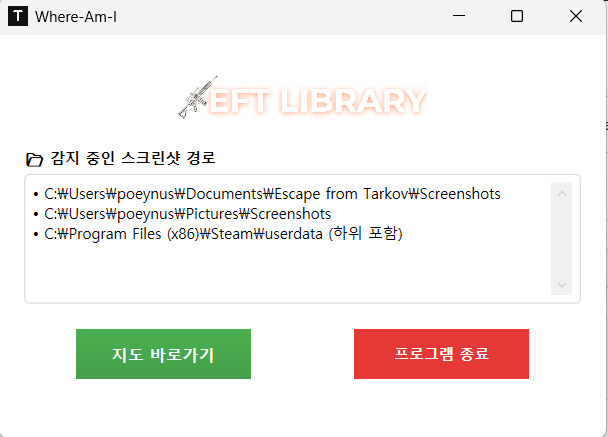
해결 못한 문제
처음에 Release를 빌드하니, 여러 dll 파일과 함께 많은 파일들이 생성 되었습니다.
검색해보니 하나의 exe 파일로 빌드후 배포하는 방법이 있다고 해서 적용해보았었는데,
하나로 되어서 제 컴퓨터는 실행이 잘 되었는데, 다른 컴퓨터에서는 .net framework를 처음부터 설치하는 창이 나왔었습니다.
그 후로 계획은 접고 압축하여 제공하고 있습니다.
후일담
처음으로 C# WPF를 사용하여 응용프로그램을 만들고 배포도 해보았는데, 역시나 어렵습니다.
AI가 없었으면 생각도 못했을 거 같습니다.
AI로 만든 것이 온전한 제 기술의 양분이 되지는 않겠지만, 그래도 최대한 가져가보려 합니다.
