
프론트 기술인 React의 RestAPI를 구현하기 위한 백엔드 기술로 Spring Boot를 사용하고자 했습니다.
참고자료
https://github.com/kantega/react-and-spring
https://sundries-in-myidea.tistory.com/71
Spring Boot에서의 MVC 구조는 View Model Controller 이러한 패턴을 가지고 있고, Spring Boot가 공식 지원하는 View Template Engine은 Mustache, Thymeleaf, Groovy, Freemarker 이렇게 있습니다. 이러한 방법들은 Server에서 먼저 페이지가 렌더링 되는 구조인, Server Side Rendering 이라고 합니다.
학원에서는 JSP를 사용하여(Server Side Rendering) Spring Boot 프로젝트를 만들었는데, 이는 권장하는 방법이 아니라고합니다. 그래서 요즘 트렌드에 맞춰 React로 View를 구성하고자 했습니다.
하지만 React는 Client Side Rendering 기술로, 기존 서버에서 먼저 렌더링되는 구조가 아닙니다. 그래서 Spring Boot는 서버로서 API만 제공하도록 만들고, React는 독립적인 형태로 API를 사용하여 데이터를 가져오는 형식으로 구성됩니다.
개발환경 연동과정
1. Spring Boot 프로젝트 생성 (IntelliJ)
 우선 제가 필요한 Dependency만 추가하였습니다. 실제로 기본 Dependency만 있어도 무관합니다.
https://start.spring.io/ 에서 Dependency 설정 후, 프로젝트 다운로드도 가능하다.
2. 간단한 RestAPI 구현하기
@RestController	//전역 ResponseBody
@RequestMapping("/api")
public class TestController {
    private static final Logger logger = LoggerFactory.getLogger(TestController.class);

    @GetMapping("/test")
    public Map<String, Object> testHandler() {
        logger.info("TEST RestAPI / Test 핸들러 실행");

        Map<String, Object> res = new HashMap<>();
        res.put("SUCCESS", true);
        res.put("SUCCESS_TEXT", "Hello SpringBoot/React");

        return res;
    }
}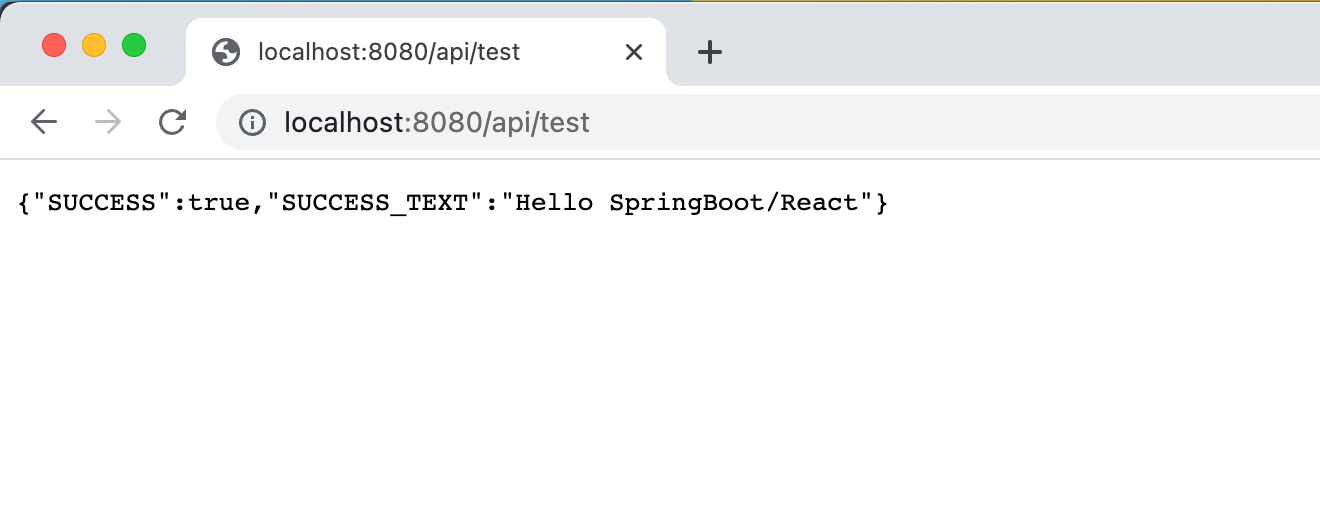
해당 RestAPI의 URL을 입력하면, JSON 객체가 응답결과로 나오게됩니다.
3. React 설치
프로젝트 루트 위치에서 터미널에 npx create-react-app [React 프로젝트 이름] 입력
설치 완료 후, React 프로젝트 루트 위치에서 npm start
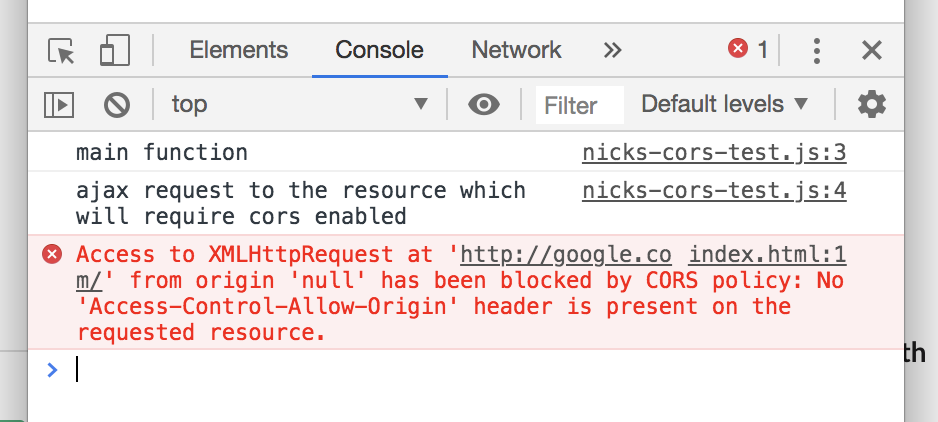
4. React와 Spring Boot의 CORS 문제 해결
Spring Boot의 백엔드 서버 포트는 8080, React의 프론트 서버 포트는 3000으로 실행 중입니다. 이런 상황에서 CORS(Cross-Origin Resource Sharing) 가 발생하게됩니다.
이러한 문제를 백엔드 또는 프론트에서 해결해줘야합니다 (저는 프론트에서 해결하겠습니다. 백엔드에서 해결방법).
CORS(Cross-Origin Resource Sharing)란?
서버와 클라이언트가 동일한 IP주소에서 동작하고 있다면, resource를 제약 없이 서로 공유할 수 있지만, 만약 다른 도메인에 있다면 원칙적으로 어떤 데이터도 주고받을 수 없도록 하는 매커니즘입니다.
발생되는 경우
- 프로토콜 : http와 https는 프로토콜이 다르다.
- 도메인 : domain.com과 other-domain.com은 다르다.
- 포트 번호 : 8080포트와 3000포트는 다르다.
방법
package.json에서 "proxy": "http://localhost:8080" => 해당 key, value를 추가해주면된다.
5. RestAPI 테스트
import logo from './logo.svg';
import './App.css';
import {useEffect, useState} from "react";

function App() {
    const [message, setMessage] = useState("");

    useEffect(() => {
        fetch("/api/test")
            .then((response) => response.json())
            .then((json) => setMessage(json.SUCCESS_TEXT));
    }, []);

    return (
        <div className="App">
            <header className="App-header">
                <img src={logo} className="App-logo" alt="logo"/>
                {message}
            </header>
        </div>
    );
}

export default App;
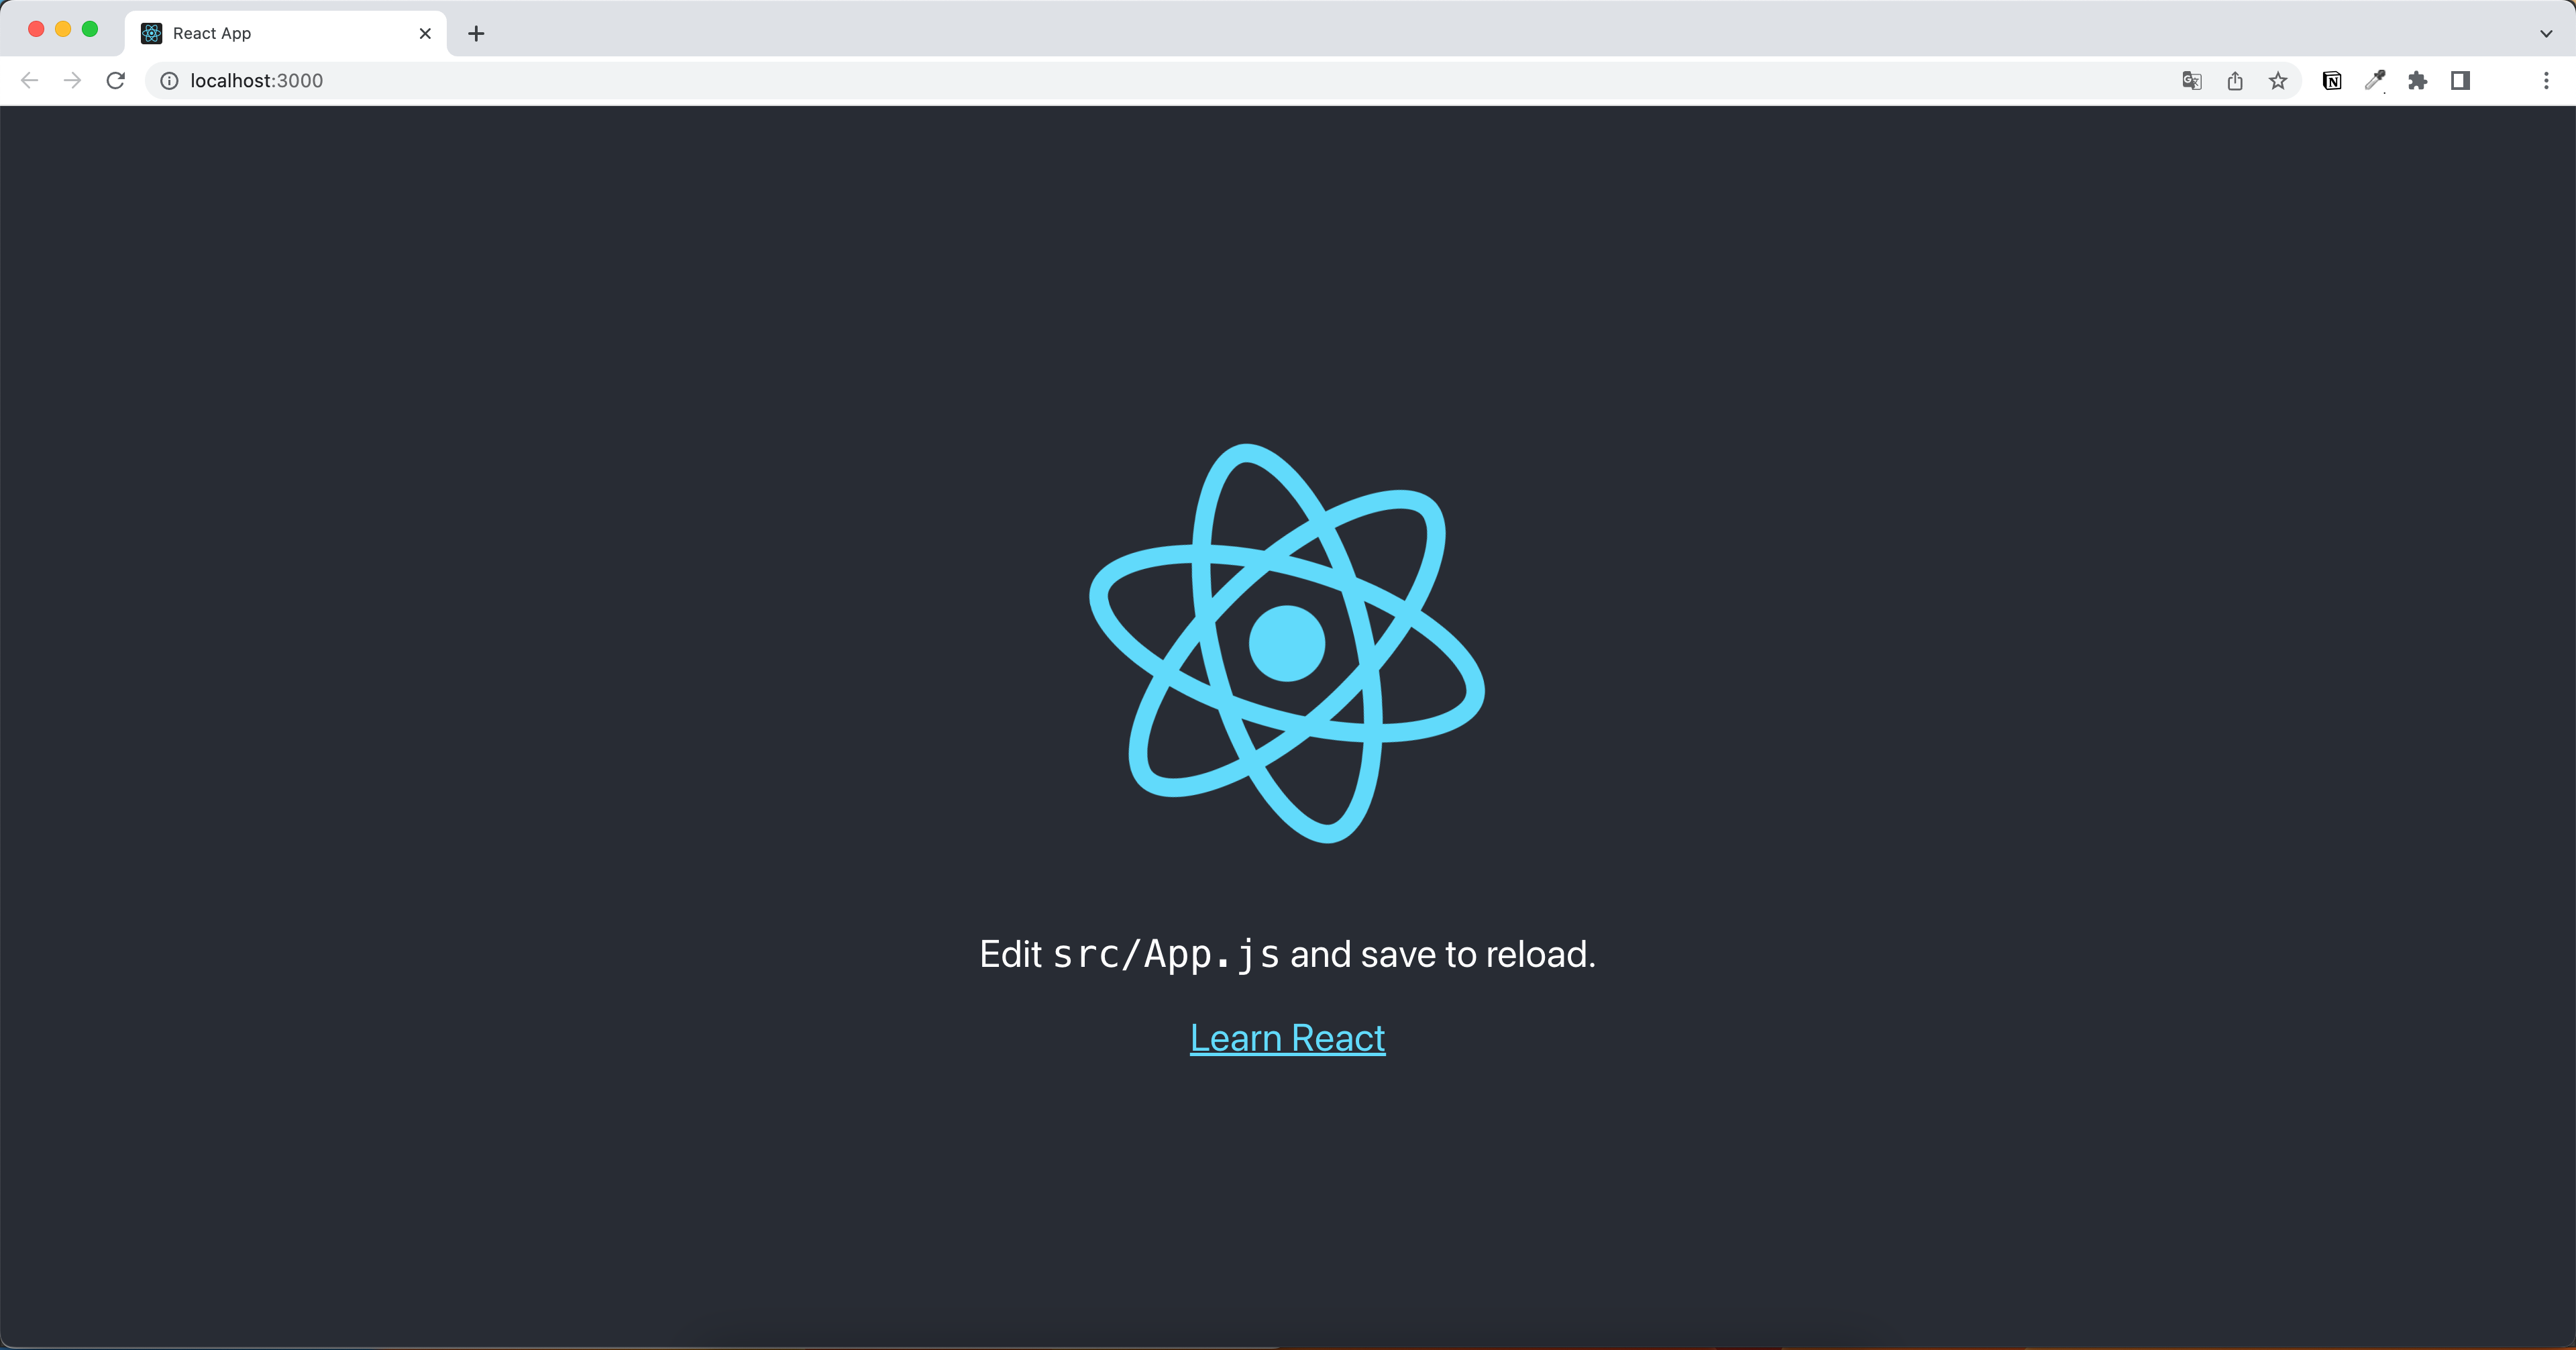
RestAPI로부터 응답 결과를 받아, 로고 하단에 응답 내용이 출력된 걸 볼 수 있습니다.
최종 배포
웹 프로젝트를 최종 배포할 시, Spring Boot 실행과 React 실행이 동시에 되어야합니다. Spring Boot를 통해서만 전체 실행이 될 수 있도록 패키징을 해주려고합니다.
1. Maven으로 NPM 실행시키기
Maven을 빌드하면서 NPM을 실행하도록 해야하는데, pom.xml에 Plugin을 추가해줘야합니다.
<plugin>
    <groupId>com.github.eirslett</groupId>
    <artifactId>frontend-maven-plugin</artifactId>
    <version>1.9.1</version>
    <configuration>
        <workingDirectory>[React 폴더]</workingDirectory>
        <installDirectory>target</installDirectory>
    </configuration>
    <executions>
        <execution>
            <id>install node and npm</id>
            <goals>
                <goal>install-node-and-npm</goal>
            </goals>
            <configuration>
                <nodeVersion>[node.js 로컬 버전]</nodeVersion>
                <npmVersion>[npm 로컬 버전]</npmVersion>
            </configuration>
        </execution>
        <execution>
            <id>npm install</id>
            <goals>
                <goal>npm</goal>
            </goals>
            <configuration>
                <arguments>install</arguments>
            </configuration>
        </execution>
        <execution>
            <id>npm run build</id>
            <goals>
                <goal>npm</goal>
            </goals>
            <configuration>
                <arguments>run build</arguments>
            </configuration>
        </execution>
    </executions>
</plugin>
frontend-maven-plugin의 버전은 아래 링크 참고
https://github.com/eirslett/frontend-maven-plugin
그 후, 터미널에서 ./mvnw clean install 입력.
빌드 완료 후 React 폴더 내, Build 폴더와 그 안에 여러 파일이 담겨져 있을겁니다.
2. Spring Boot JAR 파일 안에 React Build파일 포함 시키기
앞서 pom.xml에 추가한 plugin 구문 밑에 해당 구문은 추가해줍니다.
<plugin>
    <artifactId>maven-antrun-plugin</artifactId>
    <executions>
        <execution>
            <phase>generate-resources</phase>
            <configuration>
                <target>
                    <copy todir="${project.build.directory}/classes/public">
                        <fileset dir="${project.basedir}/[React 폴더]/build"/>
                    </copy>
                </target>
            </configuration>
            <goals>
                <goal>run</goal>
            </goals>
        </execution>
    </executions>
</plugin>
추가 후, 아까와 동일하게 터미널에서 ./mvnw clean install 입력해줍니다.
빌드 완료 후, 이전의 [React 폴더]/build 안에 포함되어있는 파일들이 target/classes/public 안에 포함됨과 함께 ~~.jar 파일이 생성될겁니다.
3. 실행
빌드된 jar파일의 경로로 접근하여, 터미널에 java -jar ~~~.jar를 입력해주면됩니다.