[express] Basic Routing, String Pattern Path,Regex,Single Callback Function & More than One Callback Function,Http methods,Route Refactor,Route Params,Controllers
[새싹x코딩온]
Basic Routing
node.js에서 exprss를 쓰는 방법을 알아보도록 하자. 먼저 아래와 같은 방식으로 진행해주면 된다.
- create folder 폴더 생성
- npm init -y
- npm i express
- create instance express Express 인스턴스 생성
- provide port : 8000 포트 설정
- basic route / 기본경로 설정
import express from 'express'
const app = express() //create server

app.get('/', (req,res) => {
    res.send("home");
    //send data to the user as a response
});

app.get('/about', (req, res) => {
    res.send("<h1>about</h1>")
});

app.get('/contact', (req,res) => {
    res.send("<h1>contact page</h1>")
})

app.listen(8000, () => console.log('server up'))
Express 인스턴스를 만든 후, 이를 app이라는 변수에 할당하고 get 메서드를 이용해서 기본 경로를 설정할 수 있다.
Nested된 경로는 아래와 같이 설정한다.
app.get('/products/iphone',(req,res) =>{
    res.send("This code will only run if you provide /products/iphone")
});
이렇게 경로를 설정하면, 지정한 경로로 요청이 왔을 때만 해당 코드가 실행된다.
String Pattern Path
경로에 패턴을 지정할 수도 있다:
app.get('/ab?cd',(req,res) => {
    res.send("if the user hit (acd) or (abcd) then this will run")
})
유저가 어떤 패스를 사용하는지에 따라 보여줄 내용을 정할 수 있다.
Regex
정규식을 사용하여 경로를 설정할 수도 있다:
app.get(/x/,(req,res)=> {
    res.send('if the path includes the letter (x) it will work')
})

users/1234(four digit)
app.get(/^\/users\/[0-9]{4}$/,(req,res)=> {
    res.send('working')
})
Single Callback Function & More than One Callback Function
단일 콜백 함수(single callback function)를 사용하는 경우:
app.get('/single-cb',(req,res) =>{
    res.send("single bacllback")
});
콜백 함수가 두 개 이상인 경우:
app.get('/double-cb',(req,res,next) =>{
    console.log("first callback");
    next();
},(req,res) => {
    res.send("second callback")
});
콜백 함수가 두 개 이상일 때는 next를 매개변수에 넣고 next()를 호출해야 한다.
Http methods
HTTP 통신할 때 사용하는 메서드들:
get: 데이터 가져올때post: 데이터 생성하거나 넣어줄때put: 데이터를 완전히 업데이트 해줄때patch: 데이터를 부분만 업데이트 해줄때delete: 데이터를 삭제해줄때all: 모든 HTTP 요청에 대해 사용 (거의 사용하지 않음)
Route Refactor
HTTP 메서드를 이용해 기본적으로 경로를 설정하면 다음과 같이 작성할 수 있다
app.get('/student', (req,res) => {
    res.send('all students')
})
app.post('/student', (req,res) => {
    res.send('add new students')
})
app.put('/student', (req,res) => {
    res.send('update students')
})
app.delete('/student', (req,res) => {
    res.send('delete students')
})
이 코드를 app.route()를 이용해 리팩토링할 수 있다.
app
.route('/student')
.get((req,res) => res.send("all students"))
.post((req,res)=> res.send("add new student"))
.put((req,res)=> res.send("update student"))
.delete((req,res)=> res.send("delete student"))
app.route()를 사용하면 중복되는 경로를 한 번만 써줄 수 있어 간편하다. 여기에서 한 번 더 리팩토링해보자.
- create foutes folder and put your routes in a seperate file
routes 폴더 생성 후, 라우트를 별도의 파일로 분리 - create instance of express.Router()
express.Router() 인스턴스 생성 - instead of app.method, change that to "router.method"
app.method 대신 router.method 사용 - export router
- import router
- use the (app.use) built-in middleware & provide your routes.
app.use 내장 미들웨어를 사용해 라우트를 제공
먼저 routes 폴더를 만들고 그 안에 student.js 파일을 생성한다
import express from 'express'
const router = express.Router()

router.get('/all',(req,res) => {
    res.send('all students')
})
router.post('/create',(req,res) => {
    res.send('sign in new students')
})
router.put('/update',(req,res) => {
    res.send('update students id')
})
router.delete('/delete',(req,res) => {
    res.send('remove students')
})

export default router;
여기서 router 변수에 express.Router 메서드를 할당했다. 그리고 이 파일을 다른 파일에서 사용하기 위해 export default router로 내보낸다.
이제 index.js 파일로 돌아가서:
import express from 'express'
import students from './routes/student.js'
const app = express() //create server

app.use('/students', students)

app.listen(8000, () => console.log('server up'))
이렇게 students를 불러온다. 여기서 주의할 점은 파일 이름 뒤에 .js를 반드시 붙여야 한다는 것이다. 이는 require 대신 import를 사용하기 때문이다.
app.use() 부분은 우리가 불러온 students 라우트 모듈을 /students 경로와 연결시켜 준다는 의미이다. 따라서 student.js에 들어있는 라우트 경로들은 항상 앞에 /students를 가지게 된다.
Route Params
라우트에 파라미터를 설정하는 방법을 알아보자. 예를 들어, 다른 이미지를 선택했을 때 각 파라미터가 다르게 된다. 아래의 코드를 보자
app.get('/product/:category/:id', (req, res) => {
    const {category, id} = req.params;
    res.send(`product category (${category}) & product id (${id})`)
})
이 코드에서 볼 수 있듯이, 파라미터는 app.get에서 :과 함께 써준다. 그리고 파라미터는 요청 객체(req)에서 req.params를 통해 접근할 수 있다. 여기서는 req.params.category와 req.params.id를 객체 분해 할당을 통해 추출했다. Postman에서 이 요청을 보내면 다음과 같다:
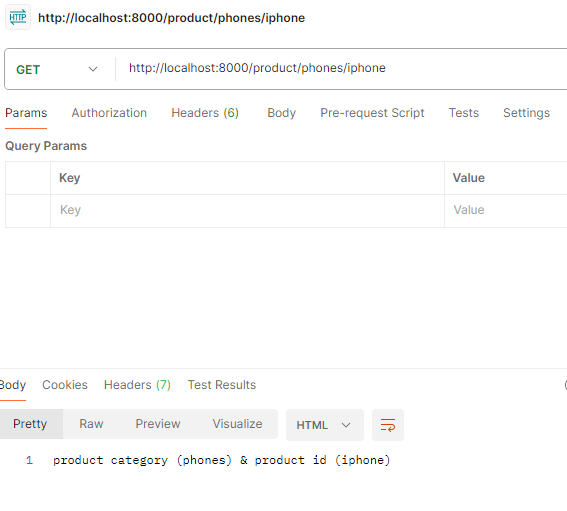
Postman에서 요청을 보낼 때는 파라미터에서 :를 지우고 써야 한다. 서버에서 설정할 때만 :를 사용한다.
app.param은 미들웨어인데, app.param은 라우트 경로에 :id 파라미터가 있을 때마다 호출된다(코드에서 "id"라고 써줬기 때문에) 이 미들웨어에서는 id 파라미터의 값을 로그로 출력하고 next()를 호출하여 다음코드로 넘긴다. 다음으로 app.get('/user/:id', ...) 라우트 핸들러가 실행된다. 이 핸들러는 console.log('This is user id path')를 실행하고 클라이언트에게 'response is ok'라는 응답을 보낸다. 즉, app.param을 사용하여 특정 파라미터가 포함된 모든 라우트에 대해 공통적으로 사전 처리를 할 수 있으며, 이 처리는 해당 파라미터가 있는 라우트 핸들러가 실행되기 전에 이루어진다.
app.param("id", (req, res, next, id) => {
    console.log(`id:${id}`)
    next()
})

app.get('/user/:id', (req, res) => {
    console.log('This is user id path')
    res.send('response is ok')
})
Controllers
이제 Controllers를 추가해보자. Controllers는 각 기능별로 코드를 따로 모아 관리하는 역할을 한다.
아까 라우트 폴더의 student.js 파일에 있던 코드 중 하나를 보면
router.get('/all',(req,res) => {
    res.send('all students')
})
이렇게 되어 있는데, 라우트 부분인 '/all'만 남겨두고 나머지 코드를 Controllers의 student.js 파일로 옮겨준다. 모든 코드를 옮겨주면 다음과 같이 작성된다.
import express from 'express'

const allStudents = (req, res) => {
    res.send('all students')
}

const newStudent = (req, res) => {
    res.send("Create students")
}

const updateStudent = (req, res) => {
  res.send("update students id");
};

const deleteStudent = (req, res) => {
  res.send("remove students");
};

export {allStudents,newStudent,updateStudent,deleteStudent}
이렇게 기능별로 코드를 작성한 뒤, export로 내보내고 라우트 폴더의 student.js 파일에서 이를 import하여 사용한다.
import express from 'express';
import {allStudents,newStudent,updateStudent,deleteStudent} from '../controllers/student.js'
const router = express.Router()

// GET localhost:PORT/students/all
router.get('/all',allStudents)
// POST localhost:PORT/students/create
router.post('/create',newStudent)
// PUT localhost:PORT/students/update
router.put('/update',updateStudent)
// DELETE localhost:PORT/students/delete
router.delete('/delete',deleteStudent)

export default router;