스프링 빈을 등록하는 여러가지 방법에 대해서 아라보자!
1. XML 설정파일을 이용한 방법
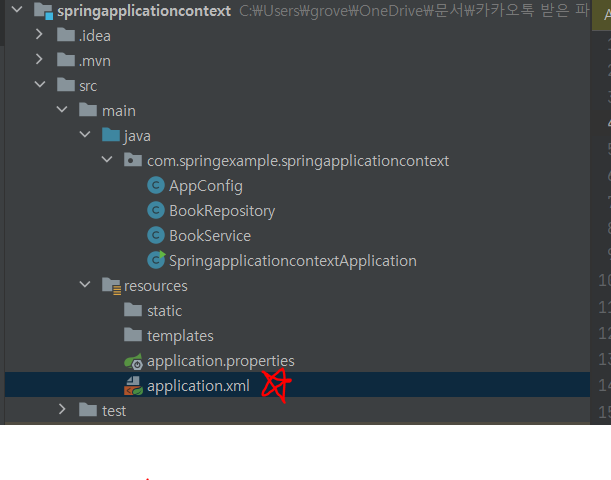
프로젝트 내에 resources파일 밑에 Spring Config xml파일을 만든다.

xml 파일
  <?xml version="1.0" encoding="UTF-8"?>
  <beans xmlns="http://www.springframework.org/schema/beans"
         xmlns:xsi="http://www.w3.org/2001/XMLSchema-instance" xmlns:context="http://www.springframework.org/schema/c"
         xsi:schemaLocation="http://www.springframework.org/schema/beans http://www.springframework.org/schema/beans/spring-beans.xsd">
      <!--XML로 빈 설정하는 방법-->
      <bean id="bookService"
            class="com.springexample.springapplicationcontext.BookService"
            scope="singleton"
            autowire="default">
          <property name="bookRepository" ref="bookRepository"/>
      </bean>
      <!--id = 빈의 이름-->
      <!--class =패키지명을 포함한 빈으로 정의할 클래스-->
      <!--scope = 빈의 스코프-->
      <!--autowired = autowired할 방법-->
      <!--<property> = 빈의 의존성 주입  name = 의존성 주입을 받을 인스턴스 이름		(BookService.class에 있음) 		ref= 주입반는 bean의 id(=bookRepository)-->
      <bean id="bookRepository"
            class="com.springexample.springapplicationcontext.BookRepository"
            scope="singleton"
            autowire="default"/>

  </beans>
xml 빈등록 설정값
xml파일에도 주석을 달아 놓았지만,,,
- id = 등록할 빈의 이름
- class = 패키지명을 포함한 빈으로 정의할 클래스
- scope = 빈의 스코프 (singleton, session, request...)
- autowired = autowired할 방법
- < property name="의존성을 주입받을 인스턴스의 이름(자바파일에 있음)" ref="주입하는 <bean>의 id값, 즉 이름" > = 의존성 주입
xml로 등록한 빈을 가져오는 방법은?
package com.springexample.springapplicationcontext;

import org.springframework.boot.SpringApplication;
import org.springframework.boot.autoconfigure.SpringBootApplication;
import org.springframework.context.ApplicationContext;
import org.springframework.context.annotation.AnnotationConfigApplicationContext;
import org.springframework.context.support.ClassPathXmlApplicationContext;

import java.util.Arrays;

//@SpringBootApplication
public class SpringapplicationcontextApplication {

    public static void main(String[] args) {


        ApplicationContext context = new ClassPathXmlApplicationContext("application.xml");
        String[] beanDefinitionNames = context.getBeanDefinitionNames();
        System.out.println(Arrays.toString(beanDefinitionNames));
    }

}
ApplicationContext의 구현체인 ClassPathXmlApplicationContext 생성시에 xml파일 이름을 넣으면 해당 xml파일을 읽어서 빈을 등록함
2. XML 컴포넌트 스캔
xml 파일에서 <bean> 으로 빈을 하나하나 등록해 주는 것은 넘모 힘들기 때문에...
컴포넌트 스캔을 이용해서 지정한 패키지 내에 있는 컴포넌트를 간단하게 모두 가져오는 방법이 있음
<?xml version="1.0" encoding="UTF-8"?>
<beans xmlns="http://www.springframework.org/schema/beans"
       xmlns:xsi="http://www.w3.org/2001/XMLSchema-instance" xmlns:context="http://www.springframework.org/schema/c"
       xsi:schemaLocation="http://www.springframework.org/schema/beans http://www.springframework.org/schema/beans/spring-beans.xsd">


    <context:component-scan base-package="com.springexample.springapplicationcontext"/>
</beans>
base-package는 해당 패키지의 내에 등록된 모든 컴포넌트를 읽어와서 빈을 등록해준다.
그럼 빈으로 등록할 컴포넌트는 어떻게 알아서 가져오는거지???

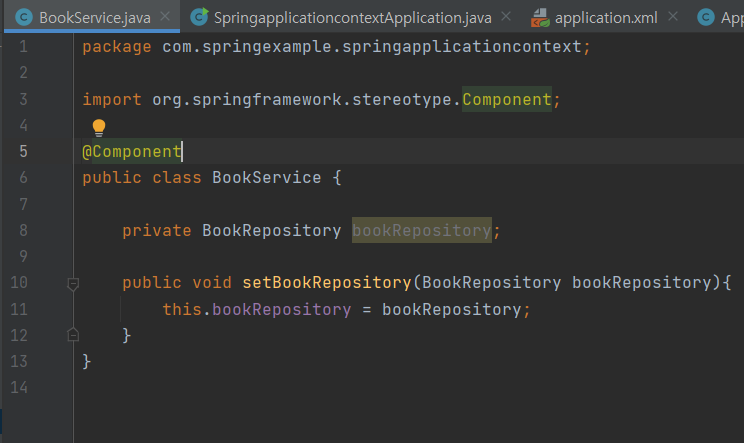
그것은 바로 사진과 같이 빈으로 등록하고 싶은 class위에 @Component 어노테이션을 달아주면 된다!
그리고 자바 설정파일을 읽어오는 방법은...
여전히 xml파일이므로 ClassPathXmlApplicationContext으로 읽어 와서 빈 등록을 해준다.
3. Java 자바 클래스를 이용한 설정 방법
xml설정파일의 <context:component-scan base-package="com.springexample.springapplicationcontext"/> 를 이용해니 빈을 하나하나 등록하지 않아서 편해졌지만, 자바 파일로 등록하면 더 편하지 않을까?
package com.springexample.springapplicationcontext;

import org.springframework.context.annotation.Bean;
import org.springframework.context.annotation.ComponentScan;
import org.springframework.context.annotation.Configuration;

//자바 설정파일로 빈을 등록하는 방법
@Configuration
public class AppConfig {

    //빈등록 방법
    @Bean
    public BookRepository bookRepository(){
        return new BookRepository();
    }

    @Bean
    public BookService bookService(){
        BookService bookService= new BookService();

        //BookService 에 BookRepository를 주입하는 방법
        //이렇게 일일히 주입 해주는 것 대신에 @Autowired 애너테이션을 붙여도 빈 주입이 된다
        bookService.setBookRepository(bookRepository());
        return bookService;
    }

}
- 자바 설정파일은 @Configuration어노테이션을 클래스 위에 붙여줘야 설정파일로서 활용 할 수있다.
- 빈으로 등록하기 위해서는 매서드 위에 @Bean어노테이션을 객체를 생성해서 return 해주면 끝임
- 해당 빈에 의존성을 주입해주기 위해서는 setter나 생성자를 이용해서 필요한 빈을 객체로 주입해 줄 수 있다.
그럼 설정파일을 읽어와서 빈으로 등록하는 방법은?
package com.springexample.springapplicationcontext;

import org.springframework.boot.SpringApplication;
import org.springframework.boot.autoconfigure.SpringBootApplication;
import org.springframework.context.ApplicationContext;
import org.springframework.context.annotation.AnnotationConfigApplicationContext;
import org.springframework.context.support.ClassPathXmlApplicationContext;

import java.util.Arrays;

//@SpringBootApplication
public class SpringapplicationcontextApplication {

    public static void main(String[] args) {
        ApplicationContext applicationContext = new AnnotationConfigApplicationContext(AppConfig.class);
        String[] beanDefNames = applicationContext.getBeanDefinitionNames();
        System.out.println(Arrays.toString(beanDefNames));
    }

}
ApplicationContext의 구현체 AnnotationConfigApplicationContext을 생성할 때 설정파일의 클래스를 넣어주면 된다.
xml = ClassPathXmlApplicationContext
java config 파일 = AnnotationConfigApplicationContext을
4. Java 자바 클래스 컴포넌트 스캔
xml에서 처럼 java 설정파일에서도 하나하나 빈을 등록하지 않고 컴포넌트 스캔을 이용해서 빈을 등록할 수 있다.
@Configuration
@ComponentScan(basePackageClasses = SpringapplicationcontextApplication.class) //해당 클래스가 속한 패키지를 전부 스캔
public class AppConfig {

}
@Configuration
@ComponentScan(basePackages ="com.springexample.springapplicationcontext") //해당 패키지가 속한 컴포넌트를 모두 스캔
public class AppConfig {
}
스캔코드블럭에서 보다싶이 @ComponentScan어노테이션을 이용해서 간단하기 빈을 등록해 올수 있는데...
두가지 옵션을 이용해서 가져올 수 있다.
- basePackageClasses - 해당 클래스가 속한 패키지를 전부 스캔
- basePackages - 해당 패키지가 속한 컴포넌트를 모두 스캔
둘중에 하나 마음에 드는걸 사용하면 된다 (하지만, basePackageClasses를 사용하는 것이 typo safe하고 추천!)
컴포넌트를 등록하는 방법은 xml로 컴포넌트 스캔 해올때랑 다르지 않음

사진과 같이 빈으로 등록하고 싶은 class위에 @Component 어노테이션을 달아주면 된다!
Outro
스프링 빈을 등록하는 여러가지 방법에 대해서 알아 보았다.
하지만 xml을 이용해서 스프링 빈을 등록하는 방법은 요즘에는 잘 쓰이지 않는 방법이기 때문에 몰라도 무방하지만,, 나는 스프링 부트가 @SpringBootApplication 에서 알아서 컴포넌트 스캔해주는 방식만 알았기 때문에 한번 정리해 보았다.
