
Intro
Yarn Berry workspace를 사용해서, 프로젝트에서 활용하고 있는 프레임웍을 하나씩 설정하는 작업을 하고 있습니다.
설정의 목표는 안전하게 작업할 수 있는 최소한의 환경부터 만들어 보자 입니다.
수정
- 2023.03.16 - 라이브러리 import 방식 변경
Workspace 구성
Yarn Berry(v3) Workspace #1 - workspace 설정을 따라 사용할 워크스페이스를 준비 합니다.
그다음 Next.js app을 생성 합니다.
cd apps
yarn dlx create-next-app@latest next-sample --use-yarn

# 실행하여 잘 설치되었는지 확인
yarn workspace nextjs-sample dev
Next.js 설정
pakcage.json 파일에 'packageManager' 항목을 추가 합니다.
version은 root의 packageManager 버전을 참고하여 기록 합니다.
// apps/nestjs-sample/package.json

{
  ...
  "packageManager": "yarn@3.4.1",
  ...
}
next.config.json을 아래와 같이 수정 합니다.
// apps/nestjs-sample/next.config.js

/** @type {import('next').NextConfig} */
const nextConfig = {
  experimental: {
    ...
  },
  images: {                 // (option) serverless dockerlizing을 위해
    unoptimized: true,
  },
  output: 'standalone',     // dockerlizing을 위해
};

module.exports = nextConfig;- 'images' 옵션은 aws lambda와 같은 readonly 디스크에 배포버전이 올라 갈 경우, .next/cache에 캐시 파일을 기록하려다 오류가 납니다. 이를 방지 하기 위해서 입니다. 그와같은 환경에서의 운영이 아닐 경우 생략 합니다.
- 'output: standalone'은 docker image를 생성할때 필요한 빌드 옵션 입니다. 역시 도커빌드가 필요 없을경우 생략 합니다.
yarn workspace nextjs-sample dev생성된 nextjs 앱이 잘 실행 되는지 확인 합니다.
공유 라이브러리 구성
공유 라이브러리 폴더를 생성 합니다.
cd packages
mkdir -p nextjs/components/src
cd nextjs/components
# 초기화
yarn init -y
pckage.json을 아래와 같이 수정 합니다.
// packages/nextjs/components/package.json
{
  "name": "@pnds/nextjs-component",
  "packageManager": "yarn@3.4.1",
  "private": true,
  "main": "dist/packages/nextjs/components/src/index.js",
  "typings": "dist/packages/nextjs/components/src/index.d.ts",
  "files": [
    "dist/**/*"
  ],
  "scripts": {
    "build": "tsc"
  },
  "dependencies": {
    "react": "^18.2.0",
    "react-dom": "^18.2.0"
  },
  "devDependencies": {
    "@types/node": "^18.15.3",
    "typescript": "^4.9.5"
  }
}
타입스크립스 설정을 합니다
// packages/nextjs/components/tsconfig.json

{
  "extends": "../../../tsconfig.base.json",
  "compilerOptions": {
    "jsx": "react",  // 중요
    "outDir": "./dist"
  },
  "include": ["./src/**/*"],
  "exclude": ["node_modules", "dist"]
}
새로운 콤포넌트 라이브러리 구성을 하였으면 'yarn install'을 실행 합니다.
다음은 샘플 소스를 작성 합니다.
// packages/nextjs/components/src/button-sample.tsx

export const ButtonSample = ({ label }: { label: string }) => {
  return <button style={{ minWidth: 100, minHeight: 40 }}>{label}</button>;
};
// packages/nextjs/components/src/index.ts
export * from './button-sample';소스코드의 오류가 없다면 build !
yarn workspace @pnds/nextjs-component build이제 next app에 공유 라이브러리 사용 설정을 합니다.
먼저 package를 import 합니다.
yarn workspace nextjs-sample add @pnds/nextjs-component타입스크립트 소스코드 참조를 위해 tsconfig.json 파일을 수정 합니다.
// apps/nextjs-sample/tsconfig.json

  {
    ...
    "baseUrl": ".",
    "paths": {
      "@/*": ["./src/*"],
      "@pnds/nextjs-component": ["../../packages/nextjs/components/src"] // 추가
    }
  },
  ...
}
샘플 버튼을 page.tsx에 추가 합니다.
// apps/nextjs-sample/app/page.tsx

...
import { ButtonSample } from '@pnds/nextjs-component';

const inter = Inter({ subsets: ['latin'] });

export default function Home() {
  return (
    <main className={styles.main}>
      <div className={styles.description}>

        {/* 버튼 추가 */}
		<ButtonSample label='hello ?'/>

        ...
  )
}
Next 13의 app Directory 사용 기준입니다.
환경에 따라 적절한 곳에 버튼을 배치 하면 됩니다.
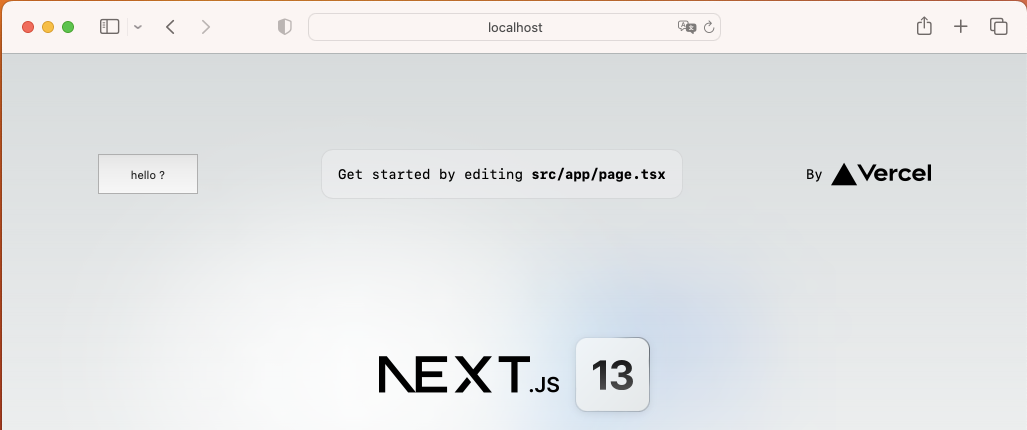
버튼이 정상적으로 출력 됩니다.
참고
워크스페이스 내에서 공유라이브러리를 add 할때 위의 예에서는 package name 을 사용하였습니다.
예: 'yarn workspace nest-sample add @pnds/nextjs-component'
하지만 워크스페이스 내에서 공유 라이브러리를 참고할 때는 상대경로방식으로 add 하는것이 잇점이 더 있다고 합니다.
예: 'yarn workspace nest-sample add ../../packages/nextjs/components'
경로 방식이 상대적으로 디버깅이 용이하고, 라이브러리간의 의존성 버전 충돌을 방지할수 있고 등등..
취향에 따라 방법은 선택하면 될것 같습니다.
Conculution
최소한의 설정만 설명 하였습니다.
Next.JS 13(app Directory)에서는 server side component와 client side component를 구분해서 사용하는것이 좋습니다. 그래서 외부 콤포넌트를 import 할때 패키지 전체를 import 하는것보다, 하위의 최소 파일단위 import 하는 방법이 좋습니다.
예를들어
import { ButtonSample } from '@pnds/nextjs-component';이것 보다는
import { ButtonSample } from '@pnds/nextjs-component/button-sample';이것이 더 좋습니다.
그러기 위해선 설정을 조금 추가해야 합니다.
상세한 설정은 다른 주제의 블로그에서 진행 하도록 하겠습니다.
Note
firebase 라이브러리를 사용하는데 워닝이 뜬다.
...
Module not found: node-fetch tried to access encoding (a peer dependency) but it isn't provided by its ancestors; this makes the require call ambiguous and unsound.
...
워크스페이스 root 에서 encoding패키지를 추가해주면 일단 문제는 해결 된다.
yarn add -D encoding