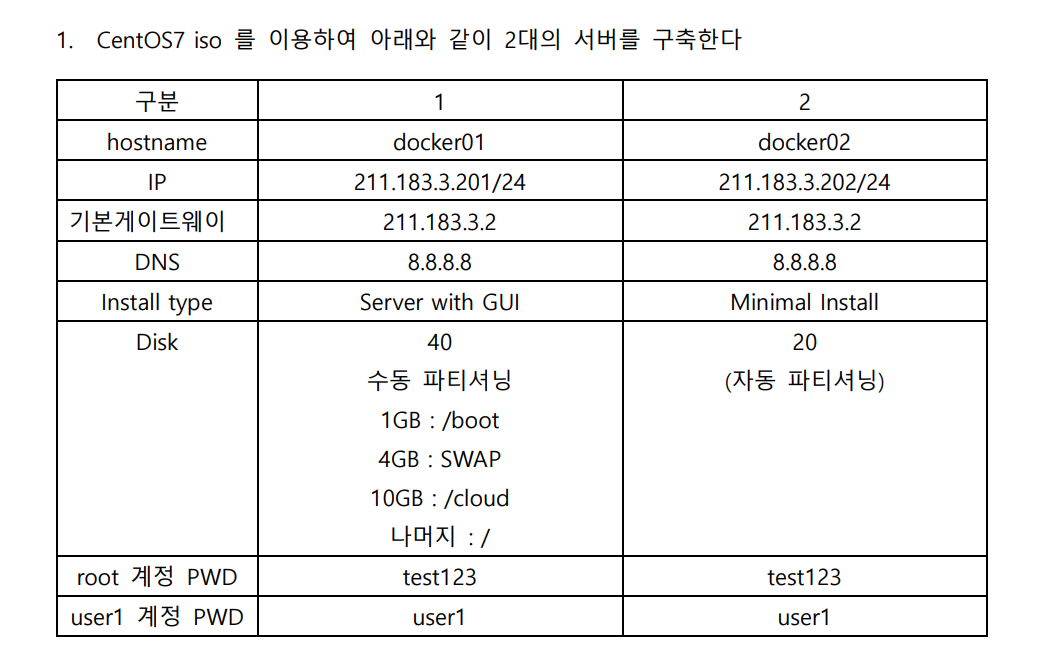
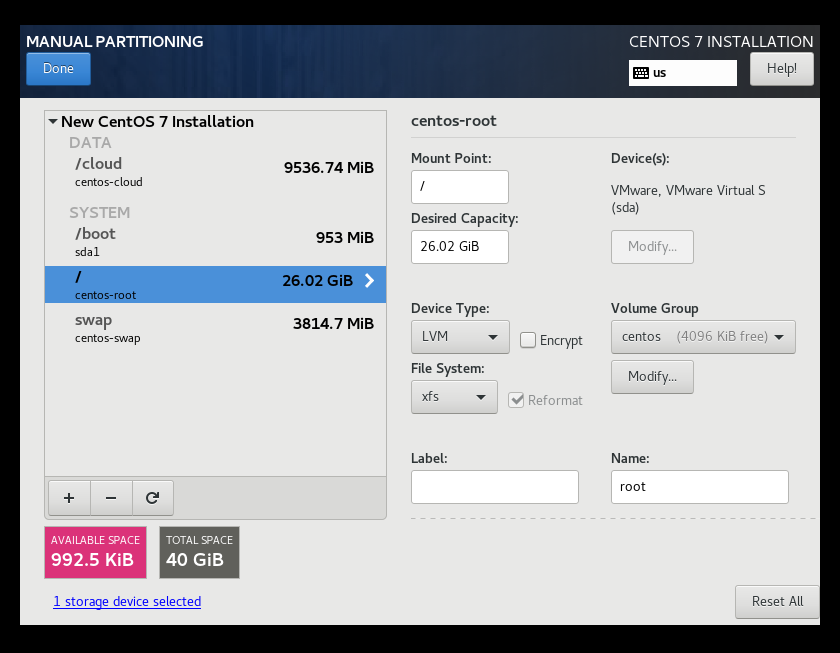
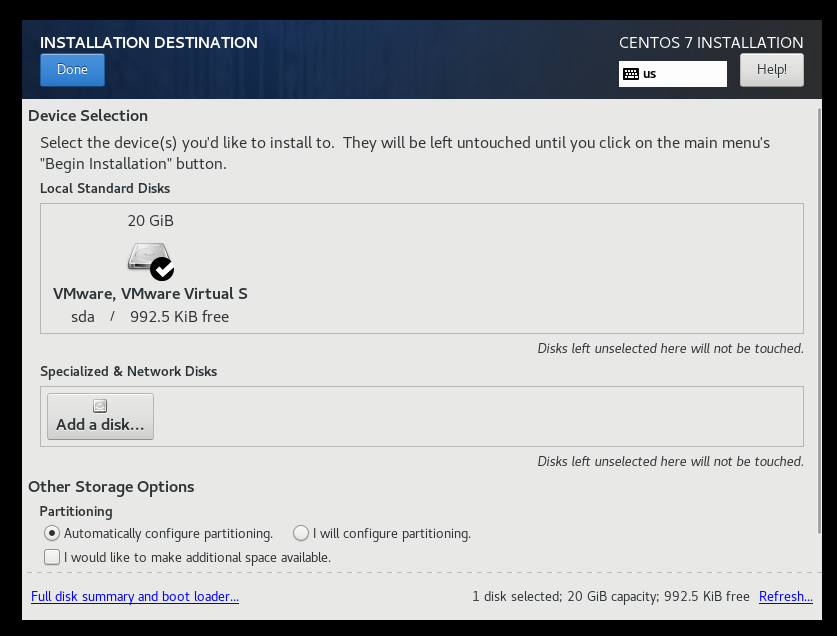
1. CentOS7 iso 를 이용하여 2대의 서버 구축
-
docker01 구성

-
docker02 구성
-
공통 구성

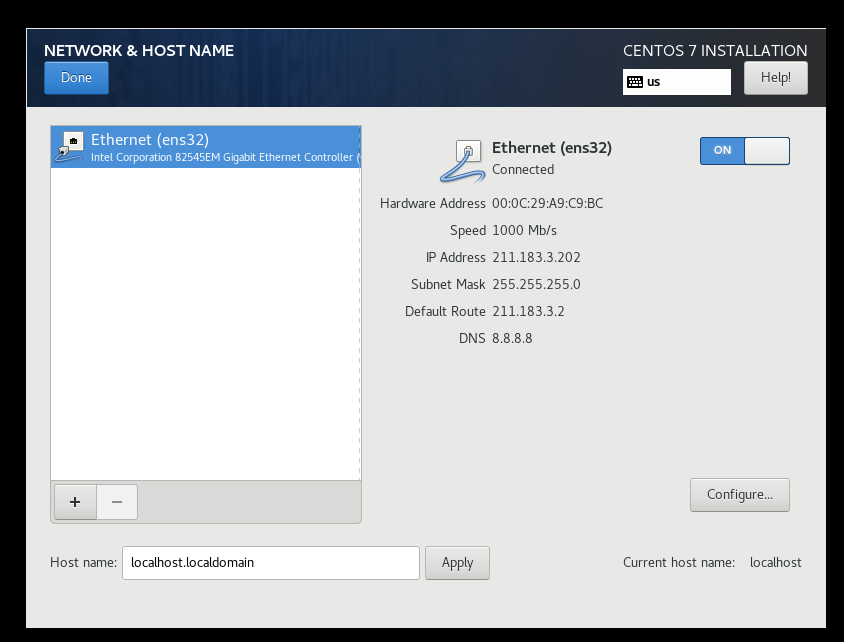
- 네트워크 확인
[docker01]
[root@localhost user1]# ifconfig ens32
ens32: flags=4163<UP,BROADCAST,RUNNING,MULTICAST>  mtu 1500
        inet 211.183.3.201  netmask 255.255.255.0  broadcast 211.183.3.255
        inet6 fe80::20c:29ff:fec4:7e71  prefixlen 64  scopeid 0x20<link>
        ether 00:0c:29:c4:7e:71  txqueuelen 1000  (Ethernet)
        RX packets 397938  bytes 549924110 (524.4 MiB)
        RX errors 0  dropped 0  overruns 0  frame 0
        TX packets 285062  bytes 327210897 (312.0 MiB)
        TX errors 0  dropped 0 overruns 0  carrier 0  collisions 0
[docker02]
[root@localhost user1]# ifconfig ens32
ens32: flags=4163<UP,BROADCAST,RUNNING,MULTICAST>  mtu 1500
        inet 211.183.3.202  netmask 255.255.255.0  broadcast 211.183.3.255
        inet6 fe80::20c:29ff:fea9:c9bc  prefixlen 64  scopeid 0x20<link>
        ether 00:0c:29:a9:c9:bc  txqueuelen 1000  (Ethernet)
        RX packets 454271  bytes 665908716 (635.0 MiB)
        RX errors 0  dropped 0  overruns 0  frame 0
        TX packets 147930  bytes 9610481 (9.1 MiB)
TX errors 0 dropped 0 overruns 0 carrier 0 collisions 0- 저장소 확인
[docker01]
[root@localhost user1]# df
Filesystem               1K-blocks    Used Available Use% Mounted on
devtmpfs                    914488       0    914488   0% /dev
tmpfs                       931512    8688    922824   1% /dev/shm
tmpfs                       931512   10784    920728   2% /run
tmpfs                       931512       0    931512   0% /sys/fs/cgroup
/dev/mapper/centos-root   27270136 8246596  19023540  31% /
/dev/sda1                   972452  189004    783448  20% /boot
/dev/mapper/centos-cloud   9754624   32992   9721632   1% /cloud
tmpfs                       186304      40    186264   1% /run/user/1000
tmpfs                       186304       0    186304   0% /run/user/0
overlay                   27270136 8246596  19023540  31% /var/lib/docker/overlay2/09ca68b45c4a143673010b3fd4378aa56f140142f6dce765dfe56e717c5e2ff9/merged
overlay                   27270136 8246596  19023540  31% /var/lib/docker/overlay2/4935aa89b00e71177fc18b0b2e86052c395273a71da4b5dc7c30d2e470c7c582/merged
overlay                   27270136 8246596  19023540  31% /var/lib/docker/overlay2/5ae75fa620b3c03e216578129eb49cecde362a1cc68bfff521c3c9de64caa172/merged
[docker02]
[root@localhost user1]# df -h
Filesystem               Size  Used Avail Use% Mounted on
devtmpfs                 899M     0  899M   0% /dev
tmpfs                    910M     0  910M   0% /dev/shm
tmpfs                    910M  9.6M  901M   2% /run
tmpfs                    910M     0  910M   0% /sys/fs/cgroup
/dev/mapper/centos-root   17G  2.8G   15G  17% /
/dev/sda1               1014M  195M  820M  20% /boot
overlay                   17G  2.8G   15G  17% /var/lib/docker/overlay2/1c8de25d179bb7bbe87d8e53345554cfefd62e1af043b62b8a64a825752bd399/merged
overlay                   17G  2.8G   15G  17% /var/lib/docker/overlay2/118c24685edcdea03fa7107882f7436b98dccf5063164378ca2cfcdb268fddc5/merged
tmpfs 182M 0 182M 0% /run/user/1000- 유저 확인
[root@localhost ~]# grep /bin/bash /etc/passwd
root:x:0:0:root:/root:/bin/bash
user1:x:1000:1000:user1:/home/user1:/bin/bash
2. docker-ce, docker-compose 설치
step 1) docker-ce 설치 (docker01, docker02)
[root@localhost ~]# yum install -y yum-utils \
> device-mapper-persistent-data \
> lvm2

[root@localhost ~]# yum-config-manager \
> --add-repo \
> https://download.docker.com/linux/centos/docker-ce.repo
Loaded plugins: fastestmirror, langpacks
adding repo from: https://download.docker.com/linux/centos/docker-ce.repo
grabbing file https://download.docker.com/linux/centos/docker-ce.repo to /etc/yum.repos.d/docker-ce.repo
repo saved to /etc/yum.repos.d/docker-ce.repo

[root@localhost ~]# yum -y install docker-ce docker-ce-cli containerd.io[root@localhost ~]# docker --version
Docker version 20.10.17, build 100c701
[root@localhost ~]# systemctl enable docker
Created symlink from /etc/systemd/system/multi-user.target.wants/docker.service to /usr/lib/systemd/system/docker.service.
[root@localhost ~]# systemctl start docker
[root@localhost ~]# systemctl status docker | grep Active
Active: active (running) since Tue 2022-08-23 23:54:16 KST; 14s agostep 2) docker-compose 설치 (docker01)
[root@localhost ~]# sudo curl -L "https://github.com/docker/compose/releases/download/1.29.2/docker-compose-$(uname -s)-$(uname -m)" -o /usr/local/bin/docker-compose
  % Total    % Received % Xferd  Average Speed   Time    Time     Time  Current
                                 Dload  Upload   Total   Spent    Left  Speed
  0     0    0     0    0     0      0      0 --:--:--  0:00:05 --:--:--     0
100 12.1M  100 12.1M    0     0  1525k      0  0:00:08  0:00:08 --:--:-- 5948k
[root@localhost ~]# sudo chmod +x /usr/local/bin/docker-compose
[root@localhost ~]# docker-compose --version
docker-compose version 1.29.2, build 5becea4c
3. 방화벽과 SELinux 중지/비활성화
[root@localhost ~]# systemctl stop firewalld
[root@localhost ~]# systemctl disable firewalld

[root@localhost ~]# systemctl stop NetworkManager
[root@localhost ~]# systemctl disable NetworkManager

[root@localhost ~]# setenforce 0
setenforce: SELinux is disabled
[root@localhost ~]# sed -i 's/SELINUX=enforcing/SELINUX=disabled/' /etc/selinux/config

[root@localhost ~]# systemctl status firewalld | grep Active
   Active: inactive (dead)
[root@localhost ~]# systemctl status NetworkManager | grep Active
   Active: inactive (dead)
[root@localhost ~]# getenforce
Disabled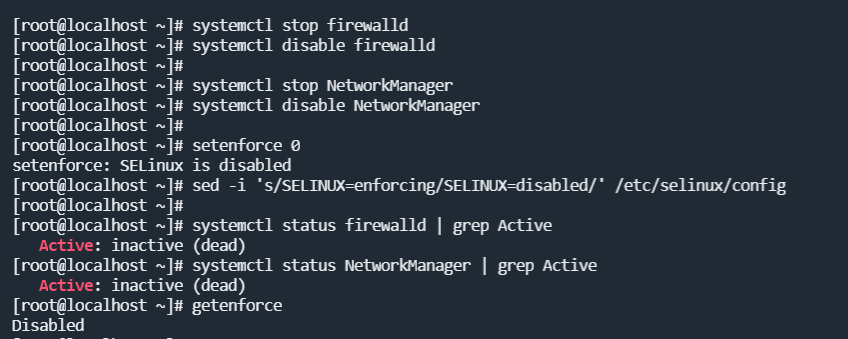
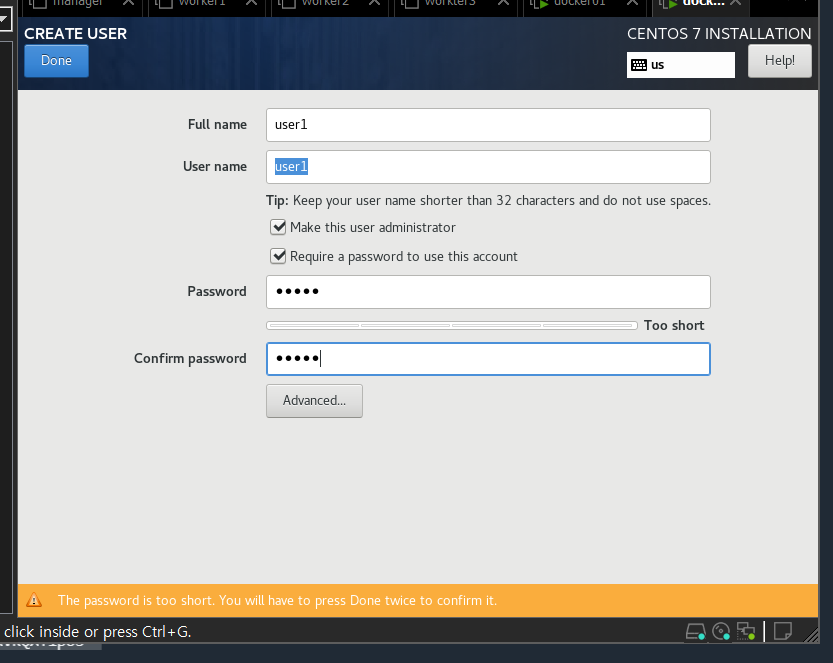
4. user1 계정 설정
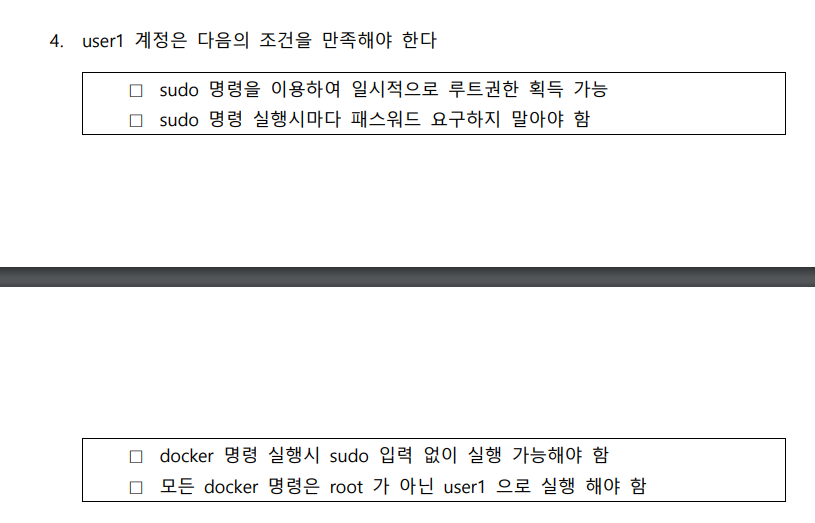
1) sudo 시 패스워드 요구 비활성화
[user1@localhost ~]$sudo vi /etc/sudoers 아래 코드 추가
user1 ALL=(ALL) NOPASSWD:ALL # user1 계정이 sudo 로 루트 권한을 얻은 뒤 명령을 실행하고자 할 때 패스워드 요구하지 않도록
2) docker group에 추가
[user1@localhost ~]$ sudo usermod -aG docker user1 # user1 계정을 docker 그룹에 포함, sudo 없이 docker 명령 사용할 수 있음
[sudo] password for user1:
[user1@localhost ~]$ groups user1
user1 : user1 wheel docker
5. private registry 구성

step 1) registry, hyper/docker-registry-web 배포
[docker02]
[user1@localhost ~]$ docker container run -d \
> -p 5000:5000 \
> --restart=always \
> --name registry \
> -v /home/user1/registry:/var/lib/registry \
> registry
0f45108fdeec0fba887e175ecc5a10052eae183780a3961aa7d7c3f8cceb3d0d[user1@localhost ~]$ docker container run -d \
> -p 8080:8080 \
> --name registry-web \
> --link registry:private \
> -e REGISTRY_URL=http://211.183.3.202:5000/v2 \
> -e REGISTRY_NAME=211.183.3.202:5000 \
> --restart=always \
> hyper/docker-registry-web
86d83feff9af64789a25038f6d2ce4f560aa655e52bdd3e229eb357bfb02e3ecstep 2) 이미지 태그 생성 (myweb:gunwoo)
[docker01]
[user1@localhost ~]$ docker tag centos:7 \
> 211.183.3.202:5000/myweb:gunwoo
step 3) insecure-registries 설정
[docker01]
[user1@localhost ~]$ sudo vi /etc/docker/daemon.json{ "insecure-registries": ["211.183.3.202:5000"] }step 4) private registry에 이미지 push (myweb:gunwoo)
[docker01]
[user1@localhost ~]$ docker push 211.183.3.202:5000/myweb:gunwoo
The push refers to repository [211.183.3.202:5000/myweb]
174f56854903: Pushed
gunwoo: digest: sha256:dead07b4d8ed7e29e98de0f4504d87e8880d4347859d839686a31da35a3b532f size: 529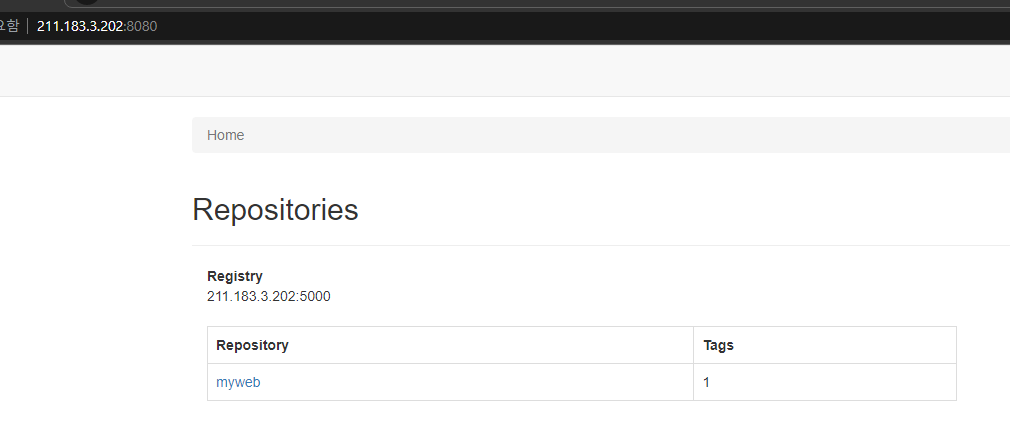
6. 도커 컨테이너 Life Cycle

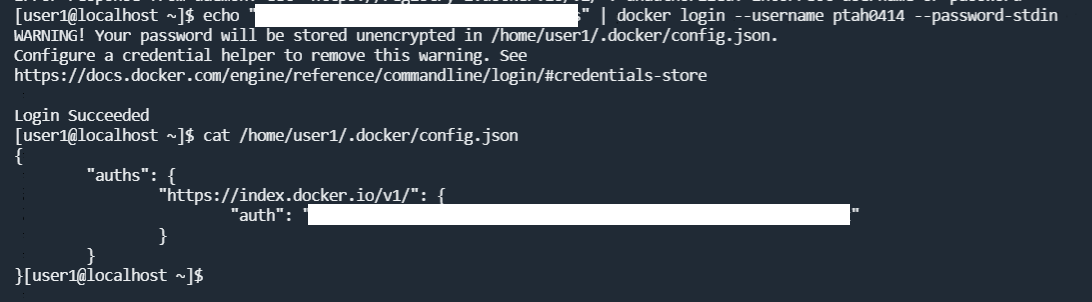
도커 저장소에는 local 저장소, public 저장소, private 저장소가 있다. public 저장소로는 도커 허브가 있어서 온라인에서 쉽게 이미지를 pull할 수 있다. 컨테이너 생성 시, 도커는 가장 먼저 본인의 local 저장소를 먼저 탐색하여 이미지가 있는지 확인한다.
보안을 위해 private registry를 따로 구축하여 이미지를 안전하게 push/pull 할 수도 있다. 로컬에서 원격지에 있는 사설 저장소로 접속하기 위해서는 사설 저장소에 인증정보를 전달해야 한다. 인증 정보는 config.json 파일에서 확인한다. 인증 정보가 없다면 해당 접근을 차단시킨다.
도커 엔진이 컨테이너를 배포할 때, 각 컨테이너는 칸막이가 있는 것 처럼 동작한다. 이미 호스트에 특정 패키지가 설치되어 있더라도 컨테이너로 중복된 패키지를 실행시킬 수 있다. 또한, 같은 패키지를 여러 컨테이너로 중복되게 배포할 수도 있다. 도커 엔진은 리눅스의 cgroup과 namespace를 통해 각 컨테이너 사이에 칸막이가 있는 것처럼 배포할 수 있다.
Dockerfile을 작성하여 이미지에 대한 명세서를 작성할 수 있다. Dockerfile을 통해 이미지를 빌드한 후 컨테이너를 배포할 수 있다.
docker container create를 하면, 컨테이너가 생성되고 실행되지는 않는다. 컨테이너를 생성하고 실행까지 시키려면 docker container run 명령어를 실행하면 된다.
docker0는 도커가 설치되면 자동으로 생성되는 bridge이며, NAT를 통해 컨테이너를 외부와 연결시켜준다.
7. Docker Hub 토큰 로그인

8. private registry에 push하기
step 1) 기본 이미지용 Dockerfile 작성
[user1@localhost 0823]$ vi DockerfileFROM centos:7
RUN yum -y install httpd
EXPOSE 80
ONBUILD ADD web.tar /var/www/html/
CMD httpd -D FOREGROUNDstep 2) 기본 이미지 빌드 (baseweb:1.0)
[user1@localhost 0823]$ docker build -t baseweb:1.0 .step 3) 기본 이미지 push (baseweb:teamleader)
[user1@localhost 0823]$ docker tag baseweb:1.0 \
> 211.183.3.202:5000/baseweb:teamleader

[user1@localhost 0823]$ docker push 211.183.3.202:5000/baseweb:teamleader
The push refers to repository [211.183.3.202:5000/baseweb]
e5deb5dde6fd: Pushed
9ff191e5ccc3: Pushed
174f56854903: Mounted from myweb
teamleader: digest: sha256:f7a573a1877d2924ab1963ed243b133ea374a5bea4a58420b92b4c0cd62f116f size: 948
9. private registry에서 pull한 이미지 배포

step 1) 로컬 저장소의 baseweb 이미지 제거
[user1@localhost 0823]$ docker image ls
REPOSITORY                   TAG          IMAGE ID       CREATED         SIZE
211.183.3.202:5000/baseweb   teamleader   78e817be9254   9 minutes ago   418MB
baseweb                      1.0          78e817be9254   9 minutes ago   418MB
centos                       7            eeb6ee3f44bd   11 months ago   204MB
211.183.3.202:5000/myweb     gunwoo       eeb6ee3f44bd   11 months ago   204MB

[user1@localhost 0823]$ docker image rm -f 211.183.3.202:5000/baseweb:teamleader
Untagged: 211.183.3.202:5000/baseweb:teamleader
Untagged: 211.183.3.202:5000/baseweb@sha256:f7a573a1877d2924ab1963ed243b133ea374a5bea4a58420b92b4c0cd62f116f
step 2) private registry에서 이미지 pull (baseweb:teamleader)
[user1@localhost 0823]$ docker pull 211.183.3.202:5000/baseweb:teamleader
teamleader: Pulling from baseweb
Digest: sha256:f7a573a1877d2924ab1963ed243b133ea374a5bea4a58420b92b4c0cd62f116f
Status: Downloaded newer image for 211.183.3.202:5000/baseweb:teamleader
211.183.3.202:5000/baseweb:teamleader
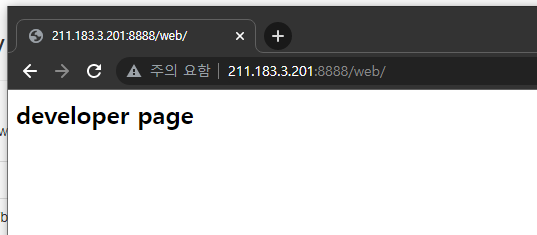
[user1@localhost 0823]$ step 3) 개발자용 index.html 생성 후 패키지화
[user1@localhost 0823]$ mkdir web
[user1@localhost 0823]$ cd web
[user1@localhost web]$ touch index.html
[user1@localhost web]$ echo "<h2>developer page<h2>" > index.html
[user1@localhost web]$ cd ..
[user1@localhost 0823]$ tree
.
├── Dockerfile
└── web
    └── index.html

1 directory, 3 files
[user1@localhost 0823]$ tar cf web.tar web/*
[user1@localhost 0823]$ tree
.
├── Dockerfile
├── web
│   └── index.html
└── web.tar
step 4) 개발자용 Dockerfile 작성
[user1@localhost 0823]$ vi Dockerfile FROM baseweb:1.0step 5) 개발자 이미지 빌드 (baseweb:developer)
[user1@localhost 0823]$ docker build -t baseweb:developer .
Sending build context to Docker daemon  15.36kB
Step 1/1 : FROM baseweb:1.0
# Executing 1 build trigger
 ---> 63abe8e012fa
Successfully built 63abe8e012fa
Successfully tagged baseweb:developer
step 6) 개발자 이미지 배포 (baseweb:developer)
[user1@localhost 0823]$
[user1@localhost 0823]$ docker container run -d \
> -p 8888:80 \
> baseweb:developer
78e93a7bf4bc4a0cd11da61619b21f5ce6d8465899ed03ae1de1aa3d7749f0fe
step 7) 개발자 페이지 접속
10. docker-compose를 통한 xe와 db 배포

step 1) 도커 네트워크, 볼륨 생성
[user1@localhost ~]$ docker network create testnetwork
41ccf42d0e106880c97c0f604b21dd5fccb71165281d6ec9d7eebb3a57ec829f
[user1@localhost ~]$ docker volume create testvol
testvol
step 2) xe 도커파일 작성
[user1@localhost xe]$ vi DockerfileFROM centos:7
RUN yum clean all
RUN yum update -y
RUN yum -y install wget git httpd
RUN wget http://rpms.famillecollet.com/enterprise/remi-release-7.rpm
RUN yum -y localinstall remi-release-7.rpm
RUN yum -y install epel-release yum-utils
RUN yum-config-manager --enable remi-php74
RUN yum -y install php php-fpm php-gd php-mysql php-xml
RUN git clone https://github.com/xpressengine/xe-core.git /var/www/html/xe
WORKDIR /var/www/html/xe
WORKDIR /var/www/html
RUN chmod -R 707 xe
RUN chown -R apache:apache xe # xe 디렉토리의 권한이 apache 소유로 됨
EXPOSE 80
CMD httpd -D FOREGROUNDstep 3) xe 이미지 빌드 (xe:1.0)
[user1@localhost xe]$ docker build -t xe:1.0 .step 4) docker-compose.yml 작성 (xe, db)
[user1@localhost xe]$ vi docker-compose.yml version: '3.8'
services:
xe:
image: xe:1.0
networks:
- testnetwork
ports:
- "80:80"
links:
- db:mysql
depends_on:
- db
db:
image: mysql:5.7
environment:
- MYSQL_ROOT_PASSWORD=test123
- MYSQL_DATABASE=testdb
volumes:
- testvol:/var/lib/mysql
networks:
testnetwork:
external: true
volumes:
testvol:
external: truestep 5) xe, db 배포
[user1@localhost xe]$ dc up -d
Creating network "xe_default" with the default driver
Creating xe_db_1 ... done
Creating xe_xe_1 ... done
step 6) 배포 확인
[user1@localhost xe]$ dc ps
 Name                Command               State                Ports
-----------------------------------------------------------------------------------
xe_db_1   docker-entrypoint.sh mysqld      Up      3306/tcp, 33060/tcp
xe_xe_1   /bin/sh -c httpd -D FOREGROUND   Up      0.0.0.0:80->80/tcp,:::80->80/tcp
80포트 접속