스키마 설계
const UserSchema = new Schema({
    username : { type : String, required : true, unique : true},
    name : {
        first : { type : String, required : true},
        last : { type : String, required : true}
    },
    age : Number,
    email : String
},{
    timestamps : true
});


const BlogSchema = new Schema(
  {
    title: { type: String, require: true },
    content: { type: String, require: true },
    isLive: { type: Boolean, require: true, default: false },
    user: { type: Types.ObjectId, require: true, ref: "user" }, // user 스키마와 관계
  },
  {
    timestamps: true,
  }
);

const CommentSchema = new Schema(
  {
    content: { type: String, required: true },
    user: { type: Types.ObjectId, required: true, ref: "user" },
    blog: { type: Types.ObjectId, required: true, ref: "blog" },
  },
  {
    timestamps: true,
  }
);
위 스키마 사이에서 아래와 같은 중첩된 객체들의 데이터가 필요하다고 가정해보자.
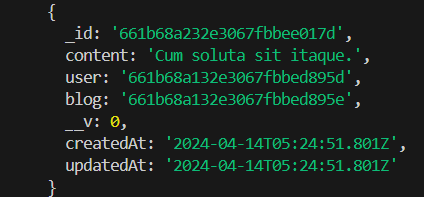
{
  _id: '661b68a232e3067fbbee017d',
  content: 'Cum soluta sit itaque.',
  user: {
    name: { first: 'Emilio', last: 'Kreiger' },
    _id: '661b68a132e3067fbbed895d',
    username: 'Jamel_Jacobs42',
    age: 53,
    email: 'Kiarra.Ernser@yahoo.com',
    __v: 0,
    createdAt: '2024-04-14T05:24:50.333Z',
    updatedAt: '2024-04-14T05:24:50.333Z'
  },
  blog: '661b68a132e3067fbbed895e',
  __v: 0,
  createdAt: '2024-04-14T05:24:51.801Z',
  updatedAt: '2024-04-14T05:24:51.801Z'
}
개발을 하다 보면 이렇게 Object안에 Object가 들어있는 중첩된 객체데이터들을 봤을것이다. 이러한 데이터들을 클라이언트에서 api를 여러번 호출하며 가공하게 되면 실제로 엄청난 시간이 걸릴 것이다. 그렇기 때문에 대부분 객체들 즉 관계형 데이터 베이스에서는 join을 이용해 테이블 들의 사이를 결합하여 데이터를 보내준다.
mongoose 에서는 이같은 연산을 위해 populate를 사용한다.
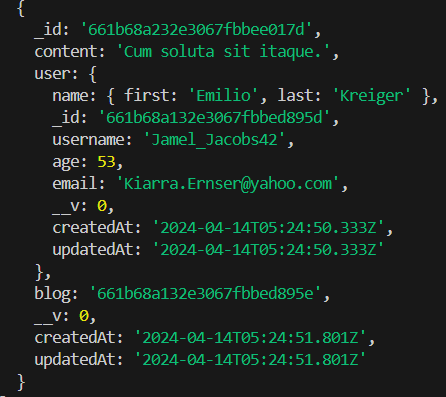
{
  _id: '661b68a132e3067fbbed895e',
  title: 'id reprehenderit aut',
  content: 'Temporibus aut sit dolorem repellendus et eos delectus omnis voluptatem. Voluptatem quia qui aliquam recusandae eveniet fuga sequi minus deleniti. Non voluptas distinctio eum. Aut iste sed qui nulla error. Corporis quam quam eaque cupiditate ipsa dolor qui sit. Nisi rerum occaecati dignissimos omnis.\n' +
    ' \rConsequatur perspiciatis cupiditate. Quidem aperiam optio reprehenderit et praesentium in aut sed. Delectus ipsa sint distinctio sed tempore magni. Iste aliquid maxime. Et eligendi qui cumque harum eos est mollitia similique eveniet. Voluptate aut asperiores id mollitia nihil.\n' +
    ' \rEum esse nihil quia voluptatum doloribus et. A et nostrum nihil voluptatibus est tempore eligendi qui. Modi assumenda fuga ipsa.',
  isLive: false,
  user: '661b68a132e3067fbbed88fa',
  __v: 0,
  createdAt: '2024-04-14T05:24:50.427Z',
  updatedAt: '2024-04-14T05:24:50.427Z',
  id: '661b68a132e3067fbbed895e'
}
실제로 populate를 사용하지 않고 해당데이터를 호출하개 되면 user객체는 userId로 반환되고 실제로 blog 스키마의 필드에 comments도 정의 되어 있지않아 comments의 정보들도 반환되지 않는다. 이러한 문제들을 백엔드 단에서 해결하기 위해 populate를 사용해 보겠다.
populate
blogRouter.get("/", async (req, res) => {
  try {

    const blogs = await Blog.find({})
      .limit(20)
      .populate([
        { path: "user" },
      ]);

    return res.send({ blogs });
  } catch (err) {
    console.log(err);
    res.status(500).send({ err: err.message });
  }
});
해당 코드는 블로그를 조회하는 api이다. 이렇게 populate를 사용해서 user를 지정해주고 조회를 하게 되면
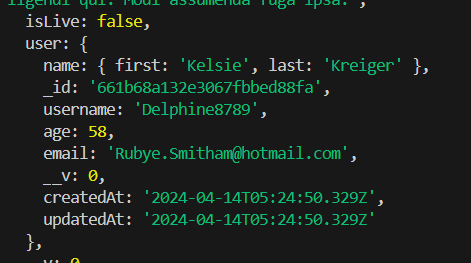
이렇게 user의 objectId가 아닌 user객체가 반환된것을 볼수 있다.
user같은 경우 blog 스키마 내부에 필드로 정의를 해서 접근할수 있지만 comment는 blog 스키마 내부에 정의되어 있지 않습니다. 이럴경우 virtual populate를 사용해야 합니다.
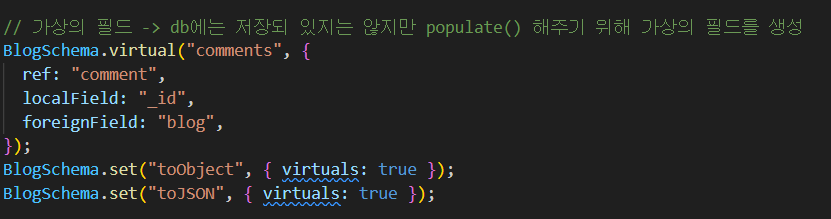
이렇게 가상의 필드를 정의해주고
 const blogs = await Blog.find({})
      .limit(20)
      .populate([
        { path: "user" },
        { path: "comments"}
      ]);
이렇게 populate를 연결하여 지정해 주면
이렇게 comment 또한 성공적으로 조회가 가능합니다.
하지만 여기서 또 한번더 populate를 사용할수 있는 부분 찾을수 있는데 user의 objectId가 아닌 user를 출력하려면 이렇게 comments에서 한번더 populate로 user를 지정해주면됩니다.
     const blogs = await Blog.find({})
      .limit(20)
      .populate([
        { path: "user" },
        { path: "comments", populate: { path: "user" } },
      ]);
이렇게 하게 되면 초반부에 반환받으려던 클라이언트에서의 데이터 가공이 아닌 데이터를 백엔드에서 populate를 통해서 반환을 받을수 있게 됩니다.
실제로 클라이언트에서 이러한 데이터를 출력하기 위해 여러번의 api 호출을 했을때와 백엔드에서 popluate를 사용했을때 발생하는 속도차이를 비교해보면

이러한 결과값을 얻을수 있었다.
