
[ 글의 목적: django에 sentry 적용하는 방법 잊을때 다시 보기 위해 기록, sentry 원리 분석에 대한 공유 ]
Sentry
Sentry란 Application 에러 트래킹, 성능 모니터링을 제공해주는 서비스다. django stack에 sentry를 적용하고 어떻게 sentry가 분석하는지 기본 원리와 사용법에 대해서 파악해보자!
-
sentry는 다음과 같은 framework, stack에서 많이 사용되고 있다 >> .NET, GO, JAVA, JAVASCRIPT, ANGULAR, REACT, VUE, NODE.JS, EXPRESS, PHP, LARAVEL, PYTHON, DJANGO, FLASK, REACT NATIVE, RUBY, RAILS)
-
가장 큰 이점과 장점은 상태, 예외 관리 이다. 그리고 FE, BE 막론하고 다양한 tech stack을 지원해 하나의 tool로 다양한 code space 관리가 가능하다는 점이다.
1. sentry monitoring system
아래 상황 에서 sentry를 사용하면 아주 도움이 된다. (그렇다고 해서 sentry가 압도적인 만능이라는 얘기는 아니다)
-
application logging을 아무리 잘해도 그 logging 을 하루 종일 볼 수 없다. 설령 elk(efk), grafana loki ... etc 를 사용한다고 해도 "결국은 확인하고 오류를 잘 기록하고, 알려줄 사람(역할)이 필요하다!"
-
사람마다 사용환경이 천차만별이다. 게다가 기기의 다영성이 폭발적으로 증가하면서 모든 환경을 직접 테스트하는건 불가능에 가까워졌다.
-
매일 실서버 환경에서 bench-marking을 할 수 없다. latency와 throughput를 측정하는 것은 안정화에 있어서 중요한 수단과 방법이지만 하루종일 이것만 개별적으로 할 수 없다.
-
에러가 발생하더라도 팀원에게 공유하기 힘들다. 에러 메시지만 덩그러니 또는 로그 파일, (BE restapi 의 경우) curl 만 주면 공유 받는 사람도 다시 분석해야하는 상황이 된다.
-
MSA concep이라 하나의 모니터링 툴이 다양한 stack에서 지원해주면 좋겠다!
2. django & sentry
공식문서에 더 정확한 내용들이 나와있다.
참고로 sentry는 무조건 무료가 아니다! self-hosting을 하면 완전 free이지만 cloud 환경에서 project 세팅을 하면 유료다. (당연하게도 ㅎㅎ..) 우선 homepage를 통해 cloud project setting을 살펴보자.
1) sentry 회원가입
-
self hosted vs cloud 비용 비교 분석: https://sentry.io/resources/self-hosted-vs-cloud/
-
Sentry 사이트에 회원가입을 하고 왼쪽 탐색 사이드바를 보면
Projects라는 항목이 있다. -
이걸 누르고 나타나는 페이지에서 오른쪽 상단에
Create Project를 누르면 새 프로젝트 생성까지 완료다. 이렇게만 해두면 기본적인 세팅은 완료다. (sentry sdk 값은 꼭 필요하다. 그리고 철저하게 private 관리가 필요하다.)
2) django config + sentry
sentry homepage project 생성과 django init & testing 영상을 참고하는 것도 좋다
-
pip install --upgrade sentry-sdk(raven을 설치하는 시절이 있었느나 이제 sentry-sdk로 대통합) -
settings.py에 아래와 같은 값만 넣으면 끝이다. 진짜 끝이다. celery 까지 같이 tracing이 가능하다.
import sentry_sdk
from sentry_sdk.integrations.celery import CeleryIntegration
from sentry_sdk.integrations.django import DjangoIntegration

sentry_sdk.init(
    dsn=SENTRY_DSN, # "https://<key>@sentry.io/<project>"
    integrations=[
        DjangoIntegration(),
        CeleryIntegration(),
    ],

    # 아래 값은 Optional 한 값으니 공식 문서를 체크하길 바란다.
    environment=env("SENTRY_ENVIRONMENT", default=DJANGO_ENV),
    traces_sample_rate=env.float("SENTRY_TRACES_SAMPLE_RATE", default=1.0),
)- celery를 Standalone 으로 사용할 땐 아래와 같은 세팅을 한다.
import sentry_sdk
from celery import Celery, signals

app = Celery("myapp")

#@signals.worker_init.connect
@signals.celeryd_init.connect
def init_sentry(**_kwargs):
sentry_sdk.init(dsn="...")- 실제로 잘 작동하는지 verify 해보자. url에 무조건 error를 뱉는 api를 하나 매핑해서 테스트를 해보자.
from django.urls import path

def trigger_error(request):
    division_by_zero = 1 / 0

urlpatterns = [
    path('sentry-debug/', trigger_error),
    # ...
]- 그런 다음
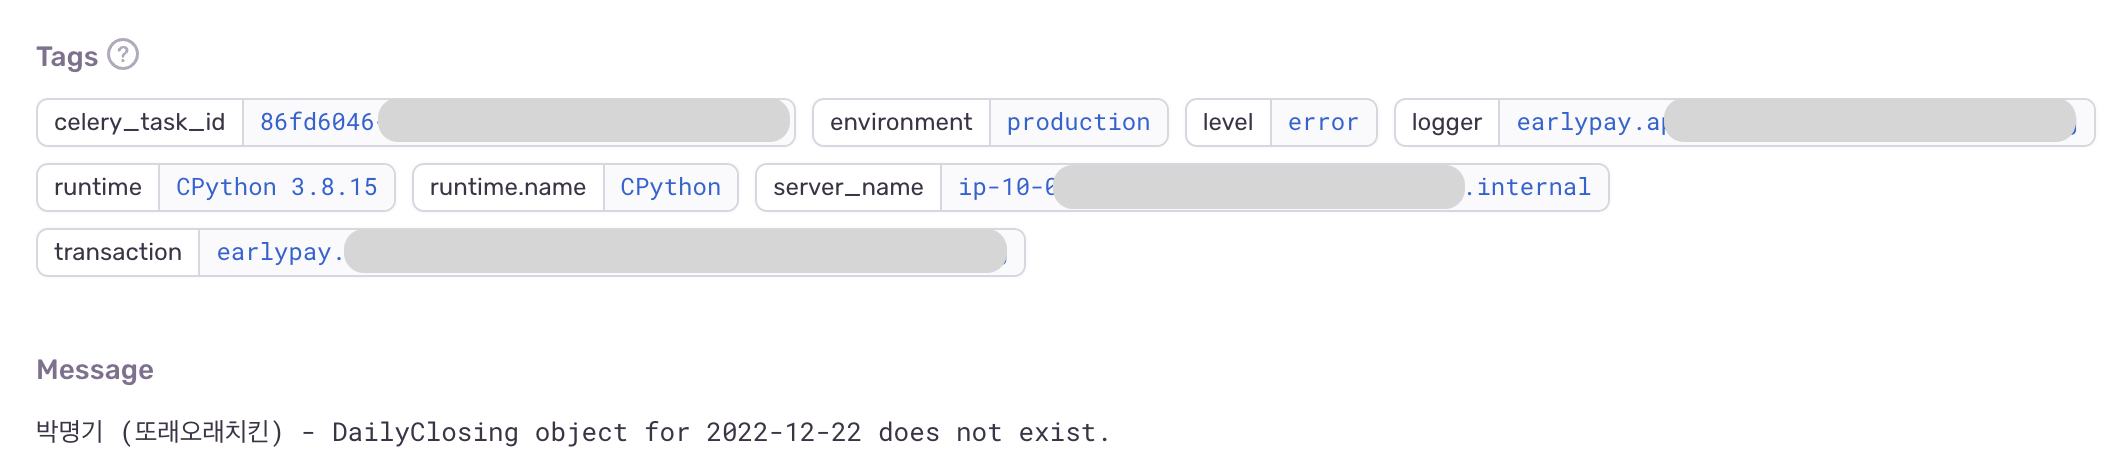
sentry-debug/에 http request를 때려보고, (1) 에서 세팅한 Project로 가서 issue tab을 확인하면 아래와 같은 장면을 볼 수 있다. 그러면 연동까지 완벽하게 된 것이다.

- (실제 내용은 위 사진과는 다를 것이다.)
3) django의 sentry, 기본 작동 원리
우선 WSGI에 대한 기본 지식은 필요하다. python cgi, wsgi, asgi 글을 한 번 읽어 둬야한다. 그리고 아래 해석은 철저히 개인적으로 접근하고 해석 한 흐름이라 큰 오차가 있을 수 도 있다.
- django를 wsgi 배포할때 사용하는
wsgi.py에서application = get_wsgi_application()메서드 정의 부분이다. 배포시gunicorn -> WSGIHandler -> django request - ...의 flow로 http request를 handling 하게 된다. (해당 부분은 django request flow의 핵심 부분을 알아야 정확한 이해가 가능하다.)
# wsgi.py 마지막 줄
application = get_wsgi_application()

################################

import django
from django.core.handlers.wsgi import WSGIHandler

def get_wsgi_application():
    """
    The public interface to Django's WSGI support. Return a WSGI callable.

    Avoids making django.core.handlers.WSGIHandler a public API, in case the
    internal WSGI implementation changes or moves in the future.
    """
    django.setup(set_prefix=False)
return WSGIHandler()- 그리고 우리가
settings.py에 세팅했던 sentry 쪽DjangoIntegration코드는 아래와 같다. (요약)
class DjangoIntegration(Integration):
    identifier = "django"

    ...(중략)

    @staticmethod
    def setup_once():
        if DJANGO_VERSION < (1, 6):
            raise DidNotEnable("Django 1.6 or newer is required.")

        install_sql_hook()
        # Patch in our custom middleware.

        # logs an error for every 500
        ignore_logger("django.server")
        ignore_logger("django.request")

        from django.core.handlers.wsgi import WSGIHandler

        old_app = WSGIHandler.__call__

        def sentry_patched_wsgi_handler(self, environ, start_response):
            # type: (Any, Dict[str, str], Callable[..., Any]) -> _ScopedResponse
            if Hub.current.get_integration(DjangoIntegration) is None:
                return old_app(self, environ, start_response)

            bound_old_app = old_app.__get__(self, WSGIHandler)

            from django.conf import settings
            use_x_forwarded_for = settings.USE_X_FORWARDED_HOST
            return SentryWsgiMiddleware(bound_old_app, use_x_forwarded_for)(
                environ, start_response
            )
        WSGIHandler.__call__ = sentry_patched_wsgi_handler

        # 아래 것들이 다 request, response capture를 위해 존재한다.
        _patch_get_response()
        _patch_django_asgi_handler()
        signals.got_request_exception.connect(_got_request_exception)
        _patch_channels()
        patch_django_middlewares()
        patch_views()
        patch_templates()

...(하략)-
install_sql_hook는 django의CursorWrapper를 활용하여 Django가 [ ORM to RawQuery ] 하는 과정에record_sql_queries -> _format_sql -> real_sql과정을 통해 Django DB ENGINE - SQL query를 capture 한다. -
setup_once의 호출 flow는 최초 부터 (type에 따라 달라질 수 있음) 따라가보면
sentry_sdk.init -> _init -> Client -> _Client 생성자(__init__)에서 _init_impl -> self.integrations = setup_integrations(...)-> integrations list 대상으로 각 object.setup_once와 같다. -
django core의 signal를 활용해
got_request_exception로 capture 역시 한다. -
위
setup_once에서WSGIHandler.__call__ = sentry_patched_wsgi_handler부분이 핵심이다. WSGIHandler를 sentry가 정의한 handler(method)를 call 해버리게 한다. - "팩토리 패턴"으로 되어있다. -
sentry_patched_wsgi_handler()는return SentryWsgiMiddleware으로 sentry 자체 middleware를 return 한다. -
SentryWsgiMiddleware 역시
__call__을 활용해 django > wsgi.py 파일에서 WSGIHandler() 과정 속application를 call binding function이SentryWsgiMiddleware이 되도록 한다.
- 그래서
SentryWsgiMiddleware부분을 보면 실제로 어떻게 request 를 follow 확인이 가능하다. 추상화 된 부분이 많아서 정확한 흐름을 따라가기는 힘들지만,sentry_sdk > integrations > wsgi.py에서 세부 코드를 확인이 가능하다.
class SentryWsgiMiddleware(object):
    __slots__ = ("app", "use_x_forwarded_for")

    ...(중략)

    def __call__(self, environ, start_response):
        # type: (Dict[str, str], Callable[..., Any]) -> _ScopedResponse
        if _wsgi_middleware_applied.get(False):
            return self.app(environ, start_response)

        _wsgi_middleware_applied.set(True)
        try:
            hub = Hub(Hub.current)
            with auto_session_tracking(hub, session_mode="request"):
                with hub:
                    with capture_internal_exceptions():
                        with hub.configure_scope() as scope:
                            scope.clear_breadcrumbs()
                            scope._name = "wsgi"
                            scope.add_event_processor(
                                _make_wsgi_event_processor(
                                    environ, self.use_x_forwarded_for
                                )
                            )

                    transaction = Transaction.continue_from_environ(
                        environ, op="http.server", name="generic WSGI request"
                    )

                    with hub.start_transaction(
                        transaction, custom_sampling_context={"wsgi_environ": environ}
                    ):
                        try:
                            rv = self.app(
                                environ,
                                partial(
                                    _sentry_start_response, start_response, transaction
                                ),
                            )
                        except BaseException:
                            reraise(*_capture_exception(hub))
        finally:
            _wsgi_middleware_applied.set(False)

        return _ScopedResponse(hub, rv)
...(하략)
WSGIHandler --(hook call)--> Django --(hook return)--> WSGIHandler의 흐름이 django의 Http Request를 처리하는 과정이다. (배포환경엔 이 앞단에 gunicorn이 있다.) 그 WSGIHandler hook call을 하는 것을 활용해 SentryWsgiMiddleware를 hook으로 바꾸어 그 흐름을 follwing 한다.
- request error를 catch 한 뒤에 capture를 하는 것은 아래 부분을 체크해보자.
# __init__.py
def _got_request_exception(request=None, **kwargs):
    # type: (WSGIRequest, **Any) -> None
    hub = Hub.current
    integration = hub.get_integration(DjangoIntegration)
    if integration is not None:
        # If an integration is there, a client has to be there.
        client = hub.client  # type: Any
        event, hint = event_from_exception(
            sys.exc_info(),
            client_options=client.options,
            mechanism={"type": "django", "handled": False},
        )
        hub.capture_event(event, hint=hint)

################################

# hub.py
def capture_event(
    self,
    event,  # type: Event
    hint=None,  # type: Optional[Hint]
    scope=None,  # type: Optional[Any]
    **scope_args  # type: Any
):
    # type: (...) -> Optional[str]
    """Captures an event. Alias of :py:meth:`sentry_sdk.Client.capture_event`."""
    client, top_scope = self._stack[-1]
    scope = _update_scope(top_scope, scope, scope_args)
    if client is not None:
        is_transaction = event.get("type") == "transaction"
        rv = client.capture_event(event, hint, scope)
        if rv is not None and not is_transaction:
            self._last_event_id = rv
        return rv
return None-
자주 마주하게 될 변수
hub와client는 각 "저장소 - cloud (or target server requested by dns)", "그 hub 매개체 역할을 하는 client" 이다. -
_got_request_exception > event_from_exception는 발생한 exception으로 부터 전처리를 하는 과정이고 실제 event를 기록하는 부분은hub.capture_event(event, hint=hint)이 된다. -
아주 러프하게 sentry의 event 기록 flow는 [ platfrom에 맞는 Integration 구조체 -> 해당 구조체에 맞게 끔 각 설정들 setup_once 하고 -> 그 설정들은 sentry issue를 보면 볼 수 있는 모든 데이터들을 수집하는 이벤트 바인딩 하고 -> catch하고 -> 전처리하고 -> 공통된 capture_event 과정을 거치는 것 (같다) ] 이다.
-
sentry_sdk > client.py > _Client > capture_event이 이제 실제 exception, error event를 기록하는 부분인데코드가 세상 길다해당 부분은 sentry를 활용하는 방법에 대해 더 파악하면서 살펴보는게 좋을 것 같다.
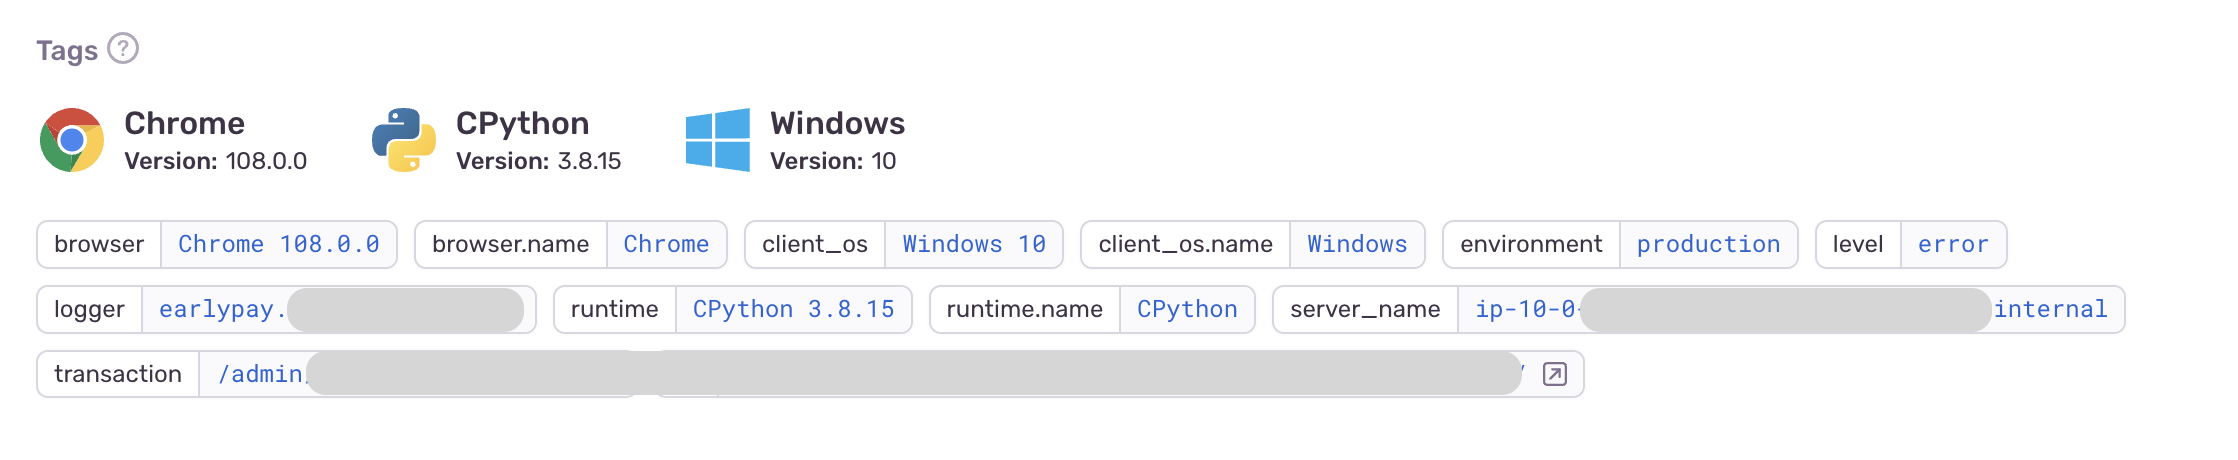
- sentry issue 에서 우리가 제공받는 정보들은 이곳 저곳에서 모든 정보를 긁고 끌어 모아서 볼 수 있는 것들이었다.
3. 마무리
-
왜 모니터링이 필요한가? 그럼 어떻게 해야할까? 글을 공유해 본다.
-
생각보다 sentry가 설정을 간단하게 하기 위해서 얼마나 많은 노력을 했는지 짐작할 수 있었다. 단순하게 request packet에 붙어서 하는 느낌보다는 그 "stack의 framework 꽤 깊은 이해도를 바탕으로 영혼까지 데이터를 끌어모아서 준다" 에 가까운 것 같다. 최근 E 시리즈를 받고 아직 고공행진 중인 모습이다.
-
바로 위에서 언급 하였듯, 아주 러프하게 sentry의 event 기록 flow는 [ platfrom에 맞는 Integration 구조체 -> 해당 구조체에 맞게 끔 각 설정들 setup_once 하고 -> 그 설정들은 sentry issue를 보면 볼 수 있는 모든 데이터들을 수집하는 이벤트 바인딩 하고 -> catch하고 -> 전처리하고 -> 공통된 capture_event 과정을 거치는 것 (같다) ] 이다.
-
이 다음은 sentry를 toy project와 cloud(hub) 연동해서 "에러가 발생한 뒤 sentry issue를 보고 어떻게 follow 하고, 활용할 수 있는 방법과 다양한 사용법 & performance check 까지 살펴볼 예정이다.
출처

3개의 댓글

-
과도한 로깅과 알림 피로
앱 전체를 감싸면 모든 오류를 무차별적으로 수집하여 "양치기 소년" 효과가 발생합니다
필요 없는 에러까지 포함해 슬랙 알림을 끄는 상황이 발생하기도 합니다 -
성능 오버헤드
고트래픽 환경에서 페이지 로드 시간을 5-10% 증가시킵니다
SDK가 상당한 성능 부담을 줄 수 있습니다 -
기술적 한계
OTLP 같은 고급 텔레메트리 프로토콜을 지원하지 않습니다
PostgreSQL 기반으로 고빈도 대용량 데이터 처리에 한계가 있습니다
좋은 정리 감사합니다. 원리가 어떤지 궁금했는데 꽤나 심오하네요!
별개로 verify가 verigy로 오타가 난 것 같습니닷