Django Redis
Redis와 Django는 middle-ware를 포함한 third party를 활용해 서로 활용도가 좋다. 캐싱과 비동기 작업 스케쥴링, 그리고 M.Q 로도 사용할 수 있는 redis의 django에서 사용법을 훑어보자! 우선 "실습 기반으로" 진행할 것이다. 해당 프로젝트는 Hands-on with Redis and Django
글을 따라간 것이다.
🔥 크게 2가지 종류의 브로커(이벤트 브로커, 메시지 브로커) 중 이벤트 브로커 - kafka 에 대해 상세하게 정리해둔 시리즈가 있다.
Redis를 사용하는 주 목적은 아래와 같다.
- Caching: Given its speed over traditional databases, in terms of read and write operations, Redis has become an ideal solution for temporarily storing data in a cache to accelerate data access in the future.
- Message Queueing(Broker): With the capability of implementing the Publish/Subscribe messaging paradigm, Redis has become a message broker for message queueing systems.
- Data storage(In-memory DB): Redis can be used to store key-value data as a NoSQL database.
아래 3가지의 시나리오에서, django에서 어떻게 redis를 사용하는지 살펴보자!
- Caching data with Redis.
- Scheduling task with Redis queue.
- Publish/subscribe service using Redis.
- redis에 대한 설명은, 제 벨로그 글 [NHN FORWARD] Redis 야무지게 사용하기
의 글로 우선 대체 한다. 간단하게 말하면 in-memory (주 메모리) DB 이다. 그리고 "메시지 브로커" 로써 사용할 수 있다.
Redis + Django with middle-ware
-
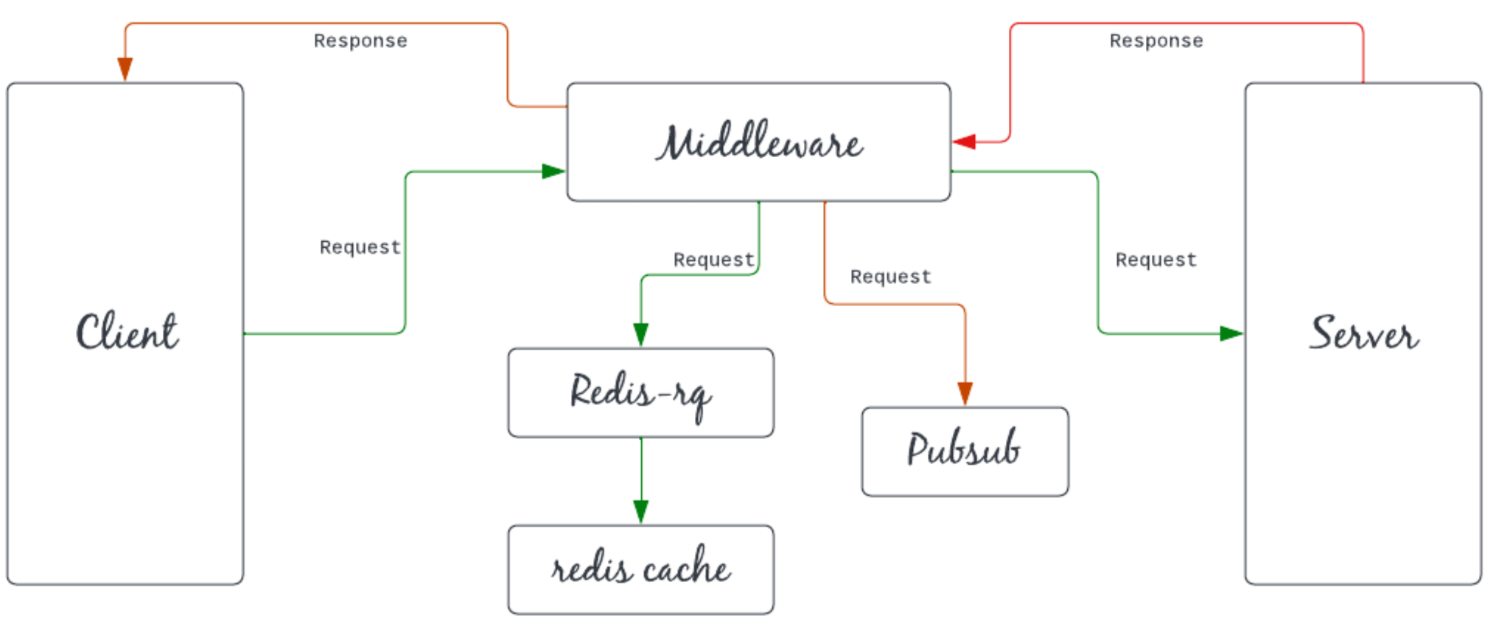
레디스를 활용한 django project의 간단한 다이어그램이다. 해당 다이어그램대로 프로젝트를 설계하고 만들면서 위에서 언급한 3가지 활용법 에 대해 살펴보자.
-
client는 middleware에 요청을 하고, 미들웨어는 먼저 요청을 queue에 추가한다. 즉, Redis 캐시 메모리의 "특정 값의" 키 값을 1 카운트를 증가시킨다. (엄청 간단한 프로젝트라, 프로젝트 완성후 비즈니스 로직을 다시 re-cap 할 때 다시 자세하게 살펴보자.)
-
그런 다음 미들웨어가 요청과 함께 서버에게 request를 전달하고, 서버는 미들웨어에 응답을 보내고, 모든 구독자(pubsub)에게 요청 및 클라이언트에 대한 응답에 대한 메시지를 보낸다. 커스텀 미들웨어 및 코딩에 대한 내용은 해당 시리즈에 있다!
실습에 활용할 docker compose & django
1. postgresql db, redis docker
services:
  djr-postgres:
    image: postgres:latest
    hostname: djr-postgres
    container_name: djr-postgres
    restart: always
    ports:
      - "5432:5432"
    environment:
      POSTGRES_USER: "djangoredis"
      POSTGRES_PASSWORD: "djangoredis!"
      POSTGRES_DB: djangoredis
    volumes:
      - ../postgresql/data/:/var/lib/postgresql/data
    networks:
      - django-redis-project

  djr-redis:
    image: redis:alpine
    hostname: djr-redis
    container_name: djr-redis
    labels:
      - "name=redis"
      - "mode=standalone"
    ports:
      - 6379:6379
    volumes:
      - ../redis/data:/data
      - ../redis/conf/redis.conf:/usr/local/etc/redis/redis.conf
    command: redis-server --port 6379
    networks:
      - django-redis-project


networks:
  django-redis-project:
driver: bridge-
우선 volumes으로 잡힌 것들 모두 지우고 진행해도 무방하다. 해당 volumes값은 config 와 실 저장 data를 위해서 잡아둔 것이다.
-
django는 docker-compose에 포함시켜서 진행하지 않는다. 이유는 계속 편집하고, hot-reload해서 사용할 목적이다. 만약 배포시에는 image를 직접만들어 compose에 포함시켜야 한다.
2. django
- 만들기와 사용하기에 집중 하기 위해 기본 django setting은 빠르게 넘어간다.
python3 -m venv .venv # 다른 가상환경 사용해도 무방
source .venv/bin/activate
pip install --upgrade pip # 필요하다면
pip install django
pip install psycopg2-binary
pip install djangorestframework
pip install django-redis # redis cache
pip install django-rq # redis message que (broker)
django-admin startproject djrtodoprj
cd djrtodoprj
python manage.py startapp todo- 아래와 같은 프로젝트 디렉토리 구조를 가지게 된다.
├── djrtodoprj
│   ├── djrtodoprj
│   │   ├── __init__.py
│   │   ├── __pycache__
│   │   ├── asgi.py
│   │   ├── settings.py
│   │   ├── urls.py
│   │   └── wsgi.py
│   ├── manage.py
│   └── todo
│       ├── __init__.py
│       ├── admin.py
│       ├── apps.py
│       ├── migrations
│       ├── models.py
│       ├── tests.py
│       └── views.py
├── docker
│   ├── docker-compose.yml
│   └── docker-start.sh
├── postgresql
│   └── data
│       ├── ...
└── redis
    ├── conf
    │   └── redis.conf
    └── data
django settings
1. INSTALLED_APP 추가
INSTALLED_APPS = [
    'django.contrib.admin',
    'django.contrib.auth',
    'django.contrib.contenttypes',
    'django.contrib.sessions',
    'django.contrib.messages',
    'django.contrib.staticfiles',
    'rest_framework',
    'todo.apps.TodoConfig',
]
2. DB 구성 세팅
DATABASES = {
    'default': {
        'ENGINE': 'django.db.backends.postgresql',
        'NAME': 'djangoredis',
        'USER': 'djangoredis',
        'PASSWORD': 'djangoredis!',
        'HOST': '127.0.0.1',
        'PORT': '5432',
    }
}
3. Todo app에 model 만들어주기
# djrtodoprj > todo > models.py
from django.db import models

class Todo(models.Model):
    work = models.CharField(max_length=100)
    done = models.BooleanField(default=False)
4. makemigrations & migrate
# 아래 코드
> python manage.py makemigrations
Migrations for 'todo':
  todo/migrations/0001_initial.py
    - Create model todo

# 아래 코드
> python manage.py migrate
Operations to perform:
  Apply all migrations: admin, auth, contenttypes, sessions, todo
Running migrations:
  Applying contenttypes.0001_initial... OK
  Applying auth.0001_initial... OK
  Applying admin.0001_initial... OK
  Applying admin.0002_logentry_remove_auto_add... OK
  Applying admin.0003_logentry_add_action_flag_choices... OK
  Applying contenttypes.0002_remove_content_type_name... OK
  Applying auth.0002_alter_permission_name_max_length... OK
  Applying auth.0003_alter_user_email_max_length... OK
  Applying auth.0004_alter_user_username_opts... OK
  Applying auth.0005_alter_user_last_login_null... OK
  Applying auth.0006_require_contenttypes_0002... OK
  Applying auth.0007_alter_validators_add_error_messages... OK
  Applying auth.0008_alter_user_username_max_length... OK
  Applying auth.0009_alter_user_last_name_max_length... OK
  Applying auth.0010_alter_group_name_max_length... OK
  Applying auth.0011_update_proxy_permissions... OK
  Applying auth.0012_alter_user_first_name_max_length... OK
  Applying sessions.0001_initial... OK
  Applying todo.0001_initial... OK
5. simple drf API 구성하기
- 시리얼라이저는 drf의 모듈이며 목적은 django의 model-form이 restapi - json을 위해 진화했다고 생각하면 가장 편하다.
해당 시리즈에 시리얼라이저에 대한 내용이 있다.
# djrtodoprj > todo > serializers.py (새로 만드세요~)
from rest_framework import serializers

from .models import Todo


class TodoSerializer(serializers.ModelSerializer):
    class Meta:
        model = Todo
        fields = '__all__'
django redis conf
1. 여기서 부터는 django에서 redis와 관련된 conf 값을 집중적으로 체크해보자. 먼저 cache 설정이다.
- 여기서는
django-redis라이브러리를 활용한다.
CACHE_TTL = 60 * 1500

CACHES = {
    "default": {
        "BACKEND": "django_redis.cache.RedisCache",
        "LOCATION": "redis://127.0.0.1:6379/1",
        "OPTIONS": {
        	"CLIENT_CLASS": "django_redis.client.DefaultClient"
        },
        "KEY_PREFIX": "example",
    }
}
SESSION_ENGINE = "django.contrib.sessions.backends.cache"
SESSION_CACHE_ALIAS = "default"-
TTL은 cashe의 Time to live - 살아있는 시간(보관기간)을 말한다. 단위를 초 라고 생각하고
60 * 1500(즉 60초 * 1500 = 1500분 = 25시간) 을 config 값으로 세팅하자. 아주 long term 이다. 어떤 데이터를 보관하냐에 따라 TTL을 매우 신중하게 생각하는게 좋다. -
location은 cache서버의 위치이다. (만약 django도 docker 환경으로 간다면, location의 hosting을 수정하는게 좋다.)
-
django 4.0 부터는 built-in redis cache engine (
django.core.cache.backends.redis.RedisCache) 이 존재한다. 하지만 써드파티 모듈을 활용해 보자.
2. cache 공통 함수, common module py 만들기.
- 해당
cache_function.py는 todoapp 경로에 두자. (설정관련 파일 및 값, common module은 묶어두는 것이 바람직하다. 하지만 app에 귀속되는 function이라 app 디렉토리에 두었다.)
from django.core.cache import cache

# This function increase value by one
def incrKey(key, value, timeout=None):
    return cache.incr(key, delta=value)


# This function set value
def setKey(key, value, timeout=None):
    return cache.set(key, value, timeout=timeout)


# This function set value if key exist then give error
def addKey(key, value, timeout=None):
    return cache.add(key, value, timeout=timeout)


# this function get value by key
def getKey(key):
    return cache.get(key)


# this function delete value by key
def deleteKey(key):
    return cache.delete(key)


# this function delete value by pattern
def getAllKey(pattern):
    return cache.keys(pattern)
- 매번 불러와 사용하는
django.core.cache를 app 전체에서 활용할 수 있게 공통 모듈을 위와같이 만들어 두자.
3. message que, broker config
- 본 프로젝트에서 job broker & pub/sub 형태 사용을 위해 redis queue setup을 하자. 여기서는
django_rq라이브러리를 활용한다.
INSTALLED_APPS = [
    ...
    'django_rq',
]

RQ_QUEUES = {
    'default': {
    'HOST': 'localhost',
    'PORT': 6379,
    'DB': 0,
    }
}-
왜 구독/발행 형태를 사용하냐는 MSA(Micro Service Architecture)와 asynchronous service에 대한 이해가 필요하다. 각 app을 도메인별로 독립시키고 모두 공통된 인터페이스를 통해 소통하게 만드는 형태이다.
-
Django worker로 유명한 celery, 그 celery config로 broker url (host)를 세팅할 때 사용하는 것이라고 생각하면 된다.
-
그리고 message que config값에 host/0 or host/1 등과 같은 제일 뒤에 붙는 int 값은 db instance id, 즉 개수 중 몇 번째 인가를 의미한다. 위 RQ에서 config
DB : 0또한 동일하다. -
RQ 설정에 자세한 설명은 공식 페이지에서 더 확인이 가능하다.
-
todoapp 경로에
pubsub.py파일을 아래와 같이 추가하자! message를 발행(publish) 하는 function이다.
import json
import redis

redis_client = redis.StrictRedis(host='localhost', port=6379, db=1)
def publish_data_on_redis(json_data, channel_name):
    redis_client.publish(channel_name, json.dumps(json_data))
4. redis 활용을 위해 custom middle ware 추가하기!
-
django의 middle ware는 Reqeust -> 모든 middleware 순차적으로 거침 -> 비즈니스로직 -> middleware -> Response 순서로 "동기적 실행"이 된다. 언급한 대로, 커스텀 미들웨어 및 코딩에 대한 내용은 해당 시리즈에 있다!
-
todo app을 위한 middleware를 todo app 디렉토리에
middleware.py로 아래와 같은 내용으로 추가하자.
import django_rq
from .cache_function import getKey, incrKey, addKey, setKey, deleteKey, getAllKey
from .pubsub import publish_data_on_redis


def middleware(get_response):
    #here code for intialize
    addKey("GET", 0)
    addKey("POST", 0)
    addKey("PUT", 0)
    addKey("DELETE", 0)

    def middlewareFunction(request):
        #before api hit
        queue = django_rq.get_queue("default", default_timeout=800)
        queue.enqueue(incrKey, args=(request.method, 1))
        response = get_response(request)
        #after api hit
        publish_data_on_redis(request.method, "notify")
        return response

    return middlewareFunction
-
해당 middleware를 거치면 GET, POST, PUT, DELETE 의 key값을 cache에 init 한다.
-
그리고 request.method에 따라 cache에서 key를 얻어와
value + 1를 한다. 우린 작업 que이름을 "default" 만 사용한다. (해당 부분, django_rq를 러닝할때 que이름을 넘겨줘야한다는 것을 명심해야 한다!) -
비즈니스 로직이 끝나고 response가 만들어진 뒤,
publish_data_on_redis함수를 통해 message를 publising 한다. 우리는 이 메세지를 redis server에 redis-cli를 통해 잘 만들어지는지 확인할 것이다!
- setting.py 에 conf값으로 해당 미들웨어를 추가해줘야한다.
MIDDLEWARE = [
    'django.middleware.security.SecurityMiddleware',
    ...
    # todo app custom middleware
    'todo.middleware.middleware',
]
5. API 만들기
- todoapp 디렉토리에 [ model -> serializer ] 역할을 해줄 공통 함수,
tasks.py를 아래와 같은 내용으로 추가하자.
from .models import Todo as redistodo
from .serializers import TodoSerializer


def get():
    Todo = redistodo.objects.all()
    serializer = TodoSerializer(Todo, many=True)
    return serializer.data


def add(request):
    serializer = TodoSerializer(data=request.data)
    serializer.is_valid(raise_exception=True)
    serializer.save()
    return serializer.data


def update(request, pk=None):
    updateTodo = redistodo.objects.get(id=pk)
    serializer = TodoSerializer(instance=updateTodo, data=request.data)
    serializer.is_valid(raise_exception=True)
    serializer.save()
    return serializer.data


def remove(request, pk=None):
    Todo = redistodo.objects.get(id=pk)
    Todo.delete()
return "deleted"- 그리고 todo app view.py에 위 tasks.py를 활용해서 API를 만들자.
from rest_framework.response import Response
from .task import get, remove, add, update
from .cache_function import getAllKey, getKey
from django.conf import settings
from django.core.cache.backends.base import DEFAULT_TIMEOUT

# Create your views here.
from django.http import HttpResponse
from rest_framework import viewsets, status


class TodoViewSet(viewsets.ViewSet):
    def get(self, request):
        data = get()
        return Response(data)

    def add(self, request):
        data = add(request)
        return Response(data)

    def update(self, request, pk=None):
        data = update(request, pk)
        return Response(data)

    def remove(self, request, pk=None):
        data = remove(request, pk)
        return Response(data)

    def getCache(self, request, key="*"):
        return Response(getAllKey(key))

    def getKey(self, request, key="*"):
return Response(getKey(key))- 그리고 todoapp에
url.py를 만들어 아래 라우팅 세팅을 추가하자.
from django.urls import path

from .views import TodoViewSet

urlpatterns = [
    path("todo", TodoViewSet.as_view({"get": "get", "post": "add"})),
    path("todoAllCache/<str:key>", TodoViewSet.as_view({"get": "getCache"})),
    path("getKey/<str:key>", TodoViewSet.as_view({"get": "getKey"})),
    path("todo/<str:pk>", TodoViewSet.as_view({"put": "update", "delete": "remove"})),
]-
rest_framework의ViewSet을 활용한 API의 경우 kwargs로 http request method에 대한 값을 넘겨줄 수 있다. (내부에서 선언할 수 도 있다.) -
추가로 위 세팅과 다르게 api unit test를 위해서 "api name 값" 을 넘겨주는게 좋다.
-
위 todo app의
url.py를 root configurl.py에 아래와 같이 추가해주자.
from django.contrib import admin
from django.urls import path, include

urlpatterns = [
    path('admin/', admin.site.urls),
    path("", include("todo.url")),
    path("django-rq/", include("django_rq.urls"))
]
Project Run
서버 러닝에 필요한 것
-
우리는 django / db / redis 를 기본적으로 사용하고 있다. docker-compose에서 redis와 db 자체는 돌리고 있다.
-
django project만 run하면 된다. 하지만 "django-rq" 를 사용해 pub/sub worker를 실행시킬 필요가 있다. 그래서
django app / rqworker두 가지 프로세스를 러닝할 필요가 있다.
Redis-rq run & redis cli & django runserver
python manage.py rqworker default로 러닝하자.
>> python manage.py rqworker default
>> 10:48:38 Worker rq:worker:d5d10bd3082744d69893962693fba5c6: started, version 1.11.1
>> 10:48:38 Subscribing to channel rq:pubsub:d5d10bd3082744d69893962693fba5c6
>> 10:48:38 *** Listening on default...- 그런다음 redis server와 comute를 잘 하는지 체크하기 위해 redis server에 붙는다. docker redis container의 id를 체크하고 "shell" 로 붙자.
redis:alpine는 bash가 없다 ㅎ
docker exec -it c10d116df995 /bin/sh
>> redis-cli
127.0.0.1:6379 >> psubscribe notify
Reading messages... (press Ctrl-C to quit)
1) "psubscribe"
2) "notify"
3) (integer) 1
- 이제 django app을 run 해보자.
python manage.py runserver
Cache & messgae & API TEST
API request
- 위에서 6개의 API를 만들었다. 위에서 만든 미들웨어의 동작 을 떠올리면서 API request를 때려보자! 쉽게 curl로 때려보자!
GET: get all todo model
curl --request GET \
--url http://localhost:8000/todo-
최초로 때리면 당연히 todo model은 비워져있어서 response는 0이다. 하지만 우리가 위에서 실행시켜둔 shell들의 log를 살펴보자
-
default que로 러닝중인 rqworker 는 아래와 같은 로그가 찍혀있을 것이다.
>> 11:01:50 default: todo.cache_function.incrKey('GET', 1) (5454f870-6200-40f4-92b2-2b5b4da5b66d)
>> 11:01:50 default: Job OK (5454f870-6200-40f4-92b2-2b5b4da5b66d)
>> 11:01:50 Result is kept for 500 seconds
>> 11:01:50 Cleaning registries for queue: default- redis-cli로 붙은 redis는 발행된 "notify"의 값을 가져왔다. request method가 찍힌다.
1) "pmessage"
2) "notify"
3) "notify"
4) "\"GET\""
POST: create a todo model
- 차례로 crul, rqworker, redis 이다.
curl --request POST \
  --url http://localhost:8000/todo \
  --header 'Content-Type: application/json' \
  --data '{
	"work": "todo create test",
	"done": false
}'
---
>> 11:07:21 default: todo.cache_function.incrKey('POST', 1) (a8fcf7a4->> 3b2c-4fc4-968e-83f804d81482)
>> 11:07:21 default: Job OK (a8fcf7a4-3b2c-4fc4-968e-83f804d81482)
>> 11:07:21 Result is kept for 500 seconds
---
1) "pmessage"
2) "notify"
3) "notify"
4) "\"POST\""
django cache 값 확인
python manage.py shell로 django shell에 붙어 cache값을 직접확인해 보자. 위 api를 여러번 때려보고 확인하는게 좋다 :)
>>> from django.core.cache import cache
>>> cache.keys('*')
['POST', 'DELETE', 'PUT', 'GET']
>>> cache.get("POST")
10
>>> cache.get("GET")
25
Recap
requset - response data flow
-
request는 middleware를 거치면서 GET, POST, PUT, DELETE key를 init 시킨다.
-
그리고 django_rq 에서 "default" 라는 message que를 가져온다.
i. 해당 messsage que는
python manage.py rqworker default커멘드를 통해 러닝하고 있다.ii. 우린 "Scheduling task with Redis queue" 의 한 예시를 본 것이다. 이런식으로 que에 worker를 붙여서 특정 작업을 비즈니스로직과 무관하게, 비동기적으로 수행 할 수 있다. 필수적으로 celery와 같은 third-party worker를 사용할 필요는 없다.
-
그리고 우리가 만든
incrKey라는 fucntion을 worker - que에enqueue한다. 그러면 job에 대한 uuid가 만들어지고 비동기적으로 수행이 된다.i. 여기서 중요한 것은 request - response 비즈니스로직과 무관하게 비동기적으로 이뤄진다는 것이다. 해당 작업은 django.cache에서 request method에 해당하는 key를 찾아 +1 를 해주는 것이다.
ii. worker에게 수행할 job에 대한 args를 넘겨주는 것도 잊으면 안된다.
-
위 request 단계와 무관하게 response가 되는 과정에서는 redis에게 "notify" 라는 카테고리에 (kafka의 topic생각)
request.method값을 (json data로 취급) publishing 한다.i. 역시 response가 client와 전달되는 것과 무관하게 "비동기적으로" 수행된다.
ii. 지금은 publishing만 있지만, 완전 이기종 시스템에서 해당 메시지를 계속해서 구독하고 있다가 (sub - notify) 발행되는 순간에 전혀다른 작업을 또 할 수 있다. 이런 컨셉이 pub/sub의 기본 형태이며 msa로 이벤트를 제어할 수 있는 초석이다.
iii. 예를 들자면 client 에게 push noti 할 수 있는 것이다.
subscribe 추가하기
-
redis docker에 shell 붙어서 (exec) redis-cli를 보기엔 불편하다. 실제 엔터프라이즈에서는 이기종 시스템에서 어떻게 핸들링을 하느냐! 를 보여주면 좋겠지만, 3th party app을 추가하긴 너무 heavy해서
django custom cli를 추가해보자. -
todo app에
management > commands디렉토리를 추가해주자. django custom cli를 따로 다룰 예정이지만, custom command를 만들기 위해서는 이런 디렉토리를 무조건 유지해야 하며,file name이command line name이 된다. -
즉
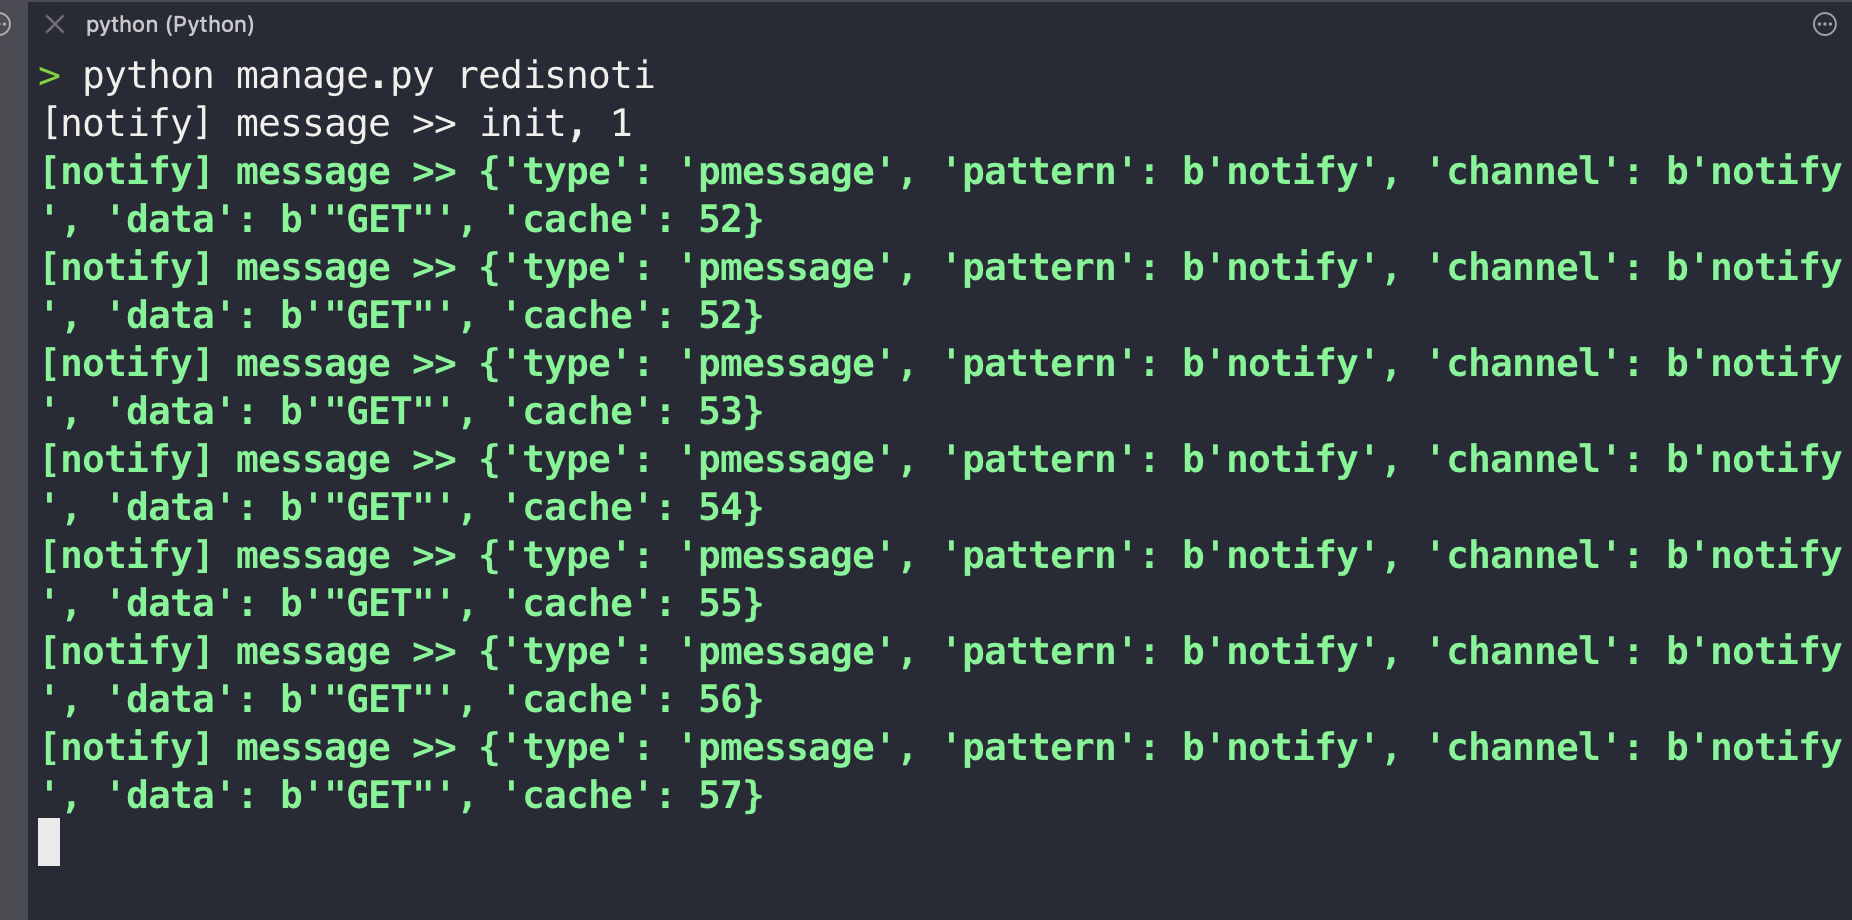
management > commands > redisnoti.py를 만들었고, 실제 사용할 땐python manage.py redisnoti를 쳐야한다.
import json
import redis
from django.core.cache import cache
from django.core.management.base import BaseCommand

class Command(BaseCommand):
    def handle(self, *args, **options):
        r = redis.StrictRedis(host='localhost', port=6379, db=1)
        p = r.pubsub()
        p.psubscribe("notify")
        for message in p.listen():
            if message:
                if isinstance(message.get("data"), int):
                    self.stdout.write(f"[notify] message >> init, {message.get('data')}")
                    continue

                request_method = json.loads(message.get("data").decode('utf-8'))
                message["cache"] = cache.get(request_method)
self.stdout.write(self.style.SUCCESS(f"[notify] message >> {message}"))-
from django.core.management.base import BaseCommand를 상속받는 class에def handle함수에 우리가 사용할 로직을 넣어주면 custom command는 쉽게만들 수 있다. 추가로 print 등의 shell output을 만드려면self.stdout.write을 쓰는 것이 낫다. -
redis object를 만들어서 "notify" 를 계속해서 read 할 것이다. 위와 같은 행위는 사실 무한 loop와 동일 하다. 정확한 것은
p.listen()이터레이팅을 살펴보면 좋다. -
그렇게 읽어온 메시지가 존재한다면, 우선 가장 처음 받는 data는 ping같은 int값이 넘어온다. 그래서
if isinstance조건절이 하나 더 있고, 그 아래가 실제 우리가 하려는 행위다. -
우리가 publishing 할 땐 data를
json.dumps떳다. 그리고 메시지큐에서 가져올 땐 byte가 되어json.loads를 해줘야 한다. 그리고 실제 cache에 저장되는 값을 읽어오려고 한다.from django.core.cache import cache의cache.get을 통해 캐시값을 계속 읽어오는 로직이다.
- 마지막으로 "djrtodoprj" 프로젝트 디렉토리 구조는 아래와 같아진다.
.
├── djrtodoprj
│   ├── __init__.py
│   ├── asgi.py
│   ├── settings.py
│   ├── urls.py
│   └── wsgi.py
├── manage.py
└── todo
    ├── __init__.py
    ├── admin.py
    ├── apps.py
    ├── cache_function.py
    ├── management
    │   └── commands
    │       └── redisnoti.py
    ├── middleware.py
    ├── migrations
    ├── models.py
    ├── pubsub.py
    ├── serializers.py
    ├── task.py
    ├── tests.py
    ├── url.py
    └── views.py
출처
- https://github.com/rq/django-rq
- https://enlear.academy/hands-on-with-redis-and-django-ed7df9104343
- https://stackabuse.com/working-with-redis-in-python-with-django/
- project init, boilerplate 느낌이라 github에는 세팅하지 않았습니다. 혹시나 전체 프로젝트 zip 파일이 필요하신 경우 메일로 요청 주세요 :)

7개의 댓글

궁금한게 있어 질문 드려봅니다.
django_rq를 사용해서 queue 작업을 하시는게 따로 있고, 직접 redis 연결을 통해 sub/pub 작업을 하시는게 있는데 redis pub/sub을 구현하는 두 가지 방법을 보여주기 위해서 인지
아니면 따로 목적이 있어서 인지가 궁금합니다.
django_rq의 구현 코드에서 queue에 넣는 항목은 있는데 get이 없더군요.
rqworker 코드 구현 없이 get을 하는게 이해가 잘 안가서요.
공식 문서를 이해 하는게 우선이 맞지만, github에 방문하니 이해가 어려워 질문을 먼저 드려보았습니다.
그리고 혹시 구현된 코드를 메일로 받아볼 수 있을까요?
감사합니다.
감사합니다:)