JPA 자바 표준 ORM(Object Relational Mapping)
관계형 데이터베이스가 SQL만 인식할 수 있으니 각 테이블마다 기본적인 CRUD를 매번 생성해야 한다.
패러다임 불일치
- 관계형 데이터베이스 : 어떻게 데이터를 저장할지에 초점
- 객체지향 프로그래밍 언어 : 메시지를 기반으로 기능과 속성을 한 것에서 관리하는 기술
이 둘의 패러다임이 다른데 객체를 데이터베이스에 저장하려고 하니 여러 문제가 발생하는데 이를패러다임 불일치라고 한다.
상속, 1:N 등 다양한 객체 모델링을 데이터베이스로는 구현할 수 없으니 웹 애플리케이션 개발이 데이터베이스 모델링에만 집중하는 문제가 발생하여 이를 해결하기 위해 JPA가 등장했다.
- 객체지향 프로그래밍 언어와 관계형 데이터베이스를 중간에서 패러다임 일치를 시켜주기 위한 기술
- 개발자 : 객체지향적으로 프로그래밍
- JPA : 이를 관계형 데이터베이스에 맞게 SQL을 대신 생성해서 실행
Sping Data JPA
JPA를 사용하기 위해서 구현체가 필요한데 Hibernate, Eclipse Link 등이 있다.
- JPA <- Hibernate <- Spring Data JPA
사용 이유
- 구현체 교체의 용이성 (Hibernate 외에 다른 구현체로 쉽게 교체)
- 저장소 교체의 용이성 (관계형 데이터베이스 외에 다른 저장소로 쉽게 교체)
JPA 사용의 장점
- CRUD 쿼리를 직접 작성할 필요가 없다.
- 부모 - 자식 관계 표현, 1:N 관계 표현, 상태와 행위를 한 곳에서 관리하는 것과 같은 객체지향 프로그래밍을 쉽게 할 수 있다.
프로젝트에 Spring Data Jpa 적용
implementation 'org.springframework.boot:spring-boot-starter-jpa'
implementation 'com.h2database:h2'
build.gradle 의 dependencies 에 추가한다.
spring-boot-starter-data-jpa
- 스프링 부트용 Spring Data Jpa 추상화 라이브러리
- 스프링 부트 버전에 맞춰 자동으로 JPA관련 라이브러리들의 버전을 관리해준다.
h2
- 인메모리 관계형 데이터베이스
- 별도의 설치가 필요없이 프로젝트 의존성만으로 관리가능
- 메모리에서 실행되기 때문에 애플리케이션을 재시작할 때마다 초기화된다는 점을 이용하여 테스트 용도로 많이 사용
- 이 책에서 JPA 테스트, 로컬 환경에서의 구동에서 사용
도메인 : 게시글, 댓글, 회원, 정산, 결제 등 소프트웨어에 대한 요구사항 혹은 문제 영역
Post 엔티티
package com.springboot.book.springbootwebservice.domain.posts;

import lombok.Builder;
import lombok.Getter;
import lombok.NoArgsConstructor;

import jakarta.persistence.Column;
import jakarta.persistence.Entity;
import jakarta.persistence.GeneratedValue;
import jakarta.persistence.GenerationType;
import jakarta.persistence.Id;

@Getter
@NoArgsConstructor
@Entity
public class Posts {

  @Id
  @GeneratedValue(strategy = GenerationType.IDENTITY)
  private Long id;

  @Column(length = 500, nullable = false)
  private String title;

  @Column(columnDefinition = "TEXT", nullable = false)
  private String content;

  private String author;

  @Builder
  public Posts(String title, String content, String author) {
    this.title = title;
    this.content = content;
    this.author = author;
  }

  public void update(String title, String content) {
    this.title = title;
    this.content = content;
  }
}
@Entity
- 테이블과 링크될 클래스임을 나타낸다.
- 기본값으로 클래스의 카멜케이스 이름을 언더스코어 네이밍(_)으로 테이블 이름을 매칭한다.
- ex) SalesManager.java -> sales_manager table
@Id
- 해당 테이블의 PK 필드를 나타낸다.
@GeneratedValue
- PK의 생성규칙을 나타낸다.
- 스프링부트 2.0 에서는 GenerationType.IDENTITY 옵션을 추가해야만 auto_increment 가 된다.
@Column
- 테이블의 칼럼을 나타내며 굳이 선언하지 않더라도 해당 클래스의 필드는 모두 칼럼이 된다.
- 사용하는 이유는 기본값 외에 추가로 변경이 필요한 옵션이 있으면 사용한다.
- 문자열의 경우 VARCHAR(255)가 기본값인데 사이즈를 500으로 늘리고 싶거나 타입을 TEXT로 변경하고 싶은 그런 경우에 사용한다.
책에서는 Entity 의 PK로 Long 타입의 Auto_increment를 추천(MySQL의 경우 bigint타입이 된다.)했는데 복합키로 PK를 가질때의 난감한 상황을 근거로 추천했다.
- FK를 맺을때 다른 테이블에서 복합키 전부를 갖고 있거나 중간 테이블을 하나 더 둬야 하는 상황이 발생한다.
- 인덱스에 좋은 영향을 끼치지 못한다.
- 유니크한 조건이 변경될 경우 PK 전체를 수정해야 하는 일이 발생한다.
다만 나의 경우 PK 가 user_id 일 경우 auto_increment 로 정수를 둔다면 아무나 랜덤 값을 넣었을때 유저정보에 접근이 용이해진다는 문제점이 있어서 uuid 및 ulid 와 같이 암호화된 PK를 사용했었다. ulid 의 경우 생성시점의 time 과 같은 정보가 같이 담겨있어 sorting 하는데 용이했다.
@Getter
- 클래스 내 모든 필드의 Getter 메소드를 자동생성
@Builder
- 해당 클래스의 빌더 패턴 클래스를 생성
- 생성자 상단에 선언 시 생성자에 포함된 필드만 빌더에 포함
자바 빈 규칙을 생각하며 getter/setter 를 무작정 생성하는 경우가 있는데 이렇게 되면 해당 클래스의 인스턴스 값들이 언제 어디서 변해야 하는지 코드상으로 명확하게 구분할 수가 없어, 차후 기능 변경시 정말 복잡해질 수 있다. 그래서 Entity 클래스에서는 절대 Setter 메소드를 만들지 않는다.대신 해당 필드의 값 변경이 필요시 그 목적과 의도를 나타낼 수 있는 메소드를 추가해야 한다.
// 잘못된 사용 예시
public class Order {
	public void setStatus(boolean status) {
    	this.status = status
    }
}
public void 주문서비스의_취소이벤트() {
	order.setStatus(false);
}
// 올바른 사용 예시
public class Order {
	public void cancelOrder() {
    	this.status = false;
    }
}
public void 주문서비스의_취소이벤트() {
	order.cancelOrder();
}
setter가 없으니 기본적으로 생성자를 통해 최종값을 채운 후 DB 에 삽입하며 값 변경이 필요시 해당 이벤트에 맞는 public 메소드를 호출하여 변경하는 것을 전제로 한다.
@Builder 사용 이유
생성자나 Builder 나 생성 시점에 값을 채워주는 역할은 똑같으나 생성자의 경우 지금 채워야 할 필드가 무엇인지 명확히 지정할 수 없다.
예시
// 생성자
public Example(String a, String b) {
	this.a = a;
    this.b = b;
}
new Example(b, a) // b, a 의 위치를 바꿔도 코드를 실행하기 전까지 문제를 찾을 수 없다.
// @Builder
Example.builder()
	.a(a)
    .b(b)
    .build();
// 어떤 필드에 어떤 값을 채워야 할지 명확히 인지할 수 있다.
Repository 생성
package com.springboot.book.springbootwebservice.domain.posts;

import org.springframework.data.jpa.repository.JpaRepository;
import org.springframework.data.jpa.repository.Query;

import java.util.List;

public interface PostsRepository extends JpaRepository<Posts, Long> {

  @Query("SELECT p FROM Posts p ORDER BY p.id DESC")
  List<Posts> findAllDesc();


}
JPA에서 Repository 라고 부르며 인터페이스로 생성한다. 인터페이스 생성후 JpaRepository<Entity 클래스, PK 타입> 을 상속히 기본적인 CRUD 메소드가 자동으로 생성된다.
- @Repository를 추가할 필요 없다. 단, Entity 클래스와 Entity Repository 는 함께 위치해야 한다.
PostRepositoryTest
package com.springboot.book.springbootwebservice.domain.posts;

import org.junit.jupiter.api.AfterEach;
import org.junit.jupiter.api.Test;
import org.junit.jupiter.api.extension.ExtendWith;
import org.springframework.beans.factory.annotation.Autowired;
import org.springframework.boot.test.context.SpringBootTest;
import org.springframework.test.context.junit.jupiter.SpringExtension;

import java.time.LocalDateTime;
import java.util.List;

import static org.assertj.core.api.Assertions.assertThat;

@ExtendWith(SpringExtension.class)
@SpringBootTest
public class PostsRepositoryTest {

  @Autowired
  PostsRepository postsRepository;

  @AfterEach
  public void cleanup() {
    postsRepository.deleteAll();
  }

  @Test
  public void 게시글저장_불러오기() {
    //given
    String title = "테스트 게시글";
    String content = "테스트 본문";

    postsRepository.save(Posts.builder()
        .title(title)
        .content(content)
        .author("jojoldu@gmail.com")
        .build());

    //when
    List<Posts> postsList = postsRepository.findAll();

    //then
    Posts posts = postsList.get(0);
    assertThat(posts.getTitle()).isEqualTo(title);
    assertThat(posts.getContent()).isEqualTo(content);
  }

}
@AfterEach
- 단위 테스트가 끝날 때마다 수행되는 메소드 지정
- 보통 배포 전 전체 테스트를 수행시 테스트간 데이터 침범을 막기 위해 사용
- 여러 테스트가 동시에 수행시 테스트용 데이터베이스인 h2에 데이터가 그대로 남아 있어 다음 테스트 실행 시 테스트가 실패할 수 있다.
postsRepository.save
- 테이블 post 에 insert/update 쿼리를 수행한다.
- id 값이 있다면 update가, 없다면 insert 쿼리를 실행한다.
postsRepository.findAll
- 테이블 posts에 있는 모든 데이터를 조회해오는 메소드이다.
@SpringBootTest
- h2 데이터베이스를 자동으로 실행한다.
결과

실행된 쿼리 로그로 확인하기
main - resources - application.properties
spring.jpa.show-sql=true테스트 다시 진행시 쿼리 로그가 찍힌다.
출력되는 쿼리 로그를 MySQL 버전으로 변경하려면
application.properties 를 다음과 같이 수정spring.jpa.show-sql=true spring.jpa.properties.hibernate.dialect=org.hibernate.dialect.MySQL57Dialect spring.jpa.properties.hibernate.dialect.storage_engine=innodb spring.datasource.hikari.jdbc-url=jdbc:h2:mem:testdb;MODE=MYSQL spring.datasource.hikari.username=sa결과

등록/수정/조회 API 만들기
API 생성시 필요한 클래스
1. Request 데이터 받을 Dto
2. API 요청을 받을 Controller
3. 트랜잭션, 도메인 기능 간의 순서를 보장하는 Service
Service 에서 비즈니스 로직을 처리해야 한다는 것은 오해이다. Service 는 트랜잭션, 도메인 간 순서 보장의 역할만 한다.
- Web Layer
흔히 사용하는 컨트롤러(@Controller)와 JSPFreemarker 등의 뷰 템플릿 영역
- 이외에도 필터 (@Filter), 인터셉터, 컨트롤러 어드바이스 (@ControllerAdvice) 등 외부 요청과 응답에 대한 전반적인 영역을 이야기한다.
- Service Layer
- @Service에 사용되는 서비스 영역
- 일반적으로 Controller와 Dao의 중간 영역에서 사용
- @Transactional이 사용되어야 하는 영역
- Repository Layer
- Database와 같이 데이터 저장소에 접근하는 영역
- DAO(Data Access Object)
- Dtos
- Dto(Data Transfer Object)는 계층 간에 데이터 교환을 위한 객체를 이야기하며 Dtos는 이들의 영역을 이야기한다.
- 예를들어 뷰 템플릿 엔진에서 사용될 객체나 Repository Layer 에서 결과로 넘겨준 객체 등이 이들을 이야기한다.
- Domain Model
- 도메인이라 불리는 개발 대상을 모든 사람이 동일한 관점에서 이해할 수 있고 공유할 수 있도록 단순화시킨것
- 이를테면 택시 앱이라고 하면 배차, 요금 등이 모두 도메인이 될 수 있다.
- @Entity 가 사용된 영역 역시 도메인 모델이라고 이해할 수 있다.
- 단, 무조건 데이터베이스의 테이블과 관계가 있어야만 하는 것은 아니다.
- VO처럼 값 객체들도 이 영역에 해당한다.

Web, Service, Repository, Dto, Domain 5가지 레이어중 비즈니스 처리를 담당하는 곳은 Domain이다.
스프링에서 Bean을 주입받는 방식
- @Autowired (권장하지 않는다.)
- setter
- 생성자
이중 생성자로 주입받는 방식이 가장 권장된다.
이때 생성자는 @RequiredArgsConstructor에서 생성자를 생성해준다.
PostsApiController
package com.springboot.book.springbootwebservice.web;

import com.springboot.book.springbootwebservice.service.posts.PostsService;
import com.springboot.book.springbootwebservice.web.dto.PostsSaveRequestDto;
import lombok.RequiredArgsConstructor;
import org.springframework.web.bind.annotation.DeleteMapping;
import org.springframework.web.bind.annotation.GetMapping;
import org.springframework.web.bind.annotation.PathVariable;
import org.springframework.web.bind.annotation.PostMapping;
import org.springframework.web.bind.annotation.PutMapping;
import org.springframework.web.bind.annotation.RequestBody;
import org.springframework.web.bind.annotation.RestController;

import java.util.List;

@RequiredArgsConstructor
@RestController
public class PostsApiController {

  private final PostsService postsService;

  @PostMapping("/api/v1/posts")
  public Long save(@RequestBody PostsSaveRequestDto requestDto) {
    return postsService.save(requestDto);
  }
}
PostsSaveRequestDto
package com.springboot.book.springbootwebservice.web.dto;


import com.springboot.book.springbootwebservice.domain.posts.Posts;
import lombok.Builder;
import lombok.Getter;
import lombok.NoArgsConstructor;

@Getter
@NoArgsConstructor
public class PostsSaveRequestDto {
  private String title;
  private String content;
  private String author;

  @Builder
  public PostsSaveRequestDto(String title, String content, String author) {
    this.title = title;
    this.content = content;
    this.author = author;
  }

  public Posts toEntity() {
    return Posts.builder()
        .title(title)
        .content(content)
        .author(author)
        .build();
  }

}
주의사항
Entity 클래스와 거의 유사한 형태임에도 Dto 클래스를 추가로 생성했는데 그 이유는 Entity 클래스를 절대로 Request/Response 클래스로 사용해서는 안되기 때문이다.
Entity 클래스는 데이터베이스와 맞닿은 핵심 클래스이다.
즉, Entity 클래스가 변경되면 여러 클래스에 영향을 끼치나 Request, Resposne용 Dto 는 View를 위한 클래스라 정말 자주 변경이 필요하다.
View Layer와 DB Layer 의 역할 분리를 철저하게 하는 게 좋다.
따라서 Entity 클래스와 Controller에서 쓸 Dto는 분리해서 사용해야 한다.
PostApiControllerTest
package com.springboot.book.springbootwebservice.web;

import com.springboot.book.springbootwebservice.domain.posts.Posts;
import com.springboot.book.springbootwebservice.domain.posts.PostsRepository;
import com.springboot.book.springbootwebservice.web.dto.PostsSaveRequestDto;

import org.junit.jupiter.api.AfterEach;
import org.junit.jupiter.api.Test;
import org.junit.jupiter.api.extension.ExtendWith;
import org.springframework.beans.factory.annotation.Autowired;
import org.springframework.boot.test.context.SpringBootTest;
import org.springframework.boot.test.web.client.TestRestTemplate;
import org.springframework.boot.test.web.server.LocalServerPort;
import org.springframework.http.HttpStatus;
import org.springframework.http.ResponseEntity;
import org.springframework.test.context.junit.jupiter.SpringExtension;

import java.util.List;

import static org.assertj.core.api.Assertions.assertThat;

@ExtendWith(SpringExtension.class)
@SpringBootTest(webEnvironment = SpringBootTest.WebEnvironment.RANDOM_PORT)
public class PostsApiControllerTest {

  @LocalServerPort
  private int port;

  @Autowired
  private TestRestTemplate restTemplate;

  @Autowired
  private PostsRepository postsRepository;

  @AfterEach
  public void tearDown() throws Exception {
    postsRepository.deleteAll();
  }

  @Test
  public void Posts_등록된다() throws Exception {
    //given
    String title = "title";
    String content = "content";
    PostsSaveRequestDto requestDto = PostsSaveRequestDto.builder()
        .title(title)
        .content(content)
        .author("author")
        .build();

    String url = "http://localhost:" + port + "/api/v1/posts";

    //when
    ResponseEntity<Long> responseEntity = restTemplate.postForEntity(url, requestDto, Long.class);

    //then
    assertThat(responseEntity.getStatusCode()).isEqualTo(HttpStatus.OK);
    assertThat(responseEntity.getBody()).isGreaterThan(0L);

    List<Posts> all = postsRepository.findAll();
    assertThat(all.get(0).getTitle()).isEqualTo(title);
    assertThat(all.get(0).getContent()).isEqualTo(content);
  }
}
HelloController 와 달리 @WebMvcTest를 사용하지 않은 이유는 @WebMvcTest의 경우 JPA 기능이 작동하지 않기 때문이다.
Controller와 ControllerAdvice 등 외부 연동과 관련된 부분만 활성화되니 JPA 기능까지 테스트시엔 @SpringBootTest 와 TestRestTemplate을 같이 사용한다.
수정 API
@Transactional
  public Long update(Long id, PostsUpdateRequestDto requestDto) {
    Posts posts = postsRepository.findById(id)
        .orElseThrow(() -> new IllegalArgumentException("해당 사용자가 없습니다. id=" + id));

    posts.update(requestDto.getTitle(), requestDto.getContent());

    return id;
  }
update 를 보면 데이터베이스에 쿼리를 날리는 부분이 없다. 이는 JPA의 영속성 컨텍스트때문이다.
영속성 컨텍스트 : 엔티티를 영구 저장하는 환경
JPA 의 엔티티 매니저가 활성화된 상태로 트랜잭션 안에서 데이터베이스에서 데이터를 가져오면 이 데이터는 영속성 컨텍스트가 유지된 상태이다.
이 상태에서 해당 엔티티의 값을 변경하면 트랜잭션이 끝나는 시점에 해당 테이블에서 변경분을 반영한다. 따라서 Update 쿼리를 날릴 필요가 없다. 이를더티 체킹이라고 부른다
PostsApiControllerTest
@Test
  public void Posts_수정된다() throws Exception {
    //given
    Posts savedPosts = postsRepository.save(Posts.builder()
        .title("title")
        .content("content")
        .author("author")
        .build());

    Long updateId = savedPosts.getId();
    String expectedTitle = "title2";
    String expectedContent = "content2";

    PostsUpdateRequestDto requestDto = PostsUpdateRequestDto.builder()
        .title(expectedTitle)
        .content(expectedContent)
        .build();

    String url = "http://localhost:" + port + "/api/v1/posts/" + updateId;

    HttpEntity<PostsUpdateRequestDto> requestEntity = new HttpEntity<>(requestDto);

    //when
    ResponseEntity<Long> responseEntity = restTemplate.exchange(url, HttpMethod.PUT, requestEntity, Long.class);

    //then
    assertThat(responseEntity.getStatusCode()).isEqualTo(HttpStatus.OK);
    assertThat(responseEntity.getBody()).isGreaterThan(0L);

    List<Posts> all = postsRepository.findAll();
    assertThat(all.get(0).getTitle()).isEqualTo(expectedTitle);
    assertThat(all.get(0).getContent()).isEqualTo(expectedContent);
  }
h2 에 직접 접근하기 위해 웹 콘솔 사용하기
application.properties 에 다음의 줄을 추가

main 인 Application 실행후 localshot:8080/h2-console, JDBC URL 이 다음과 같게 수정후 connect
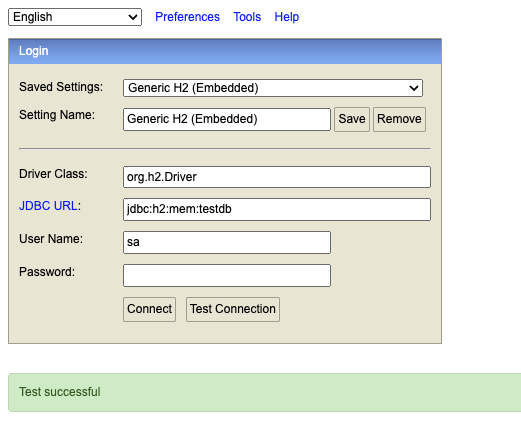
h2 관리페이지, 좌측을 보면 POSTS 테이블이 정상적으로 생성되어 있다.

아무 데이터가 없으니 아무거나 insert

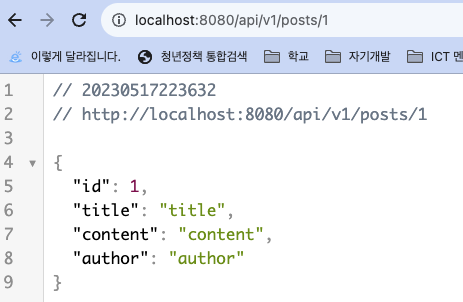
생성해두었던 조회 API 실행
JPA Auditing 으로 생성시간/수정시간 자동화
- LocalDate, LocalDateTime 사용
package com.springboot.book.springbootwebservice.domain;

import lombok.Getter;
import org.springframework.data.annotation.CreatedDate;
import org.springframework.data.annotation.LastModifiedDate;
import org.springframework.data.jpa.domain.support.AuditingEntityListener;

import jakarta.persistence.EntityListeners;
import jakarta.persistence.MappedSuperclass;
import java.time.LocalDateTime;

@Getter
@MappedSuperclass
@EntityListeners(AuditingEntityListener.class)
public abstract class BaseTimeEntity {

  @CreatedDate
  private LocalDateTime createdDate;

  @LastModifiedDate
  private LocalDateTime modifiedDate;

}
BaseEntity 클래스는 모든 Entity의 상위 클래스가 되어 Entity들의 createdDate, modifiedDate를 자동으로 관리하는 역할이다.
@MappedSuperclass
- JPA Entity 클래스들이 BaseTimeEntity를 상속할 경우 필드들(createdDate, modifiedDate)도 칼럼으로 인식하도록 한다.
@EntityListeners(AuditingEntityListenr.class)
- BaseTimeEntity 클래스에 Auditing 기능을 포함시킨다.
@CreatedDate
- Entity가 생성되어 저장될 때 시간이 자동 저장된다.
@LastModifiedDate
- 조회한 Entity의 값을 변경할 때 시간이 자동 저장된다.
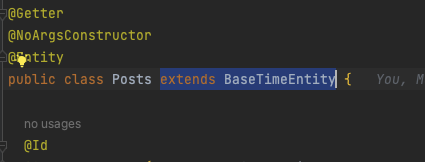
Posts 는 BaseTimeEntity를 상속받으니 생성, 수정시간이 자동 저장된다.
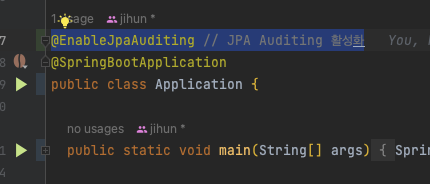
가장 상위인 Application 클래스에 @EnableJpaAuditing 어노테이션을 붙였으니 JPA Auditing 을 활성화한 것이다.
BaseTimeEntity 테스트 코드
  @Test
  public void BaseTimeEntity_등록() {
    //given
    LocalDateTime now = LocalDateTime.of(2019, 6, 4, 0, 0, 0);
    postsRepository.save(Posts.builder()
        .title("title")
        .content("content")
        .author("author")
        .build());
    //when
    List<Posts> postsList = postsRepository.findAll();

    //then
    Posts posts = postsList.get(0);

    System.out.println(">>>>>>>>> createDate=" + posts.getCreatedDate() + ", modifiedDate=" + posts.getModifiedDate());

    assertThat(posts.getCreatedDate()).isAfter(now);
    assertThat(posts.getModifiedDate()).isAfter(now);
  }