
Socket.IO 시작하기
Socket.IO는 클라이언트와 서버 사이에 낮은 대기시간, 양방향, 이벤트 기반 통신을 가능하게 해주는 라이브러리다.

Socket.IO 는 WebSocket 프로토콜을 기반으로 하여 만들어졌고 HTTP long-polling 이나 자동 재접속 과 같은 fallback 기능을 추가로 보장한다.
용어
-
polling: HTTP 는 요청 - 응답이후 연결이 종료되는 비연결성의 특징을 지녀서 언제 이벤트가 발생하지 모르니 주기적으로 계속 요청 - 응답을 반복하는 것을 말한다. -
HTTP long-polling: polling 을 개선시킨 방법으로 한번 요청을 보내면 이벤트가 발생할 때까지 연결을 유지하다가 이벤트 발생후 응답하고 바로 요청을 보내 다음 이벤트까지 연결을 유지한다. -
fallback: 어떤 기능이 약해지거나 제대로 동작하지 않을때 이에 대처하는 기능, 동작을 말한다. -
full duplex: 데이터를 양방향으로 동시에 송수신.전화기 -
half duplex: 데이터를 양방향으로 송수신이 가능하나 한번에 하나의 전송만 가능하다.무전기 -
websocket: 서버 - 브라우저 간 채널에서full-duplex와 낮은 대기시간을 제공하는 통신 프로토콜
Socket.IO 는 대략적으로 아래와 같은 구조를 갖는다.
io.on('connection', socket => {
  socket.emit('request', /* … */); // emit an event to the socket
  io.emit('broadcast', /* … */); // emit an event to all connected sockets
  socket.on('reply', () => { /* … */ }); // listen to the event
});
express 와 함께 Socket.IO 를 사용하려 할때
// 기존 express
const app = require('express')();

app.listen(3000);
// express 와 함께 Socket.IO 사용시
const app = require('express')();
const server = require('http').createServer(app);
const io = require('socket.io')(server);
io.on('connection', () => { /* … */ });
server.listen(3000);
server를socket.io로 전달해야 하며 app 이 아닌 server 에listen을 호출해야 한다.
socket.io 가 websocket 과 정확히 어떻게 다른가?
웹소켓은 브라우저와 서버 사이의 인터액티브 통신 세션을 설정할 수 있게 해주는 고급 기술이다. 개발자는 웹 소켓 API를 통해 서버로 메시지를 보내고 서버의 응답을 위해 서버를 폴링하지 않고도 이벤트 중심 응답을 받을 수 있다.- mdn -
socket.io는 Node.js 기반의 웹소켓 양방향 통신을 가능하게 해주는 라이브러리다.
socket.io 는 크로스 브라우징 이슈에 대처할 수 있고long polling방식의 fallback 이나 ( 웹소켓을 사용하지 못할때 HTTP 의long polliing방식 사용 ) 자동 재연결 등의 추가적인 구현이 되어 있는 라이브러리 이다.
Socket.IO 는 WebSocket 의 구현이 아니다. SocketIO 는 WebSocket 을 사용하는 라이브러리긴 해도 패킷에 메타데이터를 추가했기 때문에 WebSocket client 는 Socket.IO 서버에 접속할 수 없고 그 반대도 마찬가지다.
WebSocket vs Socket.IO 비교 ⭐️
WebSocket은 양방향 소통을 위한 프로토콜이다.
- HTML 5 웹 표준 기술
- 매우 빠르게 작동하고 통신시 적은 데이터를 이용한다.
- 이벤트를 듣고 보내기만 가능하다.
- 데이터 전송이 많은 경우 빠르고 비용이 적은 WebSocket 이용이 유리하다.
Socket.IO는 양방향 통신을 하기위해 웹소켓 기술을 사용하는 라이브러리이다.
- 표준 기술이 아닌 라이브러리이다.
- 연결 실패시 fallback 을 통해 HTTP long polling 방식으로 클라이언트와 연결을 시도한다.
- room 개념을 이용해서 일부 클라이언트에게만 데이터를 전송하는 broadcasting 이 가능하다.
- 서버에서 연결된 소켓을 세밀히 관리할때 용이
프로토콜 : 컴퓨터끼리 통신을 위한 약속
서버
socket.io 설치
npm i socket.io초기화
socket.io - server initialization 에서 아래와 같은 다양한 경우의 초기화 방법을 소개한다. 심지어 CommonJS, ES module (ES6), TypeScript 의 경우 각각의 초기화 코드를 알려준다.
HTTP server / HTTPS server / HTTP/2 server / Express / Koa / Nest / Fastify / µWebSockets.js
그중에 Express 를 사용하여 테스트를 진행해봤다.
const express = require("express");
const { createServer } = require("http");
const { Server } = require("socket.io");

const app = express();
const httpServer = createServer(app);
const io = new Server(httpServer, { /* options */ });

io.on("connection", (socket) => {
  // ...
});

httpServer.listen(3000);
클라이언트
socket.io 설치
따로 설치할 필요 없이 script 를 한줄 추가하면 사용할 수 있다.
초기화
Socket.IO - client Initialization
<script src="/socket.io/socket.io.js"></script>
<script>
  const socket = io();
</script>
socket 은 io()를 통해 가져온다.
io 는 전역 변수로 등록된다.
websocket 과 socket.io 코드 비교
websocket
| server | client |
|---|---|
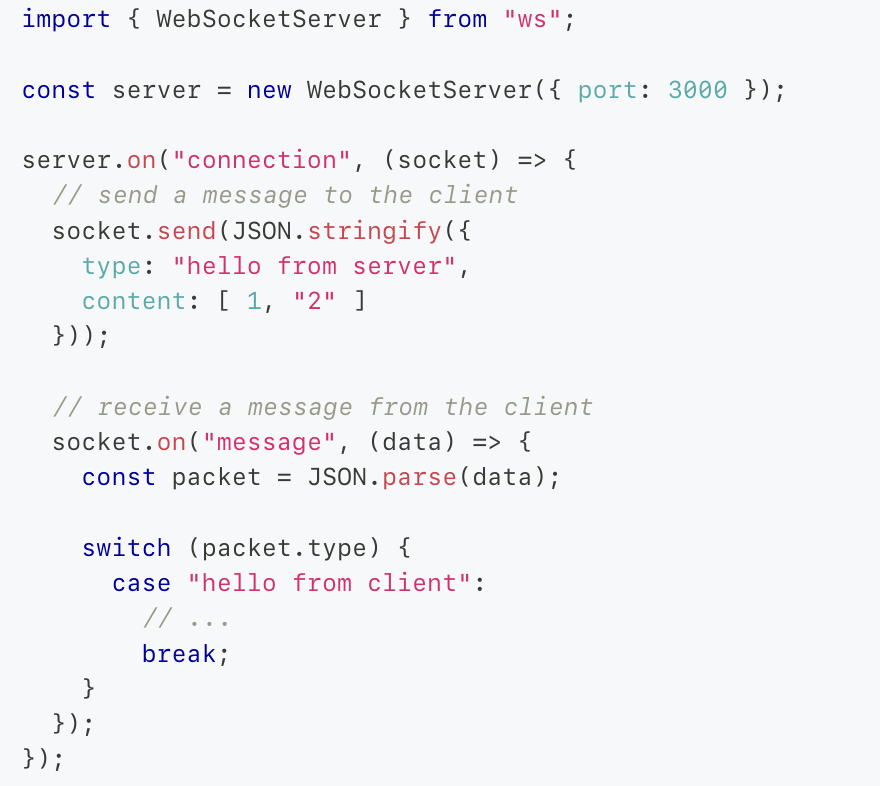 | 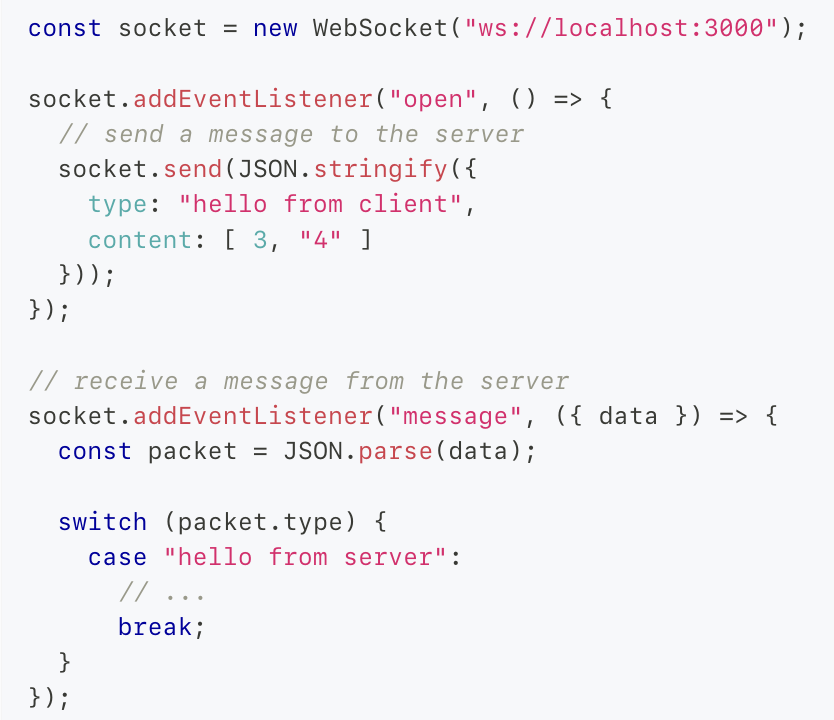 |
socket.io
| server | client |
|---|---|
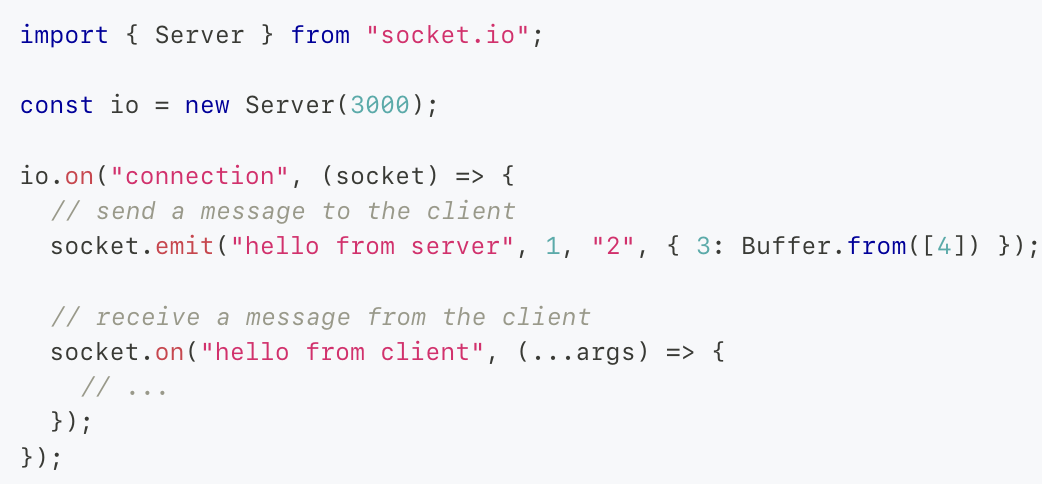 | 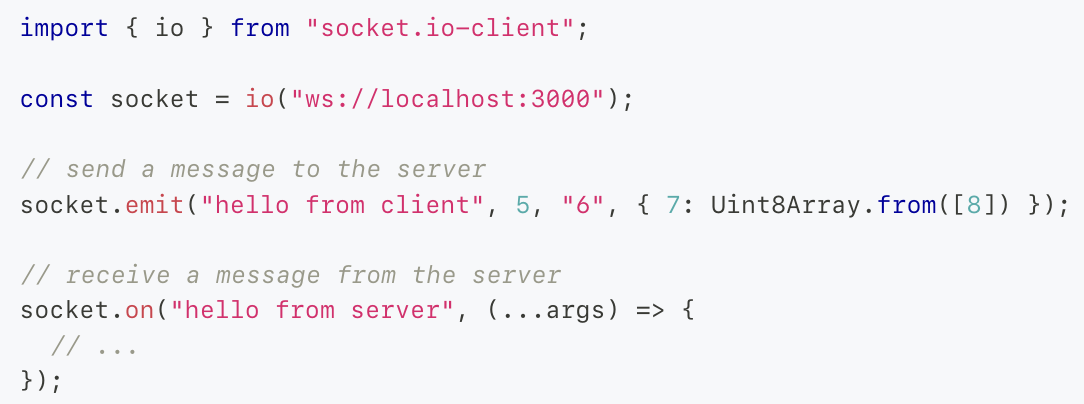 ejs 대신 Node.js 로 클라이언트를 실행하는 경우 npm install socket.io-client |
Socket.IO 기능들
HTTP long-polling fallback
Socket.IO 서버의 연결이 끊기면 fallback 으로 HTTP 의 long-polling 기능을 제공한다.
자동 재연결
WebSocket 연결은 특정 조건하에 서버와 클라이언트간의 연결이 링크가 끊어짐으로 인해 방해받을 수 있다. 이는 Socket.IO 가 heartbeat mechanism 을 도입한 이유이다.
heartbeat mechanism: 주기적으로 연결상태를 확인하는 것
만약 클라이언트가 결국 연결이 끊어지면 서버에 부담을 주지 않기 위해 back-off 지연을 이용하여 자동으로 재연결한다.
packet buffering
클라이언트 연결이 끊어지면 자동적으로 버퍼링되고 다시 연결되면 전송된다.
- socket 인스턴스의 connected 속성을 사용하는 경우
if (socket.connected) {
  socket.emit( /* ... */ );
} else {
  // ...
}- volatile event 를 이용하는 경우
socket.volatile.emit( /* ... */ );
volatile event휘발성 이벤트는 연결이 준비되지 않을때 전송되지 않는 이벤트를 말한다.
socket.volatile.emit("hello", "might or might not be received");Acknowledgements
// sender
socket.emit("hello", "world", (response) => {
  console.log(response); // "got it"
});

// receiver
socket.on("hello", (arg, callback) => {
  console.log(arg); // "world"
  callback("got it");
});

// or use timeout
socket.timeout(5000).emit("hello", "world", (err, response) => {
  if (err) {
    // the other side did not acknowledge the event in the given delay
  } else {
    console.log(response); // "got it"
  }
});
Broadcasting
- 서버 사이드에서 모든 연결된 클라이언트 혹은 클라이언트들의 부분집합으로의 이벤트를 보낼 수 있다.
// to all connected clients
io.emit("hello");

// to all connected clients in the "news" room
io.to("news").emit("hello");
Multiplexing
네임스페이스를 사용시 하나의 공유된 연결을 통해 애플리케이션의 로직을 분리할 수 있다. 예를 들어 승인된 사용자만 참여할 수 있는 '관리자' 채널을 생성하려는 경우 유용하다.
io.on("connection", (socket) => {
  // classic users
});

io.of("/admin").on("connection", (socket) => {
  // admin users
});
Testing Socket.IO with JEST
socket.io 에서는 mocha, jest, tape 를 통한 테스트코드 예시를 보여주는데 그중 jest 를 활용한 테스트코드를 참고해보자.
const { createServer } = require("http");
const { Server } = require("socket.io");
const Client = require("socket.io-client");
describe("my awesome project", () => {
let io, serverSocket, clientSocket;
beforeAll((done) => {
const httpServer = createServer();
io = new Server(httpServer);
httpServer.listen(() => {
const port = httpServer.address().port;
clientSocket = new Client(`http://localhost:${port}`);
io.on("connection", (socket) => {
serverSocket = socket;
});
clientSocket.on("connect", done);
});
});
afterAll(() => {
io.close();
clientSocket.close();
});
test("should work", (done) => {
clientSocket.on("hello", (arg) => {
expect(arg).toBe("world");
done();
});
serverSocket.emit("hello", "world");
});
test("should work (with ack)", (done) => {
serverSocket.on("hi", (cb) => {
cb("hola");
});
clientSocket.emit("hi", (arg) => {
expect(arg).toBe("hola");
done();
});
});
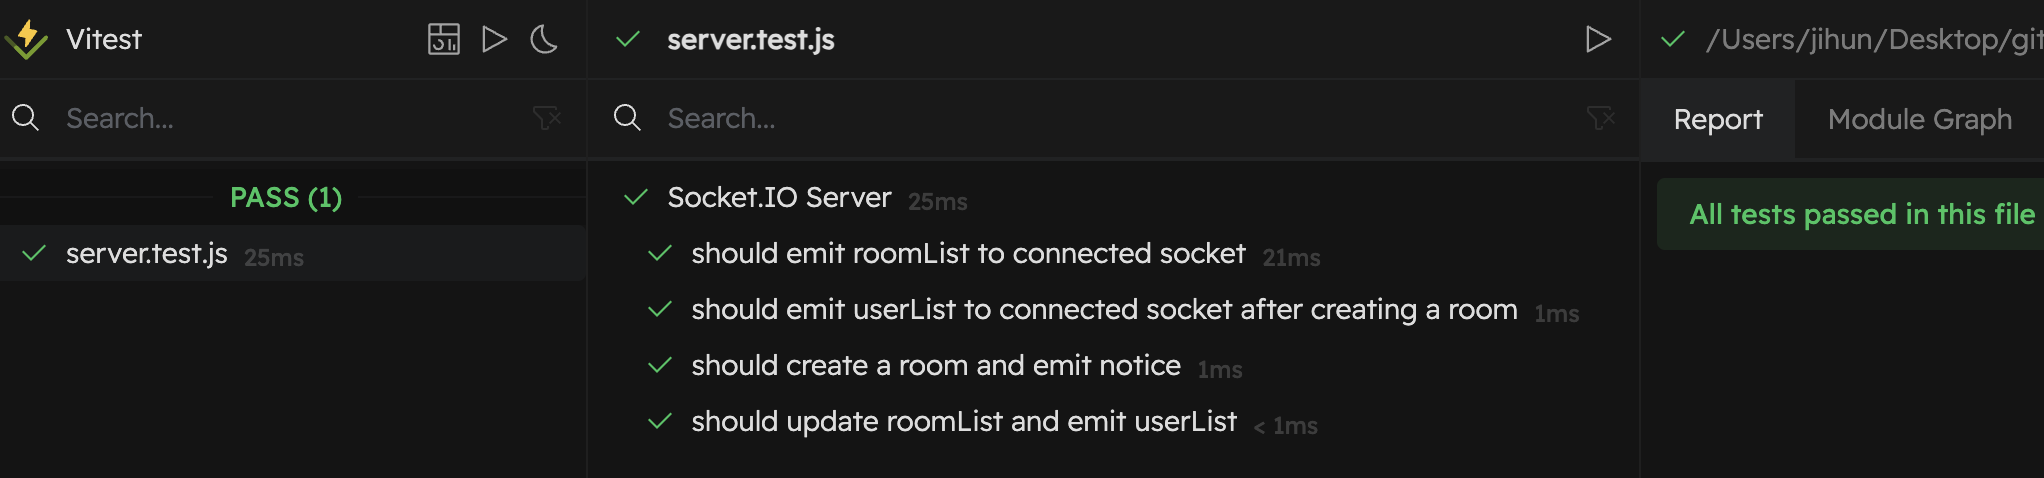
});express 와 socket.io 로 작성한 서버 코드에 대해 vitest 로 테스트코드를 일부 작성해봤다.
// server.test.js
const http = require("http");
const express = require("express");
const { Server } = require("socket.io");
const { expect } = require("vitest");

const PORT = 8001;
const app = express();

const server = http.createServer(app);
const io = new Server(server);

describe("Socket.IO Server", () => {
  let socket;

  beforeAll((done) => {
    server.listen(PORT, done);
  });

  afterAll(() => {
    server.close();
  });

  beforeEach((done) => {
    // Set up a new socket connection for each test
    socket = require("socket.io-client")(`http://localhost:${PORT}`);
    socket.on("connect", done);
  });

  afterEach(() => {
    // Close the socket connection after each test
    if (socket.connected) {
      socket.disconnect();
    }
  });

  it("should emit roomList to connected socket", (done) => {
    socket.on("roomList", (rooms) => {
      expect(rooms).toBeInstanceOf(Array);
      done();
    });
  });

  it("should emit userList to connected socket after creating a room", (done) => {
    const roomName = "testRoom";
    const userName = "testUser";

    socket.emit("create", roomName, userName, () => {
      socket.on("userList", (users) => {
        expect(users).toBeInstanceOf(Array);
        expect(users).toBe(["testUser"]);
        done();
      });
    });
  });

  it("should create a room and emit notice", (done) => {
    socket.on("notice", (message) => {
      expect(message).toContain(socket.id);
      done();
    });

    const roomName = "testRoom";
    const userName = "testUser";

    socket.emit("create", roomName, userName, () => {});
  });

  it("should update roomList and emit userList", (done) => {
    socket.on("roomList", (rooms) => {
      expect(rooms).toContain("testRoom");
    });

    socket.on("userList", (users) => {
      expect(users).toEqual([]);
      done();
    });

    const roomName = "testRoom";
    const userName = "testUser";

    socket.emit("create", roomName, userName, () => {});
  });
});
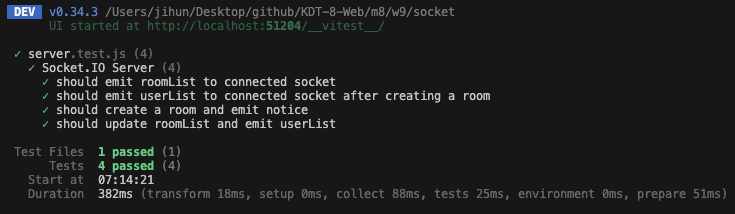
역시 vitest.. jest 보다 훨씬 빠르다

용어
Namespaces
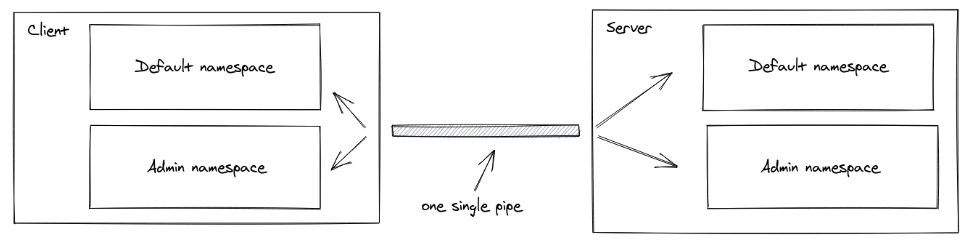
Namespace 는 단일 공유 연결 ( multiplexing 이라고 부른다. ) 을 통해 애플리케이션의 로직을 분리할 수 있도록 해주는 통신 채널이다.
우아한 기술블로그에서는 다음과 같이 용어들을 비유로 설명해주고 있다.

- event handler
io.of("/orders").on("connection", (socket) => {
  socket.on("order:list", () => {});
  socket.on("order:create", () => {});
});

io.of("/users").on("connection", (socket) => {
  socket.on("user:list", () => {});
});- rooms
const orderNamespace = io.of("/orders");

orderNamespace.on("connection", (socket) => {
  socket.join("room1");
  orderNamespace.to("room1").emit("hello");
});

const userNamespace = io.of("/users");

userNamespace.on("connection", (socket) => {
  socket.join("room1"); // distinct from the room in the "orders" namespace
  userNamespace.to("room1").emit("holà");
});- middlewares
const orderNamespace = io.of("/orders");

orderNamespace.use((socket, next) => {
  // ensure the socket has access to the "orders" namespace, and then
  next();
});

const userNamespace = io.of("/users");

userNamespace.use((socket, next) => {
  // ensure the socket has access to the "users" namespace, and then
  next();
});
특정 관리자만 접근 가능한 로직을 애플리케이션의 나머지 파트로부터 분리하고 싶을때도 namespace 를 사용할 수 있다.
const adminNamespace = io.of("/admin");

adminNamespace.use((socket, next) => {
  // ensure the user has sufficient rights
  next();
});

adminNamespace.on("connection", socket => {
  socket.on("delete user", () => {
    // ...
  });
});
여러 tentant 를 가질 수 있으니 namespace 당 하나의 tenant 를 생성할 수 있다.
tenant
tenant가 다른 리소스를 빌리는 임차인같은 개념인데 여기서의tenant는 동일한 애플리케이션이나 플랫폼을 공유하나 별도의 격리된 환경이나 데이터를 갖는 고유한 인스턴스 혹은 사용자 그룹을 의미한다.
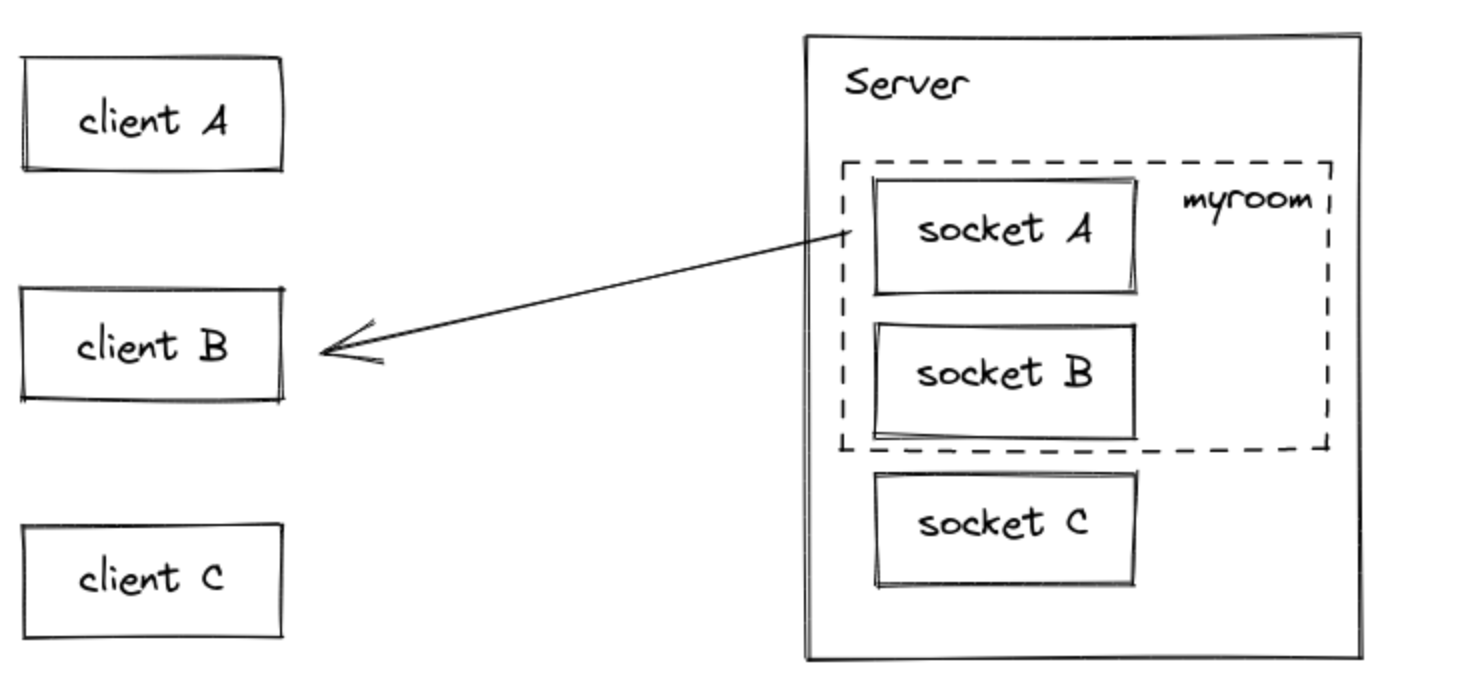
Rooms
room 은 소켓이 join 혹은 leave 할수 있는 임의의 채널이다. 클라이언트의 하위 집합에 이벤트를 broadcast 하는데 사용할 수 있다.
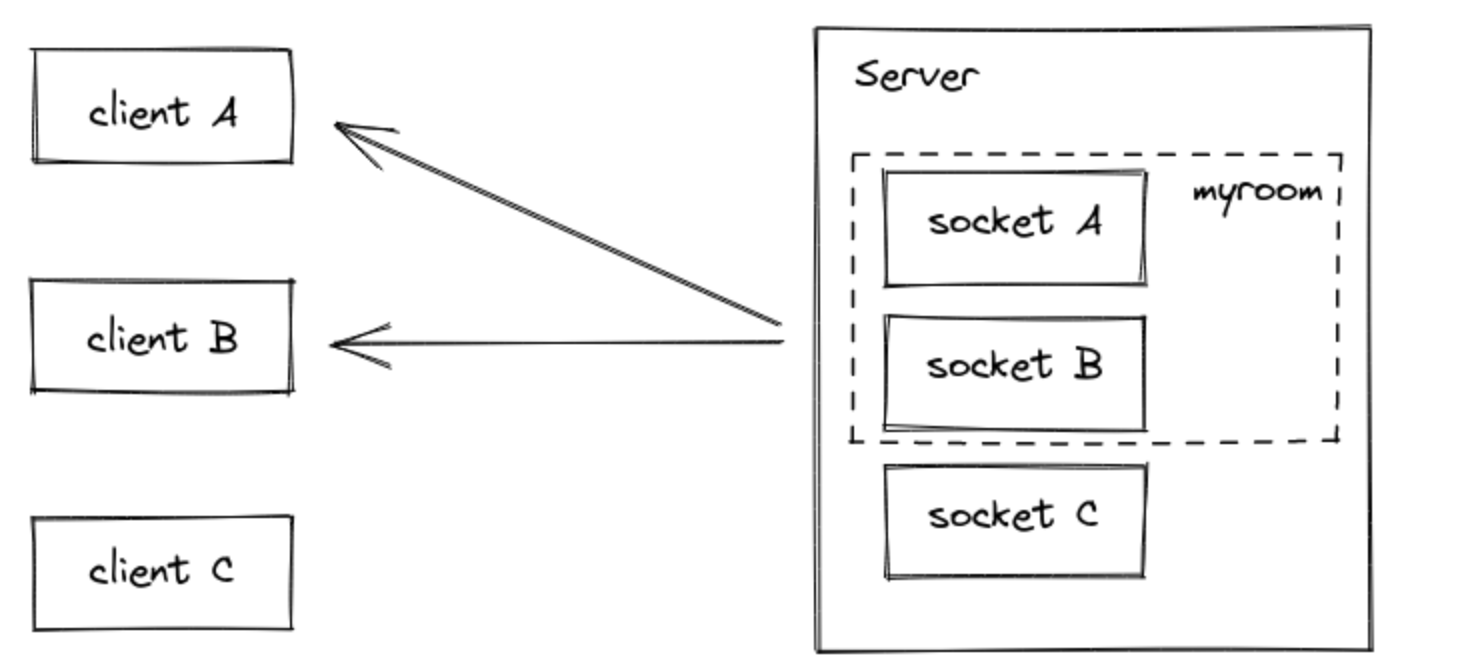
room 은 오직 서버측의 개념이다. 클라이언트는 자신이 참여한 room 목록에 접근할 수 없다.
// room 에 접속
io.on("connection", (socket) => {
  socket.join("some room");
});

// 특정 room 에 이벤트 전송 (to 와 in 은 동일하다)
io.to("some room").emit("some event");

// 한번에 여러 room 에 동시에 emit
io.to("room1").to("room2").to("room3").emit("some event");
socket 은 두개 이상의 room 에 있어도 이벤트를 한번만 받는다. ... 추가조사필요
// sender 를 제외하고 room 에 있는 사람들에게 emit
io.on("connection", (socket) => {
  socket.to("some room").emit("some event");
});
room 에서 나갈때는 join 대신 leave 를 사용한다.
// disconnecting 은 연결을 해제하려는 경우이고 disconnect 는 연결을 해제했을때 발생한다.
io.on("connection", socket => {
socket.on("disconnecting", () => {
console.log(socket.rooms); // the Set contains at least the socket ID
});
socket.on("disconnect", () => {
// socket.rooms.size === 0
});
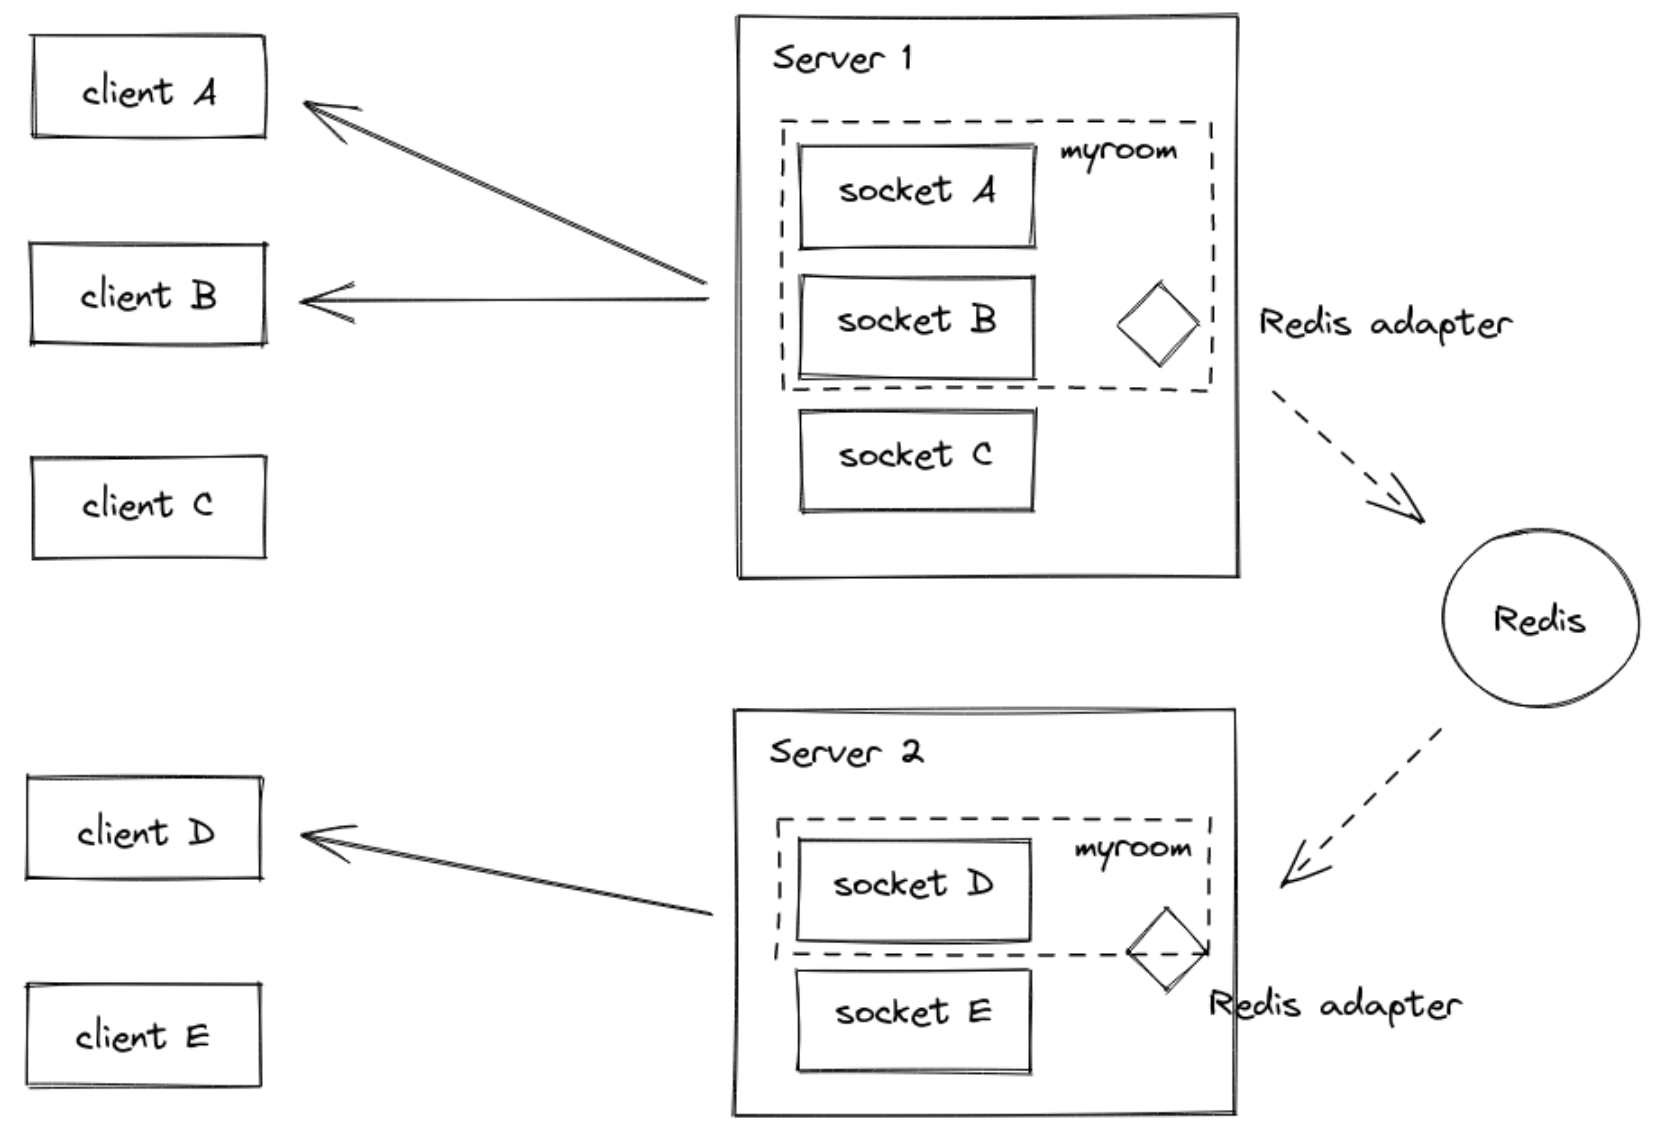
});만약 global broadcasting 을 하고 싶다면 adapter 를 redis adapter 로 교체해야 한다.
room event
create-room (argument: room)
delete-room (argument: room)
join-room (argument: room, id)
leave-room (argument: room, id)
io.of("/").adapter.on("create-room", (room) => {
  console.log(`room ${room} was created`);
});

io.of("/").adapter.on("join-room", (room, id) => {
  console.log(`socket ${id} has joined room ${room}`);
});
Adapter
adapter 는 서버측 컴포넌트로 클라이언트 전체 혹은 일부에 이벤트를 broadcast 하는 역할을 한다.
in-memory adapter 에는 5가지 종류가 있다.
Redis adapterRedis Streams adapterMongoDB adapterPostgres adapterCluster adapter
adapter 접근
// main namespace
const mainAdapter = io.of("/").adapter; // WARNING! io.adapter() will not work
// custom namespace
const adminAdapter = io.of("/admin").adapter;
각 adapter 는 room 을 생성, 삭제, 참여, 나가기 이벤트를 emit 할 수 있다.
create-room (argument: room)
delete-room (argument: room)
join-room (argument: room, id)
leave-room (argument: room, id)
io.of("/").adapter.on("create-room", (room) => {
  console.log(`room ${room} was created`);
});

io.of("/").adapter.on("join-room", (room, id) => {
  console.log(`socket ${id} has joined room ${room}`);
});
emitter
설치
npm install @socket.io/redis-emitter redis사용
import { Emitter } from "@socket.io/redis-emitter";
import { createClient } from "redis";

const redisClient = createClient({ url: "redis://localhost:6379" });

redisClient.connect().then(() => {
  const emitter = new Emitter(redisClient);

  setInterval(() => {
    emitter.emit("time", new Date);
  }, 5000);
});
redis@3 이후
import { Emitter } from "@socket.io/redis-emitter";
import { createClient } from "redis";

const redisClient = createClient({ url: "redis://localhost:6379" });
const emitter = new Emitter(redisClient);

setInterval(() => {
  emitter.emit("time", new Date);
}, 5000);
대부분의 어댑터 구현에는 다른 Node.js 구현에서 Socket.IO 서버와 통신할 수 있는 관련 emiter 패키지가 함께 제공된다.
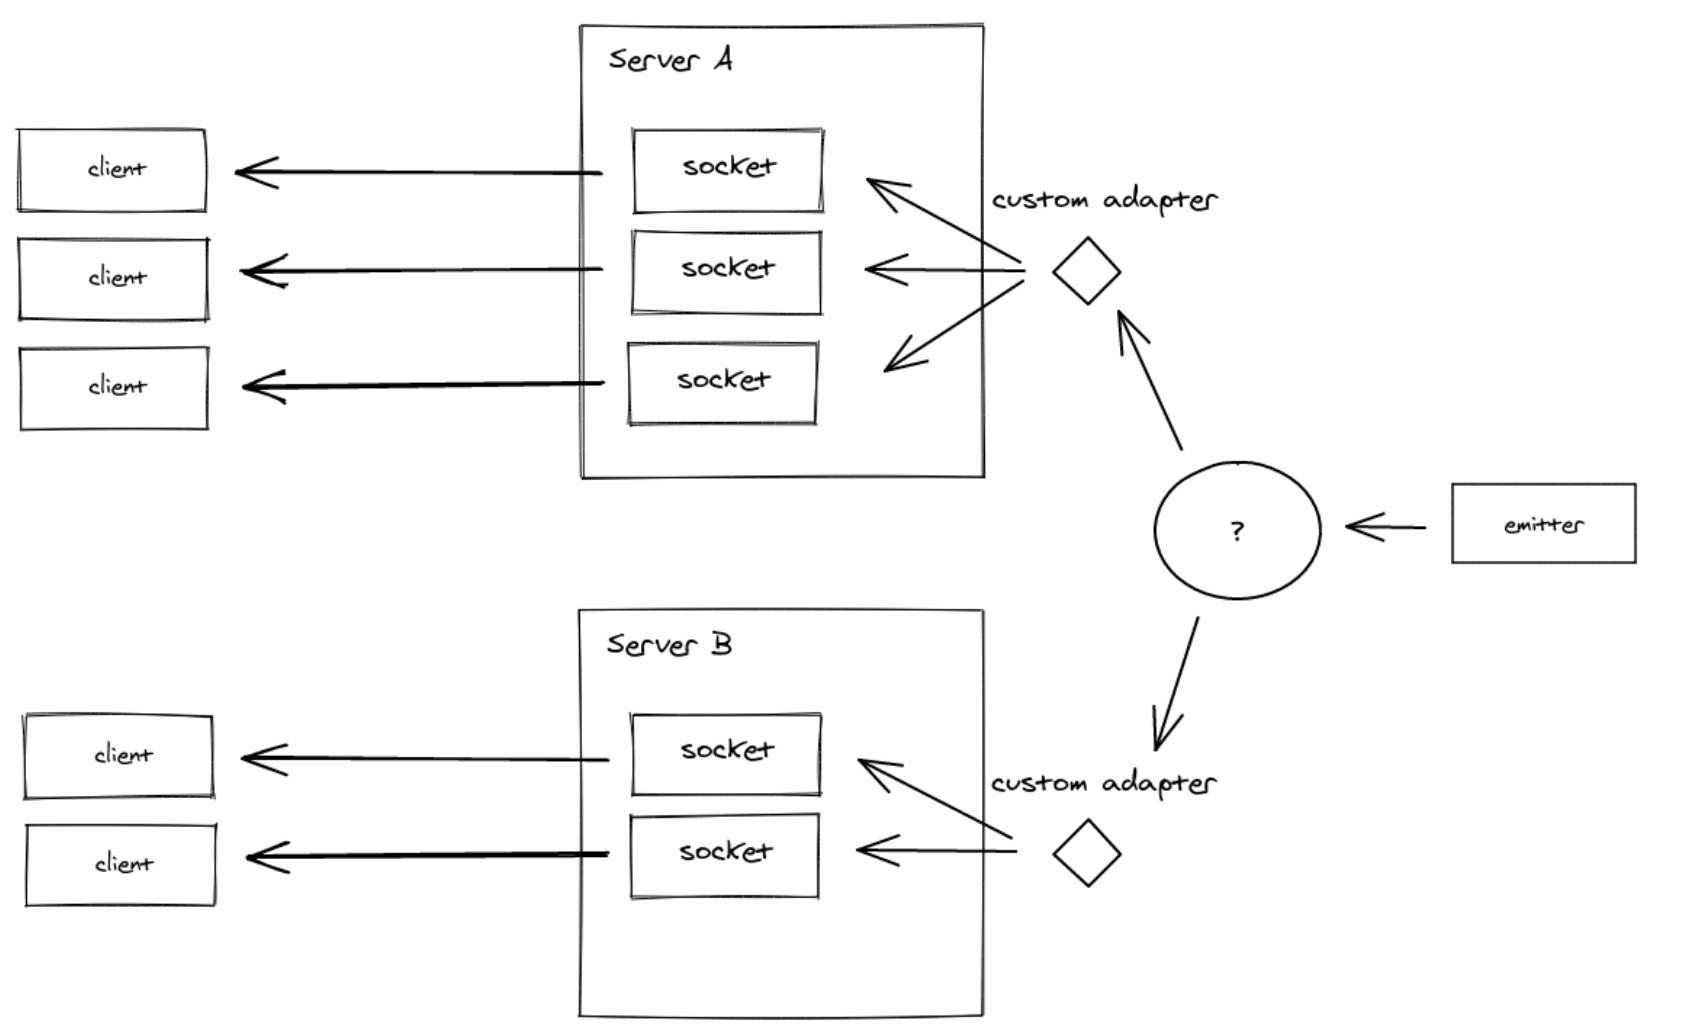
emitter 는 마이크로서비스에서 유용한데 예를 들어 모든 클라이언트가 마이크로서비스 m1 에 연결되고 마이크로서비스 m2 는 이미터를 사용하여 패킷을 broadcast 하는 설정에 사용될 수 있다.
emitter cheatsheet
// to all clients
emitter.emit(/* ... */);

// to all clients in "room1"
emitter.to("room1").emit(/* ... */);

// to all clients in "room1" except those in "room2"
emitter.to("room1").except("room2").emit(/* ... */);

const adminEmitter = emitter.of("/admin");

// to all clients in the "admin" namespace
adminEmitter.emit(/* ... */);

// to all clients in the "admin" namespace and in the "room1" room
adminEmitter.to("room1").emit(/* ... */);

// make all Socket instances join the "room1" room
emitter.socketsJoin("room1");

// make all Socket instances of the "admin" namespace in the "room1" room join the "room2" room
emitter.of("/admin").in("room1").socketsJoin("room2");
socketsJoin
// make all Socket instances join the "room1" room
emitter.socketsJoin("room1");

// make all Socket instances of the "admin" namespace in the "room1" room join the "room2" room
emitter.of("/admin").in("room1").socketsJoin("room2");
socketsLeave()
// make all Socket instances leave the "room1" room
emitter.socketsLeave("room1");

// make all Socket instances in the "room1" room leave the "room2" and "room3" rooms
emitter.in("room1").socketsLeave(["room2", "room3"]);

// make all Socket instances in the "room1" room of the "admin" namespace leave the "room2" room
emitter.of("/admin").in("room1").socketsLeave("room2");
disconnectSockets()
// make all Socket instances disconnect
emitter.disconnectSockets();

// make all Socket instances in the "room1" room disconnect (and discard the low-level connection)
emitter.in("room1").disconnectSockets(true);

// make all Socket instances in the "room1" room of the "admin" namespace disconnect
emitter.of("/admin").in("room1").disconnectSockets();

// this also works with a single socket ID
emitter.of("/admin").in(theSocketId).disconnectSockets();
serverSideEmit()
// emit an event to all the Socket.IO servers of the cluster
emitter.serverSideEmit("hello", "world");

// Socket.IO server (server-side)
io.on("hello", (arg) => {
  console.log(arg); // prints "world"
});
emit cheatsheet
공식문서 socket.io 의 내용과 같다.
server-side
io.on("connection", (socket) => {

  // basic emit back to sender
  socket.emit(/* ... */);

  // to all clients in the current namespace except the sender
  socket.broadcast.emit(/* ... */);

  // to all clients in room1 except the sender
  socket.to("room1").emit(/* ... */);

  // to all clients in room1 and/or room2 except the sender
  socket.to(["room1", "room2"]).emit(/* ... */);

  // to all clients in room1
  io.in("room1").emit(/* ... */);

  // to all clients in room1 and/or room2 except those in room3
  io.to(["room1", "room2"]).except("room3").emit(/* ... */);

  // to all clients in namespace "myNamespace"
  io.of("myNamespace").emit(/* ... */);

  // to all clients in room1 in namespace "myNamespace"
  io.of("myNamespace").to("room1").emit(/* ... */);

  // to individual socketid (private message)
  io.to(socketId).emit(/* ... */);

  // to all clients on this node (when using multiple nodes)
  io.local.emit(/* ... */);

  // to all connected clients
  io.emit(/* ... */);

  // to all clients, with one acknowledgement per client
  io.timeout(5000).emit("hello", "world", (err, responses) => {
    if (err) {
      // some clients did not acknowledge the event in the given delay
    } else {
      console.log(responses); // one response per client
    }
  });

  // WARNING: `socket.to(socket.id).emit()` will NOT work, as it will send to everyone in the room
  // named `socket.id` but the sender. Please use the classic `socket.emit()` instead.

  // with acknowledgement
  socket.emit("question", (answer) => {
    // ...
  });

  // without compression
  socket.compress(false).emit(/* ... */);

  // a message that might be dropped if the low-level transport is not writable
  socket.volatile.emit(/* ... */);

  // with timeout
  socket.timeout(5000).emit("my-event", (err) => {
    if (err) {
      // the other side did not acknowledge the event in the given delay
    }
  });
});
client side
// basic emit
socket.emit(/* ... */);

// with acknowledgement
socket.emit("question", (answer) => {
  // ...
});

// without compression
socket.compress(false).emit(/* ... */);

// a message that might be dropped if the low-level transport is not writable
socket.volatile.emit(/* ... */);

// with timeout
socket.timeout(5000).emit("my-event", (err) => {
  if (err) {
    // the other side did not acknowledge the event in the given delay
  }
});
reserved events
connect
connect_error
disconnect
disconnecting
newListener
removeListener
Admin UI
설치
npm i @socket.io/admin-ui서버에 옵션을 줘야 사용할 수 있다.
const { createServer } = require("http");
const { Server } = require("socket.io");
const { instrument } = require("@socket.io/admin-ui");

const httpServer = createServer();

const io = new Server(httpServer, {
  cors: {
    origin: ["https://admin.socket.io"],
    credentials: true
  }
});

instrument(io, {
  auth: false,
  mode: "development",
});

httpServer.listen(3000);
특히 require("socket.io"); 를 가져오는 부분에 대해 수업중 다른 이름인 SocketIO 라는 이름의 변수를 사용했는데 예시처럼 Server 를 new 로 사용해야 하며 옵션에 cors 설정을 해줘야 한다.
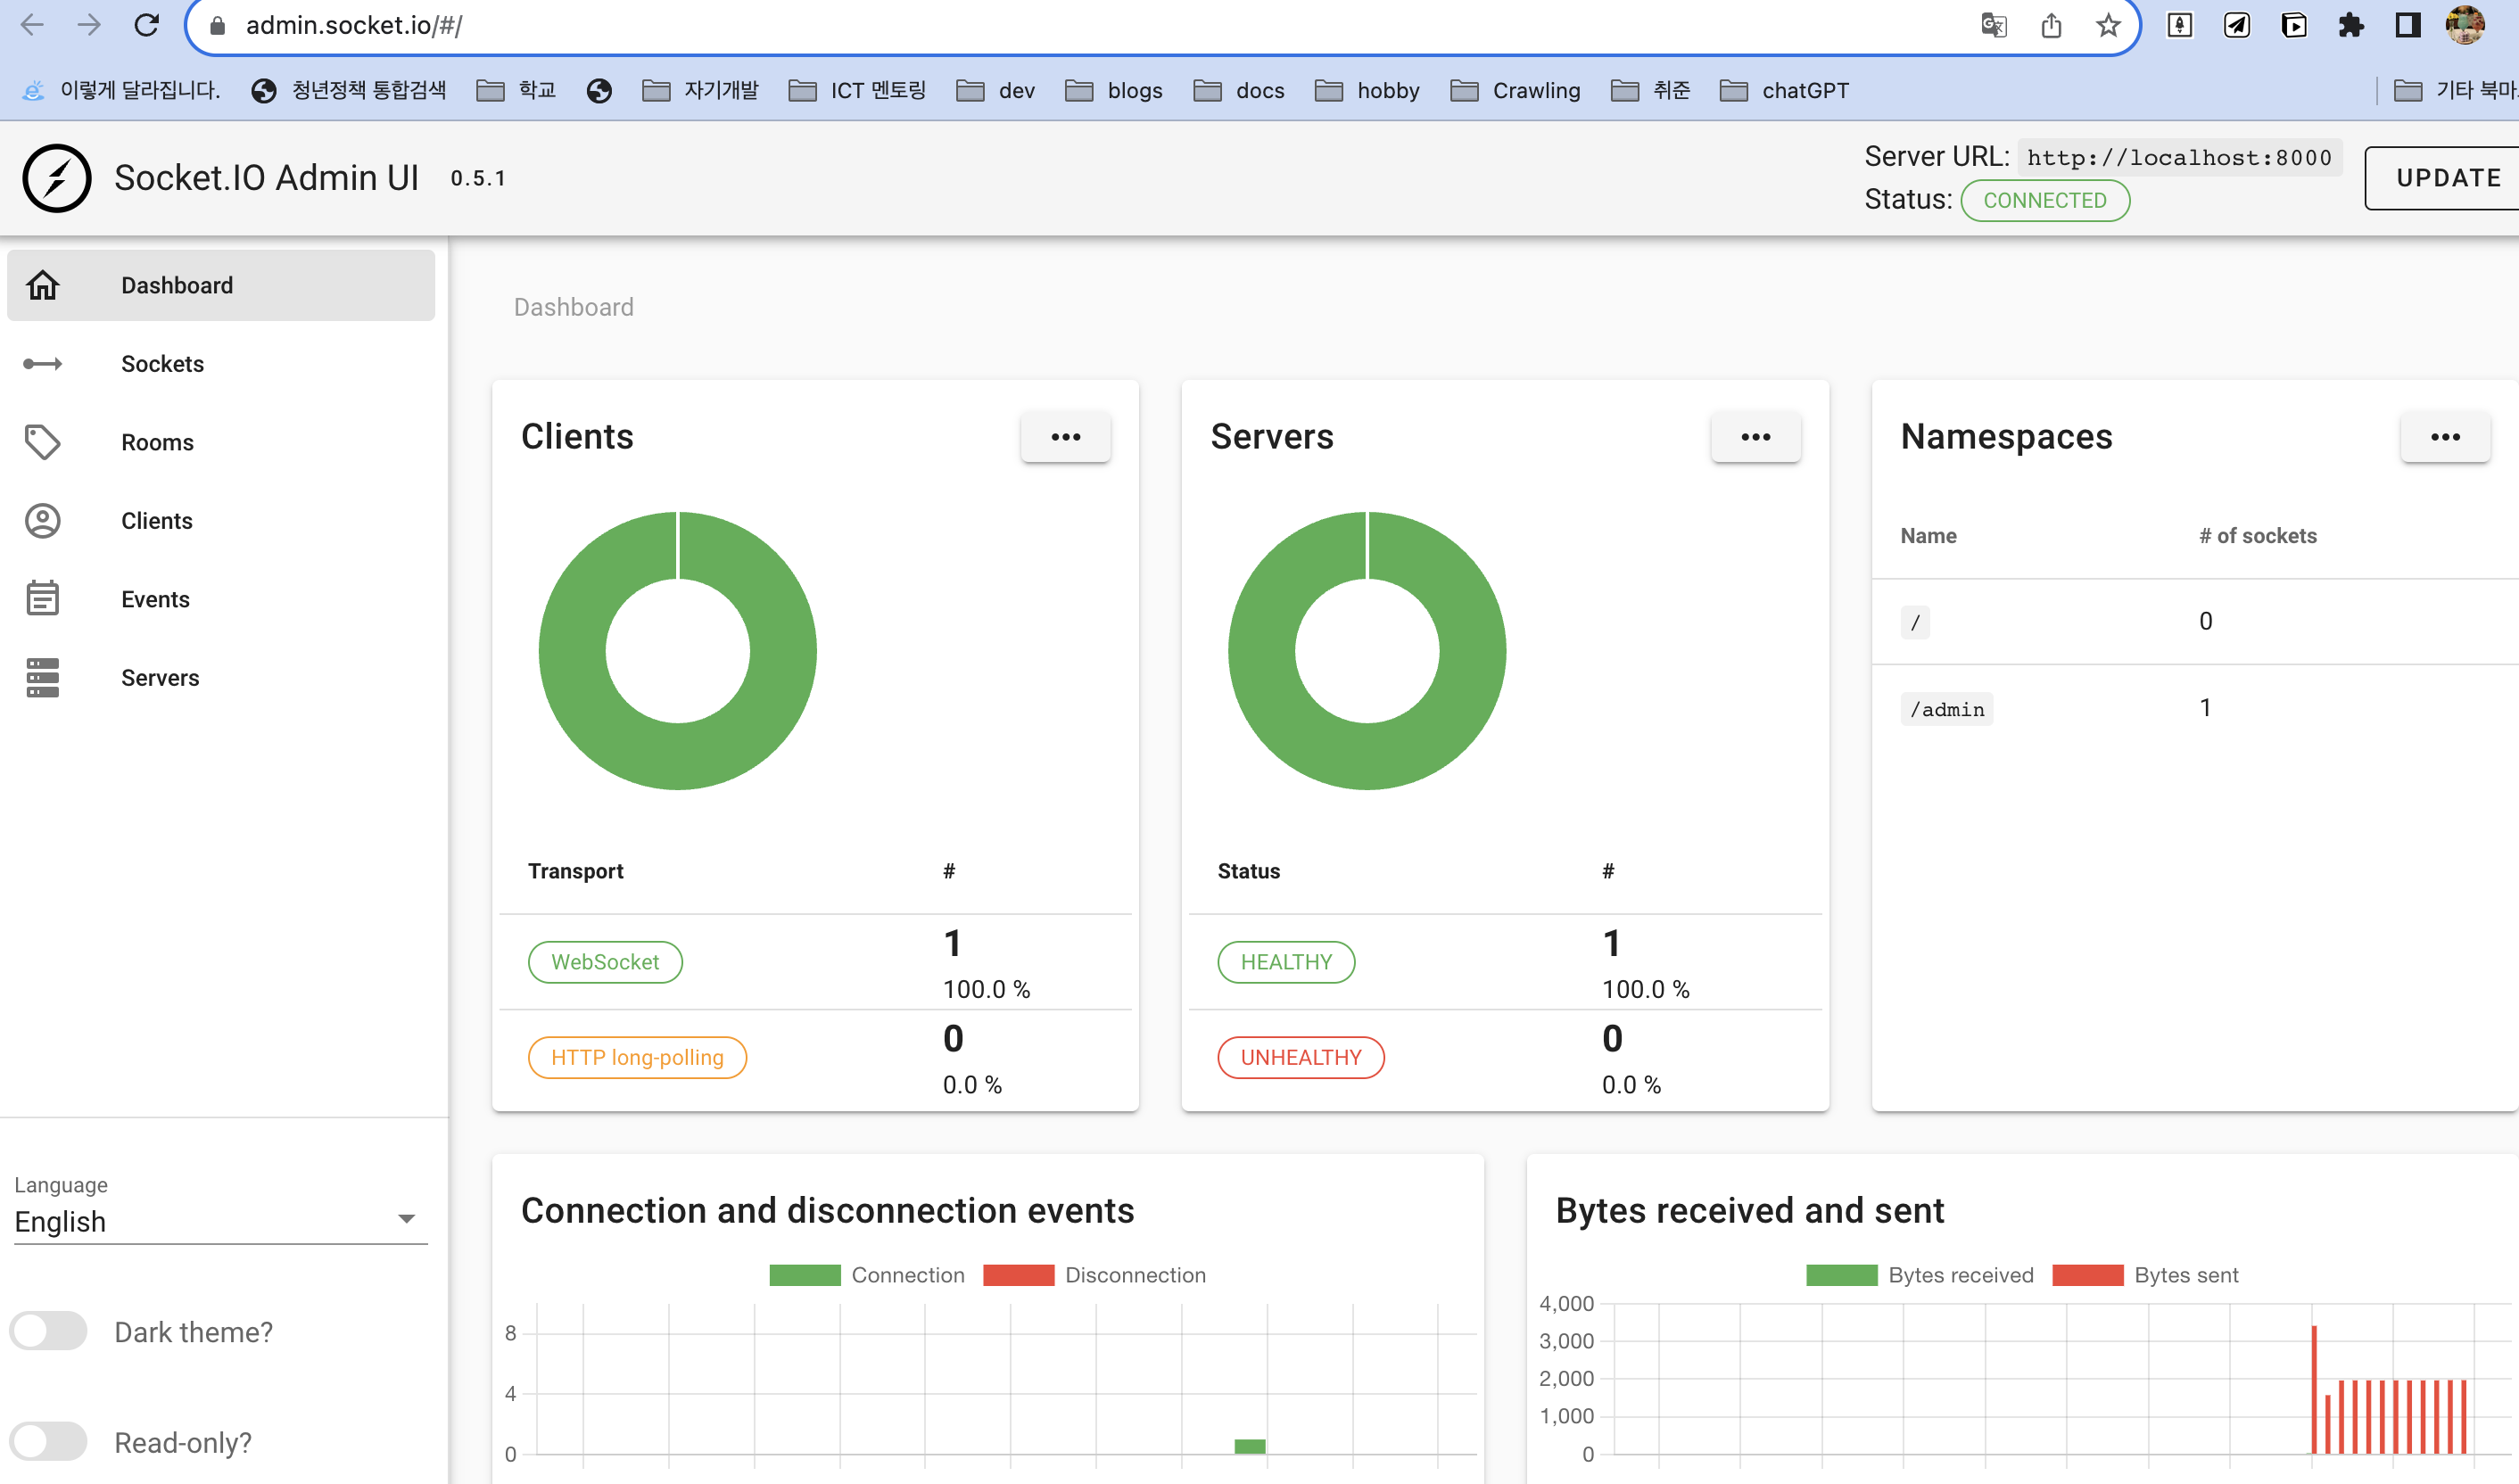
그러면 현재 접속중인 서버와 클라이언트 현황도 볼 수 있고
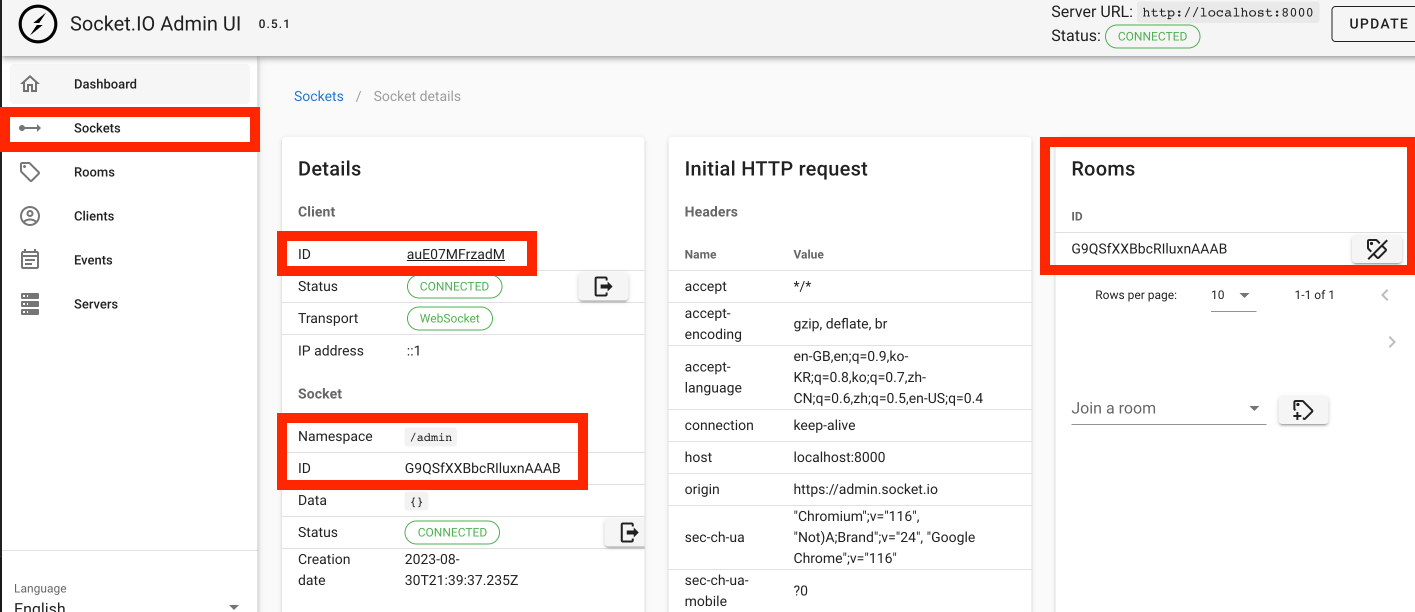
socket 의 세부사항도 UI 로 확인 할 수 있다.
레퍼런스
docs
mdn - websocket
github
socket.io repo
blog
sweet_sumin - fallback
HomieKim - socket.io 딥다이브, 개념과 이해
PETERKIMZZ - Websocket vs Socket.io