
⭐Javascript 입력 양식 ( 체크박스와 라디오버튼 )
📕체크박스
input 태그에 type을 checkbox로 지정해 주면 된다
<input type="checkbox" name="" id="">체크박스는 하나 혹은 여러 대상의 true 또는 false를 나타낸다
따라서 체크박스는 혼자서도 사용이 가능하다
change 이벤트로 사용을 하고 checked 속성을 사용한다
예를들어 회원가입 할 때 약관에 동의하는지 체크하는 부분이 체크박스이다
📗라디오버튼
input 태그에 type을 radio로 지정해 주면 된다
<input type="radio" name="" id="">라디오버튼은 여러 대상중에서 하나를 선택할 때 사용한다
라디오버튼은 혼자서 사용이 불가하다
라디오버튼이 하나의 그룹이라는 것을 나타내기 위해서는 name속성에
같은 값을 입력하면 된다
예를들어 회원가입 할 때 여성인지 남성인지 고르는 부분이 라디오버튼이다
📘예시 1
  <input type="checkbox" name="" id="">체크박스<br>
  <input type="radio" name="gender" id="">여성<br>
  <input type="radio" name="gender" id="">남성<br>
<input type="radio" name="gender" id="">직접 지정<br> 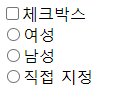
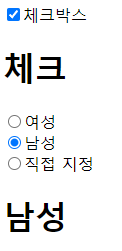
📙예시 2
선택되어 있는 체크박스와 라디오버튼의 값이 나오도록 해보자
<!DOCTYPE html>
<html>
<head>
  <meta charset="UTF-8">
  <title>Document</title>
  <script>
    document.addEventListener('DOMContentLoaded', () => {
      const checkbox = document.querySelector('input[type=checkbox]')
      const checkboxResult = document.querySelector('h1#checkbox')
      checkbox.addEventListener('change', () => {
        if (checkbox.checked){
          checkboxResult.textContent = '체크'
        } else {
          checkboxResult.textContent = '해제'
        }
      })
      const radios = document.querySelectorAll('input[type=radio][name=gender]')
      const radioResult = document.querySelector('h1#radiobutton')
      radios.forEach((radio)=> {
        radio.addEventListener('change', (event) => {
          radioResult.textContent = event.currentTarget.value
        })
      })
    })
  </script>
</head>
<body>
  <input type="checkbox" name="" id="">체크박스<br>
  <h1 id="checkbox"></h1>
  <input type="radio" name="gender" id="" value="여성">여성<br>
  <input type="radio" name="gender" id="" value="남성">남성<br>
  <input type="radio" name="gender" id="" value="직접 지정">직접 지정<br>
  <h1 id="radiobutton"></h1>
</body>
</html>
const radios = document.querySelectorAll('input[type=radio][name=gender]')위 코드에서는 input[type=radio] 만 해도 되지만 만약 타입이 radio인 input이
여러개가 있다면 위 처럼 name속성을 추가해서 구분하면 된다
📔예시 3
타이머와 함께 활용하여서 체크박스를 누르면 타이머가 진행되도록 만들어보자
<!DOCTYPE html>
<html>
<head>
  <meta charset="UTF-8">
  <title>Document</title>
  <script>
    document.addEventListener('DOMContentLoaded', () => {
      let seconds = 0
      let timerId = 0
      const checkbox = document.querySelector('input[type=checkbox]')
      const checkboxResult = document.querySelector('h1#checkbox')
      checkbox.addEventListener('change', () => {
        if (checkbox.checked){
          timerId = setInterval(() => {
            seconds += 1
            checkboxResult.textContent = `${seconds}초`
          }, 1000)
        } else {
          clearInterval(timerId)
        }
      })
    })
  </script>
</head>
<body>
  <input type="checkbox" name="" id="">타이머 활성화<br>
  <h1 id="checkbox">0초</h1>
</body>
</html>


성장을 보여주는 기록