코드링크: 링크텍스트
텍스트 요약(Text Summarization)
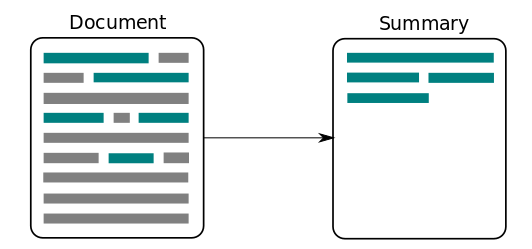
긴 글의 문서를 핵심 주제만으로 구성된 요약문으로 변환하는 것을 말합니다.
*특징
-
요약 전후에 정보 손실 발생이 최소가 되어야합니다.
-
요약 방식
-
추출적 요약(Extractive Summarization)
단어 그대로 원문에서 문장을 추출해서 요약하는 방식으로 예를 들어, 10개 문장이 들어있는 원문이 있다고 했을 때 그 중 핵심 문장 2~3개만 발췌해서 요약하는 방식입니다.
- 추상적 요약(Abstractive Summarization)
원분을 바탕으로 요약된 새로운 문장을 생성하는 방식으로 요약된 문장이 원문에 어ㅜㄴ래 없던 문장을 의미하고 이 분야를 자연어 생성(NGL)이라고 합니다.
-
뉴스 요약 기술
- Seq2Seq
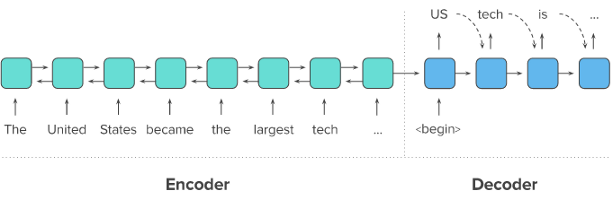
두 개의 RNN아키텍처를 이용하여 입력 시퀀스 ~ 출력 시퀀스를 생성하는 자연어 생성 모델입니다.
*과정
-
원문 입력 시 첫 번째 RNN인 인코더 입력
-
하나의 고정된 context 벡터로 변환(문맥 정보를 갖고 있는 벡터)
-
두 번째 RNN인 디코더는 위의 벡터를 받아 단어 생성하여 요약문 완성
- LSTM
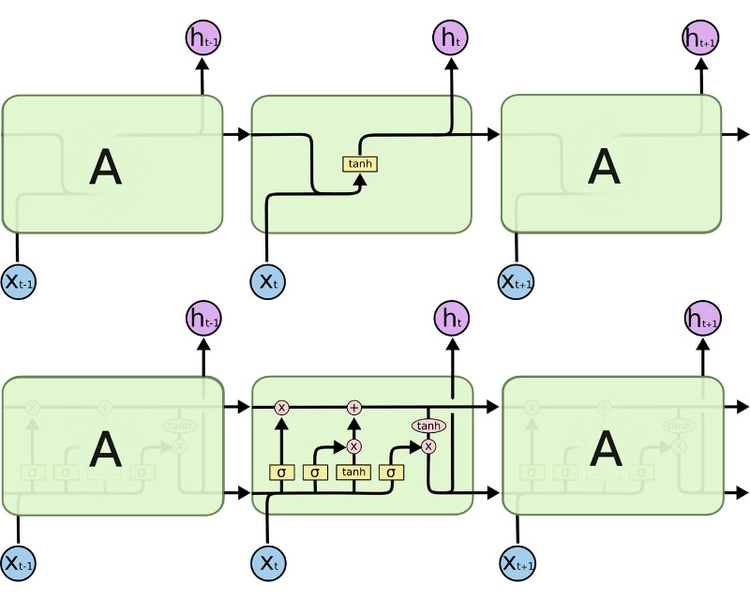
RNN과 유사하지만 다른 것은 time step의 셀에 hidden state와 cell state를 함께 전달하는 것으로 컨텍스트 벡터도 두 개의 값 모두 존재합니다.
- 시작 토큰과 종료 토큰
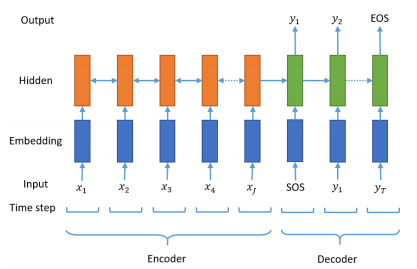
시작 토큰과 종료 토큰을 넣어주는 전처리 방식을 이용하여 어디서 멈춰야하는지 알려줄 수 있게 됩니다.
- 어텐션 메커니즘을 통한 새로운 컨텍스트 벡터
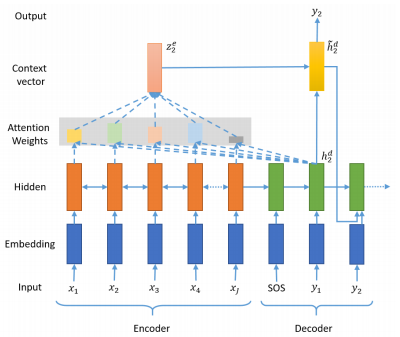
인코더의 모든 step의 hidden state의 정보가 컨텍스트 벡터에 전부 다 반영하도록 하는 것으로 동일 비율로 반영하는 것이 아닌, 각 step에 미치는 영향에 따른 가중합을 계산합니다.
데이터
- 데이터 셋: Kaggle에서 제공하는 아마존 리뷰 데이터셋
- 라이브러리: NLTK(Natural Language Toolkit)로 영어 기호, 통계, 자연어 처리
- 데이터 셋과 라이브러리 가져오는 코드
import nltk
nltk.download('stopwords')

import numpy as np
import pandas as pd
import os
import re
import matplotlib.pyplot as plt
from nltk.corpus import stopwords
from bs4 import BeautifulSoup
from tensorflow.keras.preprocessing.text import Tokenizer
from tensorflow.keras.preprocessing.sequence import pad_sequences
import urllib.request

print('=3')- 데이터 전처리 하기
3-1) 데이터 정리하기
- 중복 샘플 제거
print('Text 열에서 중복을 배제한 유일한 샘플의 수 :', data['Text'].nunique())
print('Summary 열에서 중복을 배제한 유일한 샘플의 수 :', data['Summary'].nunique())


# inplace=True 를 설정하면 DataFrame 타입 값을 return 하지 않고 data 내부를 직접적으로 바꿉니다
data.drop_duplicates(subset = ['Text'], inplace=True)
print('전체 샘플수 :', (len(data)))
- Null 샘플 값 제거
print(data.isnull().sum())

contractions = {"ain't": "is not", "aren't": "are not","can't": "cannot", "'cause": "because", "could've": "could have", "couldn't": "could not",
                           "didn't": "did not",  "doesn't": "does not", "don't": "do not", "hadn't": "had not", "hasn't": "has not", "haven't": "have not",
                           "he'd": "he would","he'll": "he will", "he's": "he is", "how'd": "how did", "how'd'y": "how do you", "how'll": "how will", "how's": "how is",
                           "I'd": "I would", "I'd've": "I would have", "I'll": "I will", "I'll've": "I will have","I'm": "I am", "I've": "I have", "i'd": "i would",
                           "i'd've": "i would have", "i'll": "i will",  "i'll've": "i will have","i'm": "i am", "i've": "i have", "isn't": "is not", "it'd": "it would",
                           "it'd've": "it would have", "it'll": "it will", "it'll've": "it will have","it's": "it is", "let's": "let us", "ma'am": "madam",
                           "mayn't": "may not", "might've": "might have","mightn't": "might not","mightn't've": "might not have", "must've": "must have",
                           "mustn't": "must not", "mustn't've": "must not have", "needn't": "need not", "needn't've": "need not have","o'clock": "of the clock",
                           "oughtn't": "ought not", "oughtn't've": "ought not have", "shan't": "shall not", "sha'n't": "shall not", "shan't've": "shall not have",
                           "she'd": "she would", "she'd've": "she would have", "she'll": "she will", "she'll've": "she will have", "she's": "she is",
                           "should've": "should have", "shouldn't": "should not", "shouldn't've": "should not have", "so've": "so have","so's": "so as",
                           "this's": "this is","that'd": "that would", "that'd've": "that would have", "that's": "that is", "there'd": "there would",
                           "there'd've": "there would have", "there's": "there is", "here's": "here is","they'd": "they would", "they'd've": "they would have",
                           "they'll": "they will", "they'll've": "they will have", "they're": "they are", "they've": "they have", "to've": "to have",
                           "wasn't": "was not", "we'd": "we would", "we'd've": "we would have", "we'll": "we will", "we'll've": "we will have", "we're": "we are",
                           "we've": "we have", "weren't": "were not", "what'll": "what will", "what'll've": "what will have", "what're": "what are",
                           "what's": "what is", "what've": "what have", "when's": "when is", "when've": "when have", "where'd": "where did", "where's": "where is",
                           "where've": "where have", "who'll": "who will", "who'll've": "who will have", "who's": "who is", "who've": "who have",
                           "why's": "why is", "why've": "why have", "will've": "will have", "won't": "will not", "won't've": "will not have",
                           "would've": "would have", "wouldn't": "would not", "wouldn't've": "would not have", "y'all": "you all",
                           "y'all'd": "you all would","y'all'd've": "you all would have","y'all're": "you all are","y'all've": "you all have",
                           "you'd": "you would", "you'd've": "you would have", "you'll": "you will", "you'll've": "you will have",
                           "you're": "you are", "you've": "you have"}

print("정규화 사전의 수: ", len(contractions))
3-2) 텍스트 정규화와 불용어 제거
- 텍스트 정규화
기계 학습 전에 미리 같은 표현으로 통일 시켜서 기계의 연산량을 줄여줍니다.
contractions = {"ain't": "is not", "aren't": "are not","can't": "cannot", "'cause": "because", "could've": "could have", "couldn't": "could not",
                           "didn't": "did not",  "doesn't": "does not", "don't": "do not", "hadn't": "had not", "hasn't": "has not", "haven't": "have not",
                           "he'd": "he would","he'll": "he will", "he's": "he is", "how'd": "how did", "how'd'y": "how do you", "how'll": "how will", "how's": "how is",
                           "I'd": "I would", "I'd've": "I would have", "I'll": "I will", "I'll've": "I will have","I'm": "I am", "I've": "I have", "i'd": "i would",
                           "i'd've": "i would have", "i'll": "i will",  "i'll've": "i will have","i'm": "i am", "i've": "i have", "isn't": "is not", "it'd": "it would",
                           "it'd've": "it would have", "it'll": "it will", "it'll've": "it will have","it's": "it is", "let's": "let us", "ma'am": "madam",
                           "mayn't": "may not", "might've": "might have","mightn't": "might not","mightn't've": "might not have", "must've": "must have",
                           "mustn't": "must not", "mustn't've": "must not have", "needn't": "need not", "needn't've": "need not have","o'clock": "of the clock",
                           "oughtn't": "ought not", "oughtn't've": "ought not have", "shan't": "shall not", "sha'n't": "shall not", "shan't've": "shall not have",
                           "she'd": "she would", "she'd've": "she would have", "she'll": "she will", "she'll've": "she will have", "she's": "she is",
                           "should've": "should have", "shouldn't": "should not", "shouldn't've": "should not have", "so've": "so have","so's": "so as",
                           "this's": "this is","that'd": "that would", "that'd've": "that would have", "that's": "that is", "there'd": "there would",
                           "there'd've": "there would have", "there's": "there is", "here's": "here is","they'd": "they would", "they'd've": "they would have",
                           "they'll": "they will", "they'll've": "they will have", "they're": "they are", "they've": "they have", "to've": "to have",
                           "wasn't": "was not", "we'd": "we would", "we'd've": "we would have", "we'll": "we will", "we'll've": "we will have", "we're": "we are",
                           "we've": "we have", "weren't": "were not", "what'll": "what will", "what'll've": "what will have", "what're": "what are",
                           "what's": "what is", "what've": "what have", "when's": "when is", "when've": "when have", "where'd": "where did", "where's": "where is",
                           "where've": "where have", "who'll": "who will", "who'll've": "who will have", "who's": "who is", "who've": "who have",
                           "why's": "why is", "why've": "why have", "will've": "will have", "won't": "will not", "won't've": "will not have",
                           "would've": "would have", "wouldn't": "would not", "wouldn't've": "would not have", "y'all": "you all",
                           "y'all'd": "you all would","y'all'd've": "you all would have","y'all're": "you all are","y'all've": "you all have",
                           "you'd": "you would", "you'd've": "you would have", "you'll": "you will", "you'll've": "you will have",
                           "you're": "you are", "you've": "you have"}

print("정규화 사전의 수: ", len(contractions))- 불용어 제거
텍스트에 자주 쓰이지만 실제로는 필요가 없는 단어들을 제거하는 것입니다.
print('불용어 개수 :', len(stopwords.words('english') ))
print(stopwords.words('english'))

temp_text = 'Everything I bought was great, infact I ordered twice and the third ordered was<br />for my mother and father.'
temp_summary = 'Great way to start (or finish) the day!!!'

print(preprocess_sentence(temp_text))
print(preprocess_sentence(temp_summary, False))  # 불용어를 제거하지 않습니다.
3-3) 샘플의 최대 길이 정하기
훈련에 이용할 샘플의 최대 길이를 정해줍니다.
# 길이 분포 출력
import matplotlib.pyplot as plt

text_len = [len(s.split()) for s in data['Text']]
summary_len = [len(s.split()) for s in data['Summary']]

print('텍스트의 최소 길이 : {}'.format(np.min(text_len)))
print('텍스트의 최대 길이 : {}'.format(np.max(text_len)))
print('텍스트의 평균 길이 : {}'.format(np.mean(text_len)))
print('요약의 최소 길이 : {}'.format(np.min(summary_len)))
print('요약의 최대 길이 : {}'.format(np.max(summary_len)))
print('요약의 평균 길이 : {}'.format(np.mean(summary_len)))

#임의로 정한 것
text_max_len = 50
summary_max_len = 8
3-4) 시작 토큰과 종료 토큰 추가하기

디코더는 시작 토큰을 입받아 문장을 생성하고, 종료 토큰을 예측하는 순간 문장 생성을 멈추는 것으로 추가할 필요가 있습니다.
# 요약 데이터에는 시작 토큰과 종료 토큰을 추가한다.
data['decoder_input'] = data['Summary'].apply(lambda x : 'sostoken '+ x)
data['decoder_target'] = data['Summary'].apply(lambda x : x + ' eostoken')
data.head()

# 토큰 붙인 후 Numpy타입으로 저장
indices = np.arange(encoder_input.shape[0])
np.random.shuffle(indices)
print(indices)
3-5) 훈련 데이터와 테스트 데이터 분리
훈련데이터와 테스트 데이터를 8 :2 비율로 분리하고 전체 데이터 크기에서 0.2를 곱해서 테스트 데이터의 크기를 정의합니다.
3-6) 단어 집합 만들기 와 정수 인코딩
기계가 텍스트를 숫자로 처리하도록 하는 훈련 데이터와 테스트 데이터의 단어를 모두 정수로 바꾸어서 각 단어에 고유 정수를 맵핑하는 작업입니다.
src_tokenizer = Tokenizer() # 토크나이저 정의
src_tokenizer.fit_on_texts(encoder_input_train) # 입력된 데이터로부터 단어 집합 생성


src_vocab = 8000
src_tokenizer = Tokenizer(num_words=src_vocab) # 단어 집합의 크기를 8,000으로 제한
src_tokenizer.fit_on_texts(encoder_input_train) # 단어 집합 재생성.

# 텍스트 시퀀스를 정수 시퀀스로 변환
encoder_input_train = src_tokenizer.texts_to_sequences(encoder_input_train)
encoder_input_test = src_tokenizer.texts_to_sequences(encoder_input_test)

# 잘 진행되었는지 샘플 출력
print(encoder_input_train[:3])
3-7) 패딩
서로 다른 길이의 샘플들을 병렬처리 위해 같은 길이로 맞춰주는 작업으로, 짧은 데이터들 뒤에 0을 넣어 최대 길이로 맞춰줄 겁니다.
encoder_input_train = pad_sequences(encoder_input_train, maxlen=text_max_len, padding='post')
encoder_input_test = pad_sequences(encoder_input_test, maxlen=text_max_len, padding='post')
decoder_input_train = pad_sequences(decoder_input_train, maxlen=summary_max_len, padding='post')
decoder_target_train = pad_sequences(decoder_target_train, maxlen=summary_max_len, padding='post')
decoder_input_test = pad_sequences(decoder_input_test, maxlen=summary_max_len, padding='post')
decoder_target_test = pad_sequences(decoder_target_test, maxlen=summary_max_len, padding='post')
모델 설계
from tensorflow.keras.layers import Input, LSTM, Embedding, Dense, Concatenate
from tensorflow.keras.models import Model
from tensorflow.keras.callbacks import EarlyStopping, ModelCheckpoint


# 인코더 설계 시작
embedding_dim = 128
hidden_size = 256

# 인코더
encoder_inputs = Input(shape=(text_max_len,))

# 인코더의 임베딩 층
enc_emb = Embedding(src_vocab, embedding_dim)(encoder_inputs)

# 인코더의 LSTM 1
encoder_lstm1 = LSTM(hidden_size, return_sequences=True, return_state=True ,dropout = 0.4, recurrent_dropout = 0.4)
encoder_output1, state_h1, state_c1 = encoder_lstm1(enc_emb)

# 인코더의 LSTM 2
encoder_lstm2 = LSTM(hidden_size, return_sequences=True, return_state=True, dropout=0.4, recurrent_dropout=0.4)
encoder_output2, state_h2, state_c2 = encoder_lstm2(encoder_output1)

# 인코더의 LSTM 3
encoder_lstm3 = LSTM(hidden_size, return_state=True, return_sequences=True, dropout=0.4, recurrent_dropout=0.4)
encoder_outputs, state_h, state_c= encoder_lstm3(encoder_output2)


# 디코더 설계
decoder_inputs = Input(shape=(None,))

# 디코더의 임베딩 층
dec_emb_layer = Embedding(tar_vocab, embedding_dim)
dec_emb = dec_emb_layer(decoder_inputs)

# 디코더의 LSTM
decoder_lstm = LSTM(hidden_size, return_sequences=True, return_state=True, dropout=0.4, recurrent_dropout=0.2)
decoder_outputs, _, _ = decoder_lstm(dec_emb, initial_state=[state_h, state_c])

#출력층 설계
urllib.request.urlretrieve("https://raw.githubusercontent.com/thushv89/attention_keras/master/src/layers/attention.py", filename="attention.py")
from attention import AttentionLayer


#어텐션 매커니즘: 또 다른 새로운 신경망 설계

## 구현된 거 가져오기

urllib.request.urlretrieve("https://raw.githubusercontent.com/thushv89/attention_keras/master/src/layers/attention.py", filename="attention.py")
from attention import AttentionLayer

# 어텐션 층(어텐션 함수)
attn_layer = AttentionLayer(name='attention_layer')
# 인코더와 디코더의 모든 time step의 hidden state를 어텐션 층에 전달하고 결과를 리턴
attn_out, attn_states = attn_layer([encoder_outputs, decoder_outputs])

# 어텐션의 결과와 디코더의 hidden state들을 연결
decoder_concat_input = Concatenate(axis=-1, name='concat_layer')([decoder_outputs, attn_out])

# 디코더의 출력층
decoder_softmax_layer = Dense(tar_vocab, activation='softmax')
decoder_softmax_outputs = decoder_softmax_layer(decoder_concat_input)

# 모델 정의
model = Model([encoder_inputs, decoder_inputs], decoder_softmax_outputs)
model.summary()
모델 훈련하기
model.compile(optimizer='rmsprop', loss='sparse_categorical_crossentropy')
es = EarlyStopping(monitor='val_loss', patience=2, verbose=1) #조기 종료
history = model.fit(x=[encoder_input_train, decoder_input_train], y=decoder_target_train, \
          validation_data=([encoder_input_test, decoder_input_test], decoder_target_test), \
          batch_size=256, callbacks=[es], epochs=50)

# 그래프 시각화

plt.plot(history.history['loss'], label='train')
plt.plot(history.history['val_loss'], label='test')
plt.legend()
plt.show()
인퍼러슨 모델 구현하기
src_index_to_word = src_tokenizer.index_word # 원문 단어 집합에서 정수 -> 단어를 얻음
tar_word_to_index = tar_tokenizer.word_index # 요약 단어 집합에서 단어 -> 정수를 얻음
tar_index_to_word = tar_tokenizer.index_word # 요약 단어 집합에서 정수 -> 단어를 얻음
# 인코더 설계
encoder_model = Model(inputs=encoder_inputs, outputs=[encoder_outputs, state_h, state_c])

# 이전 시점의 상태들을 저장하는 텐서
decoder_state_input_h = Input(shape=(hidden_size,))
decoder_state_input_c = Input(shape=(hidden_size,))

dec_emb2 = dec_emb_layer(decoder_inputs)

# 문장의 다음 단어를 예측하기 위해서 초기 상태(initial_state)를 이전 시점의 상태로 사용. 이는 뒤의 함수 decode_sequence()에 구현
# 훈련 과정에서와 달리 LSTM의 리턴하는 은닉 상태와 셀 상태인 state_h와 state_c를 버리지 않음.
decoder_outputs2, state_h2, state_c2 = decoder_lstm(dec_emb2, initial_state=[decoder_state_input_h, decoder_state_input_c])

def decode_sequence(input_seq):
    # 입력으로부터 인코더의 상태를 얻음
    e_out, e_h, e_c = encoder_model.predict(input_seq)

     # <SOS>에 해당하는 토큰 생성
    target_seq = np.zeros((1,1))
    target_seq[0, 0] = tar_word_to_index['sostoken']

    stop_condition = False
    decoded_sentence = ''
    while not stop_condition: # stop_condition이 True가 될 때까지 루프 반복

        output_tokens, h, c = decoder_model.predict([target_seq] + [e_out, e_h, e_c])
        sampled_token_index = np.argmax(output_tokens[0, -1, :])
        sampled_token = tar_index_to_word[sampled_token_index]

        if (sampled_token!='eostoken'):
            decoded_sentence += ' '+sampled_token

        #  <eos>에 도달하거나 최대 길이를 넘으면 중단.
        if (sampled_token == 'eostoken'  or len(decoded_sentence.split()) >= (summary_max_len-1)):
            stop_condition = True

        # 길이가 1인 타겟 시퀀스를 업데이트
        target_seq = np.zeros((1,1))
        target_seq[0, 0] = sampled_token_index

        # 상태를 업데이트 합니다.
        e_h, e_c = h, c

    return decoded_sentence
모델 테스트
# 원문의 정수 시퀀스를 텍스트 시퀀스로 변환
def seq2text(input_seq):
    temp=''
    for i in input_seq:
        if (i!=0):
            temp = temp + src_index_to_word[i]+' '
    return temp

# 요약문의 정수 시퀀스를 텍스트 시퀀스로 변환
def seq2summary(input_seq):
    temp=''
    for i in input_seq:
        if ((i!=0 and i!=tar_word_to_index['sostoken']) and i!=tar_word_to_index['eostoken']):
            temp = temp + tar_index_to_word[i] + ' '
    return temp

import requests
from summa.summarizer import summarize
추출적 요약
! pip list | grep summa


import requests
from summa.summarizer import summarize

text = requests.get('http://rare-technologies.com/the_matrix_synopsis.txt').text

print(text[:1500])

print('Summary:')
print(summarize(text, ratio=0.005))


print('Summary:')
print(summarize(text, ratio=0.005, split=True))

print('Summary:')
print(summarize(text, words=50))