플라스크
-
마이크로 웹 프레임워크
- 마이크로: 웹 서비스를 구성하는 최소한의 기능을 담고 있고, 확장이 가능한 설계 의미
- 웹: 인터넷 브라우저 통해 보고 있는 공간
- 프레임워크: 문제 해결을 위한 구조
-
CODE
-
from flask import Flask: flask패키지에서 Flask모듈 가져오기
-
from flask_ngrok import run_with_ngrok: 패키지에서 모듈 가져 오기
-
run_with_ngrok(app): 앱이 실행될 시 ngrok 시작
-
app = Flask(name): Flask 객체 생성하여 app라는 변수 저장
-
@app.route( '/') : @와 같이 적힌 코드를 데코레이터.
-
데코레이터: URL 규칙을 받아 해당 규칙의 URL로 요청이 들어오면 함수 실행하게 한다. 함수를 반환하는 함수로 데코레이터 밑에 있는 함수가 실행되기 전에 먼저 실행된다고 생각을 하면 된다.
-
('/') : root의 위치 나타냄
-
from flask import Flask
from flask_ngrok import run_with_ngrok

app = Flask(__name__)
run_with_ngrok(app)

@app.route("/")
def hello():
    return "플라스크 동작 확인!"

if __name__ == "__main__":
app.run()- PYTHON CODE
def main_function():
     print ("test function")
print("🚌💨")

import datetime

# 코드 선언부
def main_function():
     print ("test function")

# 코드 실행부
print (datetime.datetime.now()) #- 텍스트 표시 전 시간
main_function()
print (datetime.datetime.now()) #- 텍스트 표시 후 시간

# 코드 선언부
def datetime_decorator(func):
        def decorated():
                print(datetime.datetime.now())
                func()
                print(datetime.datetime.now())
        return decorated

@datetime_decorator
def main_function():
        print ("test function")


# 코드 실행부
main_function()
vi editor 사용법
-
if 에디터 실행, i눌러서 insert모드로 변경
-
코드 복사
-
Esc 눌러서 :wq 입력하면 변경 내용 저장 완료
Templates
-
플라스크에서 보이는 부분과 처리하는 부분을 나누는 것
-
디렉토리에 저장되고 이 부분에 HTML파일 넣기
HTML
-
브라우저를 통해서 아는 마크업 언어
-
콘텐츠의 여러 부분 감싸기
-
tags는 웹상의 다른페이지 이동하게 하는 하이퍼 링크 내용 생성 혹은 단어 강조
-
CODE
from flask import Flask, render_template
from flask_ngrok import run_with_ngrok

app = Flask(__name__)
run_with_ngrok(app)

@app.route('/')
def index():
  return render_template('index.html')

@app.route('/about')
def about():
    return 'About project'

if __name__ == "__main__":
    app.run()
랜더링(Rendering)
- HTML, CSS등 브라우저 랜더링 엔진을 토애 그래픽 형태로 출력한다
GET & POST
-
웹에서 데이터 주고 받을 시 쓰이는 통신 규약
-
GET: 주로 링크 클릭 시, 사용
-
POST: 데이터가 있는 게시물 올릴 때, 사용
-
CODE
@app.route('/index')
def about():
    return 'About project'

@app.route('/calculate', methods=['POST', 'GET'])
def calculate(num=None):
    if request.method == 'POST':
        pass

    elif request.method == 'GET':
        pass
UI 코드
HTML기초
-
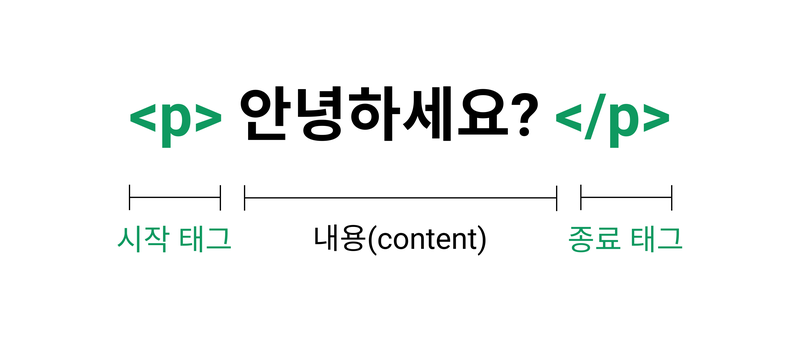
태그(tag): 홑화살괄호로 감싸진 것
- 시작태그: 시작을 알리고속성과 값을 가진다. 문서 링크시키기위한 태그이다.
- 종료태그: 종료를 알린다
- 태그 안에 태그가 가능하다(연 순서대로 닫아야함)
- 종료 태그가 없는 태그는: 태그 내부에 넣을 값이 없는 경우에 쓰인다.
-
엘리먼트(element)
- 감싸진 내용
버튼과 텍스트 박스
- 버튼

-
정의: 다은 작업 진행 명령
-
HTML CODE
-
action="/get_selected_table" : app.py에 get_selected_table이라고 라우팅 된 함수를 실행합니다.
-
method="POST" : 데이터 전달 방식은 POST를 이용합니다.
-
input : 입력 UI 컴포넌트를 의미합니다.
-
type="text" : "text"를 입력하는 UI 컴포넌트 즉 텍스트 박스를 의미합니다.
-
name="table_name" : 파이썬에서 HTML의 UI 컴포넌트에 입력된 데이터를 가져올 때 사용하는 이름을 지정합니다.
-
placeholder="테이블 명" : 입력 칸에 도움을 주는 텍스트를 넣습니다.
-
required="required" : 같은 form안의 버튼을 눌렀을 때 빈칸이면 무조건 입력을 하도록 합니다. 이때, 다른 form 안에 있는 것은 신경쓰지 않습니다.
-
button type="submit" : form 내부에서 일어난 내용의 전송 기능을 담당합니다.
- form 블록의 끝을 의미합니다.
-
<form action="/get_selected_table" method="POST">
    <input type="text" name="table_name" placeholder="테이블 명" required="required" />
    <button type="submit">선택</button>
</form>-
FLASK CODE
-
'/get_selected_table' : HTML 코드에
부분이 있습니다. -
여기에서 action="/get_selected_table" 을 라우팅하고 있는 파이썬 함수가 여기라는 것을 @app.route('/get_selected_table', methods=["POST"]) 가 말하고 있는 것입니다.
-
methods=["POST"] : 데이터 전달 방식은 POST를 이용합니다.
-
request.form.get('table_name') : HTML에서 table_name 이라는 name을 가진 UI 컴포넌트에 있는 데이터를 가져옵니다
- select_table() 함수가 끝나면 render_template 안에 있는 'index.html'을 표시합니다.
-
@app.route('/get_selected_table', methods=["POST"])
def select_table():
      table_id = request.form.get('table_name')
      print(table_id)
return render_template('index.html')- 텍스트 입력
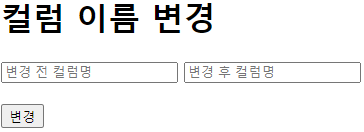
- HTML CODE
- action="/get_column_name_change" : app.py에 get_column_name_change라고 라우팅 된 함수를 실행합니다.
method="POST" : 데이터 전달 방식은 POST를 이용합니다. - 첫 번째 level 헤더에 해당하는 글을 입력합니다. 더 낮은 level의 헤더를 입력하고 싶으면 h2, h3를 입력하면 됩니다.
- name="before_column_name" : 파이썬에서 HTML의 UI 컴포넌트에 입력된 데이터를 가져올 때 사용하는 이름을 지정합니다.
- placeholder="변경 전 컬럼명" : 입력 칸에 도움을 주는 텍스트를 넣습니다.
- 줄 바꿈을 합니다. 여기선 두 번을 썼으니 두 번 줄 바꿈이 됩니다(엔터 두 번).
- button type="submit" : form 내부에서 일어난 내용의 전송 기능을 담당합니다.
- form 블록의 끝을 의미합니다
- action="/get_column_name_change" : app.py에 get_column_name_change라고 라우팅 된 함수를 실행합니다.
<form action="/get_column_name_change" method="POST">
  <h1>컬럼 이름 변경</h1>
      <input type="text" name="before_column_name" placeholder="변경 전 컬럼명" required="required" />
      <input type="text" name="after_column_name" placeholder="변경 후 컬럼명"required="required" />
  <br>
  <br>
	<button type="submit">변경</button>
</form>-
FLASK CODE
-
'/get_column_name_change' : HTML 코드에서 부분이 있습니다. 여기서 action="/get_column_name_change" 를 라우팅하고 있는 파이썬 함수가 여기라는 것을 @app.route('/get_column_name_change', methods=["POST"]) 가 말하고 있는 것 입니다.
-
methods=["POST"] : 데이터 전달 방식은 POST를 이용합니다.
- request.form.get('table_name') : HTML에서 before_column_name이라는 name을 가진 UI 컴포넌트에 있는 데이터를 가져옵니다.
- bef_column_name 값을 콘솔 창에 출력합니다. 데이터가 잘 들어오는지 확인해보세요.
- select_table() 함수가 끝나면 render_template 안에 있는 'index.html'을 표시합니다.
-
@app.route('/get_column_name_change', methods=['POST'])
def column_name_change():
    bef_column_name = request.form.get('before_column_name')
    aft_column_name = request.form.get('after_column_name')

    print(bef_column_name)
    print(aft_column_name)

return render_template('index.html')-
체크 박스

-
HTML CODE(이미지 전처리 종류 선택)
- action="/get_image_pre_status" : app.py에 get_image_pre_status이라고 라우팅 된 함수를 실행합니다.
method="POST" : 데이터 전달 방식은 POST를 이용합니다. - type="checkbox" : 입력 타입을 체크 박스로 선택합니다.
- name="pre_toggle_0" : 파이썬에서 HTML의 UI 컴포넌트에 입력된 데이터를 가져올 때 사용하는 이름을 지정합니다. 데이터를 pre_toggle_0은 180도 회전, pre_toggle_1은 흑백 변경, pre_toggle_2는 이미지 사이즈 변경으로 지정했습니다.
- span은 레이아웃을 나누는데 주로 쓰입니다. 디자인적 요소인 css를 입힐 때 사용하지만 여기서는 단순히 화면에 글씨를 넣기 위해 span을 썻습니다.
- 줄 바꿈을 합니다
- button type="submit" : form 내부에서 일어난 내용의 전송 기능을 담당합니다.
- form 블록의 끝을 의미합니다.
- action="/get_image_pre_status" : app.py에 get_image_pre_status이라고 라우팅 된 함수를 실행합니다.
<form action="/get_image_pre_status" method="POST" enctype="multipart/form-data">
    <h1>이미지 전처리 종류 선택</h1>
    <input type="checkbox" name="pre_toggle_0">
    <span>180도 회전 </span>
		<br>
    <input type="checkbox" name="pre_toggle_1">
    <span>흑백 변경 </span>
		<br>
    <input type="checkbox" name="pre_toggle_2">
    <span>이미지 사이즈 변경 </span>
    <br>
    <button type="submit">변경</button>
</form>-
FLASK CODE
-
'/get_image_pre_status' : 바로 위 HTML 코드에서 부분이 있습니다. 여기서 action="/get_image_pre_status"을 라우팅하고 있는 파이썬 함수가 여기라는 것을 @app.route('/get_image_pre_status', methods=["POST"]) 가 의미하고 있는 것 입니다.
-
methods=["POST"] : 데이터 전달 방식은 POST를 이용합니다.
-
HTML에서 POST 전송이 오면 if문 아래의 코드를 실행합니다.
-
request.form.get('pre_toggle_0') : HTML에서 pre_toggle_0이라는 name을 가진 UI 컴포넌트에 있는 데이터를 가져옵니다.
-
@app.route('/get_image_pre_status', methods=['POST'])
def image_preprocessing():
    if request.method == 'POST':
        print("0 = ", request.form.get('pre_toggle_0'))
        print("1 = ", request.form.get('pre_toggle_1'))
        print("2 = ", request.form.get('pre_toggle_2'))
    return render_template('index.html')
파일 선택
- 이미지 파일 업로드

-
HTML CODE
-
action="/upload_image" : app.py에 upload_image라고 라우팅 된 함수를 실행합니다.
-
method="POST" : 데이터 전달 방식은 POST를 이용합니다.
-
enctype=multipart/form-data : 이 속성은 파일의 데이터를 전송하는 파일입니다. 지금까지 UI 컴포넌트들의 변경 값만 전송했기 때문에 데이터 전송에 필요한 이 속성이 없었습니다.
-
type="file" : 입력 타입을 '파일'로 합니다. file을 사용하면 브라우저는 사용자가 업로드 할 파일을 선택할 수 있는 필드를 제공합니다.
-
name="uploaded_image" : 파이썬에서 HTML의 UI 컴포넌트에 입력된 데이터를 가져올 때 사용하는 이름을 지정합니다.
{% if label %} -
플라스크는 JInja2라는 문법을 지원합니다. 이 문법은 HTML에서 for, if 와 같은 문법을 쓸 수 있도록 해줍니다. {% if label %} 이 코드가 있는 곳도 HTML 코드 안에 있죠? 즉, label에 어떤 값이 들어오면 아래의 코드를 실행한다는 의미입니다.
-
label 값을 가져와서 span 안에 넣습니다. 안에 있기때문에 label의 텍스트가 표시됩니다. 예를 들어, 파이썬 코드의 return 변수 label에 image1.jpg 이라는 text가 들어왔다면 화면에 image1.jpg가 표시됩니다.
-
if문의 종료를 의미합니다.
-
<form action="/upload_image" method="POST" enctype="multipart/form-data">
    <h1>이미지 업로드 하기</h1>

    <button>이미지 업로드</button>
    <input type="file" name="uploaded_image">

    {% if label %}
        <span>
            {{ label }}
        </span>
    {% endif %}
</form>-
FLASK CODE
-
'/upload_image' : 바로 위 HTML 코드에서 부분이 있습니다. 여기서 action="/upload_image"를 라우팅하고 있는 파이썬 함수가 여기라는 것을 @app.route('/upload_image', methods=["POST"]) 가 말하고 있는 것입니다.
-
methods=["POST"] : 데이터 전달 방식은 POST를 이용합니다.
-
html에서 POST 전송이 오면 if문 아래의 코드를 실행합니다.
-
HTML에서 uploaded_image이라는 name을 가진 UI 컴포넌트에 있는 파일을 가져옵니다.
-
만약 파일이 선택되지 않았다면 'No Files'라는 텍스트를 return 값으로 label에 넣습니다. 위의 HTML 코드에서 {{ label }} 에 해당하는 코드에 텍스트가 들어가게 됩니다.
-
파일이 선택되었다면 return 값에 label 변수에 file을 넣어서 위 HTML 코드에서 {{ label }} 에 해당하는 코드에 자동으로 file에 대한 정보 텍스트가 들어가게 됩니다.
-
@app.route('/upload_image', methods=['POST'])
def upload_image_file():
    if request.method == 'POST':

        file = request.files['uploaded_image']
        if not file: return render_template('index.html', label="No Files")

        return render_template('index.html', label=file)
이미지 전처리 페이지 만들기
-
메인페이지

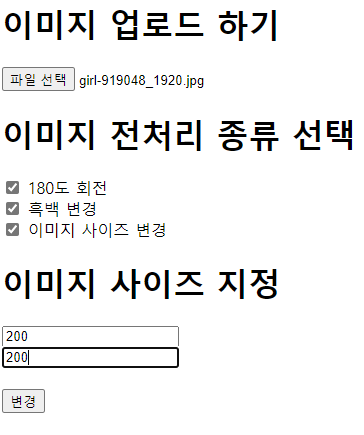
1-1. 메인페이지 -- 입력
I) 입력 사진 선택
II) 이미지 전처리 종류 선택
III) 변경하고 싶은 이미지 사이즈 입력
IV) 변경 누르기
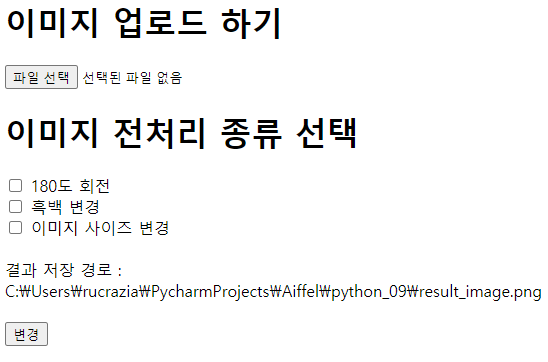
- 결과 페이지
-
결과 저장 경로 밑에 저장되어있는 경로가 아래같이 나온다
- 예: /home/aiffel/aiffel/flask_app/pyproject/result_image.png
-
코드 비교
I) HTML code
$ vi ~/aiffel/flask_app/pyproject/templates/image.html<html>
<head>
<title>이미지 전처리 페이지</title>
</head>
<body>
<form action="/image_preprocess" method="POST" enctype="multipart/form-data">
<h1>이미지 업로드 하기</h1>
<input type="file" name="uploaded_image">
<h1>이미지 전처리 종류 선택</h1>
<input type="checkbox" name="pre_toggle_0">
<span>180도 회전 </span>
<br>
<input type="checkbox" name="pre_toggle_1">
<span>흑백 변경 </span>
<br>
<input type="checkbox" name="pre_toggle_2" id="change_image_size_cb" onclick="setTextBoxShow()">
<span>이미지 사이즈 변경 </span>
<h1 id="size_header"style="display:none">이미지 사이즈 지정</h1>
<input type="text" id="width_size" name="changed_width" placeholder="넓이(width)를 입력해주세요" onkeypress="onlyNumber()" style="display:none"/>
<input type="text" id="height_size" name="changed_height" placeholder="높이(height)를 입력해주세요" onkeypress="onlyNumber()" style="display:none"/>
<br>
<script>
function onlyNumber(){
if((event.keyCode<48)||(event.keyCode>57))
event.returnValue=false;
}
function setTextBoxShow() {
var checkBox = document.getElementById("change_image_size_cb");
if (checkBox.checked == true){
width_size.style.display = "block";
height_size.style.display = "block";
size_header.style.display = "block";
} else {
width_size.style.display = "none";
height_size.style.display = "none";
size_header.style.display = "none";
}
}
</script>
{% if label %}
<span>
결과 저장 경로 :
</span>
<br>
<span>
{{ label }}
</span>
<br>
<br>
{% endif %}
<button type="submit">변경</button>
</form>
</body>
</html>II) PYTHON
$ vi ~/aiffel/flask_app/pyproject/app_image.pyfrom flask import Flask, render_template, request
from flask_ngrok import run_with_ngrok
import os
from PIL import Image
app = Flask(__name__)
run_with_ngrok(app)
'''
이미지 처리 함수
'''
def image_resize(image, width, height):
return image.resize((int(width), int(height)))
def image_rotate(image):
return image.transpose(Image.ROTATE_180)
def image_change_bw(image):
return image.convert('L')
'''
플라스크
'''
@app.route("/index")
def index():
return render_template('image.html')
@app.route('/image_preprocess', methods=['POST'])
def preprocessing():
if request.method == 'POST':
file = request.files['uploaded_image']
if not file: return render_template('index.html', label="No Files")
img = Image.open(file)
is_rotate_180 = request.form.get('pre_toggle_0')
is_change_bw = request.form.get('pre_toggle_1')
is_change_size = request.form.get('pre_toggle_2')
if is_rotate_180 == 'on':
img = image_rotate(img)
if is_change_bw == 'on':
img = image_change_bw(img)
if is_change_size == 'on':
img = image_resize(img, request.form.get('changed_width'), request.form.get('changed_height'))
img.save('result_image.png')
src_dir = os.path.dirname(os.path.abspath(__file__))
image_path = os.path.join(src_dir, 'result_image.png')
# 결과 리턴
return render_template('image.html', label=image_path)
if __name__ == '__main__':
app.run()- 결과 확인
- 앱 실행 후 URL 접속
$ pip install Pillow
$ python ~/aiffel/flask_app/pyproject/app_image.py
코드 분석
- 함수
- def image_resize(image, width, height): 이미지 사이즈 변환하는 함수 입니다. 이전 노드에서 했던 사이즈 변환과 다른 점은 width와 height를 둘 다 입력합니다(이전 노드에선 높이가 고정되어 있었습니다).
- def image_resize(image, width, height): 이미지를 180도 회전하는 함수입니다.
- def image_change_bw(image): 이미지 색공간을 흑백으로 바꾸는 함수입니다.
def image_resize(image, width, height):
        return image.resize((int(width), int(height)))

def image_rotate(image):
    return image.transpose(Image.ROTATE_180)

def image_change_bw(image):
return image.convert('L')- 이미지 업로드하기

-
HTML CODE
-
action="/image_preprocess" : app.py에 image_preprocess라고 라우팅 된 함수를 실행합니다.
-
method="POST" : 데이터 전달 방식은 POST를 이용합니다.
-
enctype=multipart/form-data : 이 속성은 파일의 데이터를 전송하는 파일입니다. 선택한 이미지 파일을 전송해야하기 때문에 해당 속성이 필요합니다.
-
<form action="/image_preprocess" method="POST" enctype="multipart/form-data">
    <h1>이미지 업로드 하기</h1>
<input type="file" name="uploaded_image">-
PYTHON CODE
- '/image_preprocess' : 바로 위 HTML 코드에서 부분이 있습니다. 여기서 action="/image_preprocess"을 라우팅하고 있는 파이썬 함수가 여기라는 것을 @app.route('/image_preprocess', methods=["POST"]) 가 말하고 있는 것 입니다.
-
methods=["POST"] : 데이터 전달 방식은 POST를 이용합니다.
-
PIL 패키지의 Image 모듈을 이용해서 이미지 파일을 로드합니다.
@app.route('/image_preprocess', methods=['POST'])
def preprocessing():
    if request.method == 'POST':
        file = request.files['uploaded_image']
        if not file: return render_template('index.html', label="No Files")

        img = Image.open(file)

        is_rotate_180 = request.form.get('pre_toggle_0')
        is_change_bw = request.form.get('pre_toggle_1')
        is_change_size = request.form.get('pre_toggle_2')

        if is_rotate_180 == 'on':
            img = image_rotate(img)

        if is_change_bw == 'on':
            img = image_change_bw(img)

        if is_change_size == 'on':
            img = image_resize(img, request.form.get('changed_width'), request.form.get('changed_height'))

        img.save('result_image.png')

        src_dir = os.path.dirname(os.path.abspath(__file__))
        image_path = os.path.join(src_dir, 'result_image.png')

        # 결과 리턴
return render_template('image.html', label=image_path)- 이미지 전처리 종류 선택
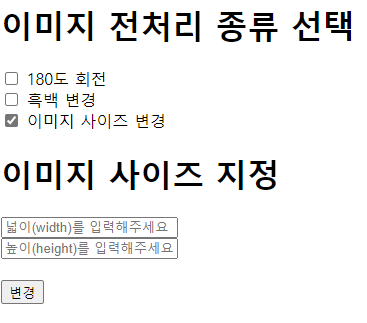
-
HTML CODE
-
id="change_image_size_cb" : 밑에서 설명할 script 내부에서 사용을 위해 이 checkbox만을 위한 id를 지정합니다. 이 id를 이용하면 해당 checkbox만을 컨트롤 가능합니다.
-
onclick="setTextBoxShow()" : 해당 checkbox가 클릭되면 밑에서 설명할 script 내부에서 선언되어 있는 이 함수가 실행되도록 합니다.
-
script 안에는 javascript 문법으로 HTML 내에서 직접 정보를 처리할 수 있도록 해줍니다. 플라스크에서 지원하는 jinja2와 비슷하지만 jinja2는 파이썬 코드와의 통신을 위한 것이고 javascript는 HTML 페이지의 UI 컴포넌트의 변화에 따른 동작이므로 서로 사용 목적이 다릅니다.
-
onlyNumber() 함수는 이미지 width, height를 입력할 수 있는 text box에 숫자만 넣을 수 입력하게 해줍니다.
-
setTextBoxShow() 함수는 '이미지 사이즈 변경' 체크박스에 체크가 되면 이미지 width, height를 입력할 수 있는 칸이 나오게 되는 코드입니다.
-
    <input type="checkbox" name="pre_toggle_0">
    <span>180도 회전 </span>
    <br>
    <input type="checkbox" name="pre_toggle_1">
    <span>흑백 변경 </span>
    <br>
    <input type="checkbox" name="pre_toggle_2" id="change_image_size_cb" onclick="setTextBoxShow()">
    <span">이미지 사이즈 변경 </span>

    <h1 id="size_header"style="display:none">이미지 사이즈 지정</h1>
        <input type="text" id="width_size" name="changed_width" placeholder="넓이(width)를 입력해주세요" onkeypress="onlyNumber()" style="display:none"/>
        <input type="text" id="height_size" name="changed_height" placeholder="높이(height)를 입력해주세요" onkeypress="onlyNumber()" style="display:none"/>
    <br>

    <script>
    function onlyNumber(){

            if((event.keyCode<48)||(event.keyCode>57))

               event.returnValue=false;

    }

    function setTextBoxShow() {
      var checkBox = document.getElementById("change_image_size_cb");
      if (checkBox.checked == true){
        width_size.style.display = "block";
        height_size.style.display = "block";
        size_header.style.display = "block";

      } else {
        width_size.style.display = "none";
        height_size.style.display = "none";
        size_header.style.display = "none";
      }
    }
    </script>

	  {% if label %}
      <span>
          결과 저장 경로 :
      </span>
	    <br>
      <span>
          {{ label }}
      </span>
	    <br>
	    <br>
    {% endif %}
    <button type="submit">변경</button>
</form>
-
PYTHON
-
img.save('result_image.png'): 변환된 결과 이미지를 저장합니다.
-
src_dir = os.path.dirname(os.path.abspath(file)) :현재 실행되고 있는 파일이 있는 폴더를 알아내는 코드입니다.
-
image_path = os.path.join(src_dir, 'result_image.png')
-
os.path.join(src_dir, 'result_image.png') : os.path.join() 을 이용하면 안에 있는 두 개의 경로를 합칩니다. 여기서는 폴더의 경로에 result_image.png라는 경로를 합칩니다.
-
return render_template('image.html', label=image_path)
-
HTML로 넘겨주는 label 변수에 image_path 를 넣어 HTML에서 표시를 해줄 수 있도록 합니다.
-
@app.route('/image_preprocess', methods=['POST'])
def preprocessing():
    if request.method == 'POST':
        file = request.files['uploaded_image']
        if not file: return render_template('index.html', label="No Files")

        img = Image.open(file)

        is_rotate_180 = request.form.get('pre_toggle_0')
        is_change_bw = request.form.get('pre_toggle_1')
        is_change_size = request.form.get('pre_toggle_2')

        if is_rotate_180 == 'on':
            img = image_rotate(img)

        if is_change_bw == 'on':
            img = image_change_bw(img)

        if is_change_size == 'on':
            img = image_resize(img, request.form.get('changed_width'), request.form.get('changed_height'))

        img.save('result_image.png')

        src_dir = os.path.dirname(os.path.abspath(__file__))
        image_path = os.path.join(src_dir, 'result_image.png')

        # 결과 리턴
        return render_template('image.html', label=image_path)

if is_rotate_180 == 'on': # 이미지 회전 시키는 함수
img = image_rotate(img) 