리눅스 환경에서 SPI 통신을 사용하는 방법과 BMP280 센서에서 데이터를 읽어오는 과정을 알아보겠습니다. I2C 통신에 대한 개념과 SPI 통신의 기본 원리, 리눅스 커널에서의 SPI 지원 그리고 실제 BMP280 센서와의 연결 및 데이터 읽기에 대해 살펴보겠습니다.
1. I2C 통신
- I2C는 2개의 신호선(SCL, SDA)을 사용하는 동기식 시리얼 통신 프로토콜
- SPI는 4개의 신호선 (MOSI, MISO, SCLK, CS)을 사용
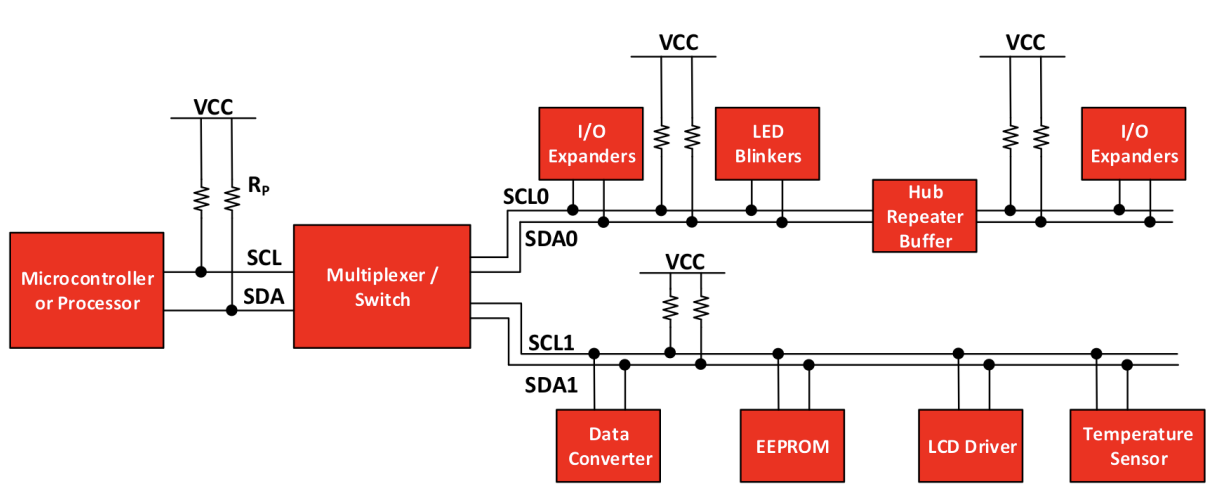
- I2C 버스 구성
- 마이크로컨트롤러를 중심으로 멀티플렉서, I/O 확장, LED 깜빡임, 허브 리피터, 데이터 변환기, EEPROM, LCD 드라이버, 온도 센서 등 다양한 장치들이 연결
- 데이터 전송
- SCL 클럭 신호에 맞춰 SDA 데이터 신호가 전송
- MSB(Most Significant Bit)부터 LSB(Least Significant Bit) 순서로 전송
- 바이트 전송 후에는 수신 측에서 ACK(Acknowledge) 신호를 보내 전송 성공 여부를 알림
- NACK
- 데이터 전송 실패 시에는 NACK(Not Acknowledge) 신호가 발생
- 데이터 손실이나 장치 오류
- 쓰기 과정
- 마스터 장치는 슬레이브 장치의 주소와 쓰기 모드(R/W=0)를 전송
- 레지스터 주소와 데이터를 순차적으로 전송
- I2C와 SPI 비교
- 신호선
- I2C는 2개(SDA, SCL), SPI는 4개(MOSI, MISO, SCLK, CS)
- 속도
- I2C는 최대 3.4Mbps, SPI는 10Mbps, 50Mbps 이상으로 SPI가 더 빠름
- 복잡도
- I2C는 주소 지정 및 ACK/NACK 처리가 필요하여 SPI보다 복잡
- I2C는 주소 지정 및 ACK/NACK 처리가 필요하여 SPI보다 복잡
- 신호선
2. SPI
개념
- SPI는 I2C와 함께 널리 사용되는 동기식 시리얼 통신 방식
- I2C보다 빠르고, 속도 제한이 없어 고속 데이터 전송에 적합
구성
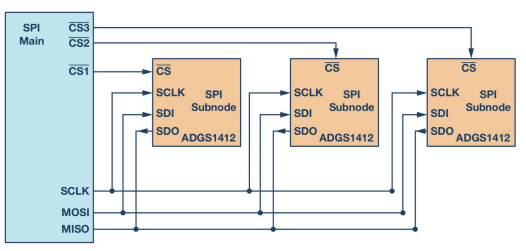
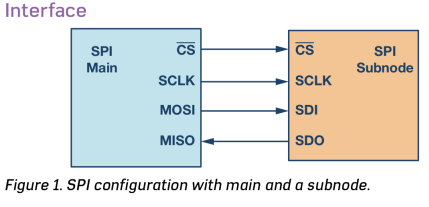
- 마스터 장치와 슬레이브 장치가 CS, SCLK, MOSI, MISO 신호선을 통해 연결
- SPI 통신은 일반적으로 I2C보다 고속으로 동작
구성 요소
- SCLK(SPI CLK)
- 클럭 신호를 제공
- CS(Chip Select)
- 여러 개의 슬레이브 장치 중 통신할 장치를 선택
- MOSI(Master Out Slave In)
- 마스터에서 슬레이브로 데이터를 전송
- MISO(Master In Slave Out)
- 슬레이브에서 마스터로 데이터를 전송
- 슬레이브에서 마스터로 데이터를 전송
모드
- SPI는 클럭 극성(Clock Polarity, CPOL)과 위상(Clock Phase, CPHA)에 따라 4가지 모드를 지원
| 모드 | CPOL (Idle 상태) | CPHA (샘플링 엣지) |
|---|---|---|
| 0 | Low | Rising (MOSI), Falling (MISO) |
| 1 | Low | Falling (MOSI), Rising (MISO) |
| 2 | High | Rising (MOSI), Falling (MISO) |
| 3 | High | Falling (MOSI), Rising (MISO) |
다중 슬레이브
- 하나의 마스터 장치가 여러 개의 슬레이브 장치와 통신
- 슬레이브 장치는 고유의 CS 신호를 통해 선택
소프트웨어
- 리눅스에서 SPI 통신은 마스터 모드로 동작
- CS 신호를 통해 특정 슬레이브 장치(센서, 디바이스 등)를 선택하고 통신
- 리눅스 커널의 GPIO bit-banging 알고리즘을 사용하여 소프트웨어적으로 SPI 파형을 생성
3. SPI 버스 드라이버
- SPI 버스 드라이버는 drivers/spi/ 디렉토리에 위치
- spi_controller 표준 인터페이스를 통해 등록
- 라즈베리파이의 경우, drivers/spi/spi-bcm2835.c 드라이버가 사용
- arch/arm/boot/dts/bcm283x.dtsi 와 arch/arm/boot/dts/bcm2711.dtsi 파일에서 관련 설정을 확인
코드
// drivers/spi/spi-bcm2835.c
static const struct of_device_id bcm2835_spi_match[] = {
    { .compatible = "brcm,bcm2835-spi", },
    { }
};
MODULE_DEVICE_TABLE(of, bcm2835_spi_match);

static struct platform_driver bcm2835_spi_driver = {
    .driver = {
        .name   = DRV_NAME,
        .of_match_table = bcm2835_spi_match,
    },
    .probe          = bcm2835_spi_probe,
    .remove         = bcm2835_spi_remove,
    .shutdown       = bcm2835_spi_shutdown,
};
module_platform_driver(bcm2835_spi_driver);
4. 유저 SPI 인터페이스
- 리눅스는 사용자 공간에서 SPI 버스를 직접 제어할 수 있는 인터페이스
- 애플리케이션에서 SPI 속도 조절, 데이터 송수신
- 라즈베리파이에서는 /dev/spidev0.0 과 같은 장치 파일을 통해 SPI 버스에 접근
코드
#include <fcntl.h>
#include <unistd.h>
#include <sys/ioctl.h>
#include <linux/spi/spidev.h>

int main() {
    int fd;
    unsigned char tx_buf[2] = {0x01, 0x00}; //예시 데이터
    unsigned char rx_buf[2];

    fd = open("/dev/spidev0.0", O_RDWR);
    if (fd < 0) {
        perror("Error opening SPI device");
        return -1;
    }

    struct spi_ioc_transfer tr = {
        .tx_buf = (unsigned long)tx_buf,
        .rx_buf = (unsigned long)rx_buf,
        .len = 2, // 전송할 바이트 수
        .speed_hz = 1000000, // SPI 클럭 속도 ex)1MHz
        .bits_per_word = 8,
    };

    if (ioctl(fd, SPI_IOC_MESSAGE(1), &tr) < 0) {
        perror("Error sending SPI message");
        close(fd);
        return -1;
    }

    printf("Received: 0x%02x 0x%02x\\n", rx_buf[0], rx_buf[1]);

    close(fd);
    return 0;
}
5. Device Tree 설정(disable_spidev)
- SPI 장치를 비활성화하기 위한 Device Tree Overlay를 작성
disable_spidev.dts
/dts-v1/;
/plugin/;

/ {
        compatible = "brcm,bcm2708";

        fragment@0 {
                target = <&spi0>;
                __overlay__ {
                        status = "disabled";
                };
        };
};
arch/arm/boot/dts/bcm2711-rpi-4-b.dts 에서 spidev 관련 설정
6. 커널 모듈 작성(k_spi.c) - BMP280 센서와의 통신
- BMP280 센서와 통신하기 위한 커널 모듈
#include <linux/init.h>
#include <linux/module.h>
#include <linux/kernel.h>
#include <linux/spi/spi.h>
#include <linux/delay.h>
#include <linux/gpio.h>

#define BUF_SIZE 1024
#define DRIVER_NAME "k_spi_driver"
#define DRIVER_CLASS "k_spi_class"
#define TOY_SPI_BUS_NUM 0

static struct spi_device *bmp280_dev;

struct spi_board_info spi_device_info = {
        .modalias = "bmp280",
        .max_speed_hz = 1000000,
        .bus_num = TOY_SPI_BUS_NUM,
        .chip_select = 0,
        .mode = 3,
};

static int __init k_module_init(void)
{
    struct spi_master *master;
    u8 id;

    pr_info("k_spi_driver loaded\\n");

    master = spi_busnum_to_master(TOY_SPI_BUS_NUM);
    if (!master) {
        pr_err("Error! spi bus with Nr. %d\\n", TOY_SPI_BUS_NUM);
        return -ENODEV;
    }

    bmp280_dev = spi_new_device(master, &spi_device_info);
    if (!bmp280_dev) {
        pr_info("Could not create spi device!\\n");
        return -ENODEV;
    }

    bmp280_dev->bits_per_word = 8;
    if (spi_setup(bmp280_dev) != 0) {
        pr_info("Could not change bus setup!\\n");
        spi_unregister_device(bmp280_dev);
        return -EFAULT;
    }

    // BMP280 ID 레지스터(0xD0) 읽기
    id = spi_w8r8(bmp280_dev, 0xD0);
    pr_info("ID: 0x%x\\n", id);

    return 0;
}

static void __exit k_module_exit(void)
{
    pr_info("k_spi_driver unloaded\\n");

    if (bmp280_dev) {
        spi_unregister_device(bmp280_dev);
    }
}

module_init(k_module_init);
module_exit(k_module_exit);

MODULE_LICENSE("GPL");
MODULE_AUTHOR("Your Name");
MODULE_DESCRIPTION("A simple SPI driver for BMP280");
코드 설명
- spi_board_info
- SPI 슬레이브 장치(BMP280)의 정보를 정의
- spi_busnum_to_master()
- SPI 버스 번호로 spi_master 구조체를 가져오기
- spi_new_device()
- spi_master 와 spi_board_info 를 기반으로 SPI 디바이스를 생성
- spi_setup()
- SPI 디바이스의 비트 수, 모드 등을 설정
- spi_w8r8()
- 1바이트를 쓰고, 1바이트를 읽어옵니다. BMP280의 ID 레지스터(0xD0)를 읽는 데 사용
7. 하드웨어 연결
- GPIO 핀 다이어그램
- 라즈베리파이의 GPIO 핀 배열을 참고하여 연결
- BMP280 센서 연결
- VCC - 3V3 전원
- GND - Ground
- SCL - GPIO 11 (SCLK)
- SDA - GPIO 9 (MISO)
- CSB - GPIO 8 (CE0)
- SDO - GPIO 10 (MOSI)
8. 빌드
- make 명령어로 disable_spidev.dtbo 와 k_spi.ko 파일을 빌드
- disable_spidev.dtbo 파일을 라즈베리파이의 /boot/overlays 폴더에 복사
- 먼저, Boot 디렉토리를 마운트
- mount -t vfat /dev/mmcblk0p1 /boot/
- dtbo 파일을 복사
- cp disable_spidev.dtbo /boot/overlays/
- 먼저, Boot 디렉토리를 마운트
9. SPI 모듈 설정
-
/boot/config.txt 파일을 수정하여 dtoverlay=disable_spidev 를 추가
-
dtparam=spi=on 이 활성화되어 있는지 확인
-
변경 사항을 저장하고 재부팅
-
modprobe spi_bcm2835 명령어로 SPI 모듈을 로드
-
명령어로 핀 설정을 확인
mount -t debugfs debugfs /sys/kernel/debug
cat /sys/kernel/debug/pinctrl/pinctrl-maps
10. BMP280 센서 ID 읽기
- insmod k_spi.ko 명령어로 작성한 커널 모듈을 로드
- dmesg 명령어로 커널 메시지를 확인
- [ xxx.xxxxxx] ID: 0x58 와 같이 BMP280 센서의 ID가 출력되면 정상적으로 통신