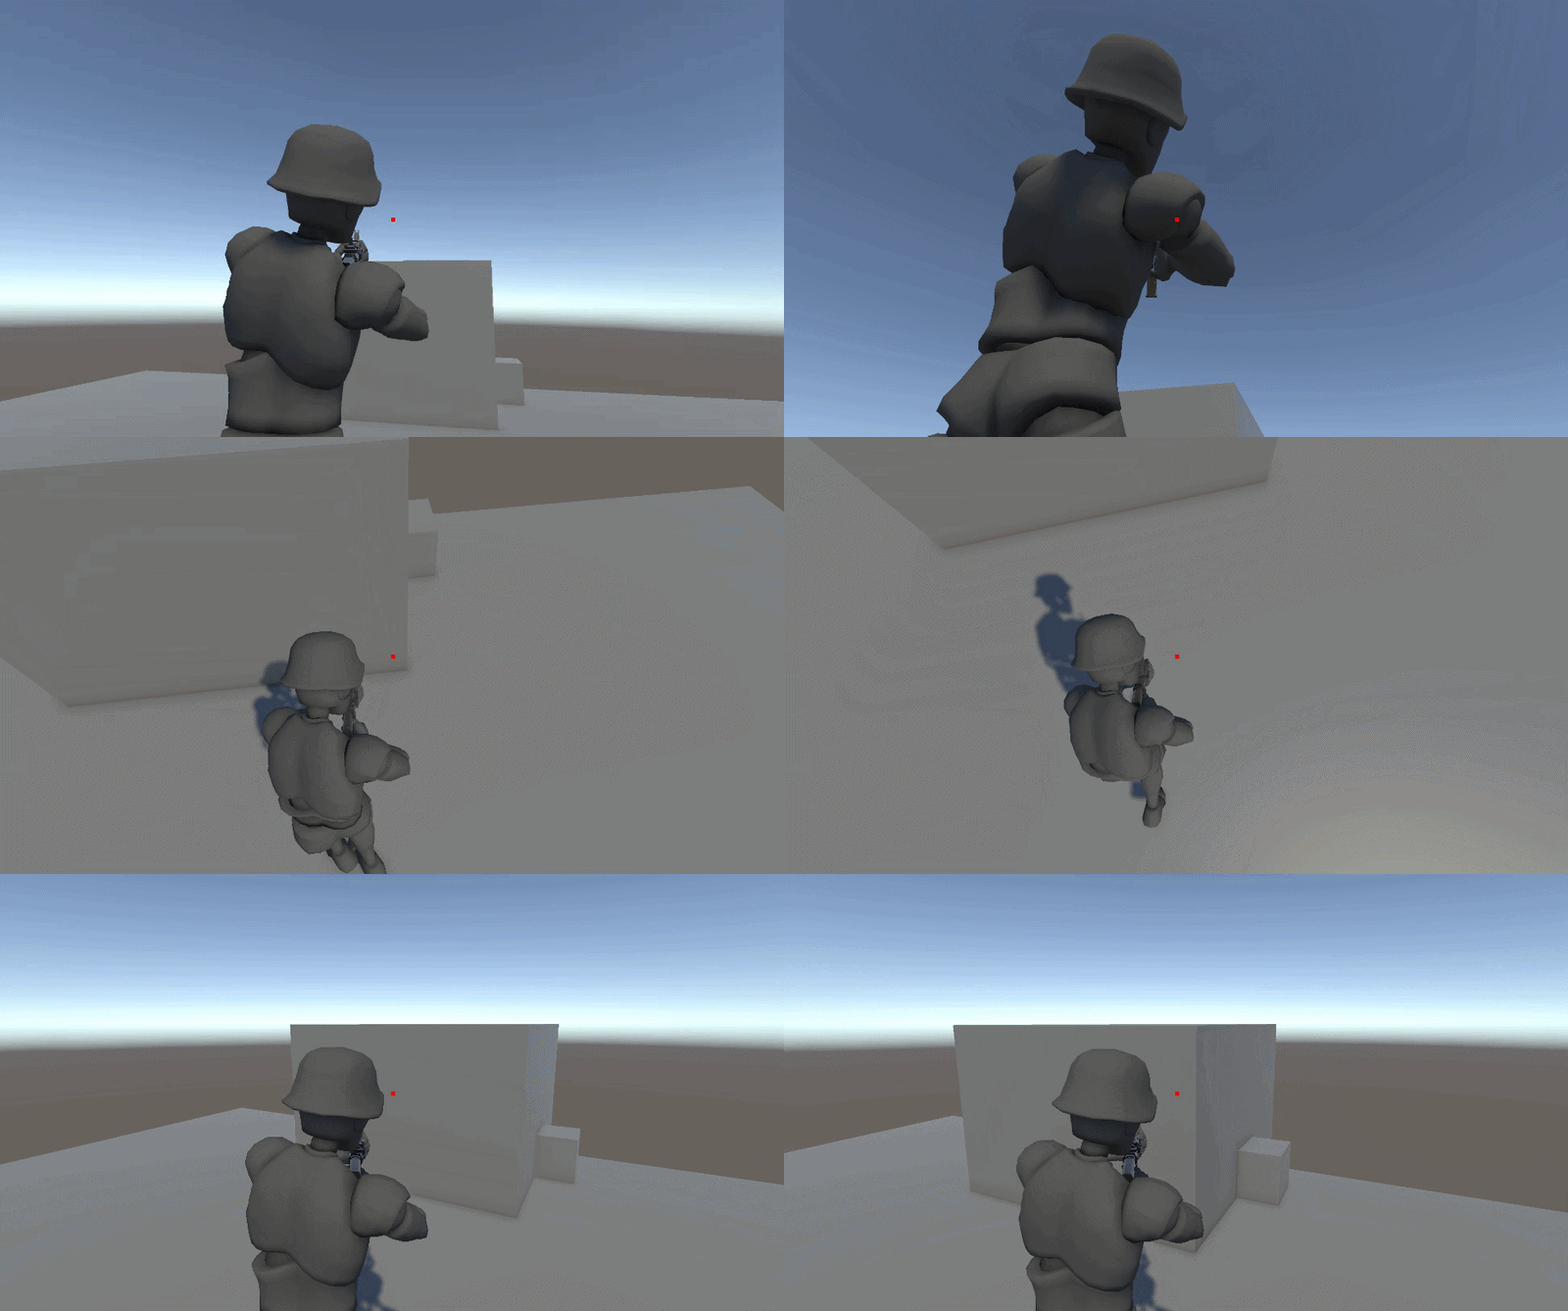
개요
FPS/TPS 에서 필수적인 Fire Event를 구현하기 전에 애니메이션을 먼저 자연스럽게 만들어보도록 하겠습니다.
구현
우선 애니메이션을 준비해줍니다.
- Idle
- Move (8 방향)
- Aim (위/아래 두 방향)
Idle, Move 애니메이션 같은 경우에는 AssetStore에서 무료 에셋을 사용하였고,
Aim은 Blender로 기존 애니메이션을 수정하여 사용하였습니다.
Animation Layer는 Upper와 Lower로 나눠줍니다.
원래는 Base와 Upper만으로 충분하지만, AimOffset의 정확도를 위해서 움직임을 아예 분리해주었습니다.
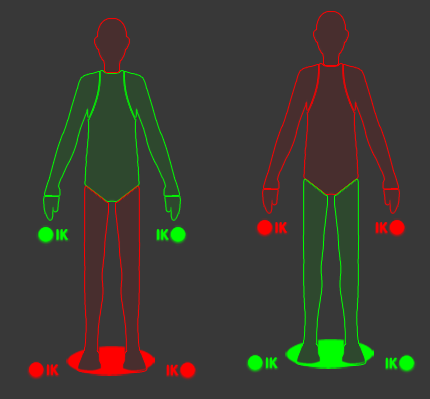
LowerBody
LowerBody 쪽에서는 움직임과 관련된 애니메이션을 실행할 예정입니다.
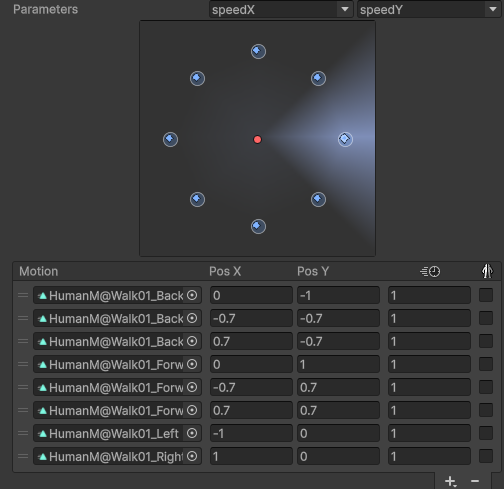
미리 준비한 8방향의 애니메이션을 통해 2D BlendSpace를 만들어줍니다.
그 후에 speed 파라미터를 코드로 업데이트 시켜줍니다.
private void ApplyState(PlayerState state)
{
	// ...

    // TODO - fix paramString to animParamID
	animator.SetFloat("speed", state.velocity.magnitude / maxRunSpeed * 1.4f);
	animator.SetFloat("speedX", state.velocity.x / maxRunSpeed);
	animator.SetFloat("speedY", state.velocity.z / maxRunSpeed);
}
UpperBody
UpperBody는 AimOffset을 구현해야합니다.
우선 Animation 구조부터 만들어 보겠습니다.
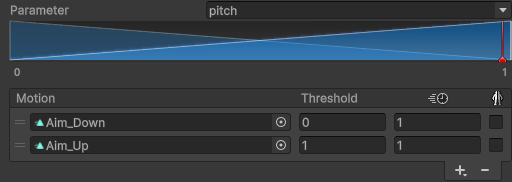
AimOffset으로는 위/아래 애니메이션만 컨트롤할 예정이기때문에, 1D BlendTree로 만들어주었습니다.
이제 캐릭터의 계층 구조를 변경해주도록 하겠습니다.
우선 TPS 방식으로 구현하기 위해서 다음과 같이 변경해주었습니다.
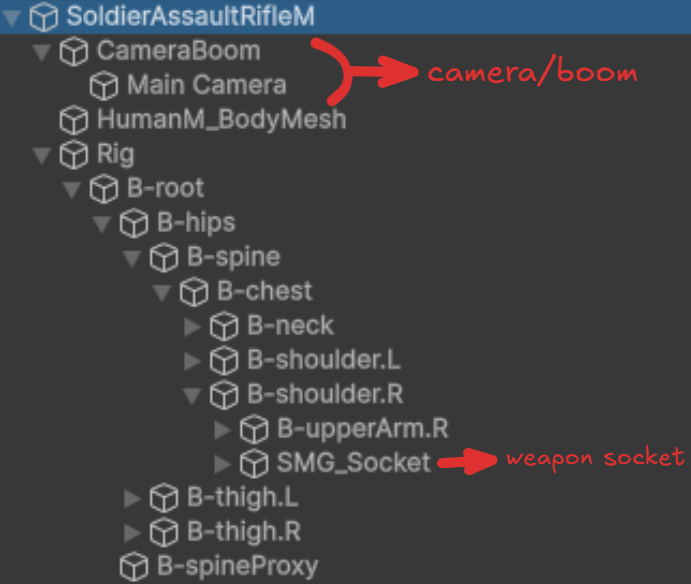
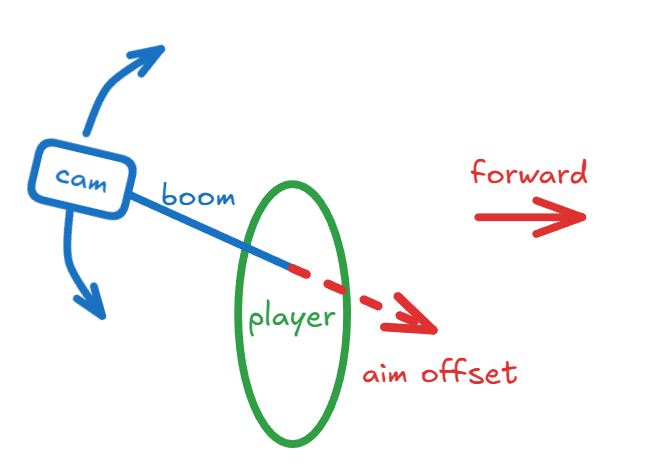
우선 플레이어 오브젝트의 자식으로 카메라 붐, 아래에 카메라를 두어서 카메라 붐의 pitch 회전만으로도 시야를 변경할 수 있도록 하였습니다.
(yaw 회전은 플레이어의 로테이션을 직접 변경합니다.)
또한, Bone 중에서 Shoulder의 자식으로 WeaponSocket을 두어 견착 및 에임 애니메이션을 자연스럽게 만들고자 하였습니다.
간단하게 그림으로 나타내보면 다음과 같습니다.
총의 적절한 부분에 Right/Left hand IK Target 을 만들어주고, IK를 적용해줍니다.
		private void OnAnimatorIK(int layerIndex)
		{
			if (currentWeapon == null) return;
			if (currentWeapon.LeftHandTarget == null) return;
			if (currentWeapon.RightHandTarget == null) return;

			animator.SetIKPositionWeight(AvatarIKGoal.LeftHand, 1f);
			animator.SetIKRotationWeight(AvatarIKGoal.LeftHand, 1f);

			animator.SetIKPositionWeight(AvatarIKGoal.RightHand, 1f);
			animator.SetIKRotationWeight(AvatarIKGoal.RightHand, 1f);

			animator.SetIKPosition(AvatarIKGoal.LeftHand, currentWeapon.LeftHandTarget.position);
			animator.SetIKRotation(AvatarIKGoal.LeftHand, currentWeapon.LeftHandTarget.rotation);

			animator.SetIKPosition(AvatarIKGoal.RightHand, currentWeapon.RightHandTarget.position);
			animator.SetIKRotation(AvatarIKGoal.RightHand, currentWeapon.RightHandTarget.rotation);
		}
그 후에 1D BlendSpace의 파라미터인 pitch값을 계산하여 적용해줍니다
private void ApplyView(in PlayerInput input, in WeaponState weaponState)
{
	// HACK - Get result after calculating recoil system
	float mouseX = Input.GetAxis("Mouse X");
	float mouseY = Input.GetAxis("Mouse Y");

	currentYaw += mouseX * mouseSensitivity;
	currentPitch -= mouseY * mouseSensitivity;

	currentPitch = Mathf.Clamp(currentPitch, -viewPitchLimit, viewPitchLimit);
	transform.rotation = Quaternion.Euler(0f, currentYaw, 0f);
	cameraBoom.localRotation = Quaternion.Euler(currentPitch, 0f, 0f);

	animator.SetFloat("pitch", -currentPitch / viewPitchLimit * .5f + .5f);
}
이제 실행 해보겠습니다.
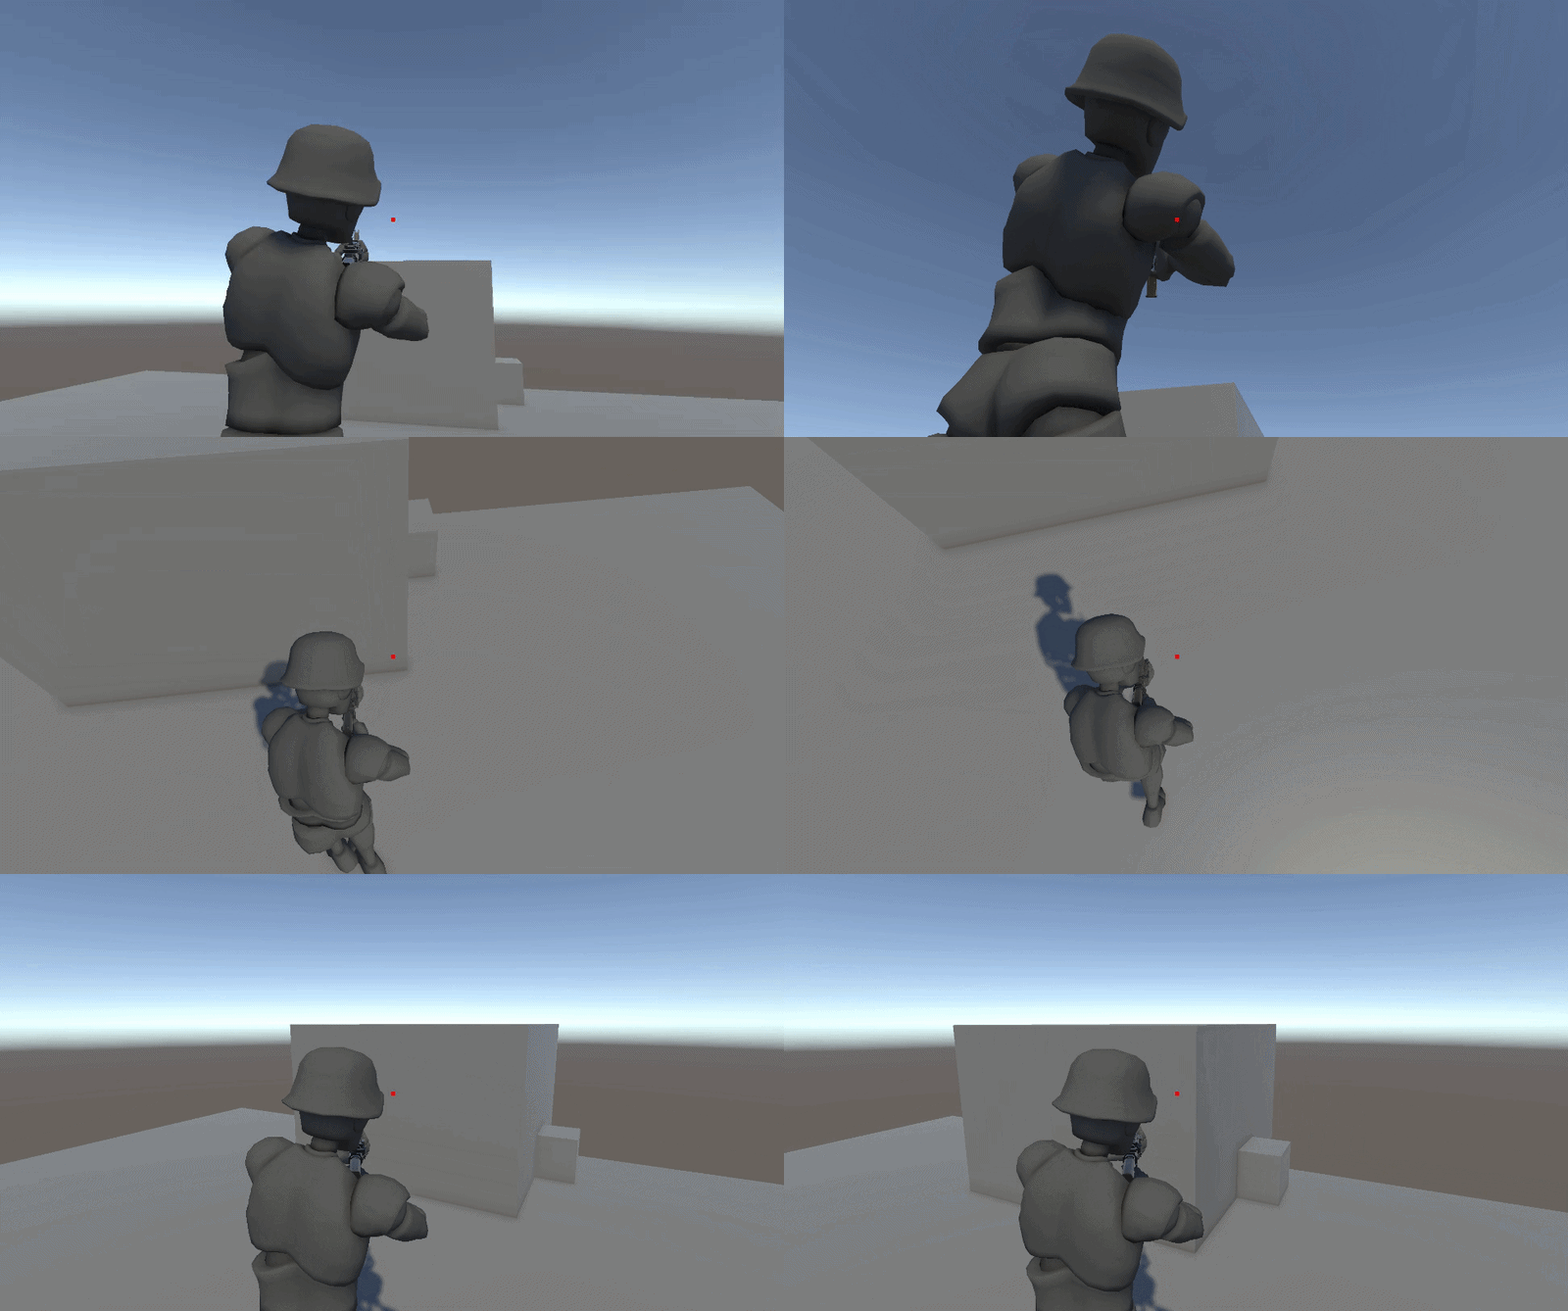
애니메이션이 어색하지 않게 잘 실행되는 것을 확인했으니, 애니메이터 파라미터를 설정해주는 함수를 따로 만들어서 해당 부분에서 네트워크로 보낼 구조체를 만들도록 하겠습니다.
[StructLayout(LayoutKind.Sequential, Pack = 1)]
public struct PlayerAnimParams
{
	public Vector2 speed;
	public float input;
	public float pitch;
	public bool isAim;
}
해당 구조체를 만들어줄 함수를 따로 구현하여 해당 함수에 애니메이션 파라미터 관련 코드를 넣도록 하겠습니다.
private void ApplyAnimParams(in PlayerInput input, in PlayerState state, in WeaponState weaponState
	, out PlayerAnimParams animParams)
{
	animParams.input = input.move.sqrMagnitude;
	animParams.speed.x = state.velocity.x / maxRunSpeed;
	animParams.speed.y = state.velocity.z / maxRunSpeed;
	animParams.pitch = -currentPitch / viewPitchLimit * .5f + .5f;
	animParams.isAim = true;

	animator.SetFloat("input", animParams.input);

	animator.SetFloat("speedX", animParams.speed.x);
	animator.SetFloat("speedY", animParams.speed.y);
	animator.SetFloat("speed", animParams.speed.x * animParams.speed.y * maxRunSpeed * 1.4f);

	animator.SetFloat("pitch", animParams.pitch);
}
이제 해당 함수를 사용하여 서버로 전송해주도록 하겠습니다.
private void Tick()
{

	// ...

	ApplyState(curPlayerState);
	ApplyView(input, curWeaponState);
	ApplyAnimParams(input, curPlayerState, curWeaponState, out PlayerAnimParams animParams);

	ServerManagers.Dedi.Send(null, Serializer.Serialize(PacketType.C2S_Input, input));
	ServerManagers.Dedi.Send(null, Serializer.Serialize(PacketType.C2S_AnimParam, animParams));
}
이제 서버가 AnimParam을 받고 다른 클라이언트 들에게 해당 정보를 넘겨서 애니메이션을 재생하도록 하면 됩니다.
마무리
Fire 이벤트를 만들기에 앞서 간단하게 AimOffset과 IK를 활용하여 애니메이션을 자연스럽게 만들어봤습니다.
생각보다 AimOffset을 맞추는게 쉽지 않아서, 블렌더와 Unity Anim Curves 를 사용해서 애니메이션을 많이 수정해야했습니다.
다음에는 총 발사 애니메이션과 함께 CSP 환경에서 어떻게 발사를 하고 총알 개수 및 리로드 동기화를 어떻게 해야하는지 알아보도록 하겠습니다.