정의
객체 지향 프로그래밍에서 커맨드 패턴은 동작을 수행하거나 나중에 이벤트를 트리거하는 데 필요한 모든 정보를 캡슐화하는 데 객체를 사용하는 behavioral design pattern 입니다. - Wikipedia
객체 지향적 관점에서 어떤 객체의 내부가 어떻게 돌아가는지 외부에서 디테일하게 알 필요가 없다. 마치 우리가 카페에서 음료를 주문할 때 바리스타가 어떤 순서대로 음료를 만드는지 알 필요가 없는 것처럼 말이다.
헤드퍼스트 디자인 패턴 책에서는 리모컨을 예시로 커맨드 패턴을 소개한다.
리모컨은 특정 버튼을 누르면 리모컨이 해당 버튼에 대응하는 커맨드를 실행하는 방식으로 동작된다.
책에서는 전등 켜기 버튼, 전등 끄기 버튼을 따로 구현하였지만 나는 현실 세계에 좀 더 맞게 수정해 보았다.
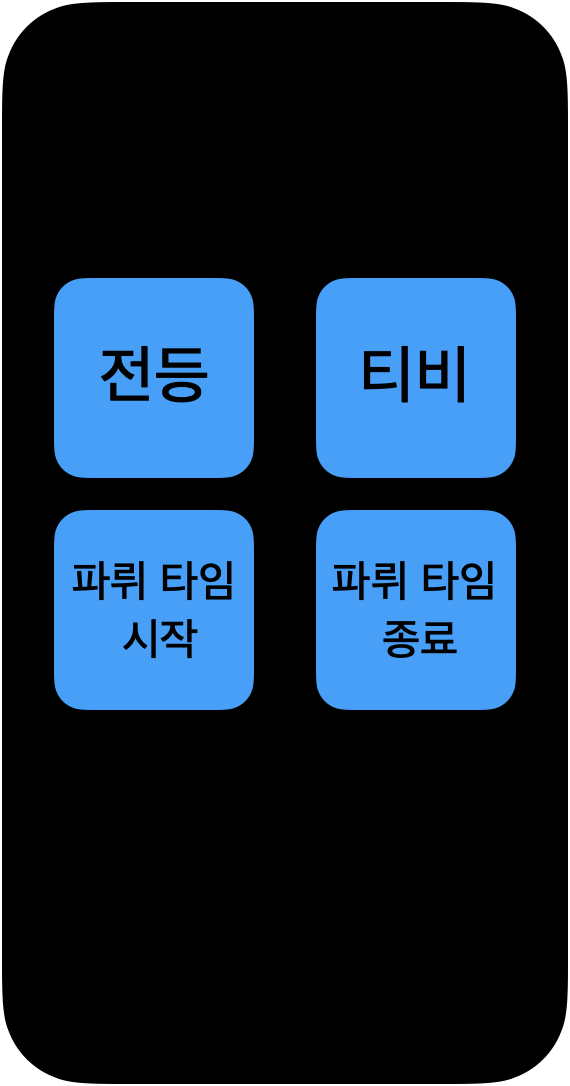
전등 혹은 티비 버튼을 누르면 켜져있으면 꺼지고, 꺼져있으면 켜진다.
"파뤼 타임 시작" 버튼은 켤 수 있는 모든 것을 켜고, "파뤼 타임 종료" 버튼은 끌 수 있는 모든 것을 끄는 버튼이다.
지금부터 예시를 살펴보자.
Example
우선 조명을 관리하는 Light 클래스를 생성하였다.
final class Light {
    private var state: State = .off

    func turnOn() {
        state = .on
        print("조명이 켜졌습니다.")
    }

    func turnOff() {
        state = .off
        print("조명이 꺼졌습니다.")
    }

    func turnReverse() {
        switch state {
        case .on:
            turnOff()
        case .off:
            turnOn()
        }
    }
}
조명의 기능에는 세 가지가 있다.
- 조명 켜기
- 조명 끄기
- 조명 켜져 있으면 끄고, 꺼져 있으면 끄기
현실 세계에서는 조명 스스로가 자신을 켜고 끄는 것을 통제하지는 않지만, 객체 지향의 세계에서는 가능하다. (의아하면 토끼책을 보자!)
TV 클래스도 조명 클래스와 이름만 다를 뿐 똑같기 때문에 코드는 생략하겠다.
이제 커맨드 프로토콜을 생성하고 조명을 통제하는 커맨드를 만들어보았다.
protocol Command {
    func execute()
}

final class LightOnCommand: Command {
    private let light: Light

    init(light: Light) {
        self.light = light
    }

    func execute() {
        light.turnOn()
    }
}

final class LightOffCommand: Command {
    private let light: Light

    init(light: Light) {
        self.light = light
    }

    func execute() {
        light.turnOff()
    }
}

final class LightReverseCommand: Command {
    private let light: Light

    init(light: Light) {
        self.light = light
    }

    func execute() {
        light.turnReverse()
    }
}
TV도 같은 방식으로 커맨드를 구현했으므로 코드는 생략한다.
"파뤼 타임"과 관련된 커맨드 또한 생성하였다.
final class PartyTimeOnCommand: Command {
    private let onCommands: [Command]

    init(onCommands: [Command]) {
        self.onCommands = onCommands
    }

    func execute() {
        print("It's party time~~!!!!!!")
        onCommands.forEach { $0.execute() }
    }
}
이렇게 커맨드 여러 개를 들고 순차적으로 실행하는 커맨드를 매크로 커맨드라고 부른다.
자, 이제 리모컨 클래스를 만들어보자.
final class RemoteControl {
    private var commands: [Command]
    private let numOfButton: Int = 8 // 리모컨 버튼의 개수

    init() {
        commands = [Command].init(repeating: NoCommand(), count: numOfButton)
    }

    func setCommand(slot: Int, command: Command?) {
        commands[slot] = command ?? NoCommand()
    }

    func didPushButton(of slot: Int) {
        commands[slot].execute()
    }
}

extension RemoteControl: CustomStringConvertible {
    var description: String {
        var description = ""
        for slot in 0..<numOfButton {
            description += "[slot \(slot)] \(type(of: commands[slot]))\n"
        }

        return description
    }
}

final class NoCommand: Command {
    func execute() {
        print("커맨드가 없습니다.")
    }
}
여기서 NoCommand 클래스를 만들어 초기화를 시켜준 이유는 아무 커맨드가 들어있지 않은 버튼을 누르더라도 똑같이 execute 메서드를 실행하여 일관성을 유지해주기 위함이다. 리모컨이 [Command?] 프로퍼티를 들게 해도 구현 상 큰 차이는 없어보인다.
또한 리모컨의 각 버튼이 어떻게 구성되어 있는지 확인하기 위해 CustomStringConvertible 프로토콜을 채택하여 description을 구현해주었다.
마지막으로 Remote Control 객체에 커맨드를 할당해주는 Remote Loader를 생성하였다.
final class RemoteLoader {
    let remoteControl: RemoteControl

    init() {
        remoteControl = RemoteControl()

        let light = Light()
        let tv = TV()

        let lightOnCommand = LightOnCommand(light: light)
        let lightOffCommand = LightOffCommand(light: light)
        let lightReverseCommand = LightReverseCommand(light: light)
        let tvOnCommand = TVOnCommand(tv: tv)
        let tvOffCommand = TVOffCommand(tv: tv)
        let tvReverseCommand = TVReverseCommand(tv: tv)

        let onCommands: [Command] = [lightOnCommand, tvOnCommand]
        let showTimeOnCommand = PartyTimeOnCommand(onCommands: onCommands)
        let offCommands: [Command] = [lightOffCommand, tvOffCommand]
        let showTimeOffCommand = PartyTimeOffCommand(offCommands: offCommands)

        remoteControl.setCommand(slot: 0, command: lightReverseCommand)
        remoteControl.setCommand(slot: 1, command: tvReverseCommand)
        remoteControl.setCommand(slot: 2, command: showTimeOnCommand)
        remoteControl.setCommand(slot: 3, command: showTimeOffCommand)
    }
}
필요한 객체를 생성하고 리모컨의 각 버튼에 커맨드를 설정하였다.
- 0번 버튼 : 전등
- 1번 버튼 : TV
- 2번 버튼 : 파뤼 타임 켜기
- 3번 버튼 : 파뤼 타임 끄기
이제 리모컨도 만들었겠다. 마구 눌러볼까?
let remoteControl = RemoteLoader().remoteControl

print(remoteControl.description)
remoteControl.didPushButton(of: 0)
remoteControl.didPushButton(of: 0)
remoteControl.didPushButton(of: 1)
remoteControl.didPushButton(of: 1)
remoteControl.didPushButton(of: 5)
remoteControl.didPushButton(of: 6)

print("가족들 여행갔다~ 파뤼 타임~~~~")
remoteControl.didPushButton(of: 2)

print("비온다고 빨리 왔다 빨리 꺼..")
remoteControl.didPushButton(of: 3)
실행 결과는 다음과 같다.
[slot 0] LightReverseCommand
[slot 1] TVReverseCommand
[slot 2] PartyTimeOnCommand
[slot 3] PartyTimeOffCommand
[slot 4] NoCommand
[slot 5] NoCommand
[slot 6] NoCommand
[slot 7] NoCommand

조명이 켜졌습니다.
조명이 꺼졌습니다.
TV가 켜졌습니다.
TV가 꺼졌습니다.
커맨드가 없습니다.
커맨드가 없습니다.
가족들 여행갔다~ 파뤼 타임~~~~
It's show time.
조명이 켜졌습니다.
TV가 켜졌습니다.
비온다고 빨리 왔다 빨리 꺼..
The Show if over.
조명이 꺼졌습니다.
TV가 꺼졌습니다.
구조
예제를 바탕으로 커맨드 패턴의 전체적인 구조를 파악해보면 다음과 같다.
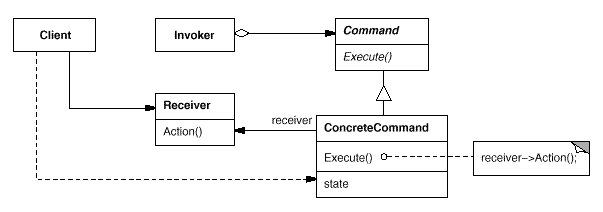
구조를 위 예시에 대입해 보면..
- Client : Remote Loader
- Invoker : Remote Control
- Receiver : Light
- Concrete Command : LightOnCommand, LightOffCommand..
장점
- 작업을 수행하는 객체와 작업을 요청하는 객체가 분리되어 있어 SRP를 준수한다.
- 기존 코드를 수정하지 않고도 Receiver나 Command를 추가할 수 있어 OCP를 준수한다.
- 커맨드 단위로 작업을 들고 있으면서 원하는 상황, 원하는 시간에 실행시킬 수 있어 활용도가 높다.
단점은 생략한다!