서론
weaviate에서 컬렉션을 생성해줄 때 벡터화 모듈을 설정해줄 수 있다.
이때 필자는 허깅페이스를 사용할 것이다. 공식문서 와 현재 보편적으로 사용되는 코드가 있는데 이건
This section of the documentation is deprecated and will be removed in the future.
See the relevant model provider integration page for the most up-to-date information.
앞으로 이렇게 되기에 새로운 문서 가 생겼다. 이 문서정보를 토대로 작성해보겠다.
Hugging Face 임베딩을 weaviate에서 사용하기
허깅페이스에서 제공하는 API 를 통해서 weaviate에서 해당 모델의 기능에 액세스할 수 있다.
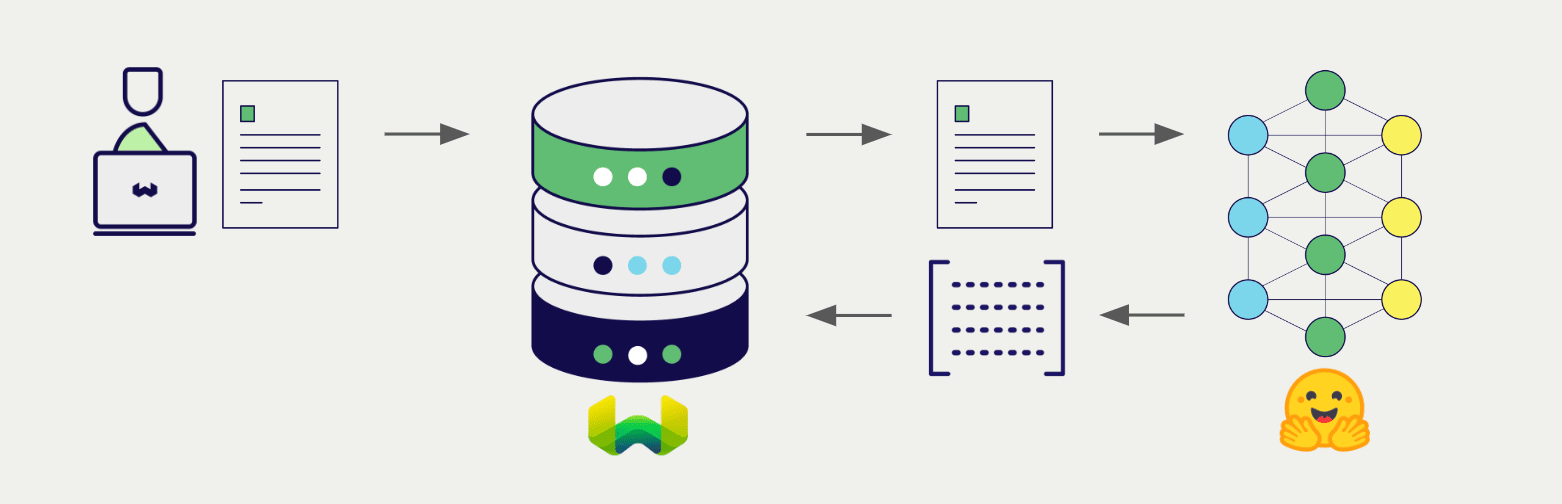
데이터를 import할 때 weaviate는 텍스트 객체에 임베딩을 생성해 인덱스에 저장한다. 벡터 및 하이브리드 검색 작업을 위해 텍스트 쿼리를 임베딩으로 변환한다.
API 키 발급
이 연동을 위해서 유효한 허깅페이스 API키를 weaviate에 저공해야한다. 그래서 허깅페이스에 가서 api키를 받자!
import weaviate
from weaviate.auth import AuthApiKey
import os

# Recommended: save sensitive data as environment variables
huggingface_key = os.getenv("HUGGINGFACE_APIKEY")
headers = {
    "X-HuggingFace-Api-Key": huggingface_key,
}

client = weaviate.connect_to_wcs(
    cluster_url=weaviate_url,                       # `weaviate_url`: your Weaviate URL
    auth_credentials=AuthApiKey(weaviate_key),      # `weaviate_key`: your Weaviate API key
    headers=headers
)

# Work with Weaviate

client.close()
이렇게 헤더에 허깅페이스 api 키를 등록해 연결할 수 있다.
collections에 vectorizer 설정하기
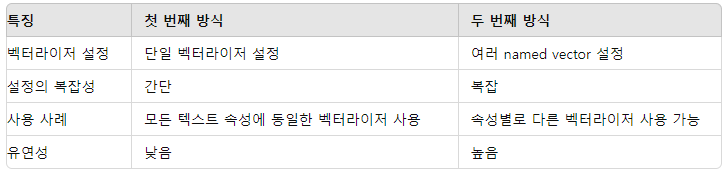
모든 속성에 동일하게 적용
from weaviate.classes.config import Configure, Property, DataType

client.collections.create(
    "Article",
    vectorizer_config=Configure.Vectorizer.text2vec_openai(),
    properties=[
        Property(name="title", data_type=DataType.TEXT),
        Property(name="body", data_type=DataType.TEXT),
    ]
)
vectorizer_config=Configure.Vectorizer.text2vec_openai(): 컬렉션 전체에 대해 하나의 벡터라이저를 설정한다. 이 경우, text2vec-openai 벡터라이저가 사용된다.
properties: 속성을 정의하며, 각 속성에 대해 별도의 벡터라이저 설정을 하지 않는다. 설정된 벡터라이저가 모든 텍스트 속성에 적용된다.
그래서 모든 텍스트 속성에 대해 동일한 벡터라이저를 사용하거나 복잡하게 벡터라이저 설정이 필요없는 경우에 해당된다.
속성마다 다르게 적용
from weaviate.classes.config import Configure, Property, DataType

client.collections.create(
    "ArticleNV",
    vectorizer_config=[
        Configure.NamedVectors.text2vec_cohere(
            name="title", source_properties=["title"]
        ),
        Configure.NamedVectors.text2vec_openai(
            name="body", source_properties=["body"]
        ),
        Configure.NamedVectors.text2vec_openai(
            name="title_country", source_properties=["title", "country"]
        )
    ],
    properties=[
        Property(name="title", data_type=DataType.TEXT),
        Property(name="body", data_type=DataType.TEXT),
        Property(name="country", data_type=DataType.TEXT),
    ],
)
vectorizer_config: 여러 개의 named vector를 설정하고 각 named vector는 다른 벡터라이저를 사용할 수 있다.
text2vec-cohere: "title" 속성에 대해 사용
text2vec-openai: "body" 속성에 대해 사용
text2vec-openai: "title"과 "country" 속성을 결합하여 사용
properties: 속성을 정의하며, 각각의 속성에 대해 별도의 벡터라이저 설정이 가능하다.
그래서 서로 다른 속성에 대해 다른 벡터라이저를 사용해야하는 경우나 각 속성별로 벡터라이저를 세밀하게 조정하고 설정해야하는 경우에 적합하다.
비교
검색
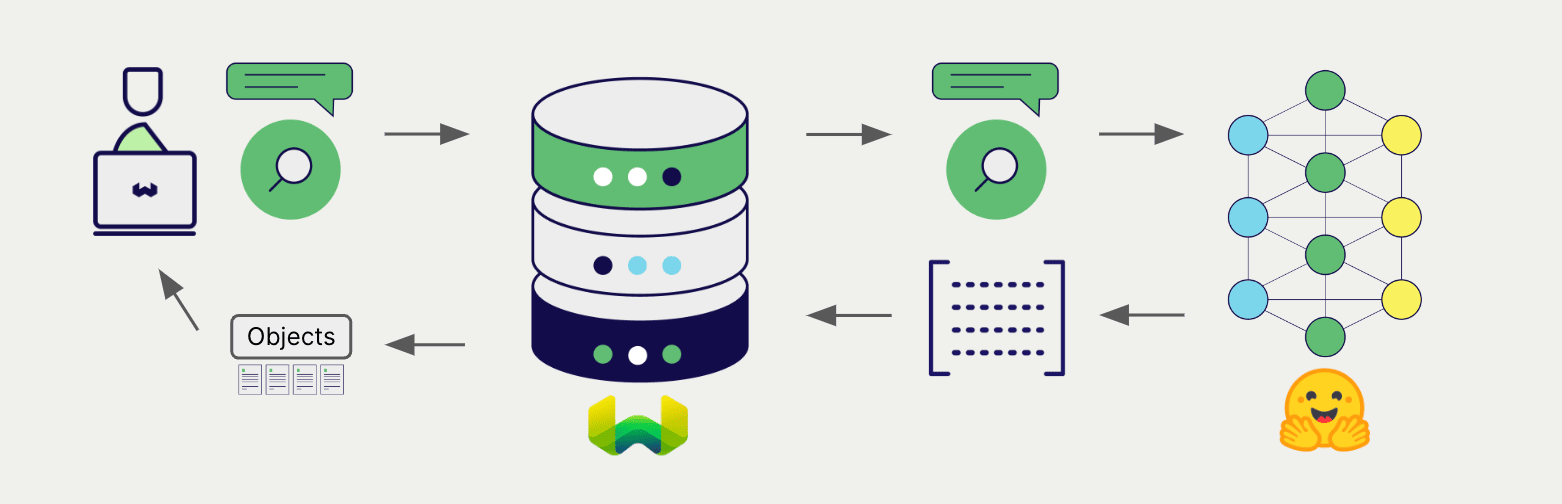
벡터라이저가 구성되면 weaviate는 지정된 허깅페이스 모델을 사용해 벡터 및 하이브리드 검색 작업을 수행할 수 있다.
vector (near text) search
벡터검색을 수행하면 지정된 모델을 사용해 텍스트 쿼리를 임베딩으로 변환하고 데이터베이스에서 가장 유사한 객체를 반환한다.
collection = client.collections.get("DemoCollection")

response = collection.query.near_text(
    query="A holiday film",  # The model provider integration will automatically vectorize the query
    limit=2
)

for obj in response.objects:
    print(obj.properties["title"])
limit 값을 통해 가장 유사한 n개를 검색할 수 있다.
Hybrid search
하이브리드 검색은 벡터검색과 키워드(BM25) 검색을 수행한 후 결과를 혼합해 데이터베이스에서 가장 일치하는 개체를 반환하는 것이다.
그래서 하이브리드 검색을 수행하면 동일하게 텍스트 쿼리를 임베딩으로 변환하고 데이터베이스에서 최고점수를 받은 개체를 반환한다.
collection = client.collections.get("DemoCollection")

response = collection.query.hybrid(
    query="A holiday film",  # The model provider integration will automatically vectorize the query
    limit=2
)

for obj in response.objects:
    print(obj.properties["title"])
다른 파라미터
from weaviate.classes.config import Configure

client.collections.create(
    "DemoCollection",
    vectorizer_config=[
        Configure.NamedVectors.text2vec_huggingface(
            name="title_vector",
            source_properties=["title"],
            # NOTE: Use only one of (`model`), (`passage_model` and `query_model`), or (`endpoint_url`)
            model="sentence-transformers/all-MiniLM-L6-v2",
            # passage_model="sentence-transformers/facebook-dpr-ctx_encoder-single-nq-base",    # Required if using `query_model`
            # query_model="sentence-transformers/facebook-dpr-question_encoder-single-nq-base", # Required if using `passage_model`
            # endpoint_url="<custom_huggingface_url>",
            #
            # wait_for_model=True,
            # use_cache=True,
            # use_gpu=True,
        )
    ],
    # Additional parameters not shown
)
여기서 보듯이 passage_model 과 query_model을 지정해줄 수 있다. 이는 Dual Encoder모델을 사용할 때 필요한 설정이다.
나머지 파라미터는 True가 디폴트인데 gpu사용만 False이다. 가용가능한 gpu가 있다면 True로 바꿔주자.