
이번에는 지금까지 배운 state, props를 활용하여 유저 parkhacker의 Twittler에서의 트윗 전송 기능을 구현하였다.
props
props란? 컴포넌트에서 컴포넌트로 전달하는 데이터이다.
props 지정
<ComponentName prop1={propValue1} prop2={propValue2} ... />props 사용
props는 읽기 전용이므로 컴포넌트의 내부에서 props를 수정해서는 안 된다.(순수 함수)
props를 받는 함수형 컴포넌트에 인자를 정의하면 props를 속성으로 가지는 객체가 해당 인자로 전달된다.
props를 받을 때 구조 분해 할당을 사용해 연산자 사용을 줄일 수 있다.
state
state란? 컴포넌트 내부의 동적 데이터이다.
1. 클래스형 컴포넌트
컴포넌트 자체가 state를 지니는 방식으로 사용한다.
클래스형 컴포넌트에서 state 사용할 때는 객체 형식의 this.state를 통해 객체 초기값 설정하고 조회할 수 있다.
2.함수형 컴포넌트
useState라는 함수, Hook을 통해 사용한다.
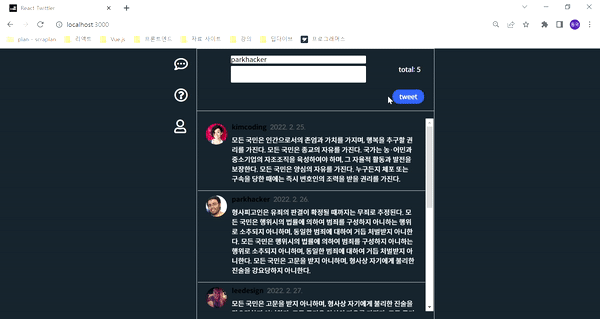
위 그림과 같이 글을 적을 때 토탈의 수가 올라가도록 하였고, 맨션이 나오도록 만들어 주었다.
React-twittler-state-props
Sidebar.js
Sidebar에서는 Link 컴포넌트를 작성하고, to 속성을 이용하여 경로를 연결했다.
const Sidebar = () => {
  return (
    <section className="sidebar">
      <Link to='/'>
        <i className="far fa-comment-dots"></i>
      </Link>
      <Link to='/about'>
        <i className="far fa-question-circle"></i>
      </Link>
      <Link to='/mypage'>
        <i className="far fa-user"></i>
      </Link>

    </section>
  );
};
Footer.js
Footer에서는 Footer 함수 컴포넌트를 작성하였다. 그리고 시멘틱 요소 footer도 작성 하였다.
const Footer = () => {
  return (
  <footer>

  </footer>
  )
};
Tweet.js
Tweet에서는 parsedDate변수를 이용해 트윗 생성일자를 만들었고, 유저 이름을 span 엘리먼트로 작성하였다.
const Tweet = ({ tweet }) => {
  const parsedDate = new Date(tweet.createdAt).toLocaleDateString('ko-kr');

  return (
    <li className="tweet" id={tweet.id}>
      <div className="tweet__profile">
        <img src={tweet.picture} />
      </div>
      <div className="tweet__content">
        <div className="tweet__userInfo">
          <div className="tweet__userInfo--wrapper">
            <span className='tweet__username'>{tweet.username}</span>
            <span className='tweet__createdAt'>{parsedDate}</span>
          </div>
        </div>
        <div className="tweet__message">
          {tweet.content}
        </div>
      </div>
    </li>
  );
};
About.js
About에서는 About 컴포넌트의 자식 컴포넌트로 Footer컴포넌트를 연결해 주었다.
const About = (props) => {
  return (
    <section className="aboutTwittler">
      <div className="aboutTwittler__container">
        <div className="aboutTwittler__wrapper">
          <div className="aboutTwittler__detail">
            <p className="aboutTwittler__detailName">React Twittler Info</p>
          </div>
        </div>
      </div>
      <div className="aboutTwittler__content">
        <i className="fas fa-users"></i>
        <p></p>
      </div>
      <Footer />
    </section>
  );
};
MyPage.js
MyPage에서는 filter 메서드를 이용해 parkhacker의 트윗만 보여주도록 하였고, 트윗 목록에서 parkhacker의 트윗만 보여주도록 filteredTweets[0]을 작성하였다.
const MyPage = () => {
  const filteredTweets = dummyTweets.filter((tweet) => {
    return tweet.username === 'parkhacker';
  })
  return (
    <section className="myInfo">
      <div className="myInfo__container">
        <div className="myInfo__wrapper">
          <div className="myInfo__profile">
            <img src={filteredTweets[0].picture} />
          </div>
          <div className="myInfo__detail">
            <p className="myInfo__detailName">
              {filteredTweets[0].username} Profile
            </p>
            <p>28 팔로워 100 팔로잉</p>
          </div>
        </div>
      </div>
      <ul className="tweets__mypage">
        <Tweet tweet={filteredTweets[0]}/>
      </ul>
      <Footer />
    </section>
  );완성
};
Tweets.js
Tweets에서는 새로 트윗을 작성하고 전송할 수 있게 useState를 사용했다.
그리고 Tweet button 엘리먼트 클릭시 작동하는 함수 handleButtonClick를 만들었다.
const Tweets = () => {

  const [tweets, setTweets] = useState(dummyTweets)
  const [user, setUser] = useState('parkhacker')
  const [msg, setMsg] = useState('')

  const handleButtonClick = (event) => {
    const tweet = {
      id: tweets.length+1,
      username: user,
      picture: `https://pbs.twimg.com/media/EjDeXNOU4AA_lE1.jpg`,
      content: msg,
      createdAt: new Date().toLocaleDateString('ko-kr'),
      updatedAt: new Date().toLocaleDateString('ko-kr')
    };.
    setTweets([tweet, ...tweets])
  };
}
그리고 Tweet input 엘리먼트에 입력 시 작동하는 함수와, Tweet textarea 엘리먼트에 입력시 작동하는 함수를 만들었다.
const handleChangeUser = (event) => {
    setUser(event.target.value)
  };

  const handleChangeMsg = (event) => {
    setMsg(event.target.value)
  };
그리고 하나의 트윗이 아니라 주어진 트윗 목록 갯수에 맞게 보여주기 위해 map 메서드를 사용하였다.
 {tweets.map((el) => {
          return (
            <Tweet tweet={el} key = {el.id} />
          )
        })}