이번시간에는 앞에서 배운 내용을 가지고 직접 번들링을 해보고자 한다.
역시 직접 해봐야지 실력이 늘것 같다.
Bare Minimum Requirement
- HTML, CSS, JavaScript로만 구성한 웹 애플리케이션을 제작합니다.
- style-loader, css-loader, html-webpack-plugin을 이용하여 번들링합니다.
- 제작한 번들은 github page 기능을 이용하여 배포합니다.
JavaScript 번들 파일은 하나만 생성합니다.
CSS 파일은 JavaScript 파일에 포함합니다.
JavaScript 번들 파일을 포함한 HTML 파일이 자동으로 생성되게 합니다.
1. 현재 파일에 npm 설치
npm init -y
2. webpack 설치
npm install -D webpack webpack-cli
3. Webpack 설정 파일 작성
webpack 설정 파일인 webpack.config.js 파일을 생성하자.
// webpack.config.js
const path = require('path');

module.exports = {
  entry: './src/index.js',
  output: {
    path: path.resolve(__dirname, 'dist'), // './dist'의 절대 경로를 리턴
    filename: 'app.bundle.js',
  },
};
4. 번들링하기
npx webpack
src 폴더에 있는 js 파일을 번들링한다.
그 다음에 npm run build를 꼭 해준다!(하기 전에 scripts 부분에 build를 적어주자.)
"scripts": {
    "build": "webpack",
    "test": "echo \"Error: no test specified\" && exit 1"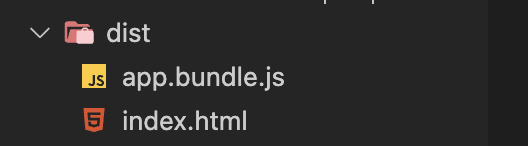
},- 그러면 dist 폴더가 생기고 dist/app.bundle.js 파일에 웹팩이 생김.

5. HTML파일 번들링하기 (plugin)
npm i -D html-webpack-plugin
설치 후 webpack.config.js 파일에 해당 플러그인을 등록해주자.
const path = require('path');
const HtmlWebpackPlugin = require('html-webpack-plugin');

module.exports = {
  entry: './src/index.js',
  output: {
    filename: 'app.bundle.js',
    path: path.resolve(__dirname, 'dist'),
  },
  plugins: [
    new HtmlWebpackPlugin({
      template: path.resolve(__dirname, 'src', 'index.html'),
    }),
  ],
};
그 다음 꼭 빌드해주자
- 그러면 html파일이 생길 것이다.
6. CSS 번들링 (loader)
npm i -D style-loader css-loader
필요한 로더를 설치 해주자.
그리고 index.js파일에 css가 import되어 있어야 한다.
webpack.config.js 웹팩 설정 로더 등록도 잊지말고 해야 한다.
const path = require('path');
const HtmlWebpackPlugin = require('html-webpack-plugin');

module.exports = {
  entry: './src/index.js',
  output: {
    filename: 'app.bundle.js',
    path: path.resolve(__dirname, 'dist'),
  },
  module : {
    rules: {
        test: /\.css$/,
        use: ["style-loader", "css-loader"],
        exclude: /node_modules/,
    }
  },
  plugins: [
    new HtmlWebpackPlugin({
      template: path.resolve(__dirname, 'src', 'index.html'),
    }),
  ],
};
그 다음 꼭 빌드 해주자
그러면 dist/index.html 파일을 브라우저에서 열어보면 스타일이 적용된 것을 확인 할 수 있다!
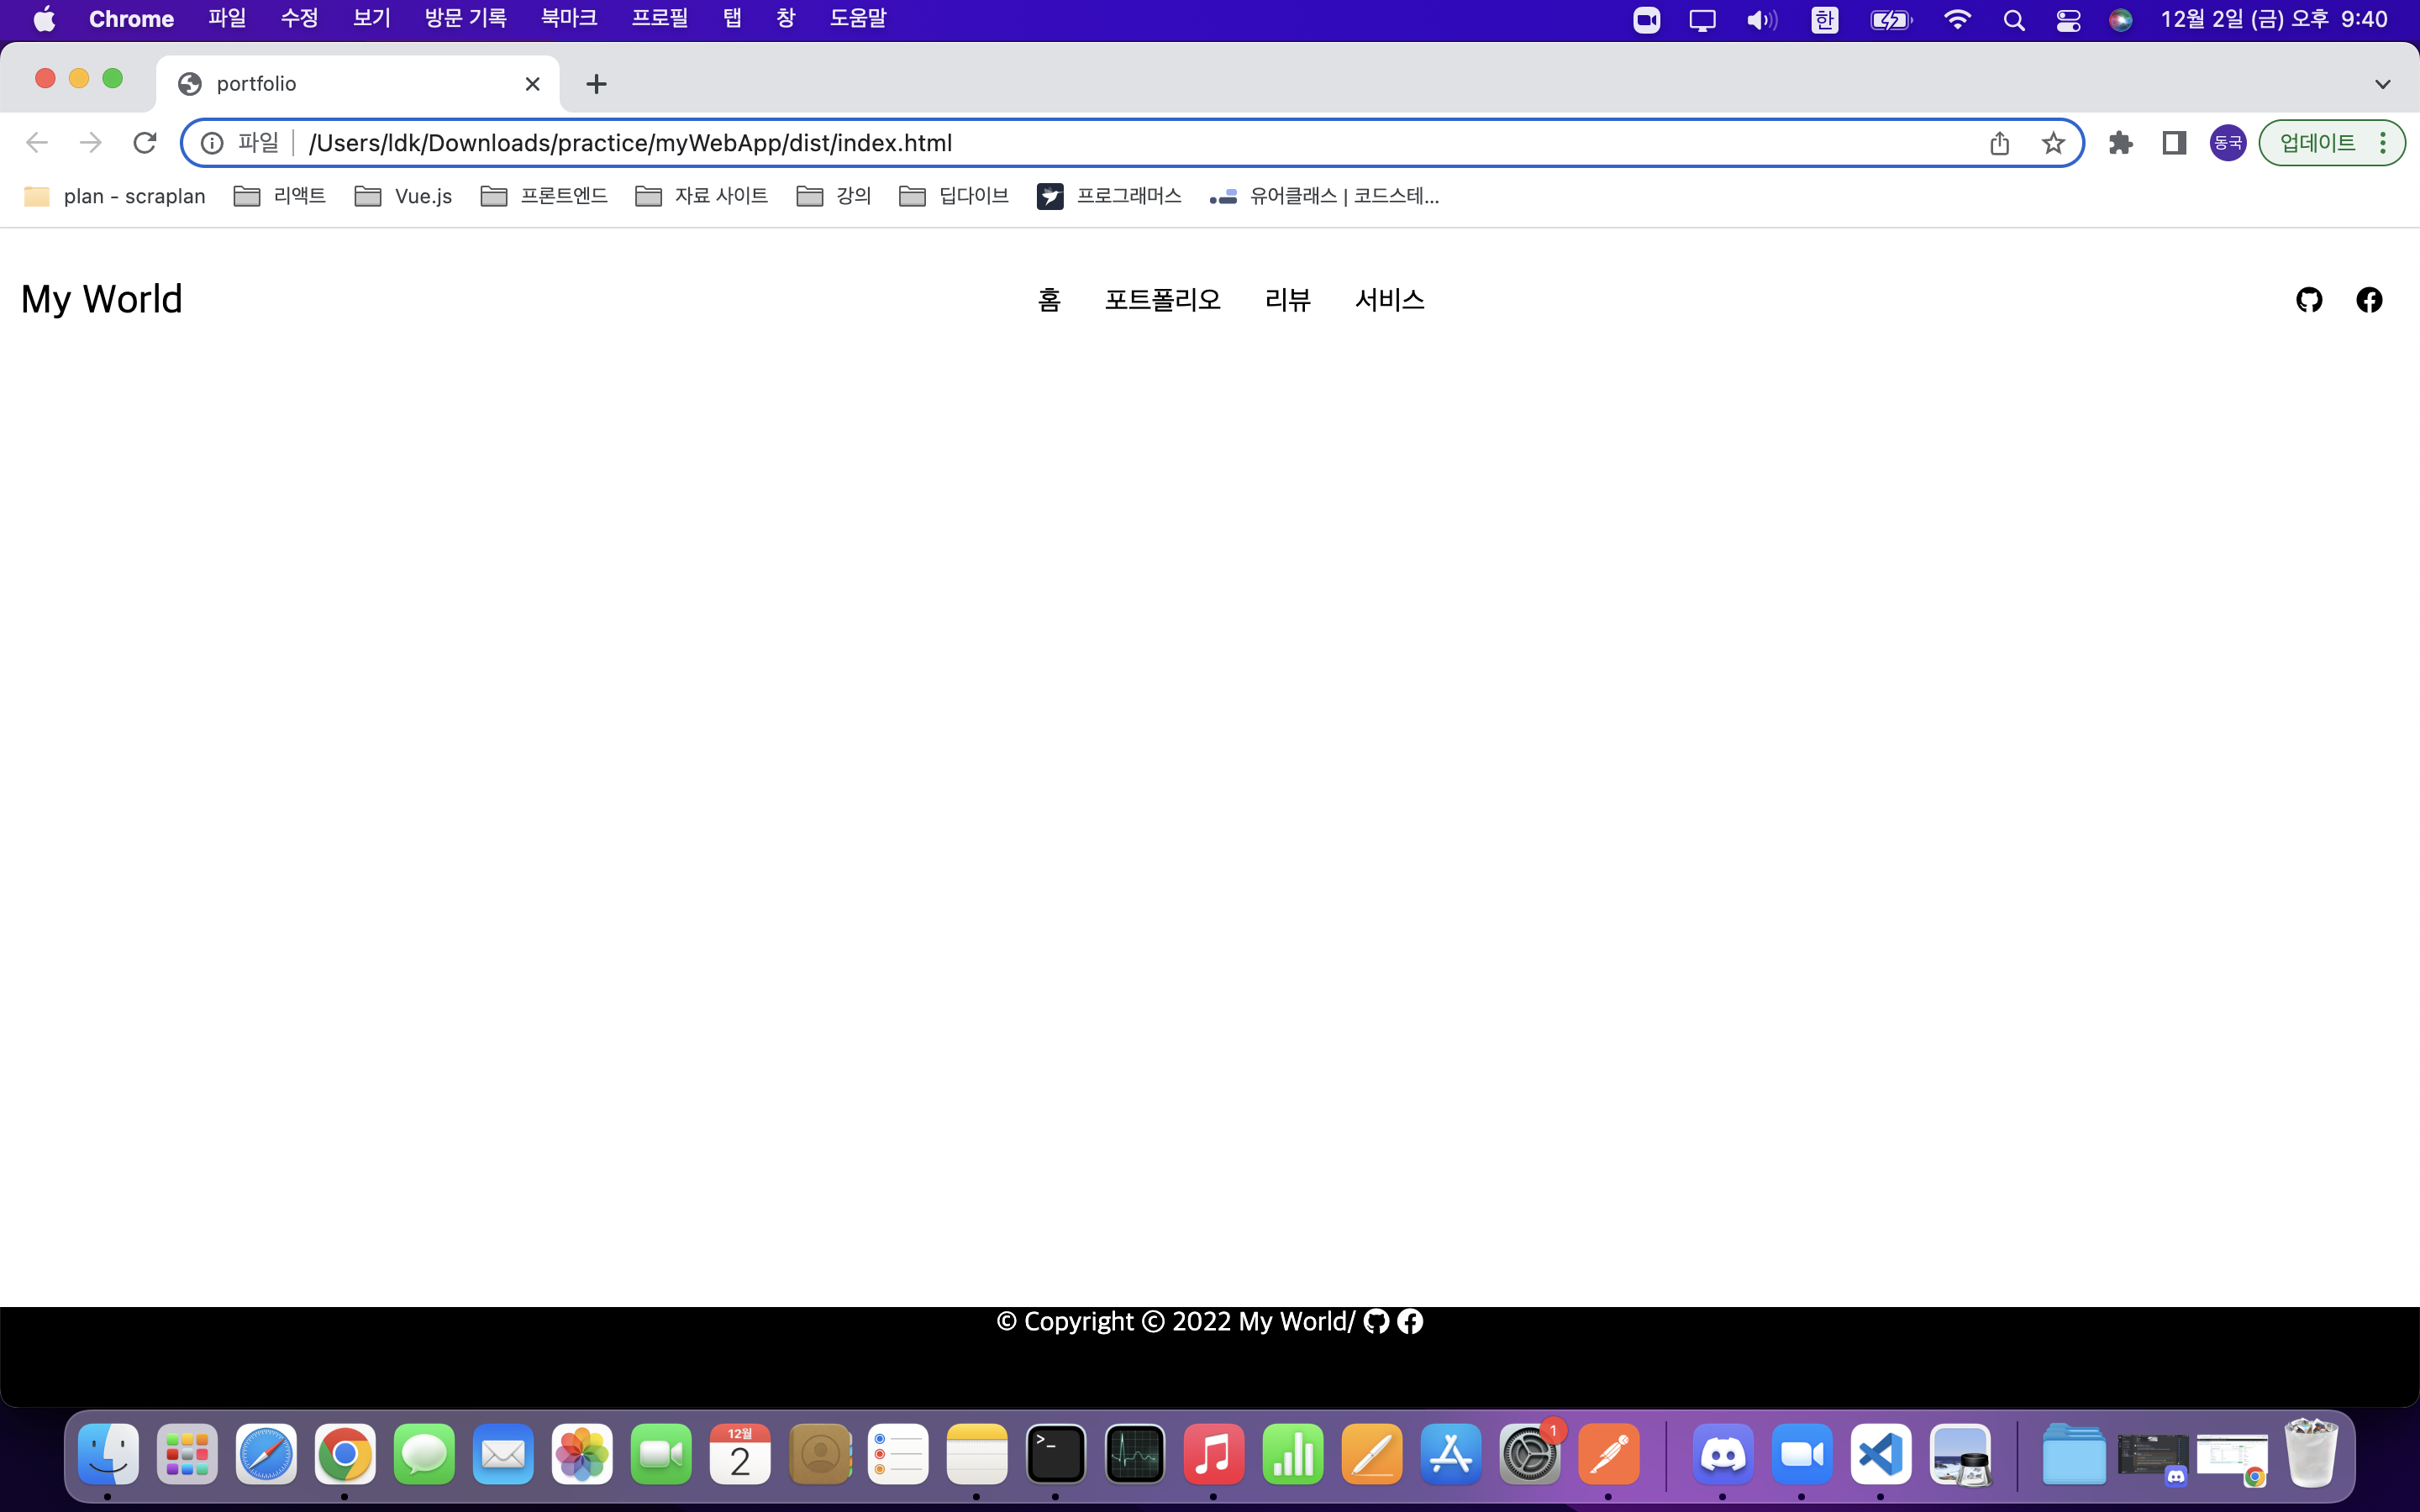
여기까지 진행하면 내 개인 파일이 모두 dist 폴더 아래에 번들링된다 !
이제 Advanced 과제를 해보자
깃허브 배포를 할려면 webpack.config.js의 dist를 docs로 변경 후 빌드를 다시 해주자.
Advanced Challenge
공식문서와 구글링으로 아래 키워드에 대해서 스스로 학습하고, 적용해보세요.
github page 배포
번들을 github page로 배포합니다.
(주의점: output이 dist가 아니고 docs로 해야하고, github page 옵션을 변경해야 합니다.)
작동 모드 설정development mode와 production mode의 차이에 대해서 학습하고, config file을 나눠보세요. (참고 링크)
Output 관리번들링 할 때 마다 dist 디렉터리를 정리해보세요. (참고 링크)
app.bundle.js 가 아니라, output이 늘 동적으로 변하도록 생성해보세요.
Asset 관리CSS에 minify를 적용해봅니다. (힌트: mini-css-extract-plugin, css-minimizer-webpack-plugin)
1. webpack-dev-server
npm i -D webpack-dev-server
이걸 설치하면 빠른 속도로 변경된 코드를 개발 서버에 반영해서 보여줄 수 있다.
webpack.config.js 웹팩 설정은 이렇게 해주자.
devServer: {
  static: {
    directory: path.resolve(__dirname, 'dist'),
  },
    port: 3001,
},
package.json scripts에 webpack serve를 추가도 해주자
"scripts": {
    "build": "webpack",
    "start": "webpack serve --open --mode=development",
    "test": "echo \"Error: no test specified\" && exit 1"
},
2. clean-webpack-plugin
npm i -D clean-webpack-plugin
기존 빌드를 통해 생성되었지만 사용하지 않는 번들 파일을 지우고싶은 경우 사용하는 플러그인이다.
webpack.config.js 웹팩 설정도 이렇게 해주자.
const {CleanWebpackPlugin} = require("clean-webpack-plugin");

module.exports = {
  ~~~~
  plugins: [new CleanWebpackPlugin()],
};
배포 페이지와 설정 코드
package.json
  "name": "webpack-portfolio",
  "homepage": "https://ldk199662.github.io/webpack-portfolio",
  "version": "1.0.0",
  "main": "index.js",
  "scripts": {
    "build": "webpack",
    "start": "webpack serve --open --mode=development",
    "test": "echo \"Error: no test specified\" && exit 1",
    "predeploy": "npm run build",
    "deploy": "gh-pages -d build"
  },
  "keywords": [],
  "author": "",
  "license": "ISC",
  "description": "",
  "devDependencies": {
    "clean-webpack-plugin": "^4.0.0",
    "css-loader": "^6.7.2",
    "html-webpack-plugin": "^5.5.0",
    "style-loader": "^3.3.1",
    "webpack": "^5.75.0",
    "webpack-cli": "^5.0.0",
    "webpack-dev-server": "^4.11.1"
  },
  "dependencies": {
    "gh-pages": "^4.0.0"
  }
}
webpack.config.js
const path = require("path");
const HtmlWebpackPlugin = require('html-webpack-plugin');
const {CleanWebpackPlugin} = require("clean-webpack-plugin");

module.exports = {
  entry: "./src/index.js",
  output: {
    path: path.resolve(__dirname, "docs"),
    filename: "app.bundle.js",
  },
  module: {
    rules: [
      {
        test: /\.css$/,
        use: ["style-loader", "css-loader"],
        exclude: /node_modules/,
      },
    ],
  },
  plugins: [
    new HtmlWebpackPlugin({
      template: path.resolve(__dirname, 'src', 'index.html'),
    }),
    new CleanWebpackPlugin(),
  ],
  devServer: {
    static: {
      directory: path.resolve(__dirname, 'docs'),
    },
      port: 3001,
  },
};
깃 허브 배포 방법
먼저
깃 허브 왼쪽에 보면 이게 있을 것이고 new를 눌러서 저장소 이름을 정한 뒤 만들어주자.
나같은 경우는 깃허브 배포 주소와 같이 webpack-portfolio로 작성해 주었다.
그리고
git init
git remote add origin ~
git remote -v
까지 한 후에 URL을 확인하자.
그러면 fetch, push의 url이 나올 것이다.
그 다음에
git push origin main
여기 까지 하면 잘 push가 되었을 것이다.
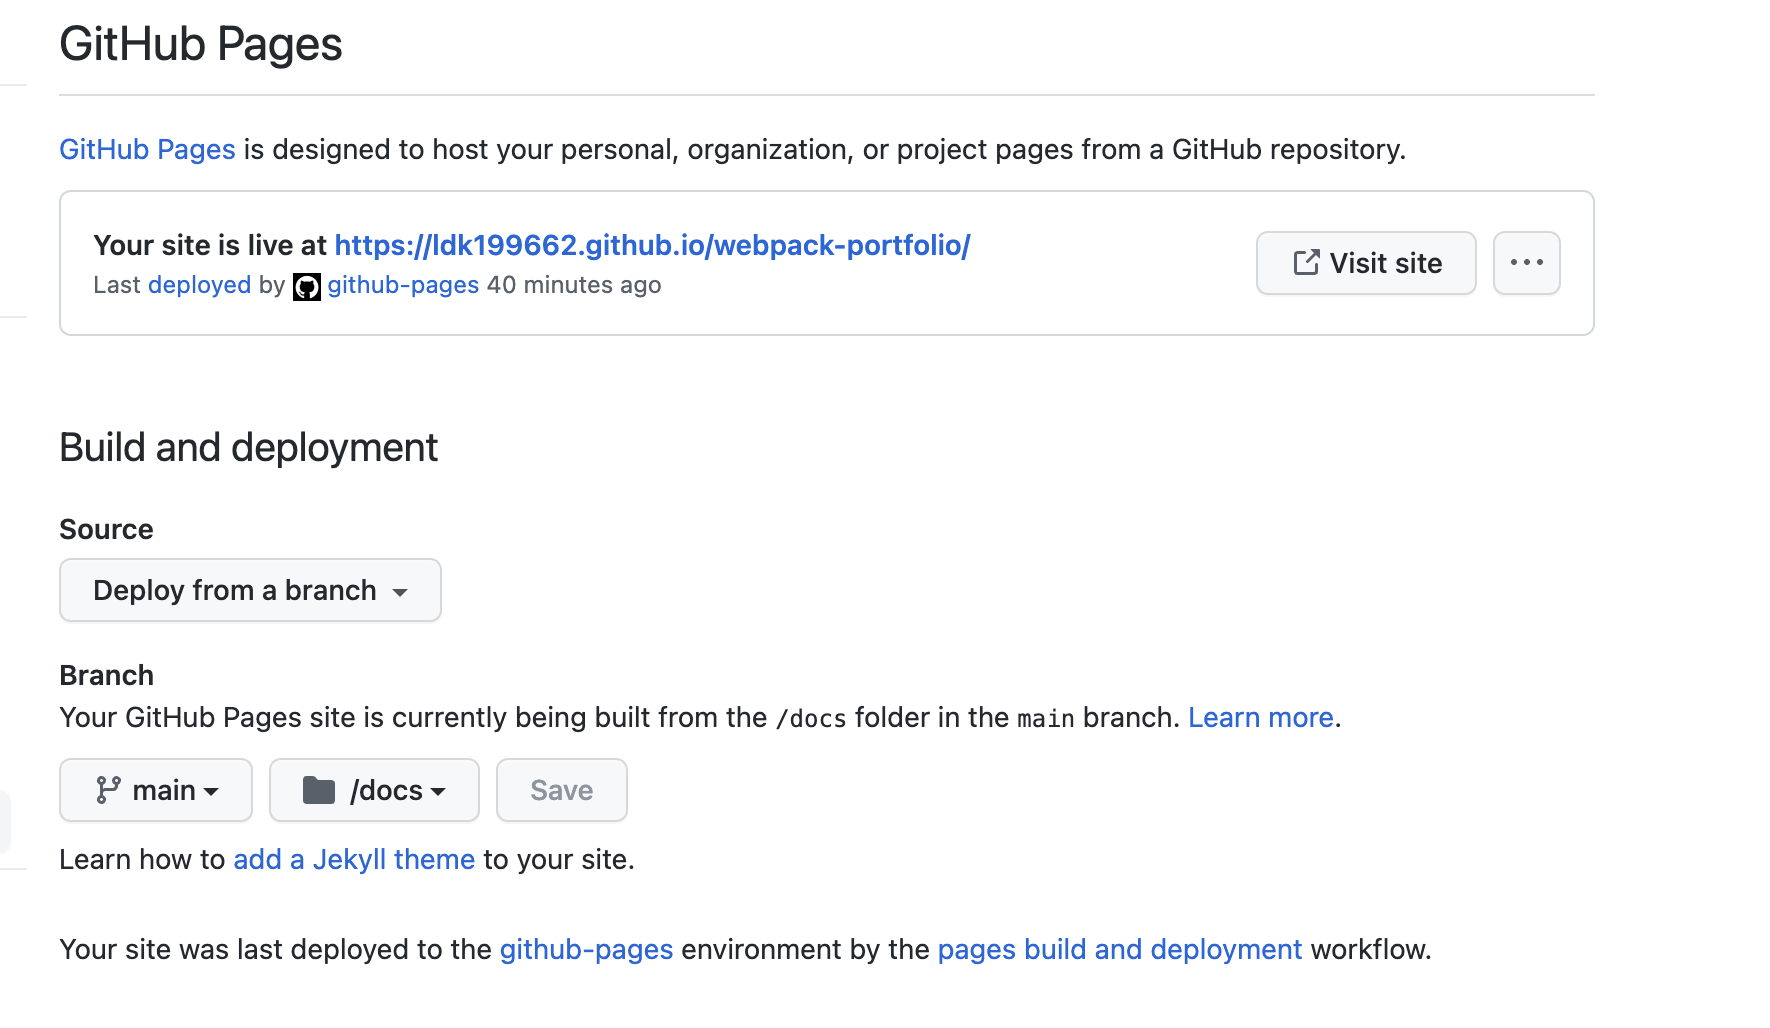
그 다음에 Branch의 main을 선택 한 뒤 docs를 선택하고 save를 누르면 위와 같이 주소가 나올 것이다.
그리고 1~10분 정도 지나고 url을 클릭해 보면 배포가 잘 되는 것을 볼 수 있을 것이다.
만약 404 오류가 나온다면 package.json에 적은 homepage주소가 잘 맞는지 한번 더 확인해 보자
나같은 경우 주소에 http 라고 적었는데 404 오류가 나와 https라고 바꾸어 주니 잘 배포가 되었다!