[도서 스터디] 트랜스포머를 활용한 자연어 처리_chapter9 : 레이블 부족 문제 다루기
레이블링 데이터가 없을 때 모델 성능 향상 방법 선택 기준
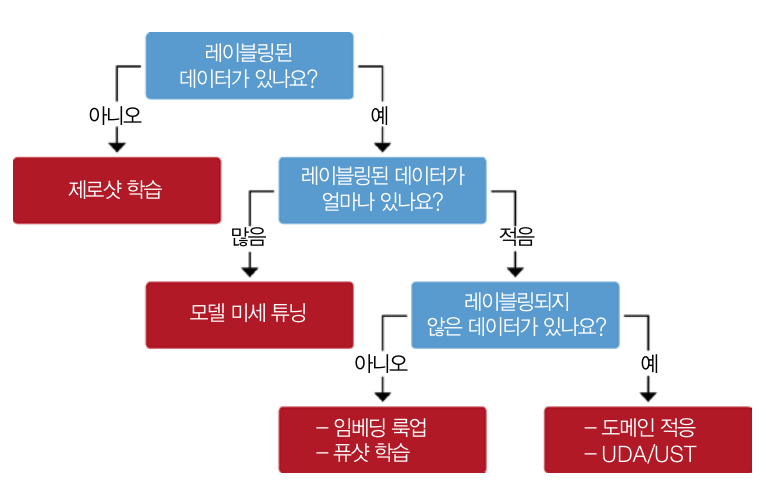
- 제로샷 학습
- 모델 미세 튜닝
- 임베딩 룩업
- 퓨샷 학습
- 도메인 적응
- UDA(unsupervised data augmentation, 비지도 데이터 증식)
- UST(uncertainty-aware self-training, 불확실성 인지 자가 훈련)
깃허브 이슈 태거 만들기
데이터
데이터 다운로드 및 준비하기
dataset_url = "https://git.io/nlp-with-transformers"
df_issues = pd.read_json(dataset_url, lines=True)
print(f"DataFrame shape: {df_issues.shape}")
# DataFrame shape: (9930, 26)
간단한 데이터 EDA
- 레이블 확인하기
- 다중레이블 : 최대 5개
- 레이블 수 : 65
print(df_issues["labels"].apply(lambda x : len(x)).value_counts().to_frame().T)
df_counts = df_issues["labels"].explode().value_counts()
print(f"Number of labels: {len(df_counts)}")
# Display the top-8 label categories
df_counts.to_frame().head(8).T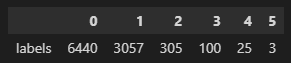

- 레이블 변환/정제하기
- str 정제 후 라벨 수 확인
- 레이블 여부 구분 추가
label_map = {"Core: Tokenization": "tokenization",
             "New model": "new model",
             "Core: Modeling": "model training",
             "Usage": "usage",
             "Core: Pipeline": "pipeline",
             "TensorFlow": "tensorflow or tf",
             "PyTorch": "pytorch",
             "Examples": "examples",
             "Documentation": "documentation"}

def filter_labels(x):
    return [label_map[label] for label in x if label in label_map]

df_issues["labels"] = df_issues["labels"].apply(filter_labels)
all_labels = list(label_map.values())

df_counts = df_issues["labels"].explode().value_counts()
df_counts.to_frame().T

df_issues["split"] = "unlabeled"
mask = df_issues["labels"].apply(lambda x: len(x)) > 0
df_issues.loc[mask, "split"] = "labeled"
df_issues["split"].value_counts().to_frame()- 데이터 중복 제거
len_before = len(df_issues)
df_issues = df_issues.drop_duplicates(subset="text")
print(f"Removed {(len_before-len(df_issues))/len_before:.2%} duplicates.")
# Removed 1.88% duplicates.- 텍스트(이슈)마다 단어수 파악
import numpy as np
import matplotlib.pyplot as plt

(df_issues["text"].str.split().apply(len)
 .hist(bins=np.linspace(0, 500, 50), grid=False, edgecolor="C0"))
plt.title("Words per issue")
plt.xlabel("Number of words")
plt.ylabel("Number of issues")
plt.show()
훈련 세트 만들기
- scikit-multilearn : 다중레이블을 균형 잡힌 비율로 훈련 데이터 셋과 검증 데이터 셋 만들기에 유용한 라이브러리
- 라벨인코딩 및 훈련/검증 데이터 셋 만들기
from sklearn.preprocessing import MultiLabelBinarizer

mlb = MultiLabelBinarizer()
mlb.fit([all_labels])
mlb.transform([["tokenization", "new model"], ["pytorch"]])

from skmultilearn.model_selection import iterative_train_test_split

def balanced_split(df, test_size=0.5):
    ind = np.expand_dims(np.arange(len(df)), axis=1)
    labels = mlb.transform(df["labels"])
    ind_train, _, ind_test, _ = iterative_train_test_split(ind, labels,
                                                           test_size)
    return df.iloc[ind_train[:, 0]], df.iloc[ind_test[:,0]]
from sklearn.model_selection import train_test_split
df_clean = df_issues[["text", "labels", "split"]].reset_index(drop=True).copy()
df_unsup = df_clean.loc[df_clean["split"] == "unlabeled", ["text", "labels"]]
df_sup = df_clean.loc[df_clean["split"] == "labeled", ["text", "labels"]]
np.random.seed(0)
df_train, df_tmp = balanced_split(df_sup, test_size=0.5)
df_valid, df_test = balanced_split(df_tmp, test_size=0.5)
from datasets import Dataset, DatasetDict
ds = DatasetDict({
"train": Dataset.from_pandas(df_train.reset_index(drop=True)),
"valid": Dataset.from_pandas(df_valid.reset_index(drop=True)),
"test": Dataset.from_pandas(df_test.reset_index(drop=True)),
"unsup": Dataset.from_pandas(df_unsup.reset_index(drop=True))})np.random.seed(0)
all_indices = np.expand_dims(list(range(len(ds["train"]))), axis=1)
indices_pool = all_indices
labels = mlb.transform(ds["train"]["labels"])
train_samples = [8, 16, 32, 64, 128]
train_slices, last_k = [], 0
for i, k in enumerate(train_samples):
# Split off samples necessary to fill the gap to the next split size
indices_pool, labels, new_slice, _ = iterative_train_test_split(
indices_pool, labels, (k-last_k)/len(labels))
last_k = k
if i==0: train_slices.append(new_slice)
else: train_slices.append(np.concatenate((train_slices[-1], new_slice)))
# Add full dataset as last slice
train_slices.append(all_indices), train_samples.append(len(ds["train"]))
train_slices = [np.squeeze(train_slice) for train_slice in train_slices]나이브 베이즈 모델 만들기
- 모델의 장점 : 훈련 속도가 빠르며 입력의 변동에 매우 안정적임
- OvR(one-versus-rest) 분류 작업으로 변경(다중 레이블 분류, L개의 레이블을 위해 L개의 이진 분류기 훈련)
- 성능평가 : 마이크로 F1-Score, 매크로 F1-Score
from collections import defaultdict

def prepare_labels(batch):
    batch["label_ids"] = mlb.transform(batch["labels"])
    return batch

ds = ds.map(prepare_labels, batched=True)

macro_scores, micro_scores = defaultdict(list), defaultdict(list)

from sklearn.naive_bayes import MultinomialNB
from sklearn.metrics import classification_report
from skmultilearn.problem_transform import BinaryRelevance
from sklearn.feature_extraction.text import CountVectorizer

for train_slice in train_slices:
    # Get training slice and test data
    ds_train_sample = ds["train"].select(train_slice)
    y_train = np.array(ds_train_sample["label_ids"])
    y_test = np.array(ds["test"]["label_ids"])
    # Use a simple count vectorizer to encode our texts as token counts
    count_vect = CountVectorizer()
    X_train_counts = count_vect.fit_transform(ds_train_sample["text"])
    X_test_counts = count_vect.transform(ds["test"]["text"])
    # Create and train our model!
    classifier = BinaryRelevance(classifier=MultinomialNB())
    classifier.fit(X_train_counts, y_train)
    # Generate predictions and evaluate
    y_pred_test = classifier.predict(X_test_counts)
    clf_report = classification_report(
        y_test, y_pred_test, target_names=mlb.classes_, zero_division=0,
        output_dict=True)
    # Store metrics
    macro_scores["Naive Bayes"].append(clf_report["macro avg"]["f1-score"])
    micro_scores["Naive Bayes"].append(clf_report["micro avg"]["f1-score"])

import matplotlib.pyplot as plt

def plot_metrics(micro_scores, macro_scores, sample_sizes, current_model):
    fig, (ax0, ax1) = plt.subplots(1, 2, figsize=(10, 4), sharey=True)

    for run in micro_scores.keys():
        if run == current_model:
            ax0.plot(sample_sizes, micro_scores[run], label=run, linewidth=2)
            ax1.plot(sample_sizes, macro_scores[run], label=run, linewidth=2)
        else:
            ax0.plot(sample_sizes, micro_scores[run], label=run,
                     linestyle="dashed")
            ax1.plot(sample_sizes, macro_scores[run], label=run,
                     linestyle="dashed")

    ax0.set_title("Micro F1 scores")
    ax1.set_title("Macro F1 scores")
    ax0.set_ylabel("Test set F1 score")
    ax0.legend(loc="lower right")
    for ax in [ax0, ax1]:
        ax.set_xlabel("Number of training samples")
        ax.set_xscale("log")
        ax.set_xticks(sample_sizes)
        ax.set_xticklabels(sample_sizes)
        ax.minorticks_off()
    plt.tight_layout()
    plt.show()

plot_metrics(micro_scores, macro_scores, train_samples, "Naive Bayes")
제로샷 분류(레이블링 없는 경우)
- 작업별 말뭉치에서 추가로 미세튜닝하지 않고 사전 훈련된 모델 사용
- base-model : 마스크드 언어 모델을 사용해 마스킹된 토큰 내용을 예측하는 fill-mask 파이프라인에 Bert 베이스 모델을 로드
파이프라인
from transformers import pipeline

pipe = pipeline("fill-mask", model="bert-base-uncased")
모델 살펴보기
- 기본 사용법 : 간단한 설명과 프롬프트에 예측할 부분을 '[MASK]'로 남겨둠
movie_desc = "The main characters of the movie madacascar \
are a lion, a zebra, a giraffe, and a hippo. "
prompt = "The movie is about [MASK]."

output = pipe(movie_desc + prompt)
for element in output:
    print(f"Token {element['token_str']}:\t{element['score']:.3f}%")

# 타겟 선택하여 결과 확인
output = pipe(movie_desc + prompt, targets=["animals", "cars"])
for element in output:
print(f"Token {element['token_str']}:\t{element['score']:.3f}%")- 자연어추론(NLI)에서 미세튜닝 모델 적용
- 텍스트 함의 : 모델이 두 개의 텍스트 구절이 서로 연결되는지 아니면 모순되는지 판단
=> MNLI 말뭉치나 XNLI 말뭉치 같은 데이터셋에서 함의와 모순을 감지 - MNLI 데이터셋
- 전제, 가설, 레이블 세 부분으로 구성됨
=> entailment 레이블 : 전제조건하에서 가설 텍스트가 참일 때 할당
=> contradiction 레이블 : 전체조건하에서 가설 텍스트가 거짓이거나 부적절할 때 사용
=> netural 레이블 : 위의 두개 외의 경우 할당 - 제로샷 분류를 위한 MNLI 모델 사용
- 전제, 가설, 레이블 세 부분으로 구성됨
from transformers import pipeline

# device=0 gpu 사용 / torch 기반 gpu
pipe = pipeline("zero-shot-classification", device=0)

sample = ds["train"][0]
print(f"Labels: {sample['labels']}")

# multi_label=True : 레이블 분류에 필요한 모든 점수 반환
output = pipe(sample["text"], all_labels, multi_label=True)
print(output["sequence"][:400])
print("\nPredictions:")

for label, score in zip(output["labels"], output["scores"]):
print(f"{label}, {score:.2f}")- 제로샷 파이프라인에 하나의 샘플을 주입하는 함수(추론하는 함수) 적용
def zero_shot_pipeline(example):
    output = pipe(example["text"], all_labels, multi_label=True)
    example["predicted_labels"] = output["labels"]
    example["scores"] = output["scores"]
    return example

ds_zero_shot = ds["valid"].map(zero_shot_pipeline)- 레이블 할당 함수(2가지 케이스)
- 임계값을 정의해서 초과한 모든 레이블 선택
- 상위 k개 레이블 선택
def get_preds(example, threshold=None, topk=None):
    preds = []
    if threshold:
        for label, score in zip(example["predicted_labels"], example["scores"]):
            if score >= threshold:
                preds.append(label)
    elif topk:
        for i in range(topk):
            preds.append(example["predicted_labels"][i])
    else:
        raise ValueError("Set either `threshold` or `topk`.")
return {"pred_label_ids": list(np.squeeze(mlb.transform([preds])))}- 예측 레이블로 분류 리포트(평가) 결과 반환 함수
def get_clf_report(ds):
    y_true = np.array(ds["label_ids"])
    y_pred = np.array(ds["pred_label_ids"])
    return classification_report(
        y_true, y_pred, target_names=mlb.classes_, zero_division=0,
output_dict=True)- 예측 레이블로 분류 리포트(평가) top-k 그래프
macros, micros = [], []
topks = [1, 2, 3, 4]
for topk in topks:
    ds_zero_shot = ds_zero_shot.map(get_preds, batched=False,
                                    fn_kwargs={'topk': topk})
    clf_report = get_clf_report(ds_zero_shot)
    micros.append(clf_report['micro avg']['f1-score'])
    macros.append(clf_report['macro avg']['f1-score'])


plt.plot(topks, micros, label='Micro F1')
plt.plot(topks, macros, label='Macro F1')
plt.xlabel("Top-k")
plt.ylabel("F1-score")
plt.legend(loc='best')
plt.show()- 예측 레이블로 임계값 결과 그래프
macros, micros = [], []
thresholds = np.linspace(0.01, 1, 100)
for threshold in thresholds:
    ds_zero_shot = ds_zero_shot.map(get_preds,
                                    fn_kwargs={"threshold": threshold})
    clf_report = get_clf_report(ds_zero_shot)
    micros.append(clf_report["micro avg"]["f1-score"])
    macros.append(clf_report["macro avg"]["f1-score"])


plt.plot(thresholds, micros, label="Micro F1")
plt.plot(thresholds, macros, label="Macro F1")
plt.xlabel("Threshold")
plt.ylabel("F1-score")
plt.legend(loc="best")
plt.show()
=> 두 개의 그래프에 정밀도/재현율의 트레이드오프를 확인하며 최종 평가 방법 선택 후 모델에 적용(이 책에서는 top@1 선택)
레이블링 데이터가 적은 경우
데이터 증식 방법
- 장점 : 간단하지만 효과적으로 적은 데이터셋에서 텍스트 분류기 성능 향상 가능
- 방법
- 역 번역
- 방식 : 원본 언어 -> 다른 언어로 번역 -> 다시 원본 언어로 번역
- 데이터 선택 참조 : 데이터가 많은 언어 또는 도메인 특화된 언어가 매우 많지 않은 말뭉치
- 토큰 섞기
- 방식 : 한 텍스트에서 동의어 교체, 단어 추가, 교환, 삭제
동의어 교체 적용해 보기(예시)
- NlpAug의 ContextualWordEmbAug 클래스로 DistilBERT의 문맥 단어 임베딩 사용
- 모델 로드 및 간단한 테스트
from transformers import set_seed
import nlpaug.augmenter.word as naw

set_seed(3)
aug = naw.ContextualWordEmbsAug(model_path="distilbert-base-uncased",
                                device="cpu", action="substitute")

text = "Transformers are the most popular toys"
print(f"Original text: {text}")
print(f"Augmented text: {aug.augment(text)}")

# are -> 's 로 변환됨
# Original text: Transformers are the most popular toys
# Augmented text: transformers'the most popular toys- 동의어로 교체하는 함수 만들기
def augment_text(batch, transformations_per_example=1):
    text_aug, label_ids = [], []
    for text, labels in zip(batch["text"], batch["label_ids"]):
        text_aug += [text]
        label_ids += [labels]
        for _ in range(transformations_per_example):
            text_aug += [aug.augment(text)]
            label_ids += [labels]
return {"text": text_aug, "label_ids": label_ids}- 동의어로 교체 실행 및 결과 그래프 그리기
for train_slice in train_slices:
    # Get training slice and test data
    ds_train_sample = ds["train"].select(train_slice)
    # Flatten augmentations and align labels!
    ds_train_aug = (ds_train_sample.map(
        augment_text, batched=True, remove_columns=ds_train_sample.column_names)
                    .shuffle(seed=42))
    y_train = np.array(ds_train_aug["label_ids"])
    y_test = np.array(ds["test"]["label_ids"])
    # Use a simple count vectorizer to encode our texts as token counts
    count_vect = CountVectorizer()
    X_train_counts = count_vect.fit_transform(ds_train_aug["text"])
    X_test_counts = count_vect.transform(ds["test"]["text"])
    # Create and train our model!
    classifier = BinaryRelevance(classifier=MultinomialNB())
    classifier.fit(X_train_counts, y_train)
    # Generate predictions and evaluate
    y_pred_test = classifier.predict(X_test_counts)
    clf_report = classification_report(
        y_test, y_pred_test, target_names=mlb.classes_, zero_division=0,
        output_dict=True)
    # Store metrics
    macro_scores["Naive Bayes + Aug"].append(clf_report["macro avg"]["f1-score"])
    micro_scores["Naive Bayes + Aug"].append(clf_report["micro avg"]["f1-score"])

plot_metrics(micro_scores, macro_scores, train_samples, "Naive Bayes + Aug")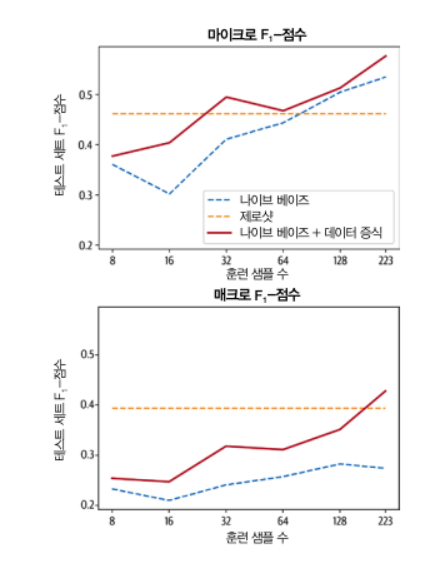
임베딩을 룩업 테이블로 사용하기
-
(LLM 임베딩 활용) openAI 분류 엔드포인트를 본 뜬 텍스트 분류기 생성
1단계 : 언어 모델을 사용해 레이블링된 전체 텍스트 임베딩
2단계 : 저장된 임베딩에 최근접 이웃 검색 수행
3단계 : 최근적 이웃의 레이블을 수집해 예측 만들기- 주의 사항 : 탐색할 이웃의 개수 조정이 중요함(적으면 잡음이 많고 너무 많으면 이웃한 그룹이 혼합됨)

import torch
from transformers import AutoTokenizer, AutoModel

model_ckpt = "miguelvictor/python-gpt2-large"
tokenizer = AutoTokenizer.from_pretrained(model_ckpt)
model = AutoModel.from_pretrained(model_ckpt)

def mean_pooling(model_output, attention_mask):
    # 각 토큰에 대한 벡터값
    # 토큰 임베딩 추출
    token_embeddings = model_output[0]
    # 어텐션 마스크 계산
    input_mask_expanded = (attention_mask
                           .unsqueeze(-1)
                           .expand(token_embeddings.size())
                           .float())
    # Sum the embeddings, but ignore masked tokens
    sum_embeddings = torch.sum(token_embeddings * input_mask_expanded, 1)
    sum_mask = torch.clamp(input_mask_expanded.sum(1), min=1e-9)
    # 하나의 평균 벡터 반환 : 전체 문장(깃허브 이슈)에 대한 임베딩 벡터 1개값
    return sum_embeddings / sum_mask

# mean_pooling 실행 함수
def embed_text(examples):
    inputs = tokenizer(examples["text"], padding=True, truncation=True,
                       max_length=128, return_tensors="pt")
    with torch.no_grad():
        model_output = model(**inputs)
    pooled_embeds = mean_pooling(model_output, inputs["attention_mask"])
    return {"embedding": pooled_embeds.cpu().numpy()}
- 새로운 택스트 임베딩과 훈련 세트에 있는 기존 임베딩 사이의 유사도 계산
=> 빠른 검색을 위해 Faiss 인덱스 활용
=> get_nearest_examples() : 가장 가까운 이웃과 각 이웃의 매칭 점수 반환
tokenizer.pad_token = tokenizer.eos_token
embs_train = ds["train"].map(embed_text, batched=True, batch_size=16)
embs_valid = ds["valid"].map(embed_text, batched=True, batch_size=16)
embs_test = ds["test"].map(embed_text, batched=True, batch_size=16)

embs_train.add_faiss_index("embedding")

i, k = 0, 3 # Select the first query and 3 nearest neighbors
rn, nl = "\r\n\r\n", "\n" # Used to remove newlines in text for compact display

query =  np.array(embs_valid[i]["embedding"], dtype=np.float32)
scores, samples = embs_train.get_nearest_examples("embedding", query, k=k)

print(f"QUERY LABELS: {embs_valid[i]['labels']}")
print(f"QUERY TEXT:\n{embs_valid[i]['text'][:200].replace(rn, nl)} [...]\n")
print("="*50)
print(f"Retrieved documents:")
for score, label, text in zip(scores, samples["labels"], samples["text"]):
    print("="*50)
    print(f"TEXT:\n{text[:200].replace(rn, nl)} [...]")
    print(f"SCORE: {score:.2f}")
print(f"LABELS: {label}")- 탐색할 최적의 개수 찾기
- k(탐색할 데이터 수)와 임계값 m < k를 바꿔 확인
- 특정 k에서 m이 너무 크거나 작으면 최적이 아닌 결과
def get_sample_preds(sample, m):
    return (np.sum(sample["label_ids"], axis=0) >= m).astype(int)

def find_best_k_m(ds_train, valid_queries, valid_labels, max_k=17):
    max_k = min(len(ds_train), max_k)
    perf_micro = np.zeros((max_k, max_k))
    perf_macro = np.zeros((max_k, max_k))
    for k in range(1, max_k):
        for m in range(1, k + 1):
            _, samples = ds_train.get_nearest_examples_batch("embedding",
                                                             valid_queries, k=k)
            y_pred = np.array([get_sample_preds(s, m) for s in samples])
            clf_report = classification_report(valid_labels, y_pred,
                target_names=mlb.classes_, zero_division=0, output_dict=True)
            perf_micro[k, m] = clf_report["micro avg"]["f1-score"]
            perf_macro[k, m] = clf_report["macro avg"]["f1-score"]
    return perf_micro, perf_macro


valid_labels = np.array(embs_valid["label_ids"])
valid_queries = np.array(embs_valid["embedding"], dtype=np.float32)
perf_micro, perf_macro = find_best_k_m(embs_train, valid_queries, valid_labels)


fig, (ax0, ax1) = plt.subplots(1, 2, figsize=(10, 3.5), sharey=True)
ax0.imshow(perf_micro)
ax1.imshow(perf_macro)

ax0.set_title("micro scores")
ax0.set_ylabel("k")
ax1.set_title("macro scores")
for ax in [ax0, ax1]:
    ax.set_xlim([0.5, 17 - 0.5])
    ax.set_ylim([17 - 0.5, 0.5])
    ax.set_xlabel("m")
plt.show()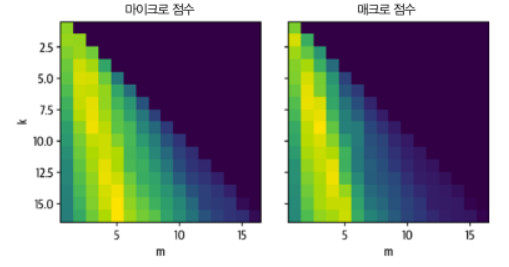
미세튜닝하기
[추가 필요]
프롬프트를 사용한 인-컨텍스트 학습과 퓨샷 학습
- 인-컨텐스트 : 프롬프트가 있는 샘플에서 효과적으로 학습하는 대규모 언어 모델을 활용하여 샘플 몇 개를 보강하여 모델 작업 성능을 향상시킴
- ADAPET : 프롬프트 샘플과 원하는 예측을 만들고 이런 샘플로 언어 모델을 계속 훈련함
레이블링되지 않은 데이터 활용
- 도메인 적용 방법 : 학습된 언어 모델을 특정 도메인 데이터에서 계속 훈련함(언어 모델을 처음부터 재훈련하는 것이 아님)
=> 마스킹된 단어를 예측함
언어 모델 미세 튜닝
- 마스크드 러닝 BERT 모델에 레이블링 없는 데이터셋 미세 튜닝하기
- 새로운 데이터를 토큰화하여 추가하기
- 특별한 데이터 콜렉터
- 새로운 데이터 토큰화 추가 : return_special_tokens_mask=True 로 마스킹 데이터 얻기
def tokenize(batch):
    return tokenizer(batch["text"], truncation=True,
                     max_length=128, return_special_tokens_mask=True)

ds_mlm = ds.map(tokenize, batched=True)
ds_mlm = ds_mlm.remove_columns(["labels", "text", "label_ids"])- 데이터 콜렉터
- 데이터셋과 모델 호출 사이를 연결하는 함수
- 동적으로 마스킹과 레이블 생성
- 별도 레이블 저장 없이 샘플링할 때마다 새 마스크 얻을 수 있음
from transformers import DataCollatorForLanguageModeling, set_seed

# BERT에서 마스킹한 값 15% 적용
data_collator = DataCollatorForLanguageModeling(tokenizer=tokenizer,
                                                mlm_probability=0.15)
# 토큰 확인
set_seed(3)
data_collator.return_tensors = "np"
inputs = tokenizer("Transformers are awesome!", return_tensors="np")
outputs = data_collator([{"input_ids": inputs["input_ids"][0]}])

original_input_ids = inputs["input_ids"][0]
masked_input_ids = outputs["input_ids"][0]

pd.DataFrame({
    "Original tokens": tokenizer.convert_ids_to_tokens(original_input_ids),
    "Masked tokens": tokenizer.convert_ids_to_tokens(masked_input_ids),
    "Original input_ids": original_input_ids,
    "Masked input_ids": masked_input_ids,
"Labels": outputs["labels"][0]}).T- 모델 미세 튜닝
[생략]
비지도 데이터 증식(UDA)
- 레이블링되지 않은 샘플과 살짝 왜곡된 샘플에 대해 모델의 예측이 일정해야 함

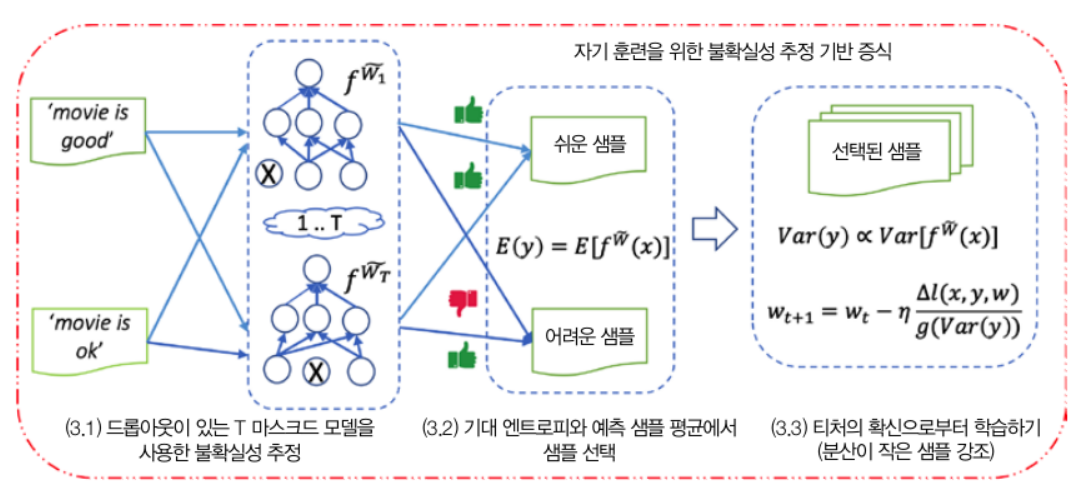
불확실성 인지 자가 훈련(UST)

개발 스터디 노트입니다.