Kubernetes설치
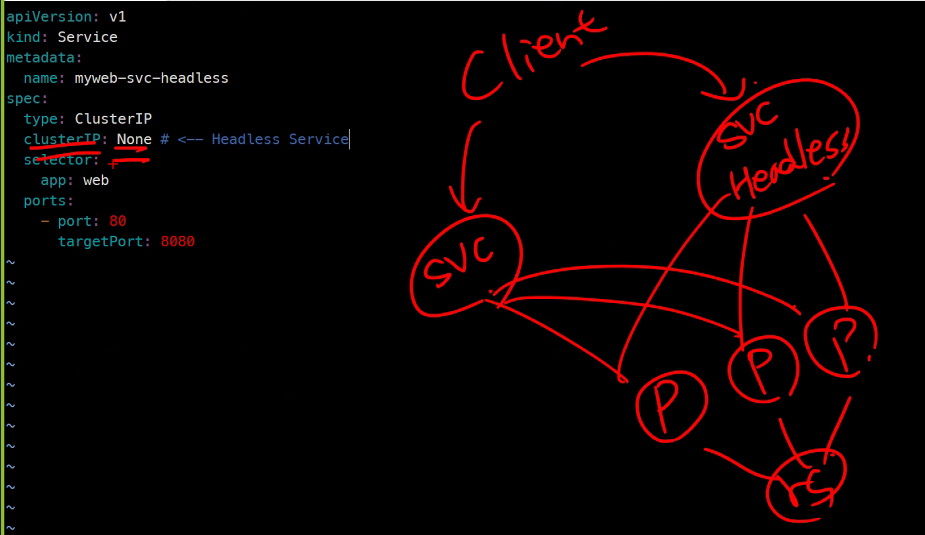
Headless
statefulSet을 구성하기 위해서는 Headless 서비스를 필수적으로 사용해야한다. 왜냐하면 기존에 배웠던 rs나 ds같은 경우 Pod가 삭제되면 그저 desired를 채우기위해 셋팅된 이미지를 받아서 Pod하나 만들어주기만 하면 그만이었지만 Statefulset은 Database같은 mutable 어플리케이션이기 때문에 아무 Pod만 만들어서는 안되고 정확히 기존에 사용하던 그 Pod가 다시 만들어져야한다. 그렇게 하기 위해서 Headless가 부여하는 Pod의 고유성을 이용하게된다.
Headless yaml파일
myweb-svc.yaml
apiVersion: v1
kind: Service
metadata:
  name: myweb-svc
spec:
  type: ClusterIP
  selector:
    app: web
  ports:
    - port: 80
      targetPort: 8080
myweb-svc-headless.yaml
apiVersion: v1
kind: Service
metadata:
  name: myweb-svc-headless
spec:
  type: ClusterIP
  clusterIP: None # <-- Headless Service
  selector:
    app: web
  ports:
    - port: 80
      targetPort: 8080
myweb-rs.yaml
apiVersion: apps/v1
kind: ReplicaSet
metadata:
  name: myweb-rs
spec:
  replicas: 3
  selector:
    matchLabels:
      app: web
      env: dev
  template:
    metadata:
      labels:
        app: web
        env: dev
    spec:
      containers:
        - name: myweb
          image: ghcr.io/c1t1d0s7/go-myweb
          ports:
            - containerPort: 8080
              protocol: TCP
yaml파일구성은 아래와 같다. 기존에 사용하던ClusterIP svc가 있고 이번 실습을 위해 만든Headless svc가 있다. 물론rs에서만든Pod들을 두 서비스 모두 참조하고 있다.
서비스 생성 및 확인
kubectl create -f .kubectl run nettool -it --image ghcr.io/c1t1d0s7/network-multitool --rm
> host myweb-svc
> host myweb-svc-headless 위에서 설명했듯 두 서비스 모두 동작하는 것을 확인할 수 있다.
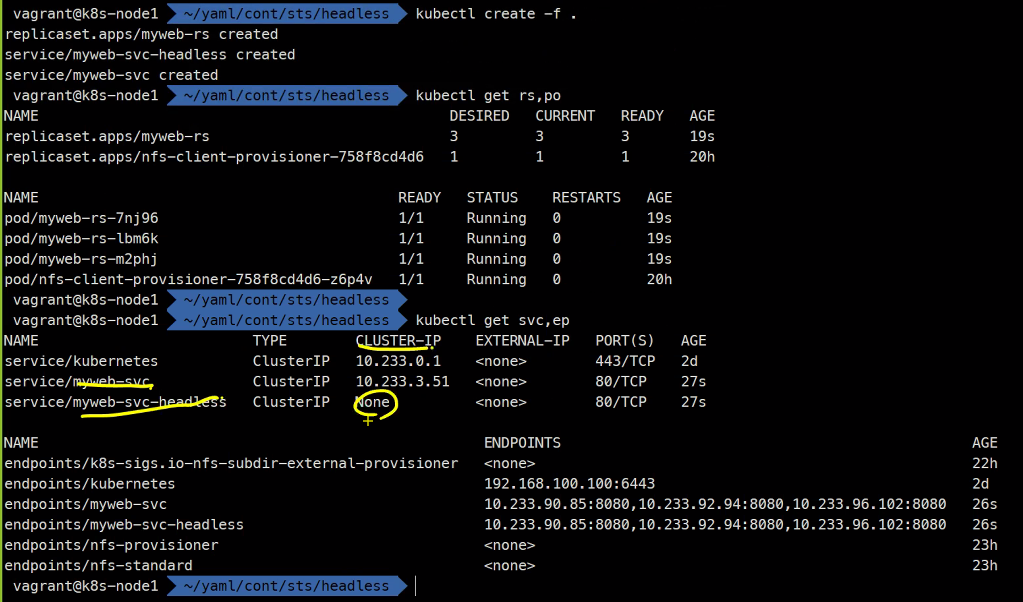
그리고 두 서비스를 접속해보면 아래와같이
headless서비스는Pod들마다 고유한 주소를 가지고 있다는 것을 확인할 수 있다.
이 상태에서Statefulset을 하게되면FQDN이 다 다르게 된다.
즉,Pod에 고유성을 부여할 수 있다.

Statefulset
myweb-svc-headless.yaml
apiVersion: v1
kind: Service
metadata:
  name: myweb-svc-headless
spec:
  type: ClusterIP
  clusterIP: None # <-- Headless Service
  selector:
    app: web
  ports:
    - port: 80
      targetPort: 8080
myweb-sts.yaml
apiVersion: apps/v1
kind: StatefulSet
metadata:
  name: myweb-sts
spec:
  replicas: 3
  serviceName: myweb-svc-headless
  selector:
    matchLabels:
      app: web
      env: dev
  template:
    metadata:
      labels:
        app: web
        env: dev
    spec:
      containers:
        - name: myweb
          image: ghcr.io/c1t1d0s7/go-myweb
          ports:
            - containerPort: 8080
              protocol: TCP
서비스 실행 및 결과확인
kubectl create -f .kubectl run nettool -it --image ghcr.io/c1t1d0s7/network-multitool --rm
> host myweb-svc-headless
> host myweb-sts-0.myweb-svc-headless
> host myweb-sts-1.myweb-svc-headless
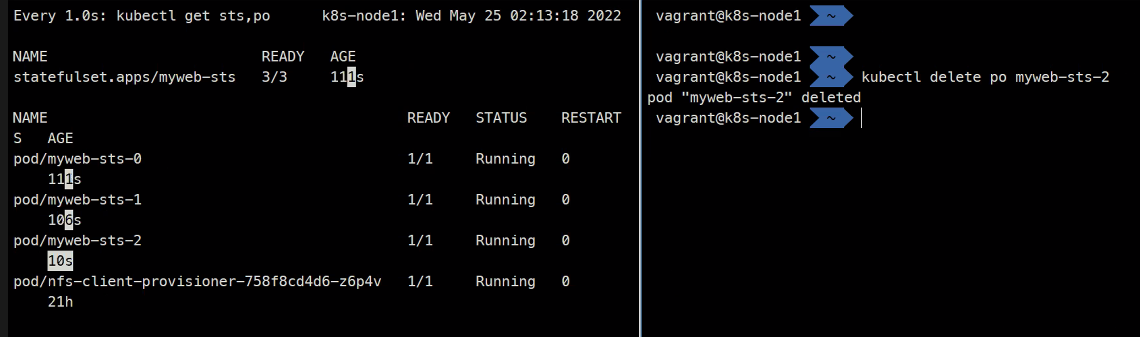
> host myweb-sts-2.myweb-svc-headlesswatch -n1 kubectl get sts,po kubectl delete po myweb-sts-2
이렇게 삭제했던 Pod가 똑같은 고유성을 가지고 생성되는 것을 확인할 수 있다. 그리고 항상 순서를 지키면서 스케일링하게 된다
그리고
statefulSet을 사용하는 경우와 사용하지 않는 경우를 비교하자면 가장 큰 예로Database를 들 수 있다. 그리고Database는 생성 되자마자 고유하게 붙어야하므로다이나믹 프로비저닝을 사용하게 된다. 일단볼륨을 고유하게Pod에pvc와pv를 붙여주고 이후 동기화를 할것인지 안할것인지는 그 다음 문제로 넘어가게된다.
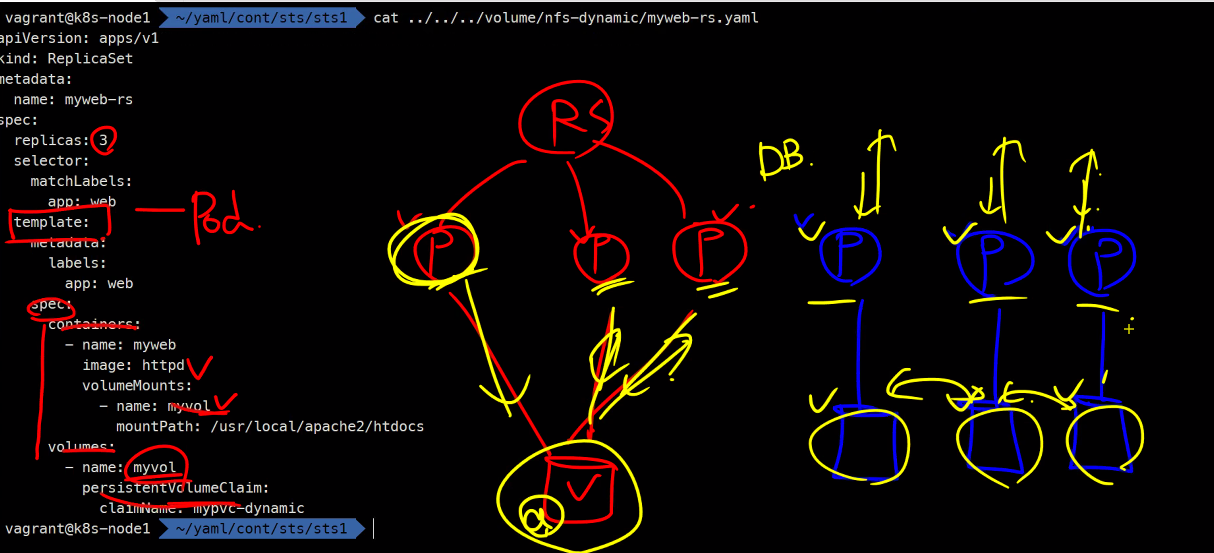
myweb-sts-vol.yaml
apiVersion: apps/v1
kind: StatefulSet
metadata:
  name: myweb-sts-vol
spec:
  replicas: 3
  serviceName: myweb-svc-headless
  selector:
    matchLabels:
      app: web
      env: dev
  template:
    metadata:
      labels:
        app: web
        env: dev
    spec:
      containers:
        - name: myweb
          image: ghcr.io/c1t1d0s7/go-myweb:alpine
          ports:
            - containerPort: 8080
              protocol: TCP
          volumeMounts:
            - name: myweb-pvc
              mountPath: /data
  volumeClaimTemplates:
    - metadata:
        name: myweb-pvc
      spec:
        accessMode:
          - ReadWriteOnce
        resources:
          requests:
            storage: 1G
        storageClassName: nfs-client
kubectl create -f myweb-svc-headless.yaml
kubectl create -f myweb-sts-vol.yaml
kubectl get sts,po,pv,pvc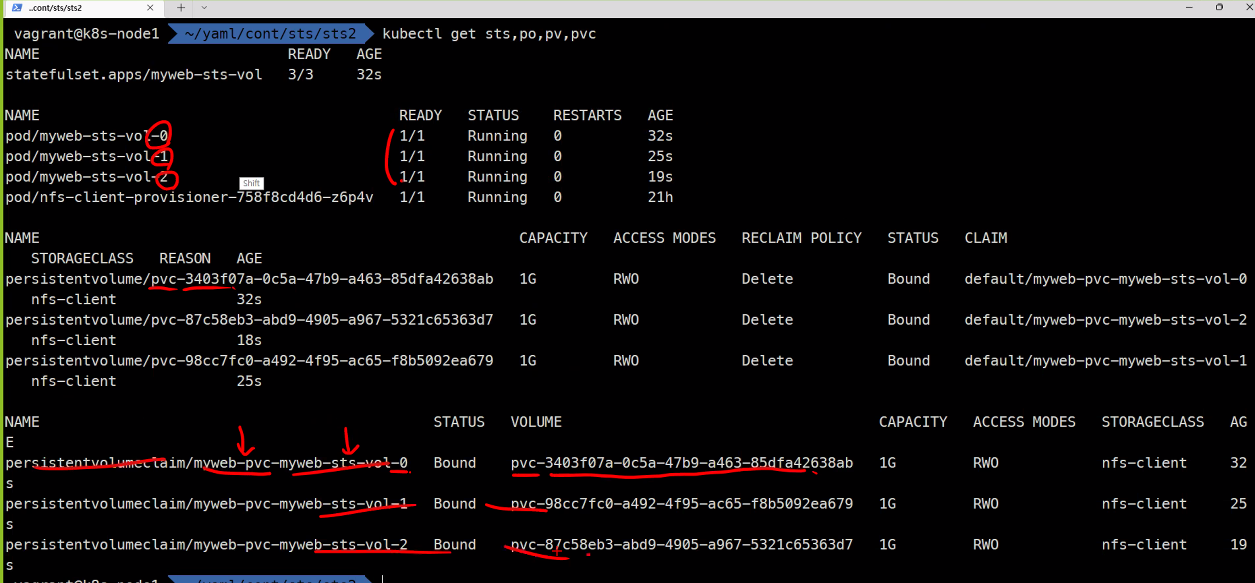
kubectl scale sts myweb-sts-vol --replicas=2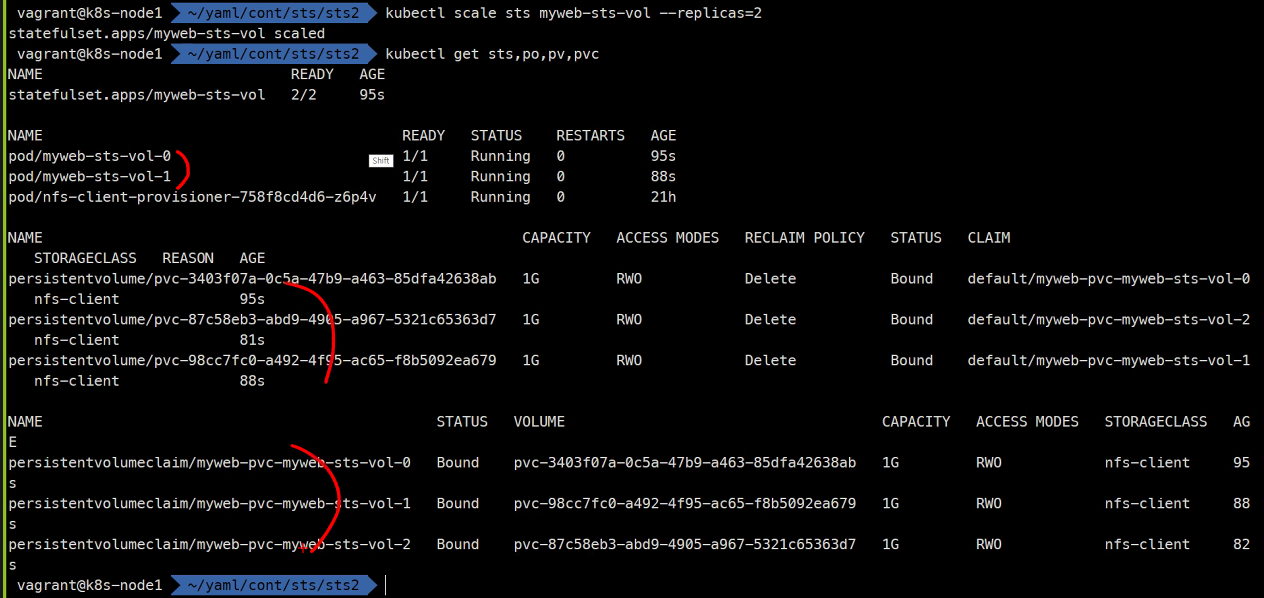
### myweb-sts-vol-0이라는 볼륨에 임시로 파일을 만들어준다.

kubectl exec myweb-sts-vol-0 -it -- sh
cd /data/
ls
touch a b c
ls
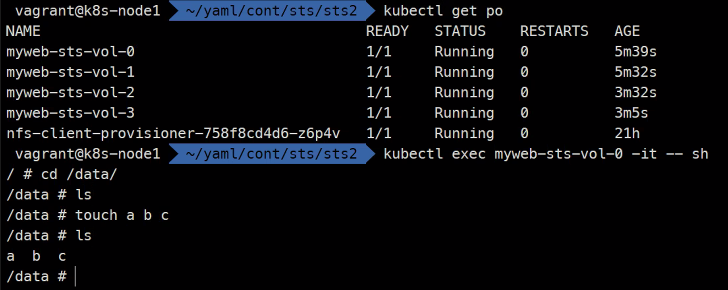
### 그리고 myweb-sts-vol-0이라는 볼륨으로 접속해보면
### 볼륨이 서로 고유한 것을 확인할 수 있다.

kubectl exec myweb-sts-vol-0 -it -- sh
cd /data/
ls

mysql 예제
https://kubernetes.io/docs/tasks/run-application/run-replicated-stateful-application/
mysql yaml파일
mysql-configmap.yaml
apiVersion: v1
kind: ConfigMap
metadata:
  name: mysql
  labels:
    app: mysql
data:
  primary.cnf: |
    # Apply this config only on the primary.
    [mysqld]
    log-bin
    datadir=/var/lib/mysql
  replica.cnf: |
    # Apply this config only on replicas.
    [mysqld]
    super-read-only
    datadir=/var/lib/mysql
mysql-services.yaml
# Headless service for stable DNS entries of StatefulSet members.
apiVersion: v1
kind: Service
metadata:
  name: mysql
  labels:
    app: mysql
spec:
  ports:
  - name: mysql
    port: 3306
  clusterIP: None
  selector:
    app: mysql
---
# Client service for connecting to any MySQL instance for reads.
# For writes, you must instead connect to the primary: mysql-0.mysql.
apiVersion: v1
kind: Service
metadata:
  name: mysql-read
  labels:
    app: mysql
spec:
  ports:
  - name: mysql
    port: 3306
  selector:
    app: mysql
mysql-statefulset.yaml
apiVersion: apps/v1
kind: StatefulSet
metadata:
name: mysql
spec:
selector:
matchLabels:
app: mysql
serviceName: mysql
replicas: 2
template:
metadata:
labels:
app: mysql
spec:
initContainers:
- name: init-mysql
image: mysql:5.7
command:
- bash
- "-c"
- |
set -ex
# Generate mysql server-id from pod ordinal index.
[[ `hostname` =~ -([0-9]+)$ ]] || exit 1
ordinal=${BASH_REMATCH[1]}
echo [mysqld] > /mnt/conf.d/server-id.cnf
# Add an offset to avoid reserved server-id=0 value.
echo server-id=$((100 + $ordinal)) >> /mnt/conf.d/server-id.cnf
# Copy appropriate conf.d files from config-map to emptyDir.
if [[ $ordinal -eq 0 ]]; then
cp /mnt/config-map/primary.cnf /mnt/conf.d/
else
cp /mnt/config-map/replica.cnf /mnt/conf.d/
fi
volumeMounts:
- name: conf
mountPath: /mnt/conf.d
- name: config-map
mountPath: /mnt/config-map
- name: clone-mysql
image: gcr.io/google-samples/xtrabackup:1.0
command:
- bash
- "-c"
- |
set -ex
# Skip the clone if data already exists.
[[ -d /var/lib/mysql/mysql ]] && exit 0
# Skip the clone on primary (ordinal index 0).
[[ `hostname` =~ -([0-9]+)$ ]] || exit 1
ordinal=${BASH_REMATCH[1]}
[[ $ordinal -eq 0 ]] && exit 0
# Clone data from previous peer.
ncat --recv-only mysql-$(($ordinal-1)).mysql 3307 | xbstream -x -C /var/lib/mysql
# Prepare the backup.
xtrabackup --prepare --target-dir=/var/lib/mysql
volumeMounts:
- name: data
mountPath: /var/lib/mysql
subPath: mysql
- name: conf
mountPath: /etc/mysql/conf.d
containers:
- name: mysql
image: mysql:5.7
env:
- name: MYSQL_ALLOW_EMPTY_PASSWORD
value: "1"
ports:
- name: mysql
containerPort: 3306
volumeMounts:
- name: data
mountPath: /var/lib/mysql
subPath: mysql
- name: conf
mountPath: /etc/mysql/conf.d
resources:
requests:
cpu: 500m
memory: 1Gi
livenessProbe:
exec:
command: ["mysqladmin", "ping"]
initialDelaySeconds: 30
periodSeconds: 10
timeoutSeconds: 5
readinessProbe:
exec:
# Check we can execute queries over TCP (skip-networking is off).
command: ["mysql", "-h", "127.0.0.1", "-e", "SELECT 1"]
initialDelaySeconds: 5
periodSeconds: 2
timeoutSeconds: 1
- name: xtrabackup
image: gcr.io/google-samples/xtrabackup:1.0
ports:
- name: xtrabackup
containerPort: 3307
command:
- bash
- "-c"
- |
set -ex
cd /var/lib/mysql
# Determine binlog position of cloned data, if any.
if [[ -f xtrabackup_slave_info && "x$(<xtrabackup_slave_info)" != "x" ]]; then
# XtraBackup already generated a partial "CHANGE MASTER TO" query
# because we're cloning from an existing replica. (Need to remove the tailing semicolon!)
cat xtrabackup_slave_info | sed -E 's/;$//g' > change_master_to.sql.in
# Ignore xtrabackup_binlog_info in this case (it's useless).
rm -f xtrabackup_slave_info xtrabackup_binlog_info
elif [[ -f xtrabackup_binlog_info ]]; then
# We're cloning directly from primary. Parse binlog position.
[[ `cat xtrabackup_binlog_info` =~ ^(.*?)[[:space:]]+(.*?)$ ]] || exit 1
rm -f xtrabackup_binlog_info xtrabackup_slave_info
echo "CHANGE MASTER TO MASTER_LOG_FILE='${BASH_REMATCH[1]}',\
MASTER_LOG_POS=${BASH_REMATCH[2]}" > change_master_to.sql.in
fi
# Check if we need to complete a clone by starting replication.
if [[ -f change_master_to.sql.in ]]; then
echo "Waiting for mysqld to be ready (accepting connections)"
until mysql -h 127.0.0.1 -e "SELECT 1"; do sleep 1; done
echo "Initializing replication from clone position"
mysql -h 127.0.0.1 \
-e "$(<change_master_to.sql.in), \
MASTER_HOST='mysql-0.mysql', \
MASTER_USER='root', \
MASTER_PASSWORD='', \
MASTER_CONNECT_RETRY=10; \
START SLAVE;" || exit 1
# In case of container restart, attempt this at-most-once.
mv change_master_to.sql.in change_master_to.sql.orig
fi
# Start a server to send backups when requested by peers.
exec ncat --listen --keep-open --send-only --max-conns=1 3307 -c \
"xtrabackup --backup --slave-info --stream=xbstream --host=127.0.0.1 --user=root"
volumeMounts:
- name: data
mountPath: /var/lib/mysql
subPath: mysql
- name: conf
mountPath: /etc/mysql/conf.d
resources:
requests:
cpu: 100m
memory: 100Mi
volumes:
- name: conf
emptyDir: {}
- name: config-map
configMap:
name: mysql
volumeClaimTemplates:
- metadata:
name: data
spec:
accessModes: ["ReadWriteOnce"]
resources:
requests:
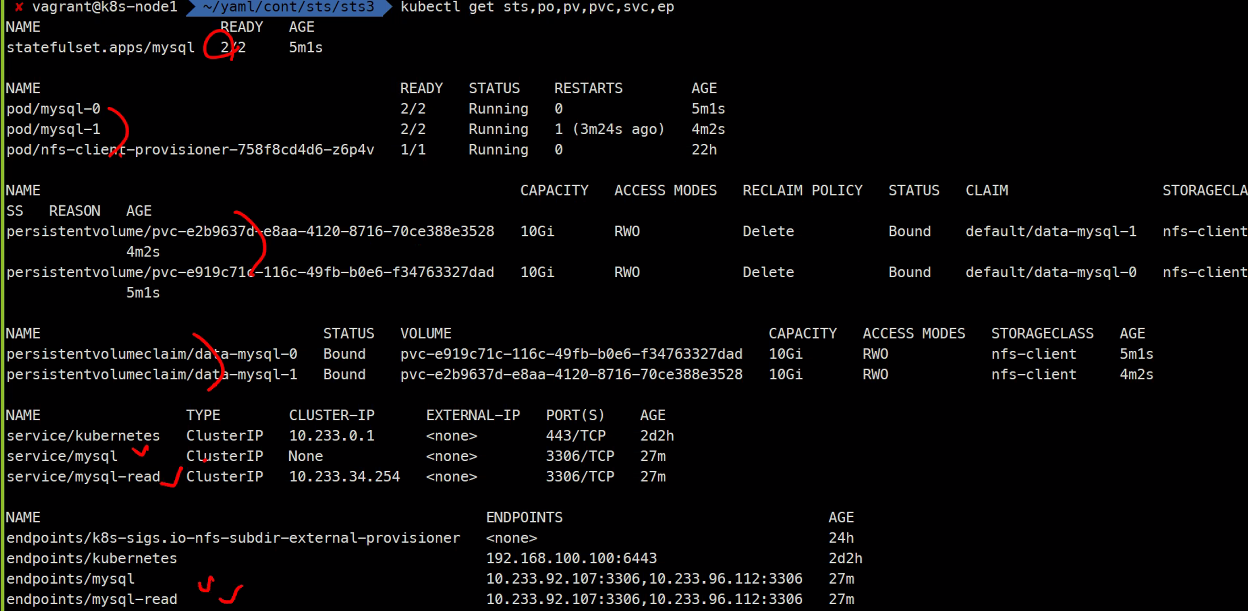
storage: 10Gi서비스 생성 및 결과확인
kubectl create -f .
kubectl get sts,po,pv,pvc,svs,ep
아래와 같이 Pod와 pv, pvc등등이 2개씩 잘 생성된 것을 확인할 수 있다.
mysql 접속
kubectl run nettool -it --image ghcr.io/c1t1d0s7/network-multitool --rm

>host mysql
>mysql -h mysql-0.mysql -u root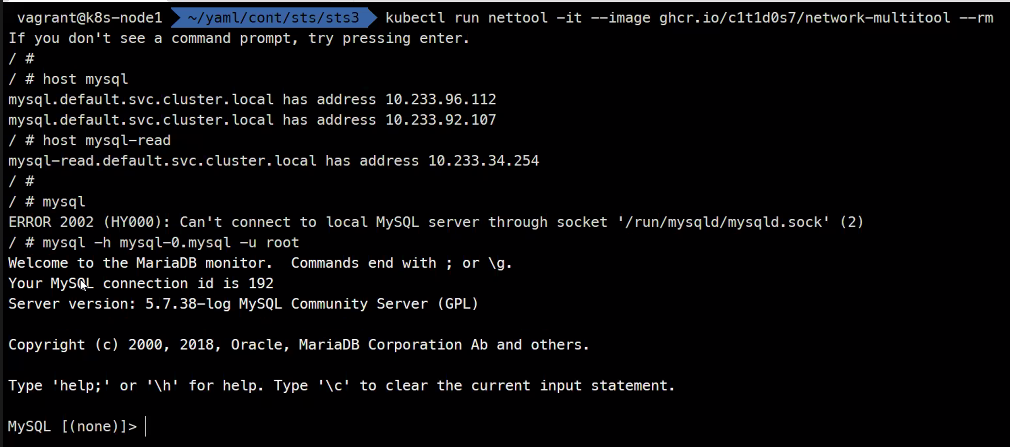
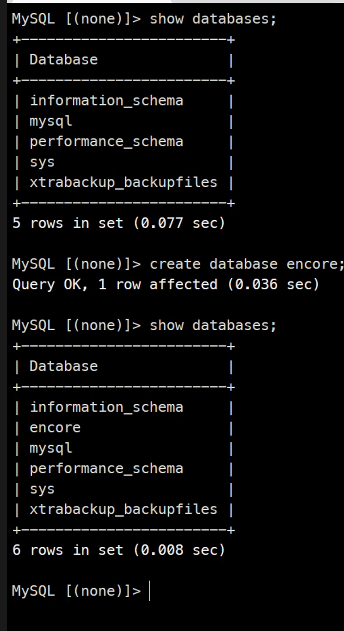
Master DB 편집
Slave DB 접속
동기화가 잘 된 것을 확인할 수 있다.
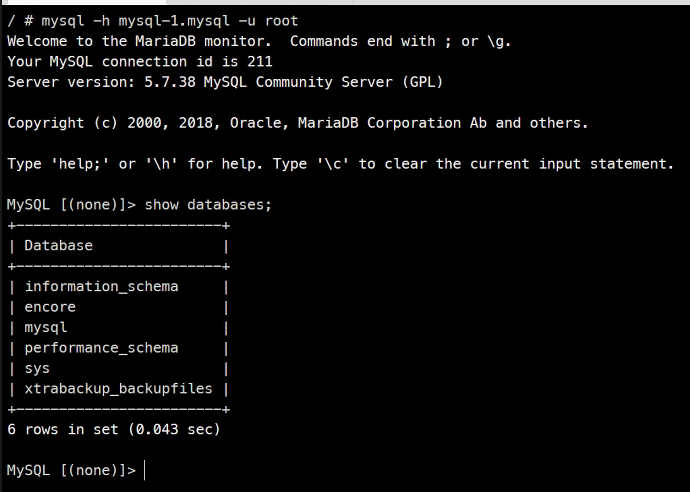
그리고 편집을 시도했지만 Readonly이기 때문에 불가능한 것을 확인할 수 있다.

Mysql 실습 구조
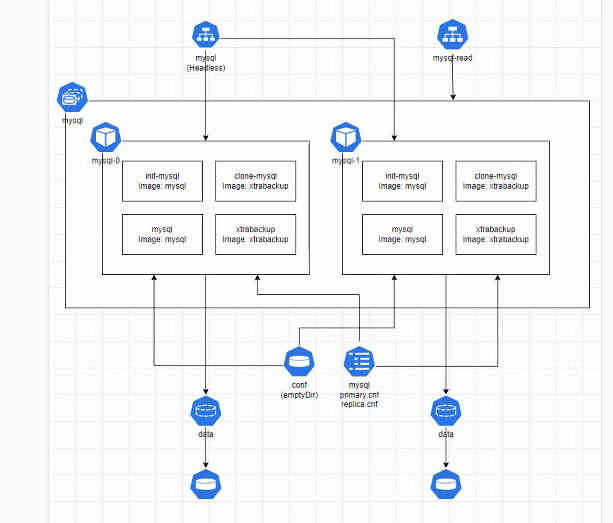
이번에 실습해본 Mysql DB의 구조는 크게
- 최초 동기화
- 메인 어플리케이션
- 이후 동기화
로 나누어 생각할 수 있다.
최초 동기화는 init-mysql
메인어플리케이션은 mysql
이후 동기화는 xtrabackup이 그 역할을 하고 있다.