HTTP 통신의 요청과 응답.
api 호출. api 붙이기. 데이터 가져오기.
프론트앤드와 백앤드의 소통.
말로만 듣던 일들을 이제 구현하기 전! 세션을 통해 fetch함수에 대해 배워보았다.
이번 강의를 듣고 백엔드와 협업이 어떤식으로 협업이 이루어질지 작게나마 알게된거 같아 좋았다.
컴포넌트를 생성할때는 constructor - > componenetWillMount -> render -> componenetDidMount순으로 진행된다.
컴포넌트를 제거할때는 componentWillUnmount메소드만 실행된다.
컴포넌트의 prop이 변경될땐 componenetWillReceiveProps -> shouldComponentUpdate-> componentWillUpdate -> render -> compnenetDidUpdate순으로 진행된다.
..................................................................................................................................................................................
🚀 리액트의 LifeCycle API를 정리하면 다음과 같다.
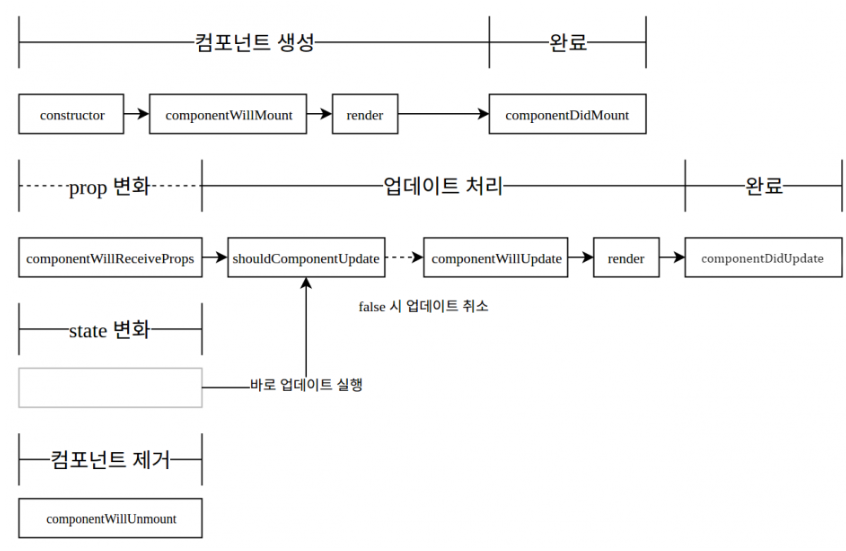
-Mount
컴포넌트가 실행될때, 'Mount 된다'라고 표현한다.
컴포넌트가 시작되면 제일 초기 작업은
1. context, defaultProps, state 저장
2. componenetWillMount메소드 호출
3. render, 컴포넌트를 DOM에 그린다.
4. componentDidMount 호출
-Unmount
Unmount, 컴포넌트가 제거되는 것.
- 기본적인 컴포넌트 생성 과정
위 메소드들이 어떤 역할을 할까??
constructor
constructor(props){
    super(props);
    console.log("constructor");
}
생성자 메소드로서 컴포넌트가 처음 만들어질때 실행된다. 이 메소드에서 기본 state를 정할 수 있다.
componentWillMount
componentWillMount(){
    console.log("componentWillMount");
}
컴포넌트가 DOM위에 만들어지기 전에 실행된다.
componentWillMount중 주의할점
1. 현재 Mount진행중이므로(Didmount 전이다), props나 state를 변경해서는 안된다. 또한 render단계에 진입하지 않았으므로 DOM에 접근할 수 없다._
render
컴포넌트 렌더링을 담당합니다.
componenetDidMount
componentDidMount(){
    console.log("componentDidMount");
}
컴포넌트가 만들어지고 첫 렌더링을 다 마친 후에 실행되는 메소드다.
이 안에서 다른 JavaScripts프레임워크를 연동하거나
setTimeout, setInterval 및 AJAX 처리 등을 한다.
-componentDidMount 에서 주의할 점
render가 되었으므로 DOM에 접근 할 수 있지만, state를 바꾸면 안된다. setState메소드를 사용하면 render 메소드가 다시 실행되기 때문이다. 방금 render를 마친 단계인데, 다시금 render가 실행되면 사용자에게 표시될때 깜박임 등을 유발 할 수 있게 된다.
componenetWillReceiveProps
componentWillReceiveProps(nextProps){
    console.log("componentWillReceiveProps: " + JSON.stringify(nextProps));
}
컴포넌트가 prop을 새로 받았을때 실행됩니다. prop에 따라 state를 업데이트 해야할 때 사용하면 유용하다.
이 안에서 this.setState()를 해도 추가적으로 렌더링하지 않는다.
shouldComponentUpdate
shouldComponentUpdate(nextProps, nextState){
    console.log("shouldComponentUpdate: " + JSON.stringify(nextProps) + " " + JSON.stringify(nextState));
    return true;
}
prop혹은 state가 변경되었을 때, 리렌더링을 할지 말지 정하는 메소드이다.
위 예제에서는 무조건 true를 반환하도록 했지만, 실제 사용할때는 필요한 비교를 하고 값을 반환하도록 하길바란다.
예 return nextProps.id !== this.props.id; JSON.stringify()를 쓰면 여러 feild를 편하게 비교할 수 있다.
componentWillUpdate
componentWillUpdate(nextProps, nextState){
    console.log("componentWillUpdate: " + JSON.stringify(nextProps) + " " + JSON.stringify(nextState));
}
컴포넌트가 업데이트 되기 전에 실행하는데, 이 메소드 안에서는 this.setState()를 사용하지 말라고 한다. 무한루프빠져서 큰일난다고 한다.
componentDidUpdate
componentDidUpdate(prevProps, prevState){
    console.log("componentDidUpdate: " + JSON.stringify(prevProps) + " " + JSON.stringify(prevState));
}
컴포넌트가 리렌더링을 마친 후 실행된다.
componentWillUnmount
componentWillUnmount(){
console.log("componentWillUnmount");
}
컴포넌트가 DOM에서 사라진 후 실행된다.
import React, {Component} from 'react';
import Child from './Child';
import './index.scss';

class index extends Component {
  constructor () {
    super ();

    this.state = {
      text: 'HI',
      users: [],
    };
  }

  componentDidMount () {
    // 데이터 로딩 data loading...

    // 1. 백엔드 서버를 호출해서 원하는 데이터를 받는다.
    // 2. 받은 데이터를 이 컴포넌트의 저장소에 저장한다 (setState).
    // 3. 사용한다.

    fetch ('https://jsonplaceholder.typicode.com/users') //1. => 요청
      .then (response => response.json ()) // => JSON body 를 JS로 변환
      .then (response => this.setState ({users: response})); //2.
  }

  clickHandler = () => {
    this.setState ({text: 'HELLO'});
  };

  render () {
    return (
      <div className="state">
        <div onClick={this.clickHandler} className="state-contents">
          {this.state.users.map ((user, idx) => {
            return <Child key={idx} name={user.name} />;
          })}
        </div>
      </div>
    );
  }
}
export default index;
*
단 한번만 불린다. 최초에 불리고나서 이벤트에 의해 스테이트가 바뀐다. 그래서 api를 호출한다 (데이터 로딩)
데이터 가져오는게 componentdidmount여기서 일어나는 일이다.
왜 여기가 최적의 장소일까? - jsx다 어디에 저장됨? 스테이트에있다!
setstate해야만 다시가져와서 데이터를 정상적으로 보여준다.
*내가쓸 데이터를 가져와서 호출해서 위 스테이트 객체로 넘어가고 렌더하고 setState하고 다시 렌더가된다.
근데 얘가 최초의 한번만 돌기때문에 해당 위치에서 실행해야지 좋다.
map과 filter 적용한 과제
🚀
✔️map 함수를 통해 component를 재사용 할 수 있다.
✔️Mock data를 만들어 백엔드 API 미완성 상태에서도 차질없이 개발할 수 있다.
✔️fetch 함수를 통해 API 호출을 할 수 있다.
✔️componentDidMount 메소드를 활용할 수 있다.
✔️자식 컴포넌트에서 부모 컴포넌트로 데이터를 전달할 수 있다.
문제..........................................................................................................................................................................
1. [index.js] API 호출
주어진 API주소를 호출하여 데이터 로딩을 처리한다.
componentDidMount()
fetch
setState (monsters 에 저장)*
- [index.js]
CardList 컴포넌트에 monsters 라는 이름의 props로 monsters 배열 전달
-
[Card.js]
Card 컴포넌트 구조 및 모양 -
[CardList.js]
<div className="card-list"> Card 컴포넌트를 import 한 뒤, props로 내려받은 데이터에 map 함수를 호출해 각각 다른 데이터를 가진 Card 컴포넌트들을 리턴해주세요! Card 컴포넌트에서 필요로 하는 데이터는 id, name, email 입니다. </div> -
[index.js]
정의한 handleChange 메소드를 SearchBox 컴포넌트에 props로 넘겨주고 호출 시 인자로 들어오는 이벤트객체(e)를 활용해 userInput 으로 setState. -
[index.js] 필터링 로직 구현 (filter 메소드 활용)
여기서 비교 대상은 monster 객체의 name 값입니다.
소문자로 바꾼 monster.name 값과 userInput값을 비교.
filter 메소드가 반환하는 값을 변수에 저장 후 return 문 안에 CardList에 props로 전달
....................................................................................................................................................................................
index.js가 부모 CardList.js > card.js
요런 느낌
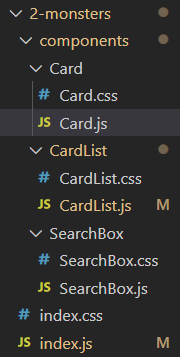
Card.js
import React, { Component } from 'react'
import './Card.css'

class Card extends Component {
  render() {
    return (
      <div className="card-container">
        <img
          src={`https://robohash.org/${this.props.id}?set=set2&size=180x180`}
        />
        <h2>{this.props.name}</h2>
        <p>{this.props.email}</p>
      </div>
    )
  }
}

export default Card;
.
.
CardList.js
설명...............................
Card 컴포넌트를 import 한 뒤, props로 내려받은 데이터에 map 함수를 호출해 각각 다른 데이터를 가진 Card 컴포넌트들을 리턴
Card 컴포넌트에서 필요로 하는 데이터는 id, name, email 입니다.
...................................
import React, { Component } from 'react'
import './CardList.css'
import Card from '../Card/Card'

class CardList extends Component {
  // constructor(props) {
  //   super(props)
  // }
  render() {
    //const { monsters } = this.props
    console.log('monster>>', this.props.monsters)
    return (
      <div className="card-list">
        {this.props.monsters.map((filtered, idx) => {
          return (
            <Card
              key={idx}
              id={filtered.id}
              name={filtered.name}
              email={filtered.email}
            />
          )
        })}
      </div>
    )
  }
}
export default CardList
............................................................................................................................................................................................
Searchbox.js
import React, { Component } from 'react'
import './SearchBox.css'

class SearchBox extends Component {
  render() {
    return (
      <input
        className="search"
        type="search"
        placeholder="Search..."
        onChange={this.props.handleChange}
      />
    )
  }
}
export default SearchBox
searchBox component 부모인 index.js에서 props로 함수를 전달받고,
input의 target값으로 부모의 state를 변경한다. (index.js참고)
index.js 설명
.여기서 비교 대상은 monster 객체의 name 값입니다.
.소문자로 바꾼 monster.name 값과 userInput값을 비교.
.filter 메소드가 반환하는 값을 변수에 저장 후 return문 안에 CardList에 props로 전달
index.js코드
import React, { Component } from 'react'
import SearchBox from './components/SearchBox/SearchBox'
import CardList from './components/CardList/CardList'
import './index.css'

class index extends Component {
  state = {
    monsters: [],
    userInput: '',
  }

  // 데이터 로딩
  componentDidMount() {
    fetch('https://jsonplaceholder.typicode.com/users') //fetch는 데이터 가져옴.
     .then((response) => response.json())
     .then((response) => console.log(response))
     .then((response) => this.setState({ monsters: response }))
  }


  // SearchBox에 props로 넘겨줄 handleChange 메소드 정의
  handleChange = (e) => {
    this.setState({ userInput: e.target.value })
  }

  render() {
    // 필터링 로직
    const { monsters, userInput } = this.state
    let filtered = monsters.filter(
      (monster) => monster.name.toLowerCase().includes(userInput))
    console.log('filter', filtered[5])


    return (
      <div className="App">
        <h1>컴포넌트 재사용 연습!</h1>
        <SearchBox handleChange={this.handleChange} />
        <CardList monsters={filtered} />
      </div>
    )
  }
}
export default index
알게된 지식
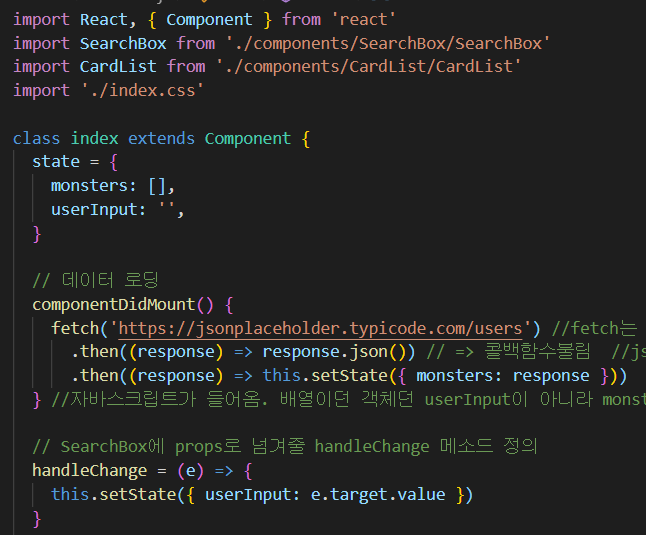
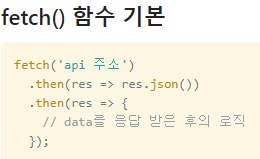
fetch는 데이터 가져혼다. 하나의 요청이다. 백엔드에다가 요청. 스트링으로 들어감주의!! "api주소"
.then((response) => response.json())
콜백함수불림 //json에서 자바스크립트로 바꿔줌 바디를. 왜바꿔? -> 읽어야되니까 json자체로는 갖다못쓴다.
json을 바디로 요청해주세요 하는 요청이다.
.then((response) => console.log(response))
.then((response) => this.setState({ monsters: response })
자바스크립트가 들어옴. 배열이던 객체던
userInput이 아니라 monsters 즉, 배열인monsters데이터를 monsters에 담음.

필터 함수를 적용해서 monsters, 즉 배열의 값이 userInput과 동일 한지 비교한다.
문제에서 소문자로 바꿔주라고 하니 toLowerCase()를 써서 바꿔준다.
그리고 콘솔찍어서 index5번째가 잘 찍히는지 확인했다.

(다행히 잘 찍힌다.)

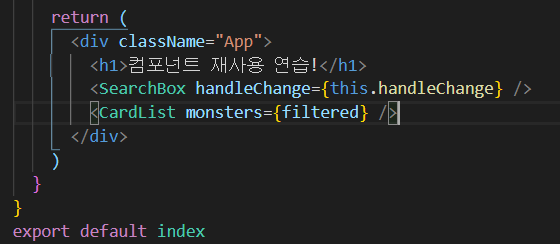
여기서 이렇게 !== false 는 어차피 맞는지를 보는 거니, 생략해줘도 무방하다.
.
.

좋은글 감사합니다
한가지 궁금하여 댓글 남겨 봅니다.
설명글에 보면
-componentDidMount 에서 주의할 점
render가 되었으므로 DOM에 접근 할 수 있지만, state를 바꾸면 안된다. setState메소드를 사용하면 render 메소드가 다시 실행되기 때문이다. 방금 render를 마친 단계인데, 다시금 render가 실행되면 사용자에게 표시될때 깜박임 등을 유발 할 수 있게 된다.
라고 하셨습니다. 다른 분들의 글에서도 공통적인 부분을 읽을 수 있구요
그런데 DisMount에서 fetch를 실행한 후 setState()를 실행하고 있습니다.
이해가 안되는 부분이어서요