Github의 이슈를 작성하면서 label을 꾸며보았다.
그런데 새로운 레파지토리를 만들 때마다 다시 세팅을 해줘야 하는 문제가 생겼다.
이걸 하나씩 적용하는건 매우 귀찮은 일이다..!
개발자라면 자고로 같은 일을 반복하게 된다면 편리한 방법을 찾는 법😎
내가 사용하는 label 템플릿을 공유하고, 레파지토리에 바로 적용하는 법을 정리해본다.
✅ Github Label
- github label은 issue와 pull request에서 카테고리를 분류하기 위한 이름표로 사용된다.
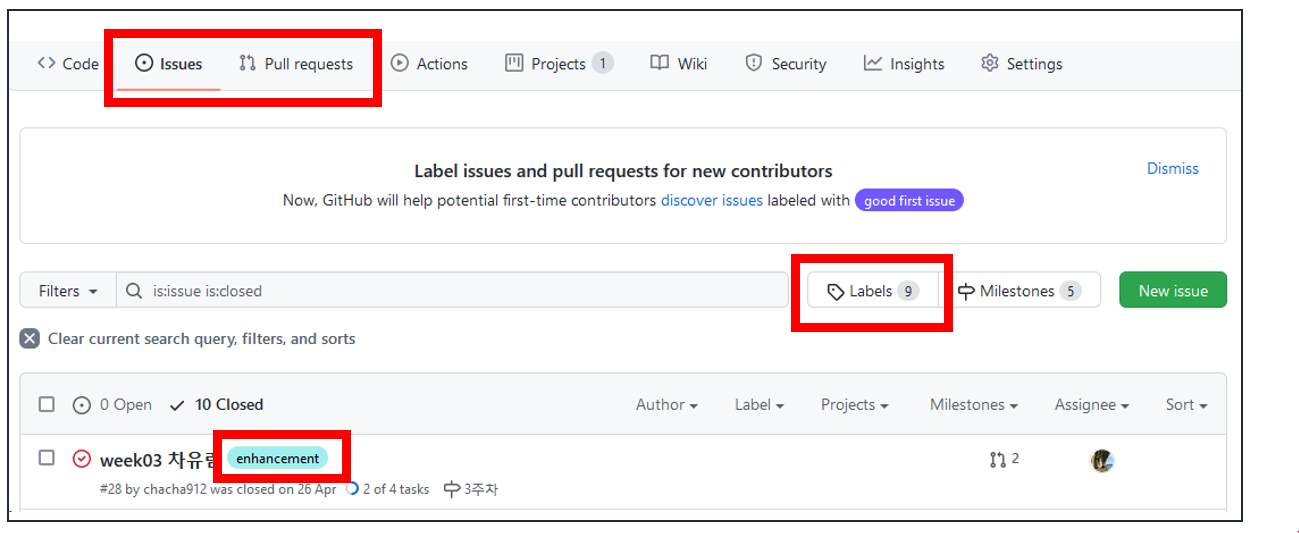
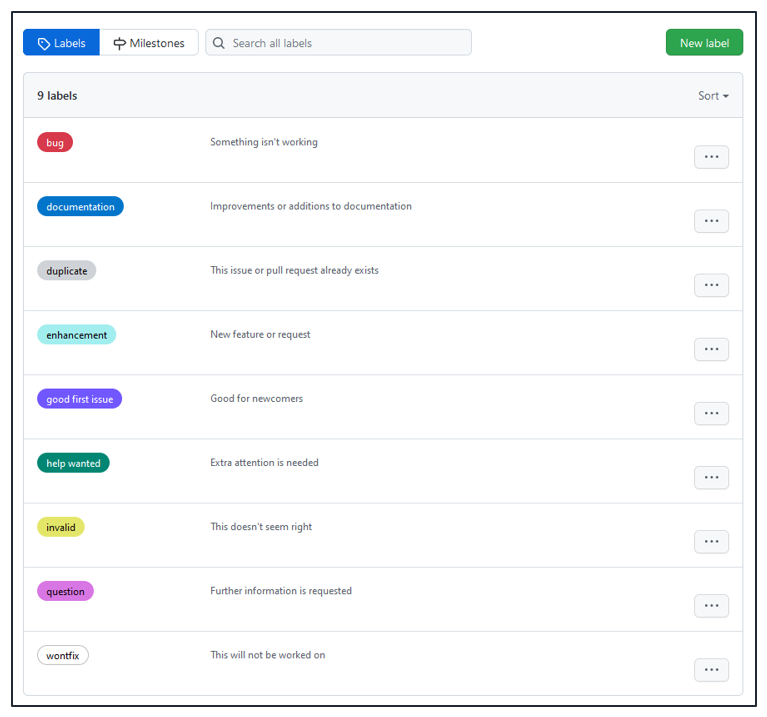
- github에서는 기본으로 9개의 Labels를 제공하고 있다. Labels(9)를 클릭하면 아래와 같이 확인할 수 있다.
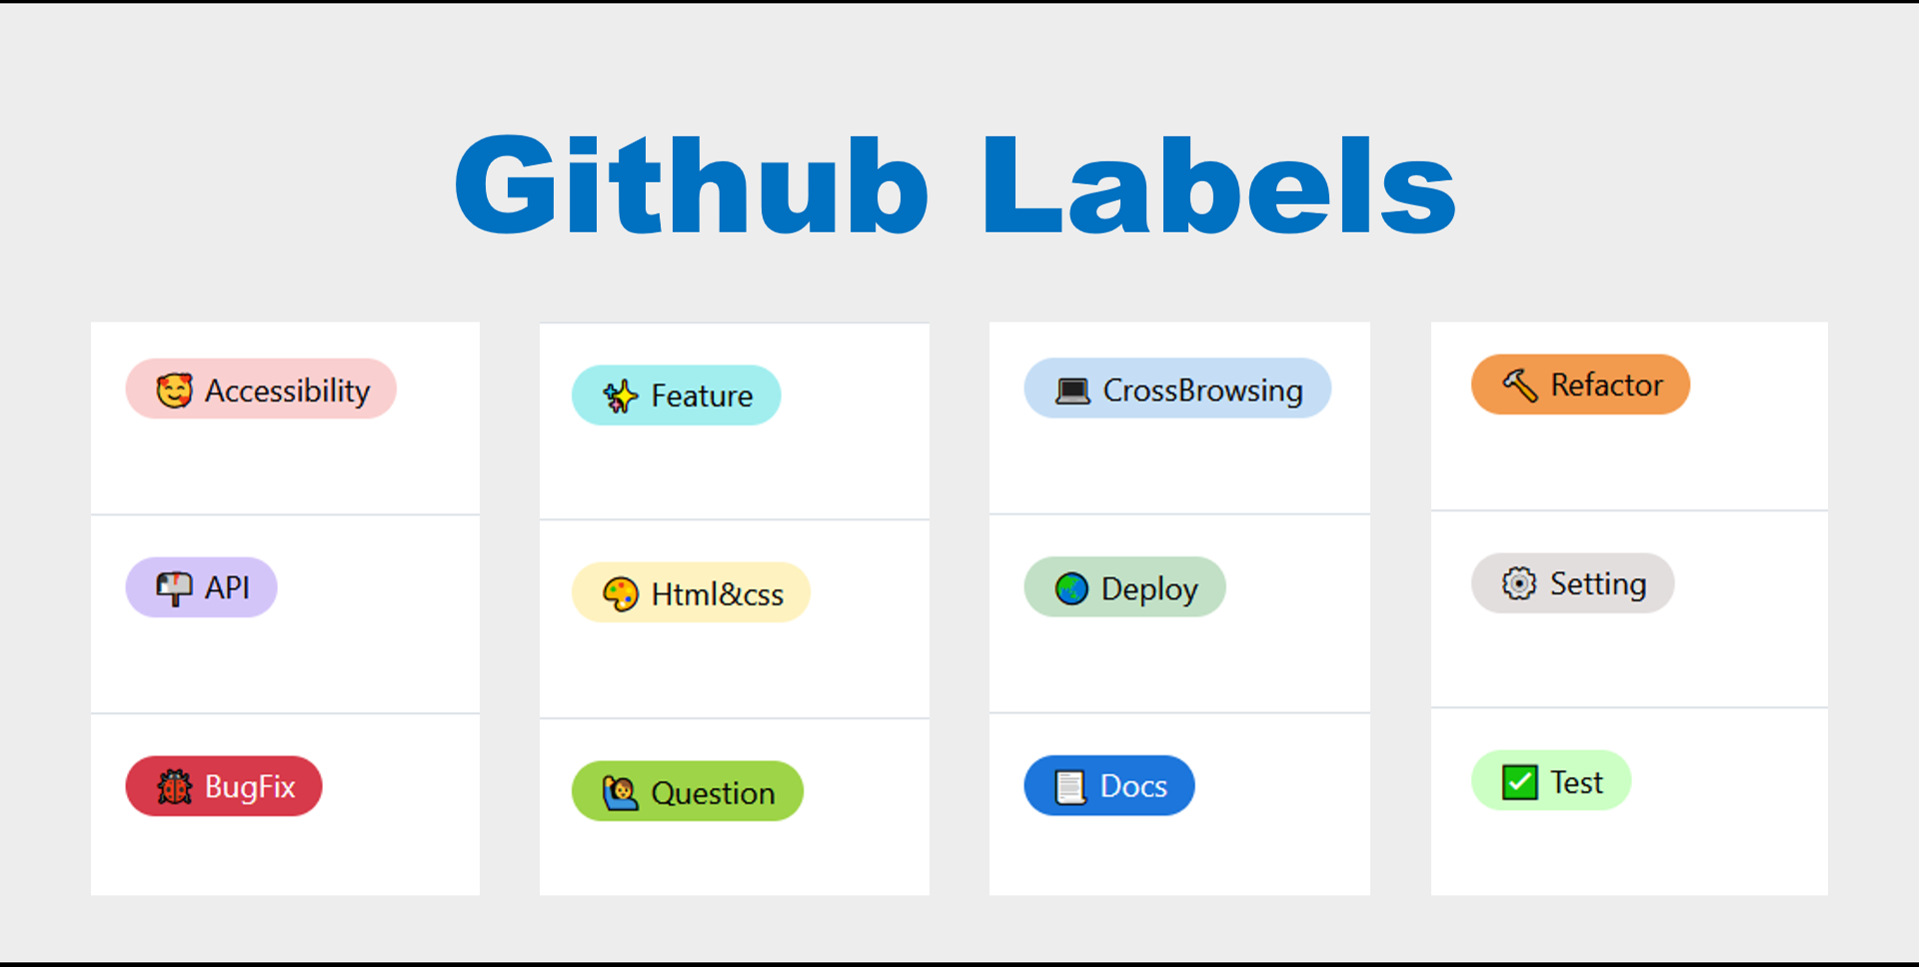
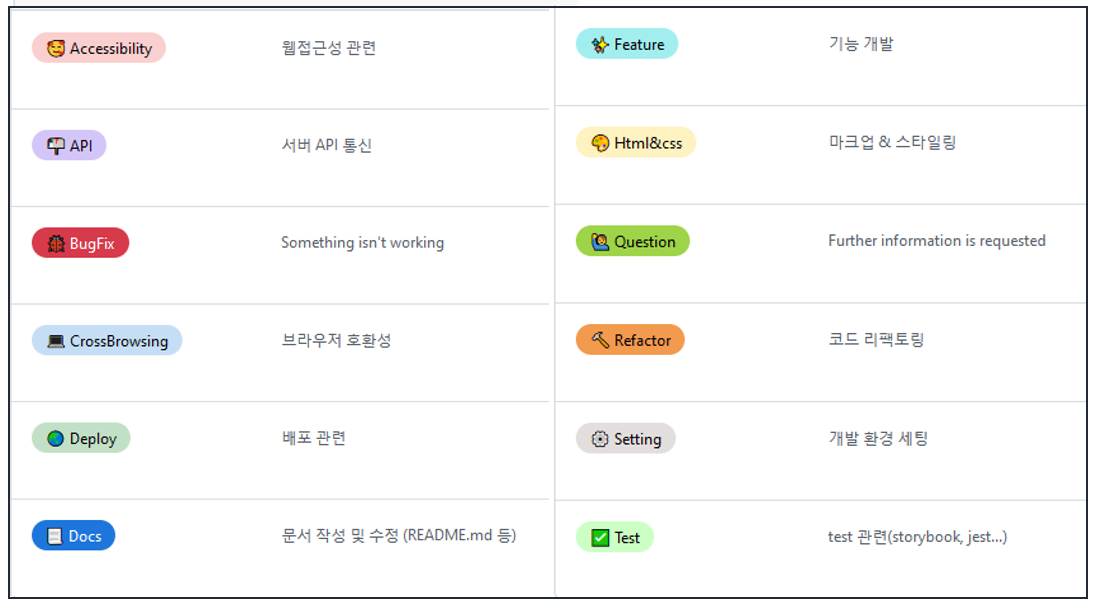
- 프로젝트할 때 자주 사용할만한 것들로 이모지를 추가하여 수정했다. 총 12개의 label이 있다.
✅ Github Label 적용하기
1. github-label-sync 설치
github label을 동기화할 수 있는 라이브러리가 있었다. GitHub Label Sync
npm install -g github-label-sync2. access-token 준비
레파지토리에 label을 적용하려면 깃헙 access-token이 있어야 한다.
이전에 git credential 정책이 바뀌면서 만들어둔 토큰이 있어서 사용했다.
아직 토큰이 없다면 git credential - access token 적용하기 글을 참고해주세요.
3. label.json 설정
새롭게 적용할 label config 파일 labels.json 을 정의해야 한다.
label의 name, color, description, aliases 를 정의할 수 있고, JSON, YAML 둘 다 가능하다.
위에서 소개했던 커스텀 label의 config 파일은 아래와 같다. 각자 원하는 색상이나 이름을 변경해서 사용하면 된다.
[
{
"name": "⚙ Setting",
"color": "e3dede",
"description": "개발 환경 세팅"
},
{
"name": "✨ Feature",
"color": "a2eeef",
"description": "기능 개발"
},
{
"name": "🌏 Deploy",
"color": "C2E0C6",
"description": "배포 관련"
},
{
"name": "🎨 Html&css",
"color": "FEF2C0",
"description": "마크업 & 스타일링"
},
{
"name": "🐞 BugFix",
"color": "d73a4a",
"description": "Something isn't working"
},
{
"name": "💻 CrossBrowsing",
"color": "C5DEF5",
"description": "브라우저 호환성"
},
{
"name": "📃 Docs",
"color": "1D76DB",
"description": "문서 작성 및 수정 (README.md 등)"
},
{
"name": "📬 API",
"color": "D4C5F9",
"description": "서버 API 통신"
},
{
"name": "🔨 Refactor",
"color": "f29a4e",
"description": "코드 리팩토링"
},
{
"name": "🙋♂️ Question",
"color": "9ED447",
"description": "Further information is requested"
},
{
"name": "🥰 Accessibility",
"color": "facfcf",
"description": "웹접근성 관련"
},
{
"name": "✅ Test",
"color": "ccffc4",
"description": "test 관련(storybook, jest...)"
}
]4. 레파지토리에 적용
access-token과 labels.json 파일이 준비되었다면 아래 명령어를 통해 레파지토리에 적용할 수 있다.
labels.json이 있는 폴더에서 실행하면 된다.
github-label-sync --access-token [액세스 토큰] --labels labels.json [계정명]/[저장소 이름]✅ 레파지토리의 label config 확인하기
보통 처음에는 깃헙 레파지토리에서 바로 새로운 label을 만들고, 수정했을 것이다.
설정했던 label config 정보를 확인하는 방법은 아래와 같다.
1. github-label-sync 설치
이번엔 label 정보를 가져오려고 하는 레파지토리 폴더에서 작업해야 한다.
npm i github-label-sync2. label.js 파일 생성
label.js 파일을 생성하고 아래 내용을 추가한다.
처음에 dryRun: true 옵션을 안 주고 실행했더니 기존 github에 만들었던 label이 다 날라갔다. 이 옵션은 Github API에 "read" 요청으로 안전하게 label 정보만 읽어오도록 설정하는 것이다.
다른 옵션들은 GitHub Label Sync에서 확인할 수 있다.
const githubLabelSync = require('github-label-sync');

githubLabelSync({
  accessToken: '토큰',
  repo: '계정명/저장소이름',
  labels: [],
  dryRun: true,
}).then(diff => {
  console.log(diff);
});
3. label.js 실행
node label.js명령어를 통해 파일을 실행한다.
console에 type(missing, changed, added)에 따라 정보가 출력될 것이다.
아래 내용 또한 GitHub Label Sync에서 자세히 확인할 수 있다.
[
	// This is a "missing" diff, it indicates that a label
	// present in your local config is not present on GitHub.
	{
		name: 'local-label-name',
		type: 'missing',
		actual: null,
		expected: {
			name: 'local-label-name',
			color: 'ff0000'
		}
	},
	// This is a "changed" diff, it indicates that a label
	// present on GitHub has diverged from your local config.
	// This could mean that either somebody has modified the
	// label manually on GitHub, or the local config has
	// been updated.
	{
		name: 'local-label-name',
		type: 'changed',
		actual: {
			name: 'remote-label-name',
			color: '00ff00'
		},
		expected: {
			name: 'local-label-name',
			color: 'ff0000'
		}
	},
	// This is an "added" diff, it indicates that a label
	// is present on GitHub but not in your local config.
	{
		name: 'remote-label-name',
		type: 'added',
		actual: {
			name: 'remote-label-name',
			color: 'ff0000'
		},
		expected: null
	}
]
나의 경우 아래와 같이 출력되었고, actual 내용을 통해 labels.json파일을 만들었다.
  {
    name: '✨ Feature',
    type: 'added',
    actual: { name: '✨ Feature', color: 'a2eeef', description: '기능 개발' },
    expected: null
  },
📚 참고
- GitHub Label Sync
- Github Label, Issue, Pull Request Template 적용하기
- Label 관리 및 적용 가이드 방식 제안
(개발환경에서도 develop, production을 나누는 등 label을 어떻게 관리하면 좋을지도 고민해보면서 계속 수정할 예정이다)


label.json 설정
새롭게 적용할 label config 파일 label.json 을 정의해야 한다.
레파지토리에 적용
access-token과 labels.json 파일이 준비되었다면
실행 시 금방 알아챌 수 있지만
3. 에서는 label.json이고
4. 에서는 labels.json 이라서
통일되면 좋을 것 같아요! :-)
덕분에 라벨 잘 적용했습니다!