[논문 리뷰] CAMERAS: Enhanced Resolution And Sanity preserving Class Activation Mapping for image saliency
스터디_리뷰

2024년 2월 2일 세미나 발표 내용
Goal
Compute high-fidelity backpropagation saliency maps without requiring any external priors and preserving the map sanity
Motivation
- Class insensitivity of the earlier layers only allows saliency computation with low resolution activation maps of the deeper layers(Low-resolution image saliency)
- Remedifying this can lead to sanity failures
Contribution
- Obtaining precise backpropagation image saliency while preserving the sanity
- Enhanced the widely considered strongest adversarial attack PGD with the saliency technique of CAMERAS
- Obtaining new quantitative metrics and sanity checks
Two new evaluation metrics and a sanity check to advance the research directio
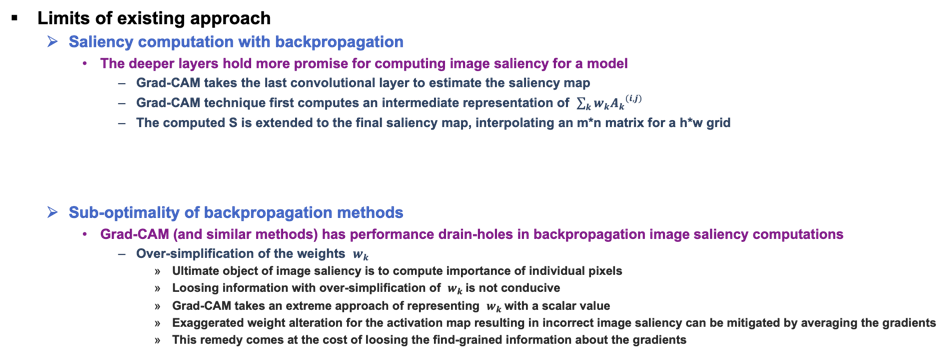
Limits of existing approach
Saliency computation with backpropagation
The deeper layers hold more promise for computing image saliency for a model
- Grad-CAM takes the last convolutional layer to estimate the saliency map
- Grad-CAM technique first computes an intermediate representation of ∑𝒌▒〖𝒘𝒌 〖𝑨_𝒌〗^((𝒊, 𝒋)) 〗
- The computed S is extended to the final saliency map, interpolating an mn matrix for a hw grid
Sub-optimality of backpropagation methods
Grad-CAM (and similar methods) has performance drain-holes in backpropagation image saliency computations
Over-simplification of the weights 𝒘_𝒌
- Ultimate object of image saliency is to compute importance of individual pixels
- Loosing information with over-simplification of 𝒘_𝒌 is not conducive
- Grad-CAM takes an extreme approach of representing 𝒘_𝒌 with a scalar value
- Exaggerated weight alteration for the activation map resulting in incorrect image saliency can be mitigated by averaging the gradients
- This remedy comes at the cost of loosing the find-grained information about the gradients
Large interpolated segments
- The activation maps of deeper convolutional layer in visual classifiers are smaller than the original input(ResNet: 77 maps of last conv. layer, 1024 times smaller than the 224224 inputs)
- 99.9% of the values are generated by the function of Grad-CAM
- Automatically renders a low-resolution map, leaving alone the issue of correctness of the importance assigned to the individual pixels in the eventual saliency map
- Improving methods techniques rely on external information
- This leads to sanity check failures(The operands are not purely grounded in the original model)
The room for improvement
- Leveraging the underlying signals from multiple layers can help overcoming the issues
- This possibility is restricted by the class-insensitivity of the earlier network
- Fusing multi-layer can affect image saliency
- A technique specifically targeting the class-sensitive last layer holds significant promises for better saliency computation
CAMERAS
𝚿=𝒇(𝑹𝒆𝑳𝑼(∑𝒌▒〖𝑾𝒌^∗◉𝑨_𝒌^∗)), ∀𝒌,〗
𝑾_𝒌^∗ encodes the differential information of the backpropagated gradients for the k th activation map
- 〖𝑾𝒌^∗=𝚬𝒕 [𝝋𝒕 (𝑾𝒌^ (𝝋𝒕 (𝑰, 𝜻〗𝒕)),𝜻_𝟎)],
- 〖𝑨𝒌^∗=𝚬𝒕 [𝝋𝒕 (𝑨𝒌^ (𝝋𝒕 (𝑰, 𝜻〗𝒕)),𝜻_𝟎)],
𝝋𝒕 (𝐗,𝜻𝒕) : t th up-sampling applied to resize X to the dimensions 𝜻𝒕(Provided as a tuple), 𝑾𝒌^ = ((𝝑𝒚^𝒊)/(𝝑𝑨_𝒌^((𝒊, 𝒋) ) ))
The algorithm computes the desired saliency map 𝚿 by an iterative multi-scale accumulation of activation maps and gradients for the k th layer of the model
- t th iteration: I gets up-sampled to 𝜻_𝒕 based on the maximum desired size
- Input upscaling does not alter the model prediction
The activation maps and backpropagated gradients to the k th layer are also up-scaled and stored
- 𝛁𝑱(𝒌, 𝒍) denotes the collective backpropagated gradients to the k th layer
- Performed to match the original image size 𝜻_𝟎, the same accumulated signals are transformed in to the saliency map of the original image
- Finally compute their averages
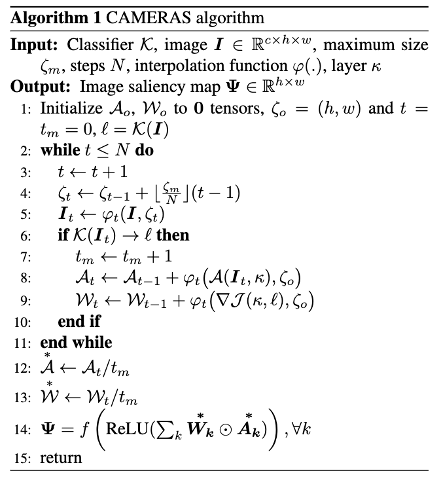
- Input: maximum size, steps N, interpolation function, layer k
𝜻𝒎 (𝑻𝒉𝒆 𝒎𝒂𝒙𝒊𝒎𝒖𝒎 𝒔𝒊𝒛𝒆)=𝒄𝑵𝜻𝟎 (𝒄:𝒔𝒕𝒆𝒑 𝒔𝒊𝒛𝒆,𝜻_𝟎=(𝒉, 𝒘)) - Trading-off performances, the parameters is modified by the available computational resources
- Sanity preservation and strength
- The only source of external influence on the resulting map is through the interpolation function
- CAMERAS maps preserve their sanity because the maps would fully originate in the model
- Provided the theoretical perspective on the accumulation of multi-scale interpolated signals
리뷰 및 구현 후기
기초적인 라이브러리 및 모델 구현을 해 보았지만 논문을 보고 모델 구현을 하는 경험이 처음이라 잘 안된 부분도 조금 있었던 것 같습니다. CAM 및 GradCAM 기반의 모델을 구현 후 CAMERAS로 나아가 왔는데, 끊임없이 리뷰만 하고 '구현'을 하려 하면 엥(?)하는 생각이 들 때도 있었습니다.
결국 PyTorch도 Python Class 및 라이브러리의 일부이므로 개발자 문서를 찾아가면서 공부하기 시작하였습니다.
처음에는 CUDA와 맥북(ARM기반의 M시리즈만 해당)의 mps의 차이점도 몰라 당황하였는데, .to(mps)와 .cuda()로 GPU내에 모델을 돌리는 부분부터 정확하게 짚고 넘어갔습니다.
PyTorch를 사용하여 모델의 기반부터 Back Propagation 함수(ReLU, Sigmoid, Log...) 및 Loss Function(Cross-Entropy...) 을 구현할 수 있어 이 부분에 대해 많은 공부가 필요할 것 같았습니다.
CS의 다른 분야에서 딥러닝으로 흥미 분야가 바뀌다 보니 약간 러닝 커브에서 막히는 부분이 있는 것 같습니다.
좀 더 분발하고 열심히 해서 꼭 자유자재로 구현하고 저만의 모델을 만들어 논문을 내는 날까지 달려보고 싶습니다.
틀린 부분이 있다면 피드백은 환영합니다.
2장에서 찾아뵙겠습니다.
읽어주셔서 감사합니다!!