
컴포넌트 재사용하기
전 게시글에서 TheListItems.vue와 Completed.vue의 구조가 거의 같은것을 볼수 있었습니다.
이런 반복된 코드는 알아보기 쉽지 않고, 복잡하고, 편하지 않습니다.
이제 Completed.vue와 TheListItems.vue에 Prop를 통해 재 사용 해보겠습니다.
본격 재 사용하기
작업을 마친뒤 어떻게 하면 재 사용 가능한 컴포넌트를 내려줄수 있을까.... 이게 고민이었습니다.
theListItems를 보면 mapstate를 통해 todoList를 받아와 렌더링 해주고, Completed.vue는 mapGetters를 통해 Completed 를 받아와 랜더링 해주게 됩니다.
여기서 든 생각은 Props로 Todo든 Completed든 내려주면 TheListItems에서 렌더링 해주면 되지 않을까? 라는 결론이 나왔습니다.
바로 한번 해보겠습니다.
아. 그 전에 거슬리던 HelloWorld를 SetTodoList.vue로 이름을 바꿔주겠습니다. 다들 이정도는 하실수 있으리라 믿습니다.!
먼저 Completed의 필요없는 부분을 지우고 getters를 props로 내려주겠습니다.
// src/views/Completed.vue
<template>
 <el-card>
  <ul>
    <TheListItems v-bind:todoList="CompeleteList" />	//props내려주기
  </ul>
 </el-card>
</template>

<script lang="ts">
import { Component, Vue } from "vue-property-decorator";
import { mapGetters } from "vuex";
import TheListItems from "../components/TheListItems.vue";
@Component({
  components: {
    TheListItems
  },
  computed: {
    ...mapGetters({
      CompeleteList: "todoList/CompeleteList"
    })
  }
})
잘 하셨습니다. 정상적으로 부모 컴포넌트에서 자식 컴포넌트로 값이 전달 되었습니다.
v-bind:Props로 내려줄 이름='변수' 정도로 생각하시면 될것 같습니다.
이제 자식 컴포넌트(TheListItems.vue)에서 Props를 받아주겠습니다.
//TheListItems.vue
<template>
  <div>
    <li class="todo-item" v-bind:key="index" v-for="(todo, index) in todoList">
      <p class="text">{{ todo.text }}</p>
      <el-button v-if="todo.completed" @click="compelete(index)" class="complete completed">Complete</el-button>
      <el-button v-else @click="compelete(index)" class="complete">Complete</el-button>
      <el-button @click="deleteTodo(index)" class="delete">Delete</el-button>
    </li>
  </div>
</template>

<script lang="ts">
import { Component, Vue, Prop } from "vue-property-decorator";
import { mapMutations } from "vuex";
import { State } from "../store/Todos/todoList";
@Component({
  methods: {
    ...mapMutations({
      deleteTodo: "todoList/deleteTodo",
      compelete: "todoList/compelete"
    })
  }
})
export default class TheListItems extends Vue {
  @Prop() todoList!: State;	//props받기
}
</script>

<style scoped lang="scss">
.complete.completed {
  background-color: #409eff;
}
</style>
@Prop() todoList!: State;을 통해 부모에서 내려준 Props를 todoList로 사용할수 있게 되었습니다.
하지만 아직 부족합니다. 완료한 List들은 잘 나오지만 mapState로 받아오던 todoList가 없어 메인 페이지가 정상적으로 나오지 않습니다. 마저 수정해 보겠습니다.
<template>
  <el-card class="todo-container">
    <h2>Todo List</h2>
    <form>
      <el-input placeholder="Please input" v-model="input"></el-input>
      <el-button type="primary" @click="addTodo(input)">Add Todo</el-button>
    </form>
    <ul>
      <TheListItems v-bind:todoList="todoList" />	//Props내려주기
    </ul>
  </el-card>
</template>
<script lang="ts">
import { Component, Vue } from "vue-property-decorator";
import TheListItems from "./TheListItems.vue";
import { mapState, mapGetters, mapMutations, mapActions } from "vuex";

interface TodosType {
  text?: string;
  completed?: boolean;
}

@Component({
  components: { TheListItems },
  computed: mapState("todoList", ["todoList"]), //this.$store.todoList.todoList를 등록

  methods: {
    ...mapMutations({
      addTodo: "todoList/addTodo"
    })
  }
})
SetTodoList부분은 수정할것도 딱히 없습니다. computed를 이용해 mapState를 받아와 TheTodoList.vue로 Props를 내려주기만 하면 됩니다. 물론 컴포넌트를 재 사용하기 위해선 내려주는 이름이 같아야 겠죠?
자 이제 끝났습니다. 이제 한번 화면을 보겠습니다.
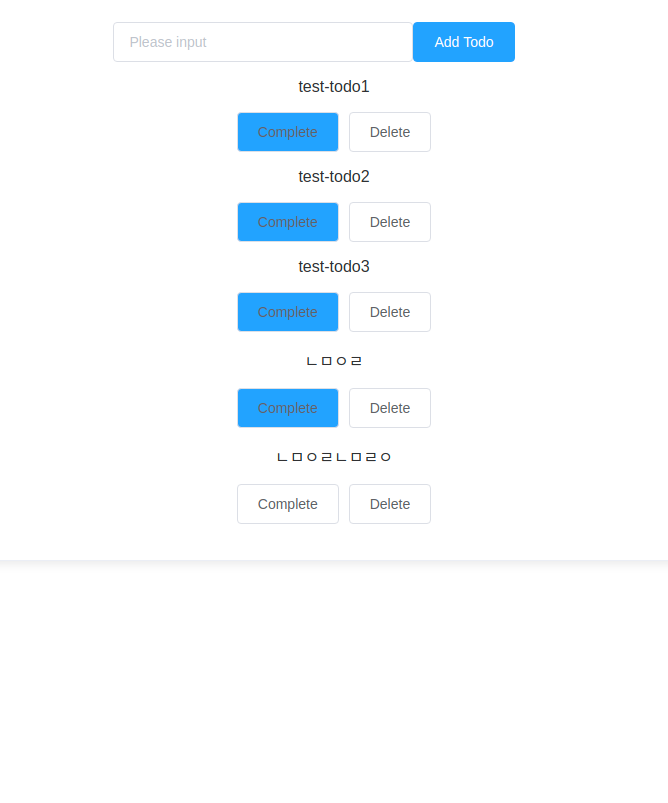
메인
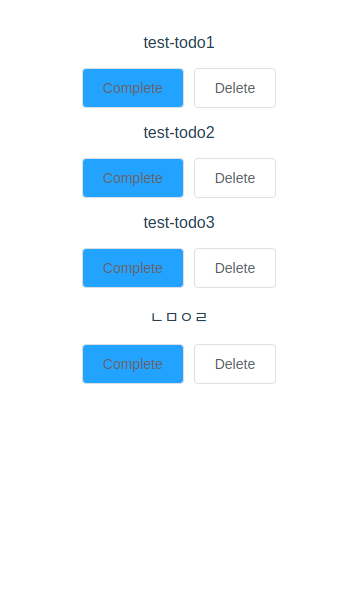
Completed
마무리
정상적으로 렌더링 되는것을 확인할 수 있습니다.
코드가 더 알아보기 쉽고 직관적이게 되지 않았나요? Main과 Completed를 한곳에서 같이 관리하면서 디자인도 한곳에 중속 되다보니 수정하기도 더 수월해질거 같습니다.
이러한 컴포넌트 재 사용은 (게시글,즐겨찾기한 게시글), (쇼핑몰,찜한상품) 이런식으로 여러 곳에 재 사용 할수 있다는 생각이 듭니다.