📌상속 개요
이번 챕터에서는 클래스의 핵심기능 중 하나인 상속에 관해 소개합니다!
개념자체는 그리 어렵지 않으나, 디테일하게 신경써야 되는 부분이 은근 많아 헷갈리는 개념 중 하나입니다.
처음에 잘 이해하고 넘어가야 나중에 큰 코 안다쳐용.
이번에 사용하는 코드는 현재 재학 중인 전북대학교의 김형기 교수님의 코드자료에 주석을 달았으며, 교수님께 직접 허락을 맡고 포스팅함을 알립니다.
상속은 그 말의 의미에서 유추할 수 있듯 부모클래스의 멤버들을 자식클래스에게 물려주는거예요.
부모클래스의 멤버들을 물려받은 자식클래스는 부모클래스의 멤버들을 그대로 사용 가능합니다.
상속하는 방법은 아래와 같이하면 클래스가 상속됩니다.
class 자식 : public 부모{
	//클래스 내용
};
쉽죠?
아래의 예제코드를 예시로 들어봅시다.
📖상속예재클래스 코드
class Account //부모클래스 생성
{
private:
	string name;
	double balance;
public:
	Account()
		: balance{ 0.0 }, name{ "An Account" } {
	}
	~Account()
	{
	}
	void deposit(double amount) { //예금
		std::cout << "Account deposit called with " << amount << std::endl;
	}
	void withdraw(double amount) {//출금
		std::cout << "Account withdraw called with " << amount << std::endl;
	}
	void testFunc() {
		std::cout << "This is Account's method!\n";

	}
};

class Savings_Account : public Account //자식클래스 : Savings_Account, 부모 클래스 : Account를 잘 상속한 모습이다.
{
private:
	double int_rate;
public:
	Savings_Account()
		: int_rate{ 3.0 } {
	}

	~Savings_Account() {
	}


	void deposit(double amount) {
		std::cout << "Savings Account deposit called with " << amount << std::endl;
	}

	void withdraw(double amount) {
		std::cout << "Savings Account withdraw called with " << amount << std::endl;
	}
};
📖상속의 다양한 이름
참고로 자식클래스와 부모클래스는 여러 이름이 있습니다.
자식, 부모라는 말이 이해하기는 더 쉬울꺼라 저는 이 용어를 쓸께요.
다 알아두시고 외워주시면 좋아요.
기본클래스 = (base class / parent class / super class)
유도클래스 = (derived class / child class / sub class)
📖상속을 받은 객체사용법
이제 위 클래스를 메인함수에서 어떻게 사용하였는지 봅시다.
int main{
	cout << "\n=== Account ==================================" << endl;
	Account acc;
	acc.deposit(2000.0);
	acc.withdraw(500.0);

	cout << endl;

	Account *p_acc = nullptr;
	p_acc = new Account();
	p_acc->deposit(1000.0);
	p_acc->withdraw(500.0);
	delete p_acc;

}
🖥️출력
=== Account ==================================
Account deposit called with 2000
Account withdraw called with 500Account deposit called with 1000
Account withdraw called with 500
위의 코드는 저희가 지금까지 사용했던 클래스의 사용방식과 크게 다를 것이 없죠?
아래의 코드를 봅시다.
int main(){
	cout << "\n=== Savings Account ==========================" << endl;
	Savings_Account sav_acc;
	sav_acc.deposit(2000.0);
	sav_acc.withdraw(500.0);
	sav_acc.testFunc();

	cout << endl;

	Savings_Account *p_sav_acc = nullptr;
	p_sav_acc = new Savings_Account;
	p_sav_acc->deposit(1000.0);
	p_sav_acc->withdraw(500.0);
	p_sav_acc->testFunc();

	delete p_sav_acc;
}
🖥️출력
=== Savings Account ==========================
Savings Account deposit called with 2000
Savings Account withdraw called with 500
This is Account's method!Savings Account deposit called with 1000
Savings Account withdraw called with 500
This is Account's method!
📌오버라이딩 개념설명
위의 코드와 출력결과를 보시면
Savings_Account(자식)이 Account(부모)의 멤버함수(testFunc())를 호출하는 것을 볼 수 있고
오버라이딩된 depoist, withdraw함수는 Savings_Account(자식)에서 재정의된 함수가 호출되는 것을 알 수 있습니다.
visual studio를 쓰신다면 "sav_acc."까지만 써보고 사용가능한 멤버들을 확인해보면 이해가 더 잘 가실꺼예요.
이와 같이 호출되는 멤버함수는 객체의 "자료형"에 기반하여 호출됩니다.
객체의 자료형이 Account면 Account의 멤버가
객체의 자료형이 Savings_Account면 Savings_Account가 멤버가 호출됩니다.
//오버라이딩 예제
class Account{
	void deposit(double amount) { //예금
		std::cout << "Account deposit called with " << amount << std::endl;
	}
};
class Savings_Account : public Account{
	void deposit(double amount) { //deposit 오버라이딩
		std::cout << "Savings Account deposit called with " << amount << std::endl;
	}
}
📌protected키워드
이번에는 protected키워드에 대해 소개합니다.
사실 protected키워드는 별거 아니긴한데, 처음배우는 분들이 실수를 많이 하시고
컴파일 오류의 원인을 못찾는 사람들이 많습니다.
쉽게 말해 자식클래스에서 접근가능하게 만든 private이라고 생각하시면 됩니다.
private : (자신) 클래스의 내부에서만 접근 가능
=>(중요)이는 상속받은 자식클래스라도 마찬가지입니다!!
그래서 많이 실수하시는 부분이 자식클래스에서 부모클래스의 private에 속한 멤버변수에 접근하려 하는 것 입니다.
=>자식클래스에서 접근가능한 부모클래스의 멤버는 protected와 public만 접근 가능합니다!
아래 예제를 봅시다.
📖예제코드
class Base {
	// Note friends of Base have access to all
public:
	int a{ 5 };
	void display()
	{
		std::cout << a << ", " << b << ", " << c << endl;
	} // member method has access to all
protected:
	int b{ 6 };
private:
	int c{ 7 };
};

class Derived : public Base {
public:
	void access_base_members() {
		a = 100;    // OK, public member
		b = 200;    // OK, protected member
	    //c = 300;    // not accessible, private member
	}
};

int main(){
cout << "=== Base member access from base objects ===========" << endl;
	Base base;
	base.a = 100;   // OK, public member
//    base.b = 200;   // Compiler Error, protected member
//    base.c = 300;   // Compiler Error, private member
	base.display();

	cout << "=== Base member access from derived objects ===========" << endl;
	Derived d;
	d.a = 100;  // OK, public member
//    d.b = 200;  // Compiler Error, protected member
//    d.c = 300;  // Compiler Error, private member
	d.access_base_members();
	d.display();
}
🖥️출력
=== Base member access from base objects ===========
100, 6, 7
=== Base member access from derived objects ===========
100, 200, 7
📌생성자의 호출순서
생성자의 호출은 눈으로 보는게 이해가 빠르다고 생각하여, 학교 교수님의 수업자료를 포스팅 허락을 맡아 올립니다.
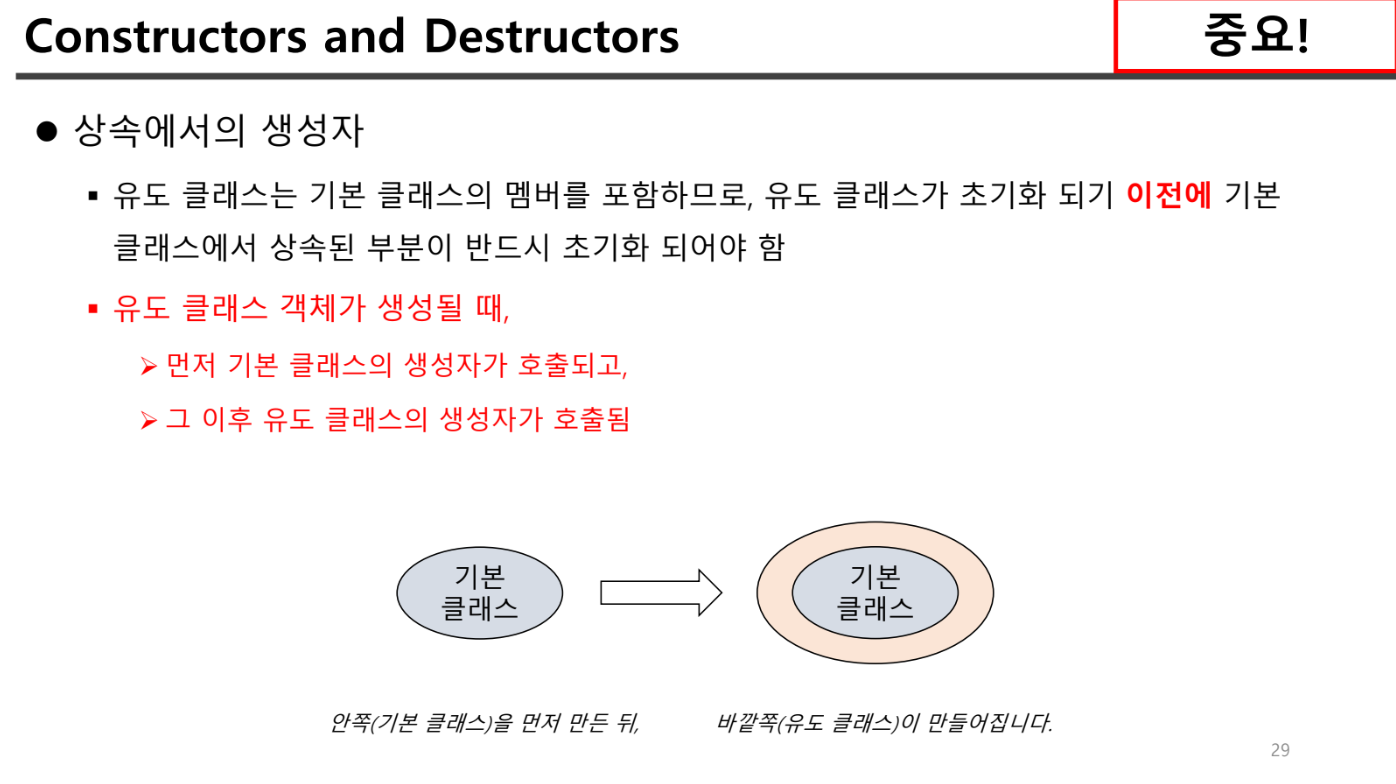
위의 그림과 같이 유도(=자식)클래스는 기본(=부모)클래스의 확장이라고 생각하면 이해하기 쉽습니다. 부모 -> 자식클래스 순으로 생성자가 호출됩니다. 만약 위의 호출순서와 반대로 자식 -> 부모 클래스 순으로 선언이 되면 껍데기부터 생기고 알맹이가 채워지는것인데 뭔가 불안정하지 않나요? 알맹이 이후 껍대기가 생긴다~라고 생각해주시면 됩니다.
반대로 소멸자의 호출 순서는 자식 -> 부모 클래스 순으로 껍대기가 없어진 후 알맹이가 살아지는 순으로 소멸자가 호출됩니다.
눈여겨 볼 점은 따로 오버로딩된 부모클래스의 생성자를 호출하지 않는 이상
부모클래스는 "기본생성자"를 호출한다는 점입니다.
line 45의 객체를 초기화할 때 Derived d{1000}을 한다고 부모클래스의 생성자인 Base(int x)가 호출되는게 아니라
Base() -> Derived(int x) 순으로 호출된다는 말입니다.
📌상속 생성자 오버로딩
만약 자식객체를 선언할 때 오버로딩된 부모클래스의 생성자를 호출하고싶다면,
자식클래스 생성자를 정의할 때 부모클래스의 오버로딩 생성자를 호출해주면 됩니다.
class Base{
	Base(int x) : value{ x } { cout << "Base (int) overloaded constructor" << endl; }
};
class Derived{
	Derived(int x) : Base{x}, doubled_value{2*x} { cout << "Derived (int) overloaded constructor" << endl;}
};
🖥️출력
Base (int) overloaded constructor
Derived (int) overloaded constructor
이상으로 코드설명을 마칩니다.