ContextAPI가 무슨 라이브러리인줄 알았는데, React 내장 API 였다.
도대체 이게 무엇이고, 언제 사용하며, 어떻게 사용하는지 알아보자.
역시 공식 문서가 최고다.
Context
Context provides a way to pass data through the component tree without having to pass props down manually at every level.
In a typical React application, data is passed top-down (parent to child) via props, but such usage can be cumbersome for certain types of props (e.g. locale preference, UI theme) that are required by many components within an application. Context provides a way to share values like these between components without having to explicitly pass a prop through every level of the tree.
- React 공식 docs -
context를 이용하면 단계마다 일일이 props를 넘겨주지 않고도 컴포넌트 트리 전체에 데이터를 제공할 수 있습니다.
일반적인 React 애플리케이션에서 데이터는 위에서 아래로 (즉, 부모로부터 자식에게) props를 통해 전달되지만, 애플리케이션 안의 여러 컴포넌트들에 전해줘야 하는 props의 경우 (예를 들면 선호 로케일, UI 테마) 이 과정이 번거로울 수 있습니다. context를 이용하면, 트리 단계마다 명시적으로 props를 넘겨주지 않아도 많은 컴포넌트가 이러한 값을 공유하도록 할 수 있습니다.
- React 공식 docs -
Context에 관하여 공식 문서는 위와 같이 설명하고 있다.
어떠한 props를 일일이 부모에서 자식으로 넘겨줄 필요없이,
필요한 곳에서 바로바로 접근할 수 있게 해준다고 한다.
이를 아주 잘 표현해주는 이미지를 찾아봤다.
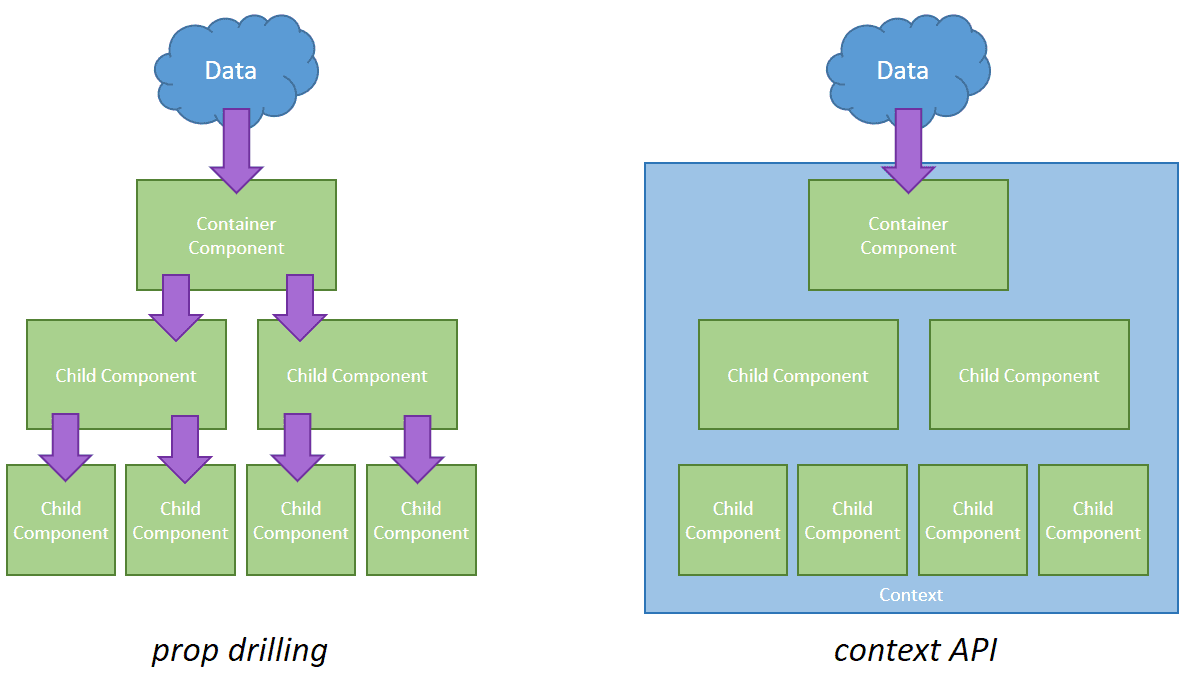
자식 컴포넌트에서 데이터를 사용하기 위해서는 부모 컴포넌트부터 시작하여
자식 컴포넌트까지 계속해서 props로 데이터를 전달해나가야하는데,
Context를 사용하면 Context 내의 모든 컴포넌트에서 데이터에 접근할 수 있게된다.
언제 Context를 사용할까?
Context is designed to share data that can be considered “global” for a tree of React components, such as the current authenticated user, theme, or preferred language.
- React 공식 docs -
context는 React 컴포넌트 트리 안에서 전역적(global)이라고 볼 수 있는 데이터를 공유할 수 있도록 고안된 방법입니다. 그러한 데이터로는 현재 로그인한 유저, 테마, 선호하는 언어 등이 있습니다.
- React 공식 docs -
공식 문서에서는 아래와 같은 상황을 예시로 보여준다.
버튼 태그에 테마를 전달하는 상황이다.
class App extends React.Component {
  render() {
    return <Toolbar theme="dark" />;
  }
}

function Toolbar(props) {
  // Toolbar 컴포넌트는 불필요한 테마 prop를 받아서
  // ThemeButton에 전달해야 합니다.
  // 앱 안의 모든 버튼이 테마를 알아야 한다면
  // 이 정보를 일일이 넘기는 과정은 매우 곤혹스러울 수 있습니다.
  return (
    <div>
      <ThemedButton theme={props.theme} />
    </div>
  );
}

class ThemedButton extends React.Component {
  render() {
    return <Button theme={this.props.theme} />;
  }
}
자식 요소인 Button 태그에서 사용하기 위해서, 부모 App에서부터 props로 전달이 되고 있다.
컴포넌트 트리 깊은 곳에 존재하는 컴포넌트가 사용할 props를 불필요하게 많은 단계를 거쳐 전달할 때,
Context를 활용하면 간단하게 필요한 데이터에 접근할 수 있게된다.
// context를 사용하면 모든 컴포넌트를 일일이 통하지 않고도
// 원하는 값을 컴포넌트 트리 깊숙한 곳까지 보낼 수 있습니다.
// light를 기본값으로 하는 테마 context를 만들어 봅시다.
const ThemeContext = React.createContext('light');

class App extends React.Component {
  render() {
    // Provider를 이용해 하위 트리에 테마 값을 보내줍니다.
    // 아무리 깊숙히 있어도, 모든 컴포넌트가 이 값을 읽을 수 있습니다.
    // 아래 예시에서는 dark를 현재 선택된 테마 값으로 보내고 있습니다.
    return (
      <ThemeContext.Provider value="dark">
        <Toolbar />
      </ThemeContext.Provider>
    );
  }
}

// 이젠 중간에 있는 컴포넌트가 일일이 테마를 넘겨줄 필요가 없습니다.
function Toolbar() {
  return (
    <div>
      <ThemedButton />
    </div>
  );
}

class ThemedButton extends React.Component {
  // 현재 선택된 테마 값을 읽기 위해 contextType을 지정합니다.
  // React는 가장 가까이 있는 테마 Provider를 찾아 그 값을 사용할 것입니다.
  // 이 예시에서 현재 선택된 테마는 dark입니다.
  static contextType = ThemeContext;
  render() {
    return <Button theme={this.context} />;
  }
}
불필요하게 props로 연달아 데이터를 전달하는 경우에 Context가 좋은 수단이 된다는 것을 알았다.
Context 사용 전 고려할 것
컴포넌트 트리 어느 곳에서든 데이터에 접근 할 수 있게 만들어 준다는 장점 때문에,
props가 연달아 전달되려고 하는 상황이면 무조건 Context를 사용하는 것이 옳은걸까?
이러한 상황에 대하여 공식 문서는 아래와 같이 말한다.
Context is primarily used when some data needs to be accessible by many components at different nesting levels. Apply it sparingly because it makes component reuse more difficult.
- React 공식 docs -
context의 주된 용도는 다양한 레벨에 네스팅된 많은 컴포넌트에게 데이터를 전달하는 것입니다. context를 사용하면 컴포넌트를 재사용하기가 어려워지므로 꼭 필요할 때만 쓰세요.
- React 공식 docs -
즉, 재사용 가능한 컴포넌트를 만드는데 Context가 오히려 방해가 될 수 있다는 것이다.
따라서, 이러한 상황에서는 컴포넌트 합성(Component Composition)이 더 나은 방법이라고 한다.
아래 상황을 보자.
<Page user={user} avatarSize={avatarSize} />
// ... 그 아래에 ...
<PageLayout user={user} avatarSize={avatarSize} />
// ... 그 아래에 ...
<NavigationBar user={user} avatarSize={avatarSize} />
// ... 그 아래에 ...
<Link href={user.permalink}>
  <Avatar user={user} size={avatarSize} />
</Link>Avatar에게 props를 전달하기 위해 Page 컴포넌트부터 시작해서 사용하지도 않는 props를
수많은 컴포넌트들이 전달받고, 전달하는 상황이다.
이런 경우 Context를 사용할 수도 있겠지만...
Avatar 컴포넌트 자체를 넘겨주는 방식으로 사용할 수도 있다.
function Page(props) {
  const user = props.user;
  const userLink = (
    <Link href={user.permalink}>
      <Avatar user={user} size={props.avatarSize} />
    </Link>
  );
  return <PageLayout userLink={userLink} />;
}

// 이제 이렇게 쓸 수 있습니다.
<Page user={user} avatarSize={avatarSize} />
// ... 그 아래에 ...
<PageLayout userLink={...} />
// ... 그 아래에 ...
<NavigationBar userLink={...} />
// ... 그 아래에 ...
{props.userLink}
컴포넌트 자체를 넘겨주다보니, 사용하지 않는 props를 중간 단계의 컴포넌트에 입력해줄 필요가 없다.
따라서, Page 컴포넌트만 Avatar가 user와 size props를 사용한다는 것을 알면 된다.
이러한 상황을 제어의 역전(inversion of control)이라고 하며,
최상위 컴포넌트의 영향력은 커지고, 전달할 props의 수는 줄일 수 있다.
물론, 이 방법 또한 완벽한 것은 아니다.
여전히 props로 무엇인가를 전달해야하기 때문에, 하위 컴포넌트 구조가 유연해야하기 때문이다.
아무튼 각설하고,
어떤 상황에 Context 사용을 고려해야하는걸까?
However, sometimes the same data needs to be accessible by many components in the tree, and at different nesting levels. Context lets you “broadcast” such data, and changes to it, to all components below. Common examples where using context might be simpler than the alternatives include managing the current locale, theme, or a data cache.
- React 공식 docs -
하지만 같은 데이터를 트리 안 여러 레벨이 있는 많은 컴포넌트에 주어야 할 때도 있습니다. 이런 데이터 값이 변할 때마다 모든 하위 컴포넌트에게 널리 “방송”하는 것이 context입니다. 흔히 예시로 드는 선호 로케일, 테마, 데이터 캐시 등을 관리하는 데 있어서는 일반적으로 context를 사용하는 게 가장 편리합니다.
- React 공식 docs -
이를 위 코드에 적용시켜보면...
props를 전달할 때, 중간에 있는 그 어떤 컴포넌트도 사용을 하지 않았던 것과 달리
props를 전달받는 컴포넌트 중 다수가 해당 props를 사용해아하는 상황이라면
Context를 사용하는 것을 고려하라는 것이다.
API
Context는 크게 데이터를 제공하는 Provider, 데이터에 접근하는 Consumer로 나눠 볼 수 있다.

이들을 코드로 구현하는 방법에 대해서 알아보자.
React.createContext
const MyContext = React.createContext(defaultValue);Context 객체를 생성한다.
Context를 구독하고 있는 컴포넌트들을 렌더링할 때,
이들은 가장 가까운, 짝이 맞는 Provieder에서 그 데이터를 읽어온다.
defaultValue는 적절한 Provider를 찾지 못했을 때만 쓰이는 값이다.
주의할 점은, Provider가 undefined의 값을 보내더라도,
구독 컴포넌트들이 defaultValue를 읽지는 않는다는 것이다.
Context.Provider
<MyContext.Provider value={/* 어떤 값 */}>Context 객체에 포함된 컴포넌트인 Provider는 Context의 변화를 감지하여
이를 구독 컴포넌트에 알려주는 역할을 한다.
value prop에 넣은 값을 구독 컴포넌트에 전달한다.
구독 컴포넌트 수에는 제한이 없으며,
Provider 아래에 Provider를 또 만드는 것도 가능하다.
주의할 것은, Context는 가장 가까운 Provider에서 그 값을 찾기 때문에
하위 Provider의 데이터에 접근한다는 것이다.
Provider를 구독하는 모든 하위 컴포넌트들은 value prop이 변할 때마다, 재렌더링된다.
또한, Provider로부터 하위 Consumer로의 전파는 shouldComponentUpdate 메서드가 적용되지 않으므로, 상위 컴포넌트가 업데이트를 건너 뛰더라도 Consumer가 업데이트 된다.
Context는 변경 감지를 Object.is()와 동일한 알고리즘을 사용하여 진행하기 때문에,
객체를 value로 사용할 경우 주의가 필요하다고 한다.
Context.Cosumer
<MyContext.Consumer>
  {value => /* context 값을 이용한 렌더링 */}
</MyContext.Consumer>Context의 변화를 구독하는 컴포넌트로, 이를 통해 함수 컴포넌트 내에서 Context에 접근할 수 있다.
Consumer의 자식 컴포넌트는 함수형 컴포넌트여야한다.
이 함수는 Context의 현재값을 받고 React 노드를 반환한다.
이 함수가 받는 value 값은 해당 Context의 Provider 중 상위 트리에서 가장 가까운 Provider의 value와 동일하다.
즉, 가장 가까운 Provider를 사용한다는 것이다.
상위에 Provider가 없다면 value 값은 createContext()에 입력한 defaultValue와 동일하다.
Context.displayName
const MyContext = React.createContext(/* some value */);
MyContext.displayName = 'MyDisplayName';

<MyContext.Provider> // "MyDisplayName.Provider" in DevTools
<MyContext.Consumer> // "MyDisplayName.Consumer" in DevTools
이는 React 개발자 도구에서 보여질 Context의 이름을 변경해주는 것이다.
useContext()는 뭘까?
필자는 사실 Cosumer를 사용한 적이 없다.
개인 프로젝트에서는 Provider와 useContext만을 사용했는데,
공부를 하다보니 이들이 무슨 관계인지, 전혀 다른 것인지 헷갈리기 시작했다.
API
const value = useContext(MyContext);Context 객체 자체를 인자로 줘야한다.
MyContext.Provider, MyContext.Consumer를 전달하는 것은 틀린 방법이다.
Accepts a context object (the value returned from React.createContext) and returns the current context value for that context. The current context value is determined by the value prop of the nearest <MyContext.Provider> above the calling component in the tree.
- React 공식 docs -
context 객체(React.createContext에서 반환된 값)을 받아 그 context의 현재 값을 반환합니다. context의 현재 값은 트리 안에서 이 Hook을 호출하는 컴포넌트에 가장 가까이에 있는 <MyContext.Provider>의 value prop에 의해 결정됩니다.
- React 공식 docs -
useContext에 관한 공식 문서의 설명인데...
사실 지금까지 위에서 공부한 것과 다른게 없다..
When the nearest <MyContext.Provider> above the component updates, this Hook will trigger a rerender with the latest context value passed to that MyContext provider. Even if an ancestor uses React.memo or shouldComponentUpdate, a rerender will still happen starting at the component itself using useContext.
- React 공식 docs -
컴포넌트에서 가장 가까운 <MyContext.Provider>가 갱신되면 이 Hook은 그 MyContext provider에게 전달된 가장 최신의 context value를 사용하여 렌더러를 트리거 합니다. 상위 컴포넌트에서 React.memo 또는 shouldComponentUpdate를 사용하더라도 useContext를 사용하고 있는 컴포넌트 자체에서부터 다시 렌더링됩니다.
- React 공식 docs -
리렌더링을 유발한다는 것 또한 같은 내용을 알려준다..
추가로 알게된 사실은, 상위 컴포넌트를 최적화를 해놓더라도
useContext를 사용하고 있는 컴포넌트 자체에서부터 리렌더링이 된다는 것이다.
이런 상황에 대하여 공식 문서는 다음과 같은 방법을 권장한다.
해당 링크의 글에서는 Context의 분리(split)을 가장 추천한다고 한다.
변경이 되는 Context를 분리해서 사용하는 것을 말하시는 듯 하다.
링크에 들어가서 읽어보시는 것을 추천드린다!
Consumer와 useContext의 관계
앞서, 필자는 Consumer를 사용한 적이 없다고 했다.
물론, Context를 사용하는데 전혀 문제가 없었고,
이는 현재 Context를 공부하는 필자를 헷갈리게 만든다.
이에 공식 문서에는 다음과 같이 말한다.
If you’re familiar with the context API before Hooks, useContext(MyContext) is equivalent to static contextType = MyContext in a class, or to <MyContext.Consumer>.
useContext(MyContext) only lets you read the context and subscribe to its changes. You still need a <MyContext.Provider> above in the tree to provide the value for this context.
- React 공식 docs -
여러분이 Hook 보다 context API에 친숙하다면 useContext(MyContext)는 클래스에서의 static contextType = MyContext 또는 <MyContext.Consumer>와 같다고 보면 됩니다.
useContext(MyContext)는 context를 읽고 context의 변경을 구독하는 것만 가능합니다. context의 값을 설정하기 위해서는 여전히 트리의 윗 계층에서의 <MyContext.Provider>가 필요합니다.
- React 공식 docs -
그렇다. 같은거였다. 그래서 사용하는데 문제가 없었던 것이다.
특히나, 필자가 프론트 공부를 시작했을 때가 이미 함수형 컴포넌트가 주를 이루던 시기였기에
클래스형 컴포넌트를 사용할 일이 없었고, 이게 더 헷갈리게 만든 것 같다.
또한, Provider와 Consumer가 같이 쓰였듯,
Provider와 useContext도 같이 쓰여야한다.
둘의 비교를 위해 공식 문서의 예시를 가져왔다.
// Provider - Cosumer 사용

import React from "react";

const themes = {
  light: {
    foreground: "#000000",
    background: "#eeeeee"
  },
  dark: {
    foreground: "#ffffff",
    background: "#222222"
  }
};

// Context 객체 생성
// defaultValue로 themes.light 설정
const ThemeContext = React.createContext(themes.light);

export default function App() {
  return (
    // value prop에 themes.dark를 사용하는 것으로 전달
    <ThemeContext.Provider value={themes.dark}>
      <Toolbar />
    </ThemeContext.Provider>
  );
}

// ThemeContext.Provider의 영향 아래에 있는 컴포넌트
function Toolbar(props) {
  return (
    <div>
      <ThemedButton />
    </div>
  );
}

// ThemeContext.Provider의 영향 아래에 있는 컴포넌트
function ThemedButton() {
  return (
    // Cosumer 컴포넌트를 사용하여 Context에 접근
    <ThemeContext.Consumer>
      {({ foreground, background }) => (
        <button style={{ background: background, color: foreground }}>
          I am styled by theme context!
        </button>
      )}
    </ThemeContext.Consumer>
  );
}
// Provider - useContext 사용
const themes = {
light: {
foreground: "#000000",
background: "#eeeeee"
},
dark: {
foreground: "#ffffff",
background: "#222222"
}
};
// Context 객체 생성
// defaultValue로 themes.light 설정
const ThemeContext = React.createContext(themes.light);
function App() {
return (
// value prop에 themes.dark를 사용하는 것으로 전달
<ThemeContext.Provider value={themes.dark}>
<Toolbar />
</ThemeContext.Provider>
);
}
// ThemeContext.Provider의 영향 아래에 있는 컴포넌트
function Toolbar(props) {
return (
<div>
<ThemedButton />
</div>
);
}
// ThemeContext.Provider의 영향 아래에 있는 컴포넌트
function ThemedButton() {
// useContext를 사용하여 Context에 접근
const theme = useContext(ThemeContext);
return (
<button style={{ background: theme.background, color: theme.foreground }}>
I am styled by theme context!
</button>
);
}위 코드들은 모두 아래와 같은 결과를 보여준다.

useContext로 인해서 어떤 값이 반환되는지 궁금하신 분이 계실 것 같아서 콘솔로 확인해봤다.

위와 같은 형태의 Context 객체가 반환이 되며,
위 코드에서 상수 themes 내에 있던 dark에 해당하는 부분이라는 것을 알 수 있다.
즉, Provider의 value prop에 들어가있는 값과 일치한다는 것을 알 수 있다.
마찬가지, Cousumer에서도 동일한 형태로 사용이 되고 있으며
아래와 같이 Consumer를 사용해도 된다.
    <ThemeContext.Consumer>
      {(theme) => (
        <button
          style={{ background: theme.background, color: theme.foreground }}
        >
          I am styled by theme context!
        </button>
      )}
    </ThemeContext.Consumer>
이 전에 사용했던 코드는 구조 분해를 통해서 사용한 것일 뿐이다.
이 외의 다양한 활용법은 공식 문서에서 소개하고 있으므로, 찾아보시면 좋을 것 같다.
필자의 활용
필자가 이 기능을 사용했던 프로젝트는 정말 작은 기능을 하는 것이라서
유저의 로그인을 판단하는 데에만 사용했다.
모든 컴포넌트에서 Context에 접근하여 로그인 여부를 판단하고,
이를 통해 유저의 접근을 제한하는 것을 위해서였다.
// App.tsx

import React, { Suspense } from "react";
import { Routes, Route, BrowserRouter } from "react-router-dom";

import { AuthContext } from "./context/auth-context";
import { useAuth } from "./hoc/auth-hook";

// ... //

function App() {
  const { token, login, logout, userId } = useAuth();

  return (
    <BrowserRouter basename={process.env.PUBLIC_URL}>
      <AuthContext.Provider
        value={{ isLoggedIn: !!token, token, userId, login, logout }}
      >
        <Suspense fallback={<LoadingSpinner />}>
          <Routes>
            <Route element={<AnyRoute />}>
              <Route path="/" element={<LandingPage />} />
              <Route path="/company" element={<CompanyPage />} />
              <Route path="/artist" element={<ArtistPage />} />
              <Route path="/business" element={<BusinessPage />} />
            </Route>

            <Route element={<PrivateRoute />}>
              <Route path="/mypage/:userId" element={<MyPage />} />
            </Route>

            <Route element={<PublicRoute />}>
              <Route path="/login" element={<LoginPage />} />
              <Route path="/join" element={<JoinPage />} />
            </Route>

            <Route path="/*" element={<UnValidPage />} />
          </Routes>
        </Suspense>
      </AuthContext.Provider>
    </BrowserRouter>
  );
}

export default App;
// auth-context.ts
import { createContext } from "react";
export const AuthContext = createContext<boolean | null | any>({
isLoggedIn: false,
userId: null,
token: null,
login: () => {},
logout: () => {},
});// PrivateRoute.tsx
import React, { useContext } from "react";
import { Outlet, Navigate } from "react-router-dom";
import { AuthContext } from "../context/auth-context";
// 로그인 유저만 접근 가능
// 비로그인 유저 접근 불가
const PrivateRoute = () => {
const auth = useContext(AuthContext);
if (!auth.isLoggedIn) {
alert("로그인이 필요한 기능입니다.");
}
return auth.isLoggedIn ? <Outlet /> : <Navigate to="/login" />;
};
export default PrivateRoute;defaultValue에 적어놓은 것과 하위 컴포넌트에 들어가는 value는 형태가 동일해야한다.
전체 라우트를 유저 인증 관련 데이터를 담고 있는 Provider로 감싸고,
인증 여부에 따라 접근을 제한해야하는 기능을 담고 있는 컴포넌트에서는
useContext를 통해 Context에 접근한다.
P.S.
Context에 관련하여 벨로퍼트님이 작성하신 글이 있다.
꼭 한번 읽어보셨으면 좋겠다.
한국말로 이렇게 자세하게 설명해주시는 분을 찾기도 힘들뿐더러,
함수형 컴포넌트로 예시를 작성하셔서 정말 이해가 편한 것 같다.
참고 자료
copycat 게시글
freecodecamp 게시글
React 공식 docs - Context
React 공식 docs - useContext