Float
-
border의 색상을 지정하지 않으면 글자색에 따라 색상이 결정된다
-
float
- float 옵션을 끝내는 지점에서 별도의 해제 작업이 필요하다
  <div class='container'>
    <div class='item float'>1</div>
    <div class='item float'>2</div>
    <div class='item float'>3</div>
    <div class='item'>4</div>
  </div>
방법1
  .container{
  border:4px solid;
  }
  .container .item{
    width:100px;
    height:100px;
    background-color:royalblue;
    border-radius:10px;
    font-size:40px;
    margin:10px;
  }
  /* 4번째 자식부터 float를 안쓰는데 이렇게 clear를 통해 float를 해제작업을 해줘야 */
  /* 다른 상위 element들이 영향을 받지 않는다.*/
  .container .item:nth-child(4){
    clear:left;
  }
  .float{
    float:left;
  }
다만 위와 같은 방식은 쓰지도 않을 dom을 일부러 생성해야 한다는 단점이 있다.
방법2
.container {
  ...
  overflow: hidden;
  /* 범위를 넘어가는 경우 다 가려진다는 단점이 있기 근본적인 해결책이 될수는 없다. */
}
방법3
/* after와 같은 가상요소는 ::가 맞는 문법이고, content가 필수로 들어가야 한다. */
.clearfix::after {
  content: '';
  display: block;
  clear: both;
}
<div class='container clearfix'>
  <div class="item float">1</div>
  <div class="item float">2</div>
  <div class="item float">3</div>
</div>
after라는 가상 요소를 통해 3번째 형제의 다음 가상의 요소를 만들고 거기다가 clear를 만듦으로써 float를 해제한다.(.clearfix 안에 있는 요소는 모두 float속성을 포함하고 있어야 한다.
미포함 요소와 섞이면 float 속성이 포함된 요소와 아닌 요소간 위치의 충돌이 발생한다)
-> 별도의 div안에 묶고 해당 div 안에 클래스를 선언하는 방법도 존재한다.
-> 부모 요소가 float를 선언하면, 자식 요소들은 반드시 float 성격을 가지고 있어야 한다!!!
<div class='container'>
  <div class='clearfix'>
    <div class="item float">1</div>
    <div class="item float">2</div>
    <div class="item float">3</div>
  </div>
  <div class='item'>4</div>
</div>
float 속성끼리 묶여 있기 때문에 위치 충돌이 없다. 실제로 랜더링 해보면 의도된대로 잘 나옴.
Position
-
자식요소가
position:absolute를 선언하게 되면 부모 방향으로 자신의 위치의 기준이 되는 요소를 찾기 시작한다. 찾으면 해당 요소를 기준으로absolute위치를 선정하게 되며, 없으면
viewport를 기준으로 위치를 찾아나간다. -
position:fixed는 기본적으로viewport를 기준으로 위치를 선정하게 된다.- 그러나 특이한건 무모 요소중
transform을 쓰면 해당 위치를 기준으로 position:fixed가 적용된다는 점이다.
-> MDN에 따르면 .. 요소의 조상 중 하나가transform,perspective,filter속성 중 하나라도none이 아니라면viewport대신 그 조상을 컨테이닝
블록으로 삼는다.(= 위치의 기준으로 삼는다)
- 그러나 특이한건 무모 요소중
-
stacking context: 쌓임 맥락 opacity를 추가하기 전에는 transform에 의해 2번째 자식 요소가 나머지 요소들 위에 있어서 덮었는데, 3번째에 opacity를 추가하니 3번째가 위에 있는
현상이 발생함 ..이런 현상을 '쌓임 맥락'이라고 함.- z-index 반드시 position을 등록해야 z-index 효과가 생긴다. or flex, grid 속성이 있는 경우에도 사용가능하다
-
display:inline을 선언하더라도 position:absolute || fixed의 경우 block 속성으로 자동 변환된다는 점을 반드시 기억하고 있을 것!
Flex
- 하나의 축을 기준으로 작업을 진행하기 때문에 1차원 레이아웃이라고 지칭함
- flex 구성
- flex container: 부모
- flex items: 자식
Flex Container
-
flex-direction
-
axis
- 주축(main-axis)
- 교차축(cross-axis)
-
flex-wrap: 줄바꿈처리를 어떻게 할지에 관해 정한다
- nowrap(default): 감싸지 않는다 -> 줄바꿈 처리 안함
-> 컨테이너의 크기를 넘어가도 줄바꿈이 일어나지 않고, 자식의 크기가 줄어드는 것을 확인할 수 있는데 이는flex-shrink:1가default설정이 되어 있기 때문이다. - wrap -> 줄바꿈 처리함
- wrap-reverse: 뒤집어서 줄바꿈 처리
- nowrap(default): 감싸지 않는다 -> 줄바꿈 처리 안함
-
justify-content: 주축의 정렬방법을 정의한다
- flex-start(default): flex container의 시작부분을 기준으로 정렬한다.
- flex-end: flex container의 끝부분을 기준으로 정렬한다
- center
- space-between: 첫번째와 마지막 번째 요소들을 양 끝에 두고 나머지 요소들에 대해서는 균등한 간격으로 배치한다.
- space-around: 각 요소의 양쪽 공간들이 균등하게 공간을 차지하도록 한다
-ㅁ--ㅁ--ㅁ--ㅁ- => 각 요소별로 -ㅁ- 만큼 차지한다
-
align-items: 교차축의 정렬방법을 정의한다 (1줄)
- flex-start: 교차축의 시작점을 기준으로 정렬
- flex-end: 교차축의 끝점을 기준으로 정렬
- center
- baseline: 문자 기준선을 기준으로 정렬 .. 글자들의 밑부분 공통되는 위치를 기준으로 정렬을 한다
-
align-content: 요소가 2줄 이상인 경우 사용할 수 있는 속성에 해당한다(n줄)(align이 포함되어 있으므로 교차축을 기준으로 속성을 정렬한다는 의미이다)
Flex Items
- flex-grow: 아이템의 크기가 비율 만큼 늘어도록 한다
(다만, 각 아이템별로 기본 너비 또는 높이가 정해져 있는 경우, 해당 크기는 우선 지키고 나머지 부분에 대해 비율대로 늘린다)(하나의 아이템만 1이상의 값을 가지면 해당 아이템의 크기를 최대한
늘린다) - flex-shrink: 주어진 비율 만큼 줄어들도록 한다(별도로 값을 명시히지 않으면 아이템의 크기가 줄어드는데 이는 디폴트가 1로 설정되어 있기 때문이다)
- flex-basis:
- 해당 값을 지정하는 경우, width는 불능 상태가 된다
- 해당 값을 지정하면 우선적으로 지정한 값을 차지하고, 나머지 너비에 대해 늘어나거나 줄어든다.
(가령,basis:200px;flex-grow:2;이면 200px을 먼저 차지하고 나머지 너비를 비율에 맞게 가져간다) - default는 auto로 그땐 알아서 width대로 계산하고, 0이면 주어진 grow, shrink 비율에 맞게 너비가 조정된다.
- flex: 단축 속성으로 grow, shrink, basis를 한번에 지정 가능
- 각각 default는
0, 1, auto인점 인지하고 사용하기! - 별도로 기입 안해도 에러는 안뜨지만 디폴트 값을 작성하지 않으면 의도한바대로 나오지 않으므로 반드시 flex 사용시 default 값을 명시해서 사용해야 한다!!(안전빵으로 각각 작성하는 것도
좋아)
- 각각 default는
- order: flex item의 순서를 지정할 수 있다
- align-self: 각각의 item에 대하여 보조축 방향으로 위치를 지정할 수 있다.
-> align-items가 수행하는 역할이랑 같음. 다만 대상이 개별 아이템으로 한정된다는 차이만 있음
-> 2줄 이상인 경우 각 줄의 주축을 기준으로 보조축을 만들고, 보조축에 대해 위치를 선정하게 된다
Grid
- 2개의 축을 기준으로 작업 진행하므로 2차원 레이아웃이라고 지칭함.
Grid Container
- 레이아웃 잡기
.container {
  display: grid;
  border: 4px solid;
  grid-template-columns: repeat(3, 100px);
  grid-template-rows: repeat(3, 1fr);
  /* 명시적: 직접 행렬 개수를 지정함*/
  grid-auto-rows: 100px;
  grid-auto-columns: 100px;
  /* 암시적: 직접 지정한 행렬 수 외에 요소가 더 들어오는 경우 크기를 어떻게 할지 지정할 수 있다*/
}

.container .item {
  border: 2px solid;
  font-size: 20px;
  background-color: orange;
}

.container .item:nth-child(5) {
  grid-column: 5;
  grid-row: 4;
  /* 특정 요소에 대해 위치를 다음과 같이 지정할 수 있다*/

}- 요소의 흐름 제어하기
.container {
  grid-auto-flow: dense;
  /* 위치를 바꾸다보면 모양이 지그재그 형태가 되어서 중간이 비어 있는 경우가 있을 수도 있다. 이러한 경우 grid-auto-flow를 사용해서 흐름을 지정할 수 있다
  (default는 row이다)
  */

}- 라인 확장하기(특정 요소를 지정하여 해당 셀의 높이, 길이를 조정할 수 있다)
.container .item:first-child {
  grid-column: 2 / span 2;
  /* column의 2번째 라인(1부터 시작)부터 시작해서 2개의 cell을 확장해서 아이템을 배치하겠다 */
}

.container .item:nth-child(2) {
  grid-column: span 3;
  /*  길이가 3으로 늘어남 */
}- 정렬하기
.container {
  width: 500px;
  height: 500px;
  border: 4px solid;
  display: grid;
  grid-template-rows: repeat(3, 70px);
  grid-template-columns: repeat(3, 70px);
  justify-content: center;
  align-content: center;
  /*
    content 정렬하기 .. justify: 행축, align: 열축

    *-content: 셀의 위치를 지정할 때 사용한다
        justify-content .. 행축
              space-between: 양끝 제외하고 요소들끼리 간격 일정 ㅁ-ㅁ-ㅁ
              space-around: 모든 요소가 일정 크기의 간격을 가진채로 정렬 -ㅁ--ㅁ--ㅁ-
              space-evenly: 요소간 간격이 모두 일정함 -ㅁ-ㅁ-ㅁ-
              normal: flex stretch와 유사하다 .. default
        align-content .. 열축
              (justify-content와 속성값은 똑같다)

    *-items: 각 셀 안에 있는 item의 위치를 지정할 때 사용한다
        justify-items .. 행축

        align-items .. 열축
  */

}- cell 배치하기
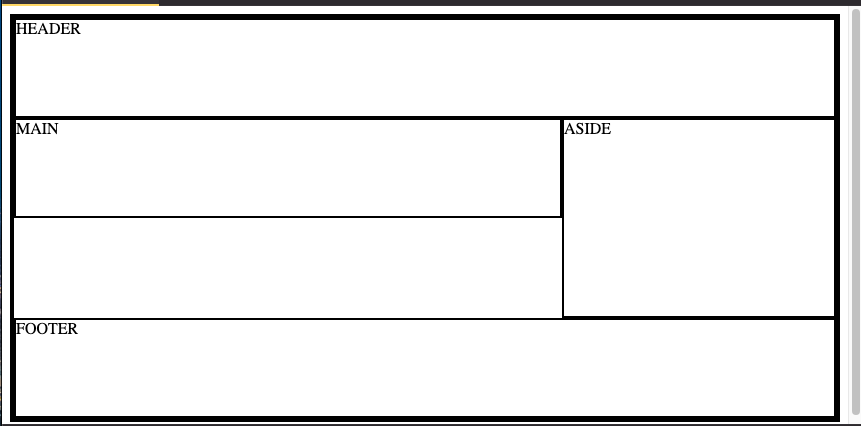
<!DOCTYPE html>
<html lang="en">
<head>
  <meta charset="UTF-8">
  <title>Title</title>
  <link rel="stylesheet" href="index.css">
</head>
<body>
<div class="container">
  <header>HEADER</header>
  <main>MAIN</main>
  <aside>ASIDE</aside>
  <footer>FOOTER</footer>
</div>
</body>
</html>
.container {
border: 4px solid;
display: grid;
grid-template-rows: repeat(4, 100px);
grid-template-columns: repeat(3, 1fr);
grid-template-areas:
"header header header"
"main main aside"
"none none aside"
"footer footer footer";
grid-gap: 10px 40px;
/* 요소간 갭 설정 가능 .. css에서는 이 갭을 line(=gutter)이라 부름 */
/*grid-row-gap: 10px;*/
/*grid-column-gap: 40px;*/
/* 한번에 적든, 나눠서 적든 알아서 편한대로 쓰면 된다 */
}
.container > * {
border: 2px solid;
}
.container header {
grid-area: header;
}
.container main {
grid-area: main;
}
.container aside {
grid-area: aside;
}
.container footer {
grid-area: footer;
}
- item 설정하기
.container .item:nth-child(1){
  grid-row-start: 2;
  grid-row-end: 3;
  grid-column-start: 2;
  grid-column-end: 3;
  /*
      몇 번 row 라인부터 시작해서 끝낼건지 지정할 수 있다.
      해당 예시에서는 2~3 row, col라인을 차지하라는 의미임
      (시작은 1부터 끝은 -1부터 시작한다)
  */
  grid-row-start: span 2;
  /* row line의 길이를 2로 늘려서 시작하라 */
  grid-column-start: span 2;


  grid-row:1/3;
  grid-column: 1/3;
  /* 다음과 같이 start~end를 단축 속성으로
   표현할 수도 있다 */
}- 아이템별로 정렬하기
.container .item{
  justify-items: end;
  align-items: end;
}
.container .item:first-child{
  justify-self: center;
  align-self: center;
}
/*
  .item에서 전체 아이템의 위치를 선정 해줬다면,
  *-self를 통해 각 item별로 위치를 개별 설정해 줄수 있다.

  *-self값으로 normal(~=stretch)를 주면, 길이가 별도로
  설정되어 있지 않으면 default가 auto이므로 길이가 최대한 늘어난다
*/

  .container .item:nth-child(3){
    order: -1;
    /* 특정 아이템의 순서를 변경할 수 있다 */

  }
  .container .item:first-child{
    order: 1;
    /*
     순서가 맨 끝으로 밀리는데 그 이유는 3번은 -1이고,
      나머지는 0이라서 1이 제일 커서 맨 오른쪽으로
      밀리기 떄문이다
    */
  }

(grid-row, *-items 등 전부 무시하고, order속성만 적용된 결과이다)
- item간 겹치게 만들기
- 하나의 item에 대해
grid-row, grid-column을 설정 했다면 다른 아이템들도 모두 설정해줘야 한다 z-index를 사용하여 순서를 정한다
- 하나의 item에 대해
.container .item{
    border: 4px solid;
    font-size: 40px;
}
.container .item:nth-child(1){
    background-color: tomato;
    grid-column: 1 / span 2;
    grid-row: 1;
    z-index: 1;
}
.container .item:nth-child(2){
    background-color: orange;
    grid-row: 1 / span 2;
    grid-column: 2;
    z-index: 2;
}
.container .item:nth-child(3){
    background-color: yellowgreen;
    grid-column: 2 / span 2;
    grid-row: 2;
    z-index: 3;
}

