
1. 실습을 하기 전 아래와 같이 파일을 구성해준다.

파일을 구성하고 실행을 하면 Faild가 뜨는데 그 이유는 Info.plist때문이다. 아래에서 해결하도록 하겠다.
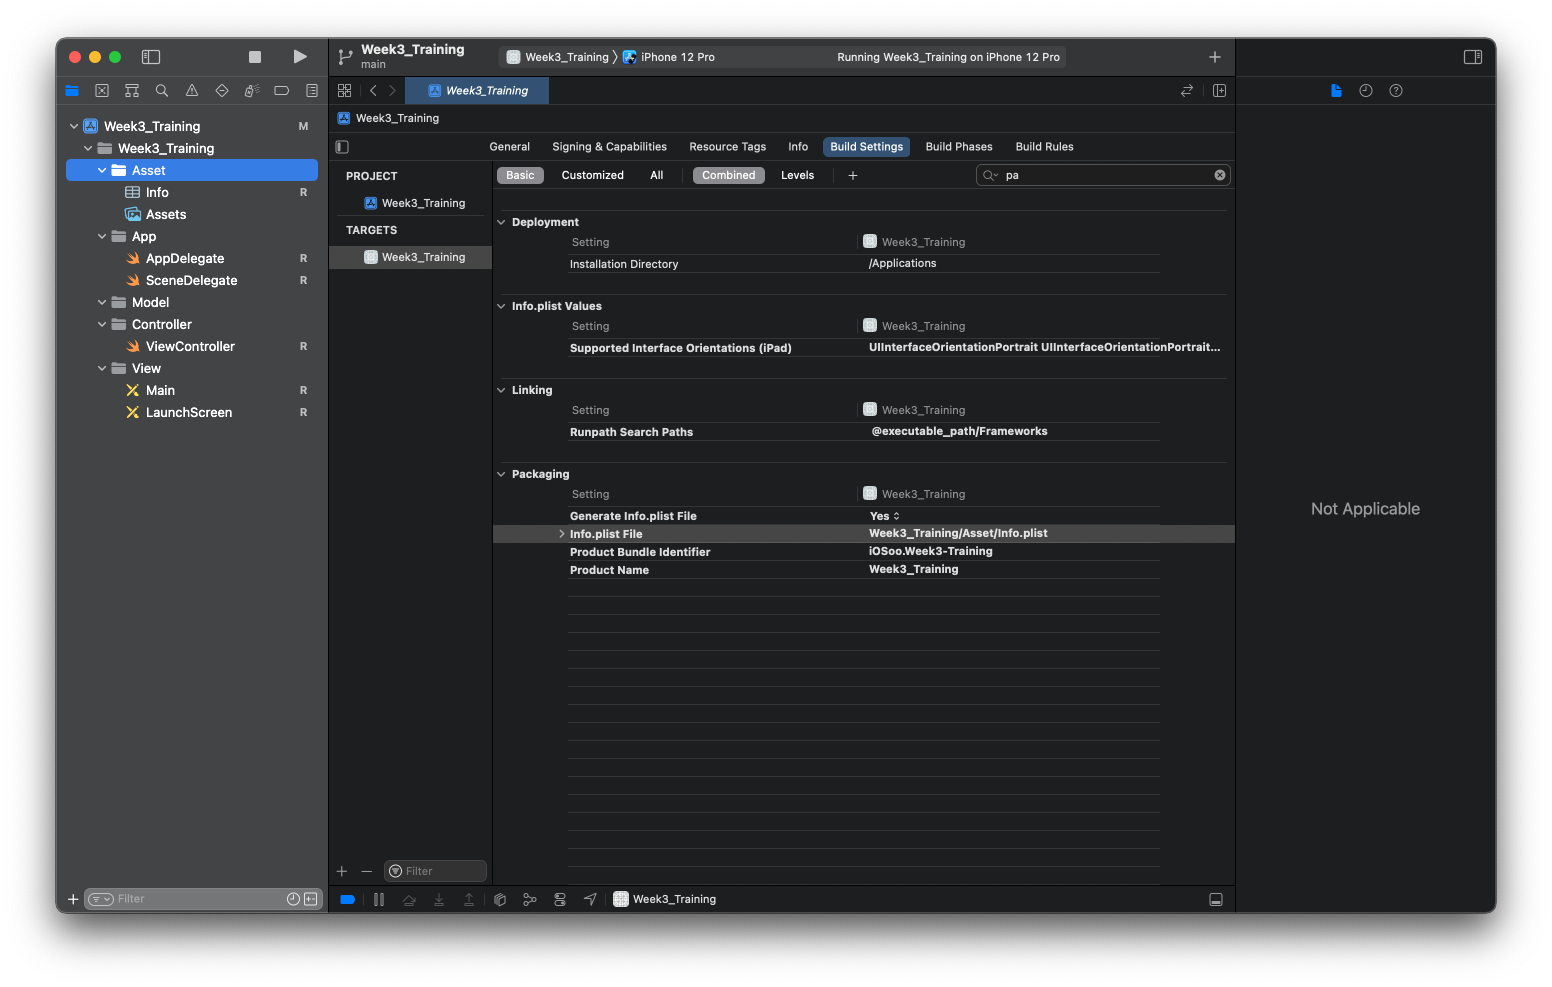
2.Appproject - TARGETS - Build Settings - Packaging - Info.plist File 더블 클릭후 위치 변경
3. 새로운 Swift파일을 만들어서 Data를 생성해준다.

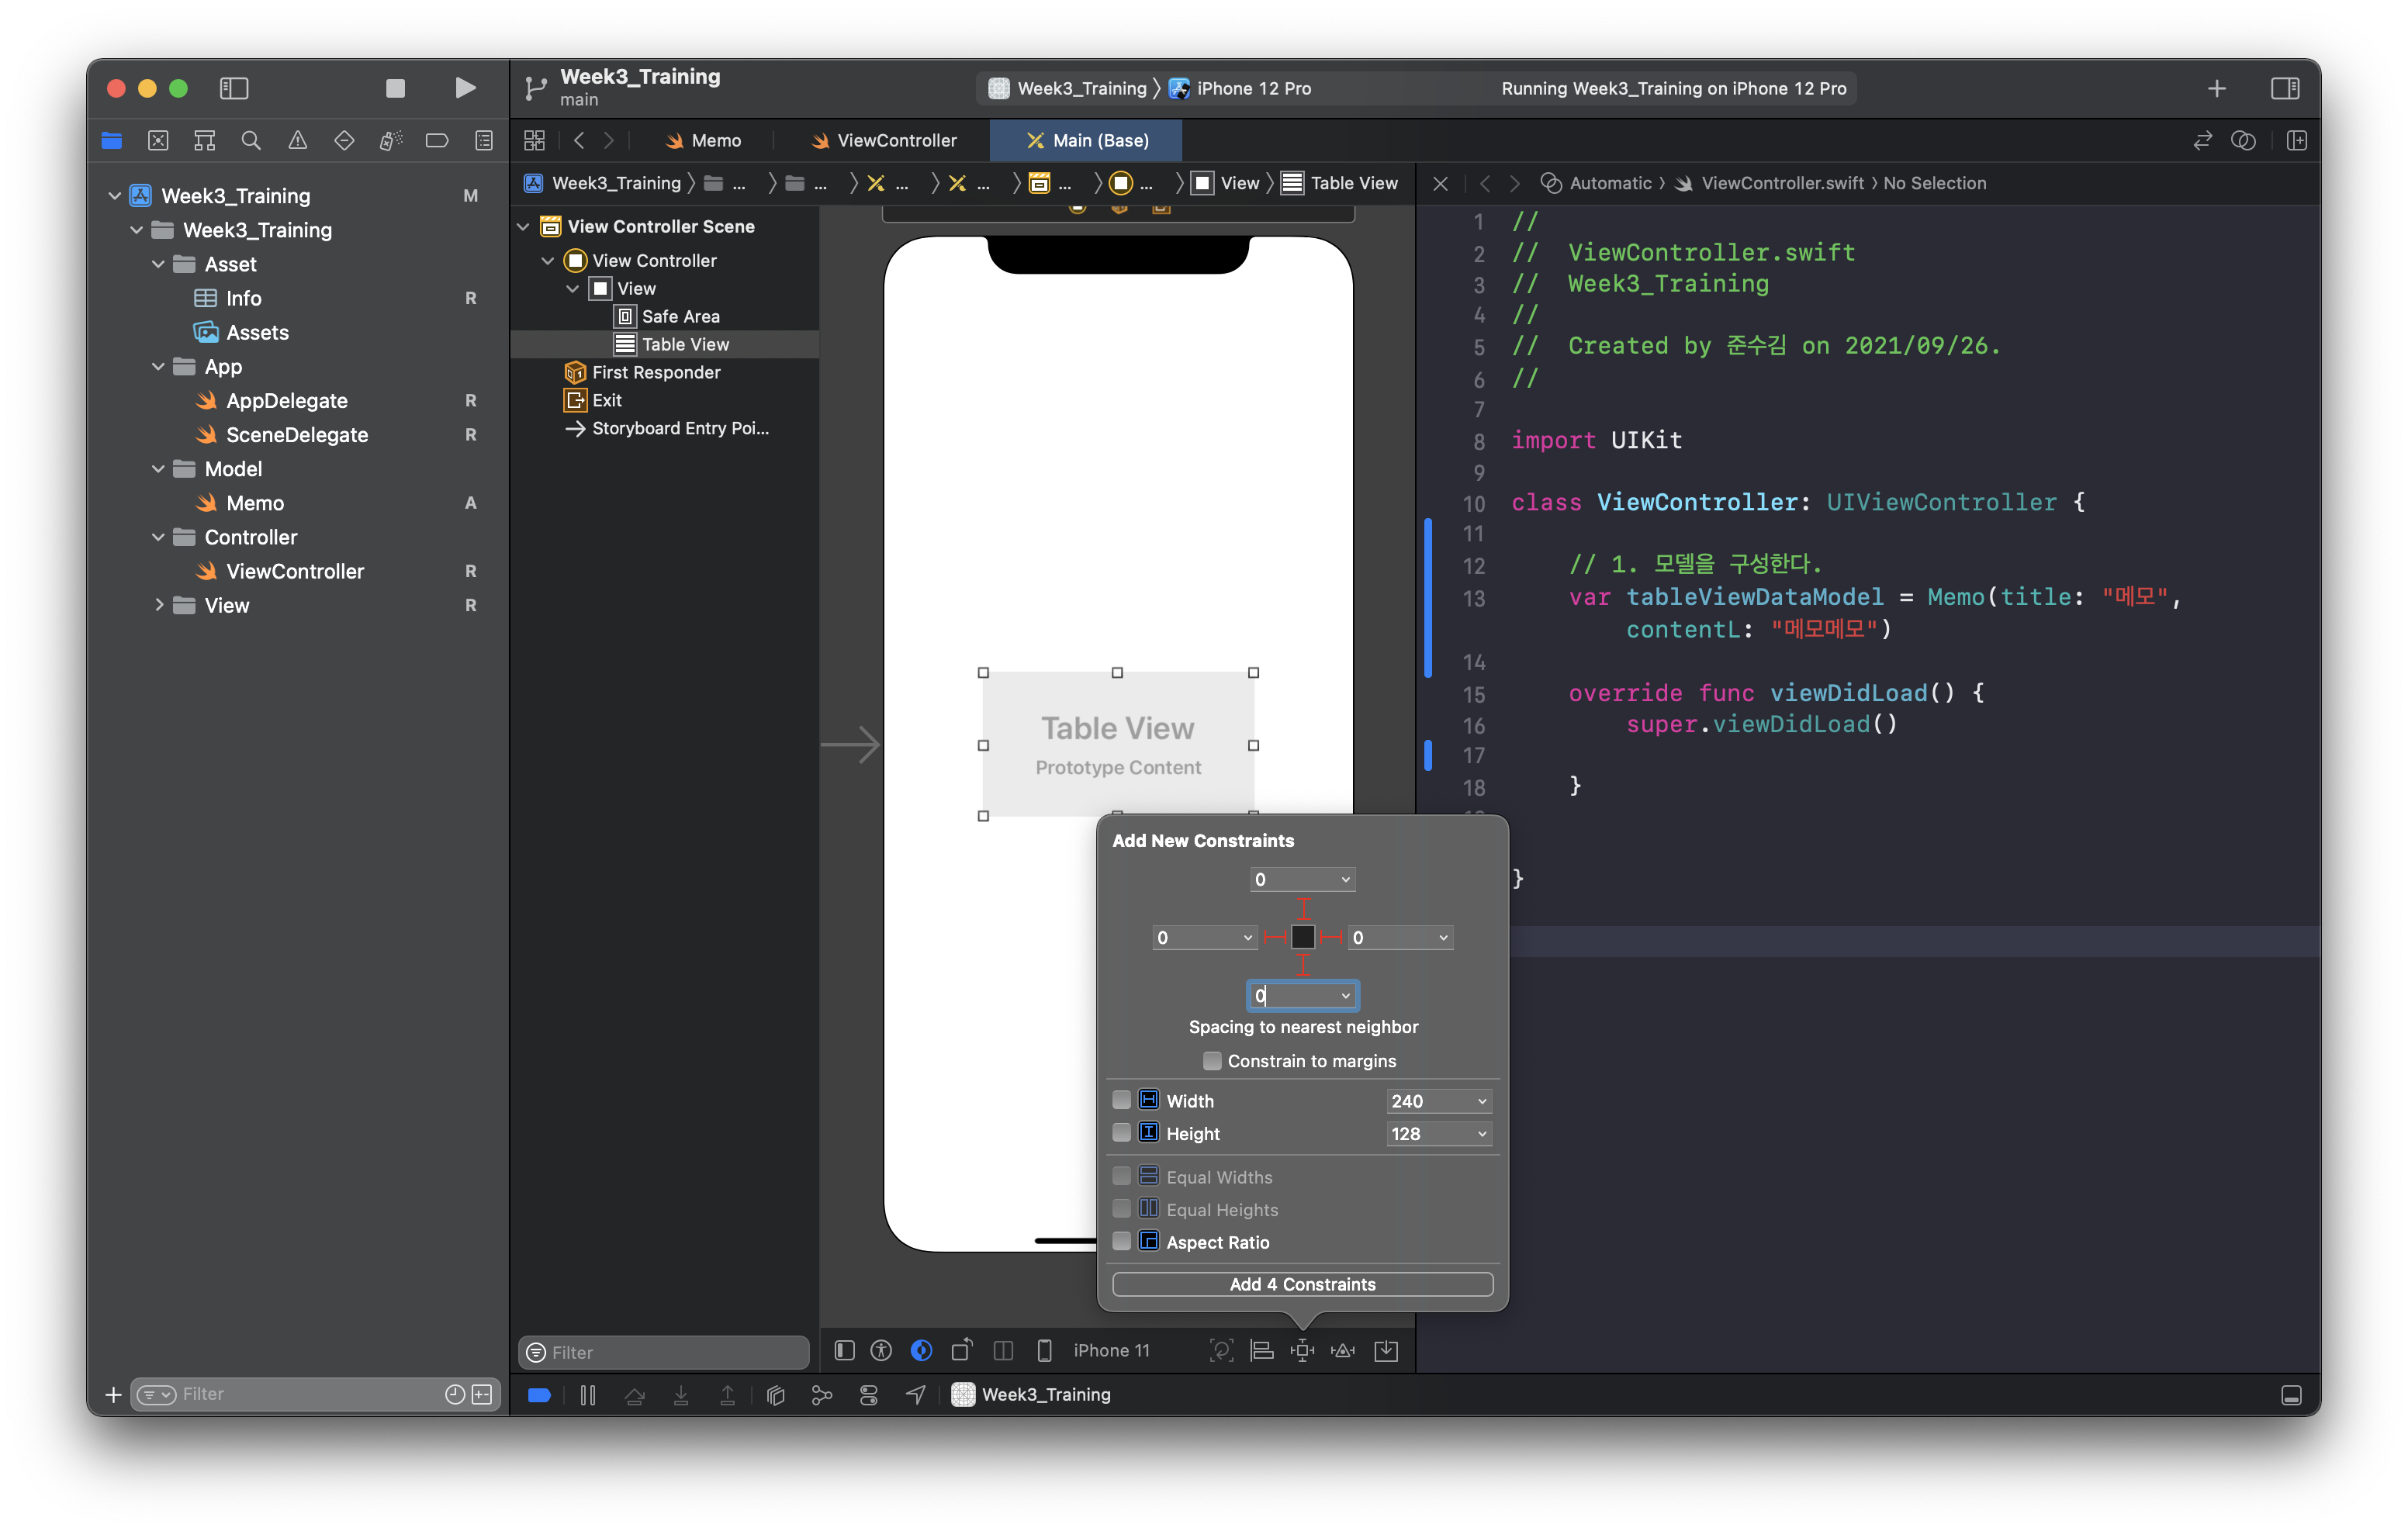
4. UITableView를 스토리보드에 놓고 아래와 같이 오토레이아웃을 잡아준다. (Constrain to margin은 되도록이면 체크해제하자.)
5. 아래와 같이 UITableView를 IBOutlet 연결해주고 코드를 작성해준다.
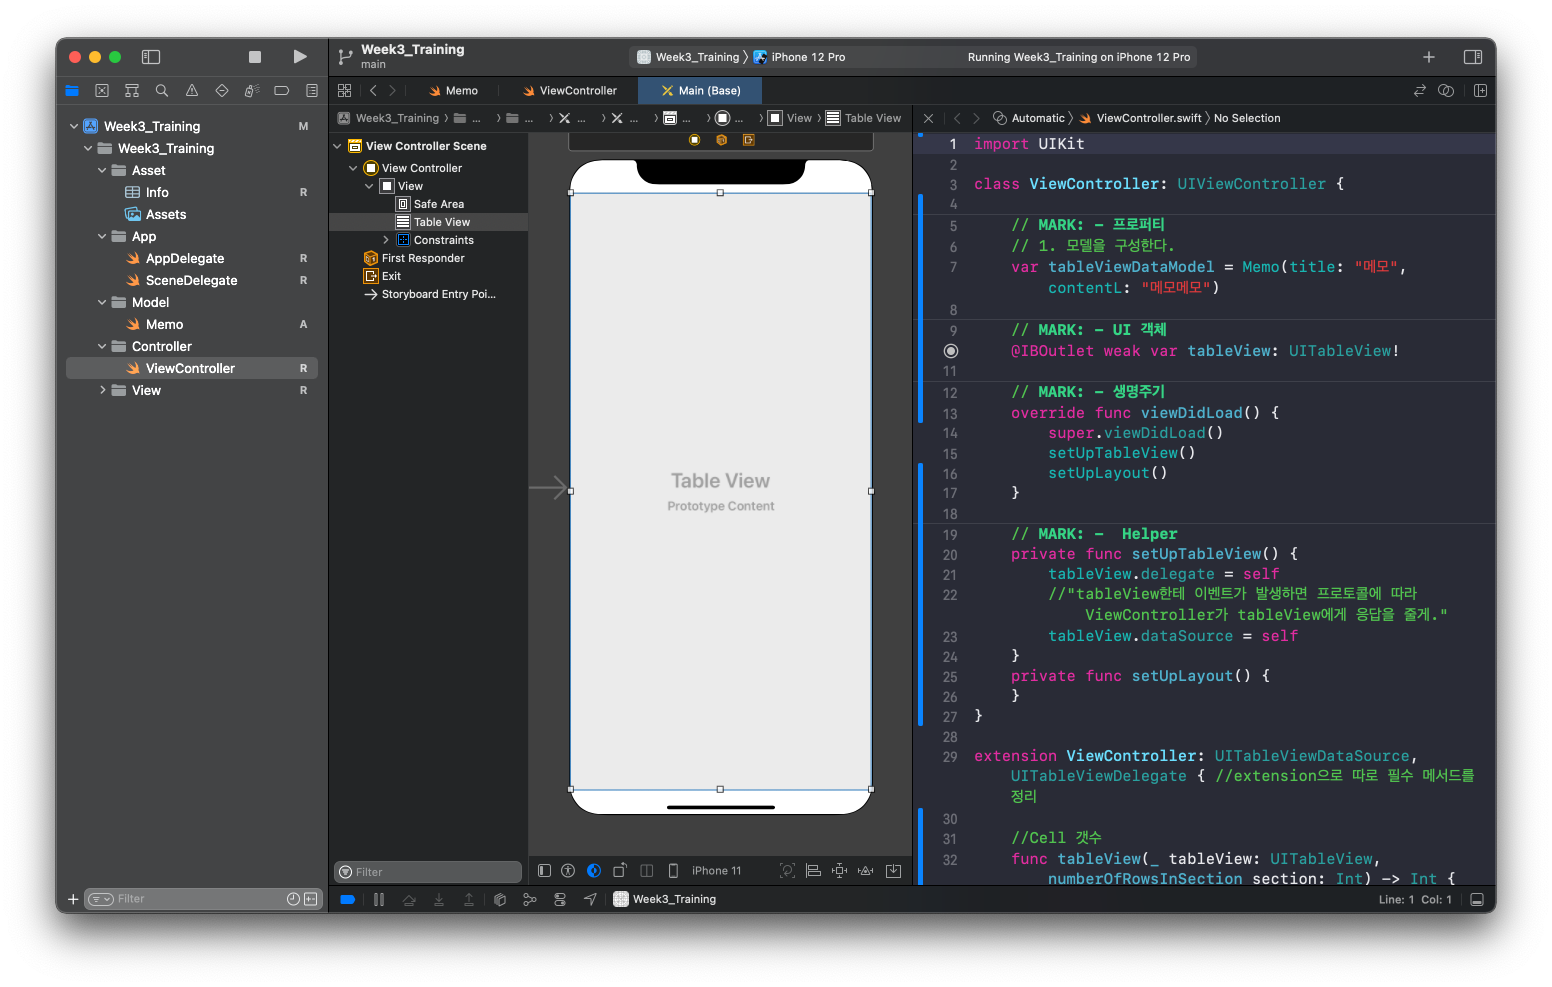
import UIKit

class ViewController: UIViewController {

    // MARK: - 프로퍼티
    // 1. 모델을 구성한다.
    var tableViewDataModel = Memo(title: "메모", contentL: "메모메모")

    // MARK: - UI 객체
    @IBOutlet weak var tableView: UITableView!

    // MARK: - 생명주기
    override func viewDidLoad() {
        super.viewDidLoad()
        setUpTableView()
        setUpLayout()
    }

    // MARK: -  Helper
    private func setUpTableView() {
        tableView.delegate = self
        //"tableView한테 이벤트가 발생하면 프로토콜에 따라 ViewController가 tableView에게 응답을 줄게."
        tableView.dataSource = self
    }
    private func setUpLayout() {
    }
}

    // MARK: - UITableViewDataSource, UITableViewDelegate
extension ViewController: UITableViewDataSource, UITableViewDelegate { //extension으로 따로 필수 메서드를 정리

    //Cell 갯수
    func tableView(_ tableView: UITableView, numberOfRowsInSection section: Int) -> Int {
        return 3
    }
    //Cell 구성
    func tableView(_ tableView: UITableView, cellForRowAt indexPath: IndexPath) -> UITableViewCell {
        return UITableViewCell()
    }
}
6. Cell 만들기
-
새로운 Cocoa Touch File 만들기
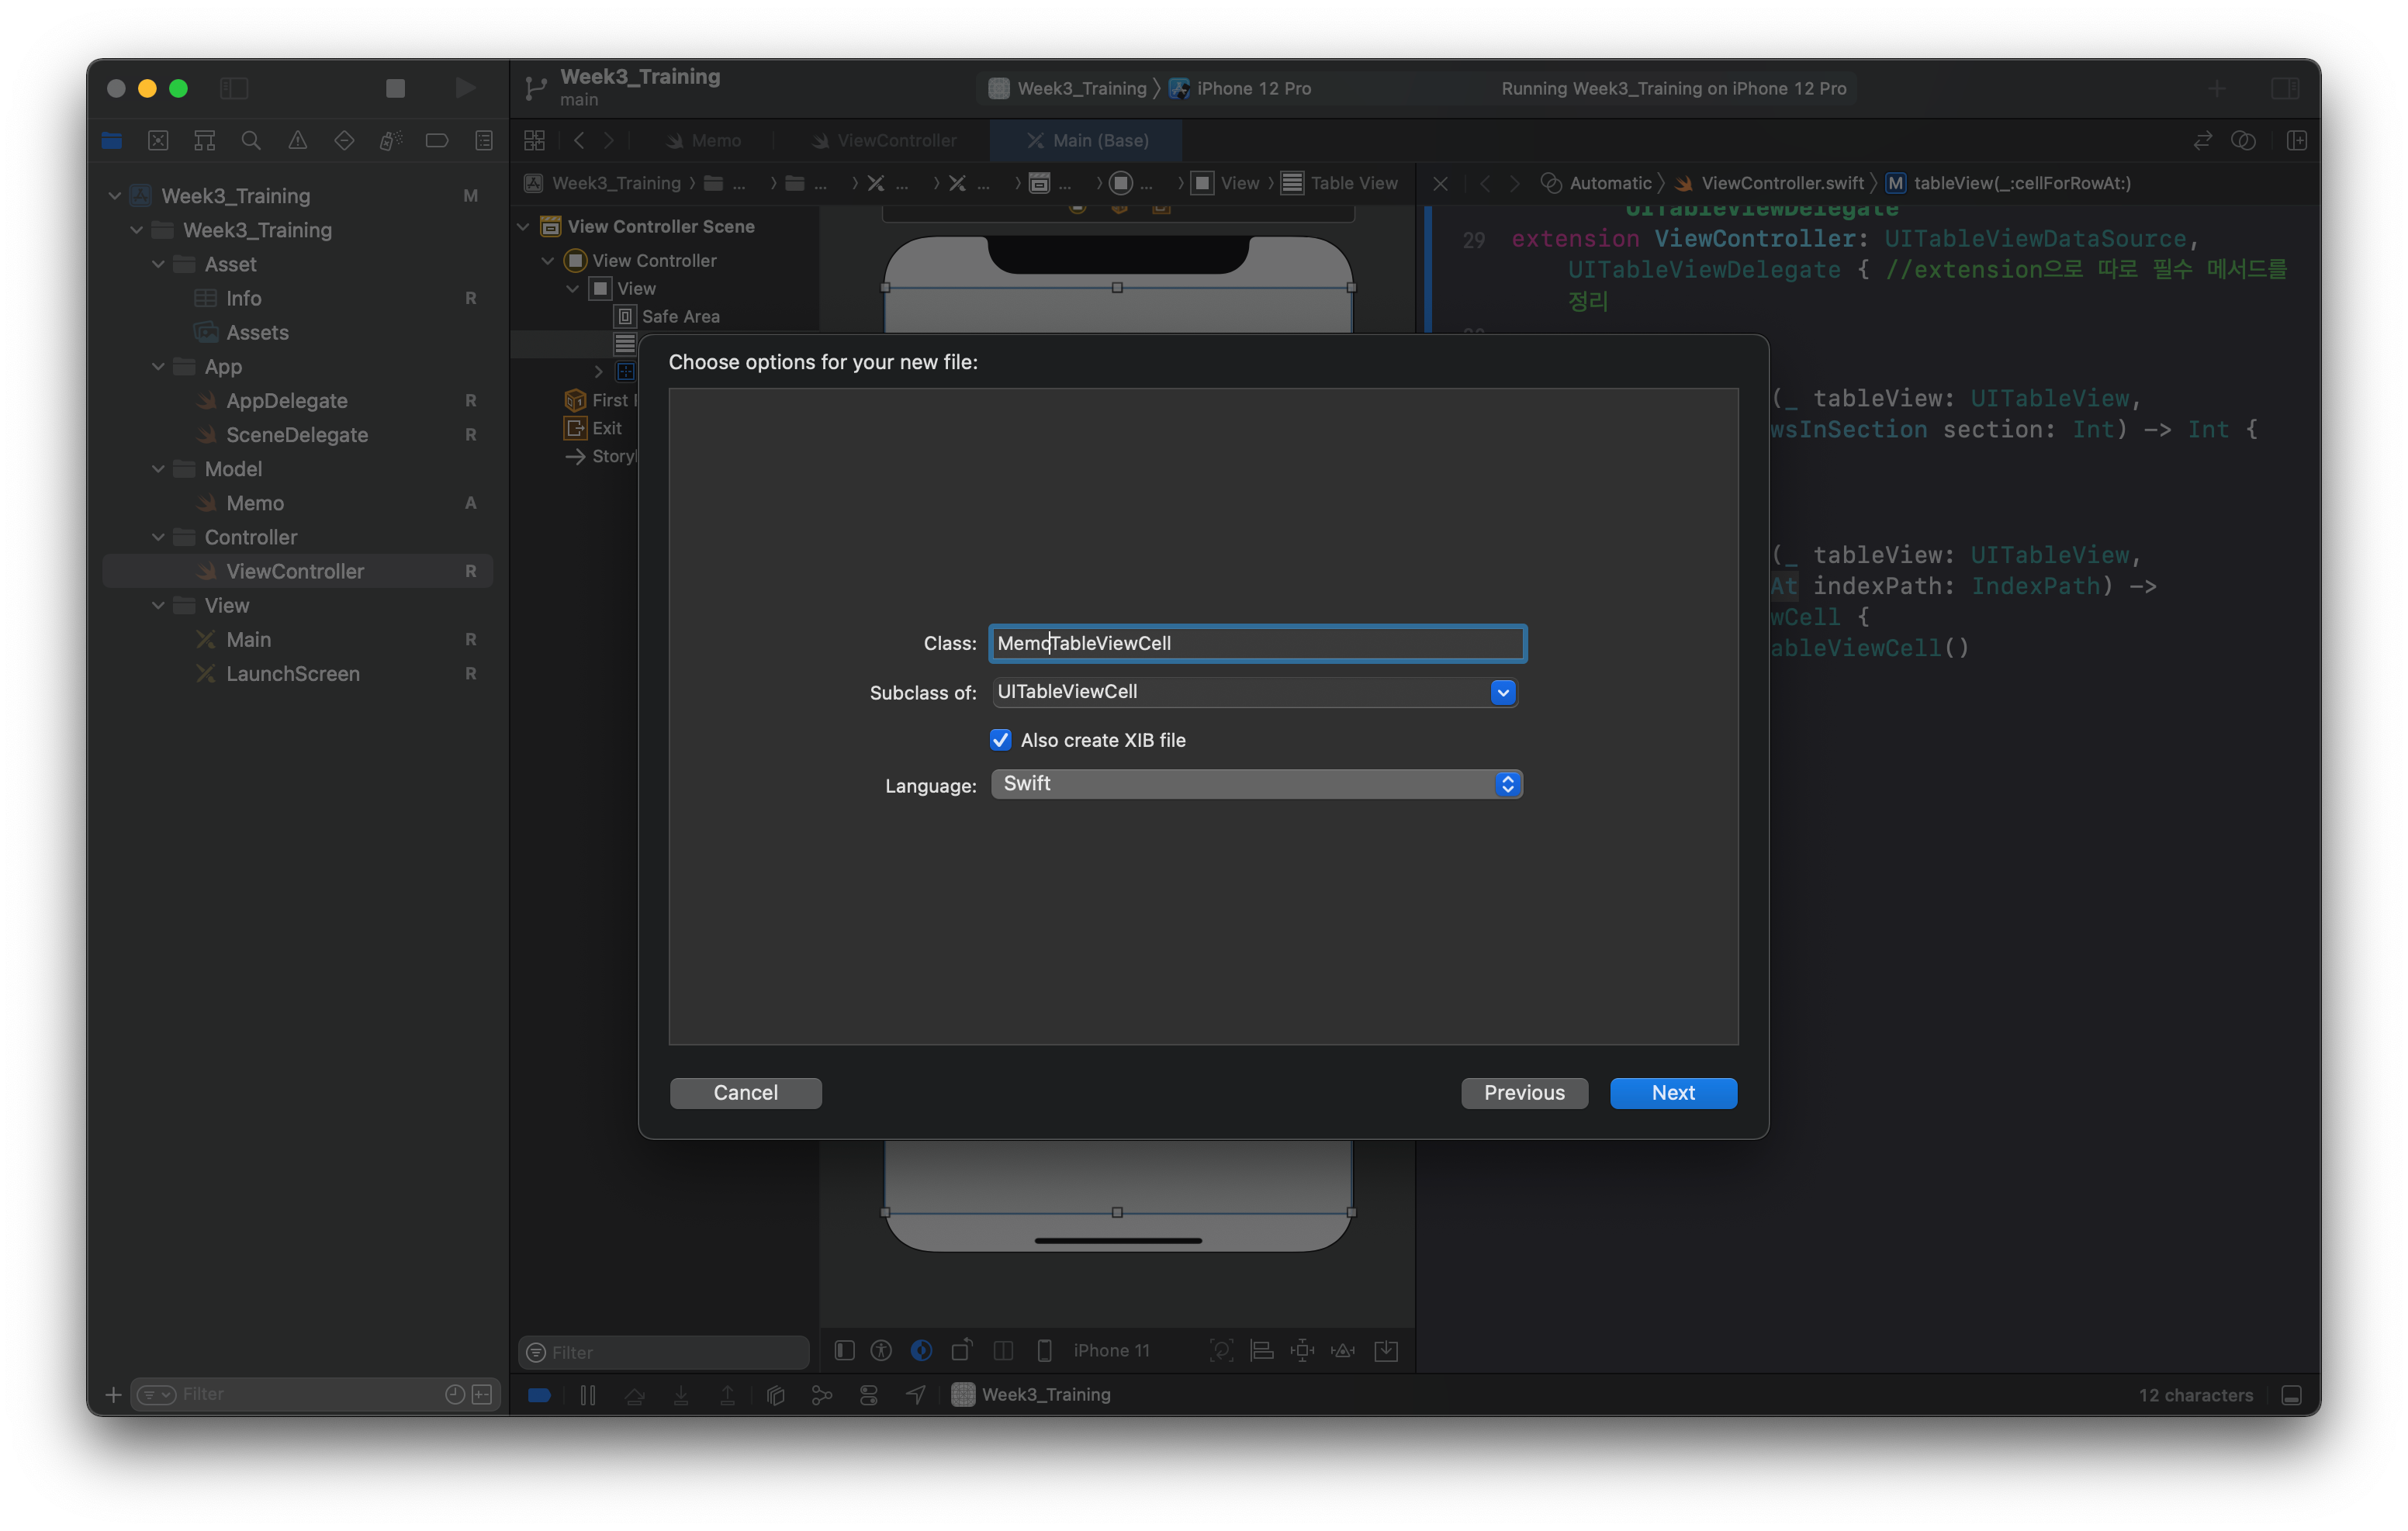
XIB 파일: UI를 기술하는 xml 파일
-
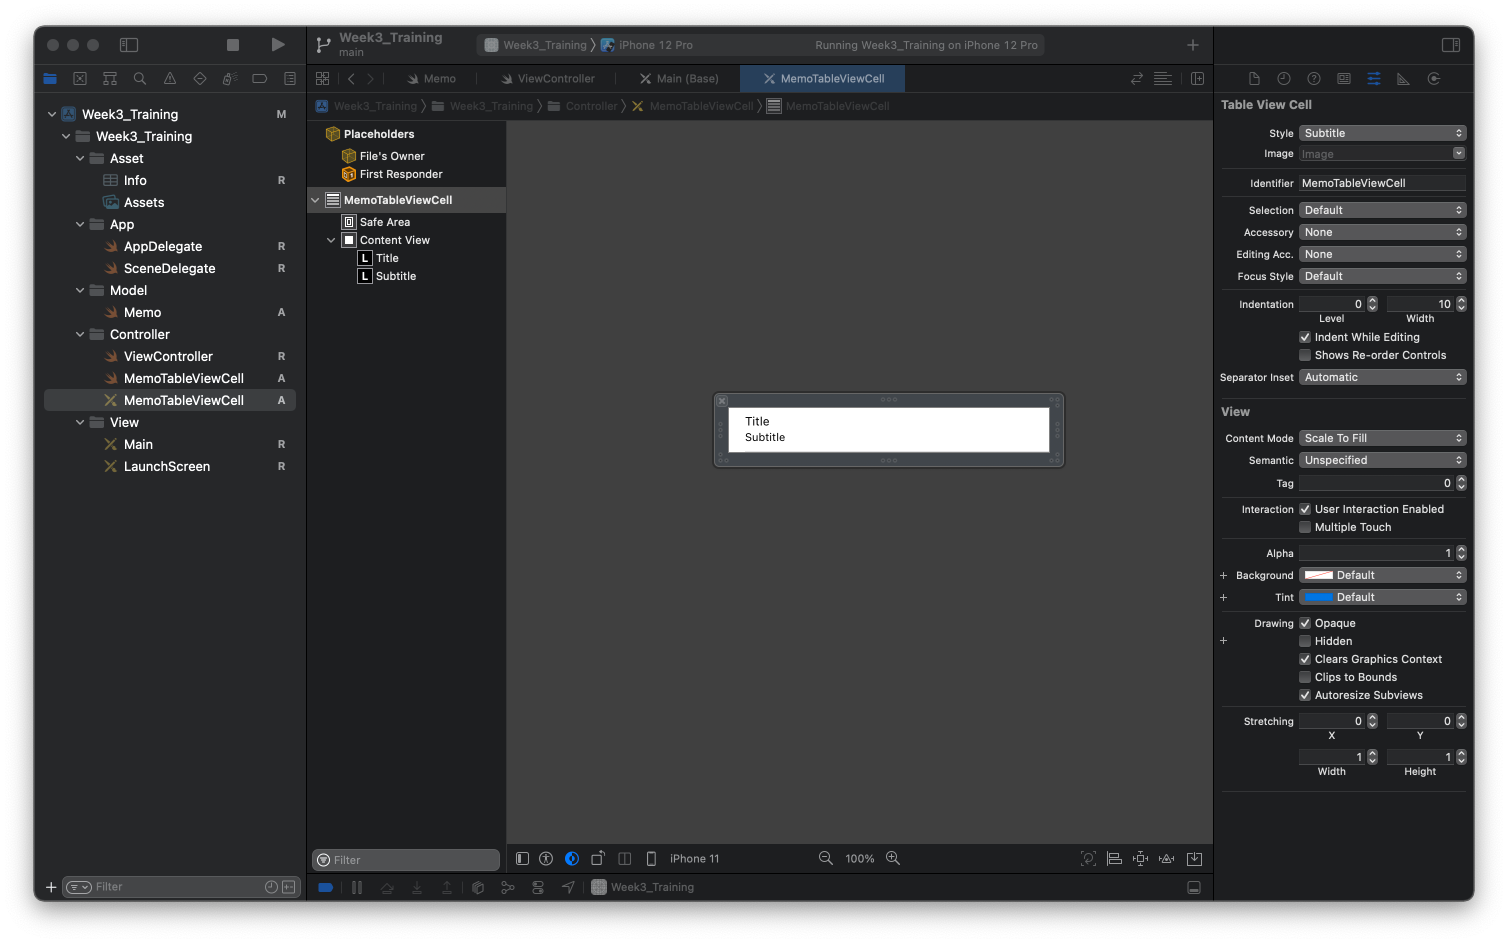
XIB 파일에서 identifier를 파일명과 동일하게 (나중에 사용하기 쉽도록) 만들고 Style은 Subtitle을 선택해준다. (Style은 커스텀하면 더 다양하게 만들 수 있다.)
Accessory는 마음대로 한다. 필자는 Disclosure Indicator를 선택함
-
register 메소드를 호출해서 XIB파일을 등록한다.

-
이후에 Cell ID를 수정하기 쉽도록 상수를 만들어준다.
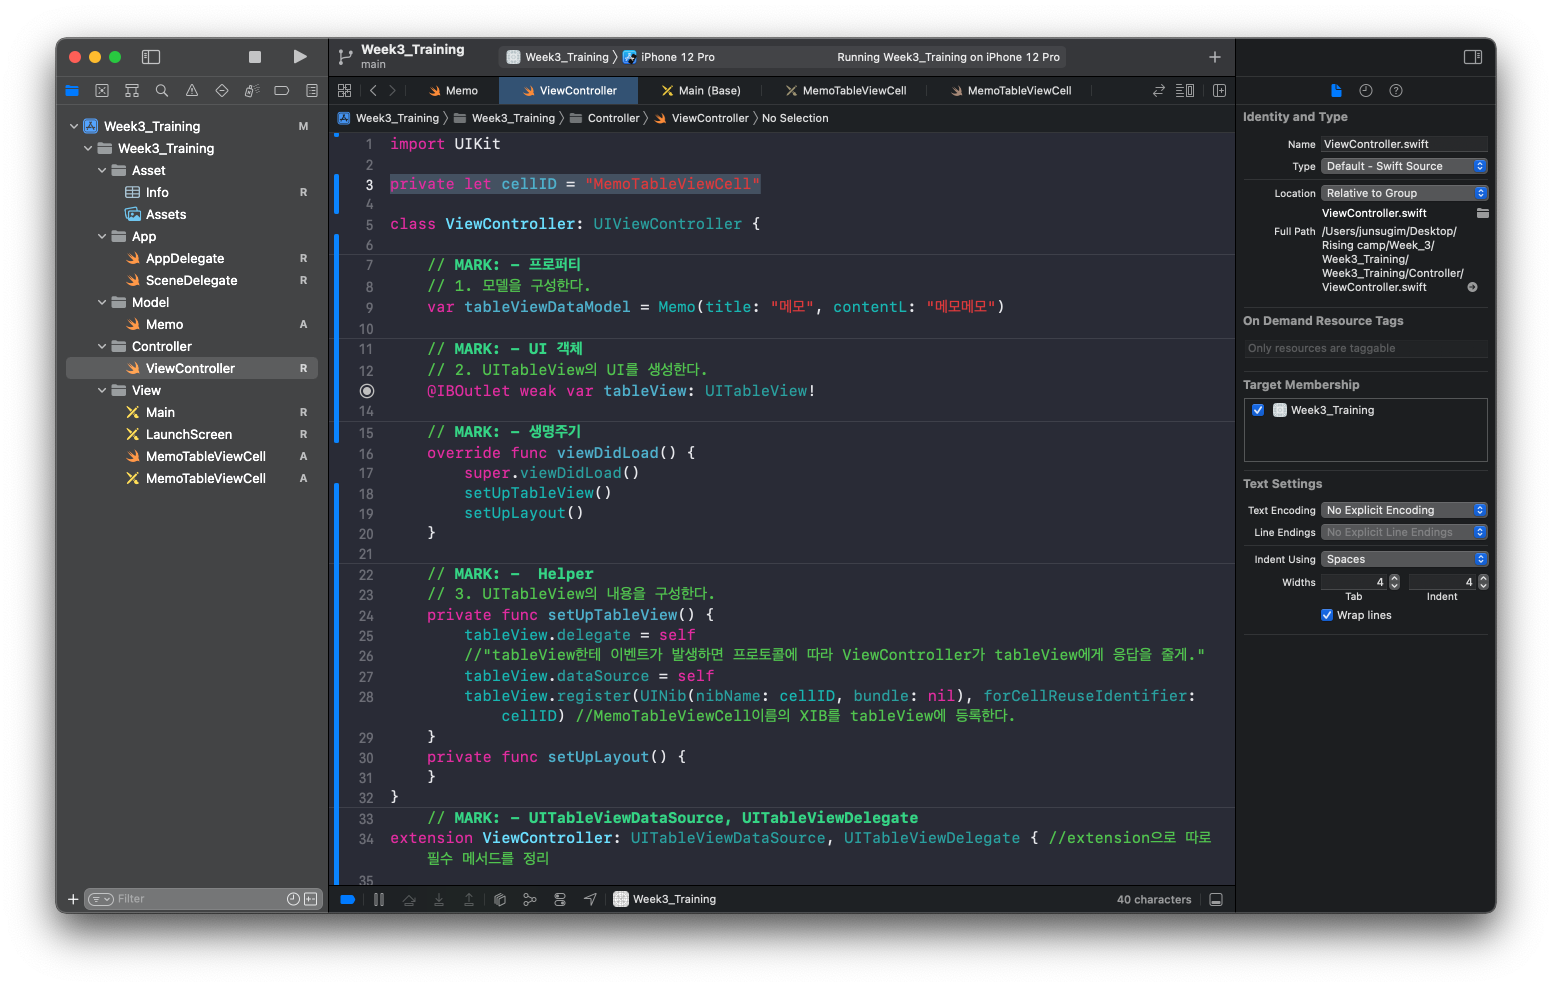
import UIKit
private let cellID = "MemoTableViewCell"
class ViewController: UIViewController {
// MARK: - 프로퍼티
// 1. 모델을 구성한다.
var tableViewDataModel = Memo(title: "메모", contentL: "메모메모")
// MARK: - UI 객체
// 2. UITableView의 UI를 생성한다.
@IBOutlet weak var tableView: UITableView!
// MARK: - 생명주기
override func viewDidLoad() {
super.viewDidLoad()
setUpTableView()
setUpLayout()
}
// MARK: - Helper
// 3. UITableView의 내용을 구성한다.
private func setUpTableView() {
tableView.delegate = self
//"tableView한테 이벤트가 발생하면 프로토콜에 따라 ViewController가 tableView에게 응답을 줄게."
tableView.dataSource = self
tableView.register(UINib(nibName: cellID, bundle: nil), forCellReuseIdentifier: cellID) //MemoTableViewCell이름의 XIB를 tableView에 등록한다.
}
private func setUpLayout() {
}
}
// MARK: - UITableViewDataSource, UITableViewDelegate
extension ViewController: UITableViewDataSource, UITableViewDelegate { //extension으로 따로 필수 메서드를 정리
//Cell 갯수
func tableView(_ tableView: UITableView, numberOfRowsInSection section: Int) -> Int {
return 3
}
//Cell 구성
func tableView(_ tableView: UITableView, cellForRowAt indexPath: IndexPath) -> UITableViewCell {
return UITableViewCell()
}
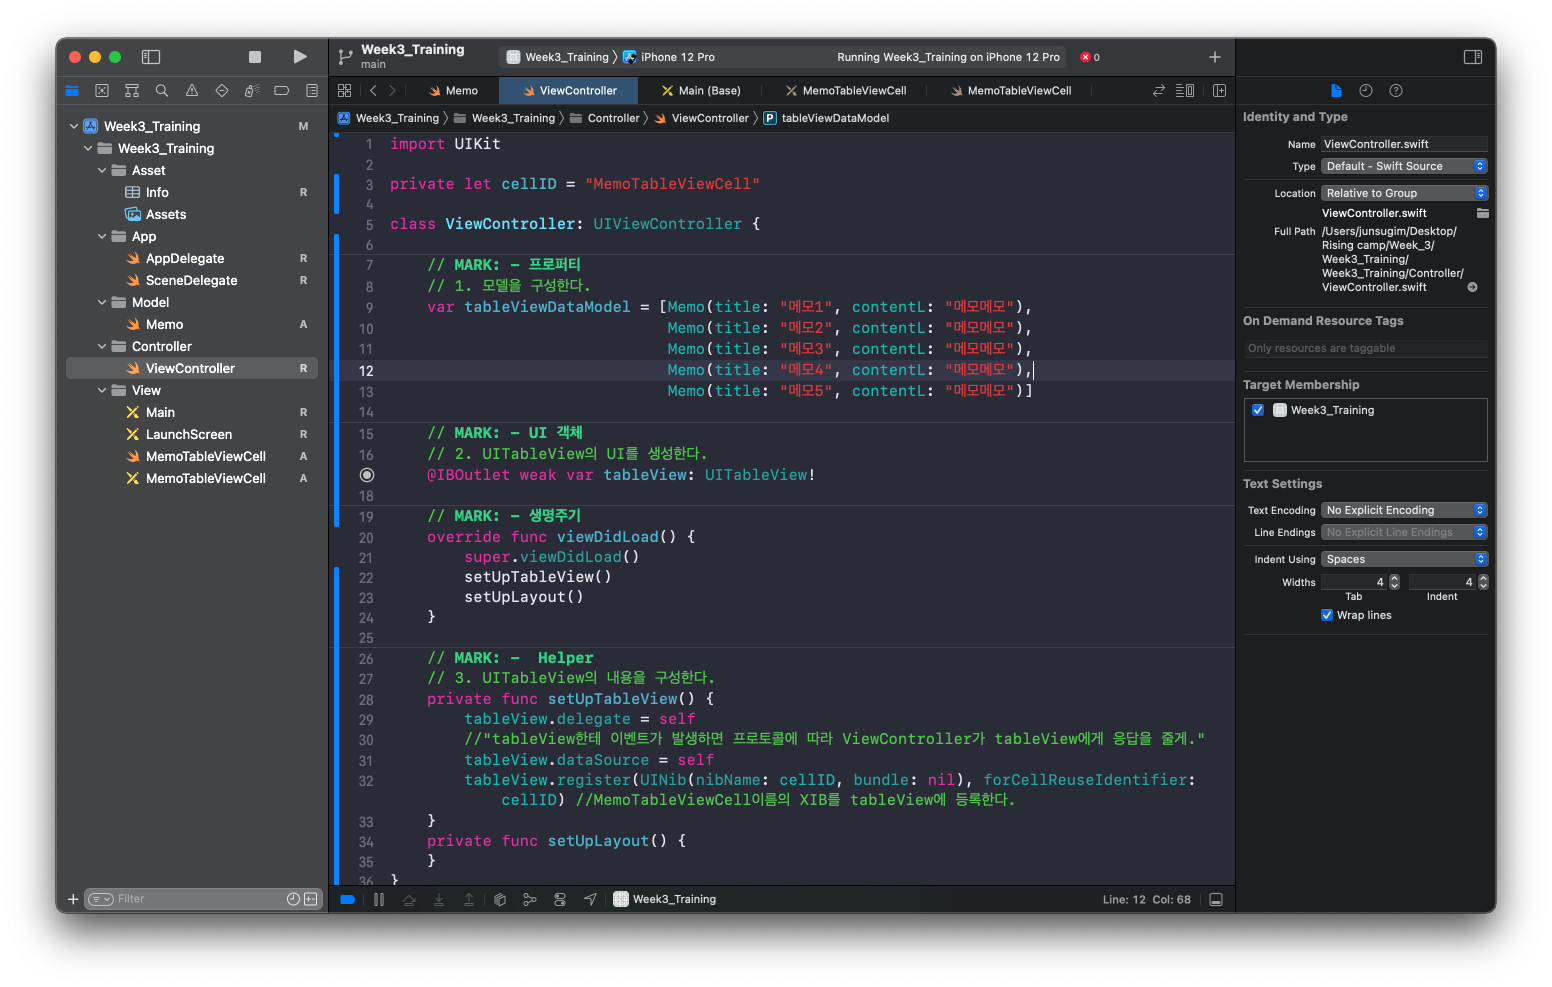
}7. Cell의 갯수를 Data의 갯수로 하기 위해서는 Data가 가변적이어야 하는데 가변적이도록 만들기 위해서는 Data를 배열로 만들어주어야한다. (중요!!! Data는 배열로!!)
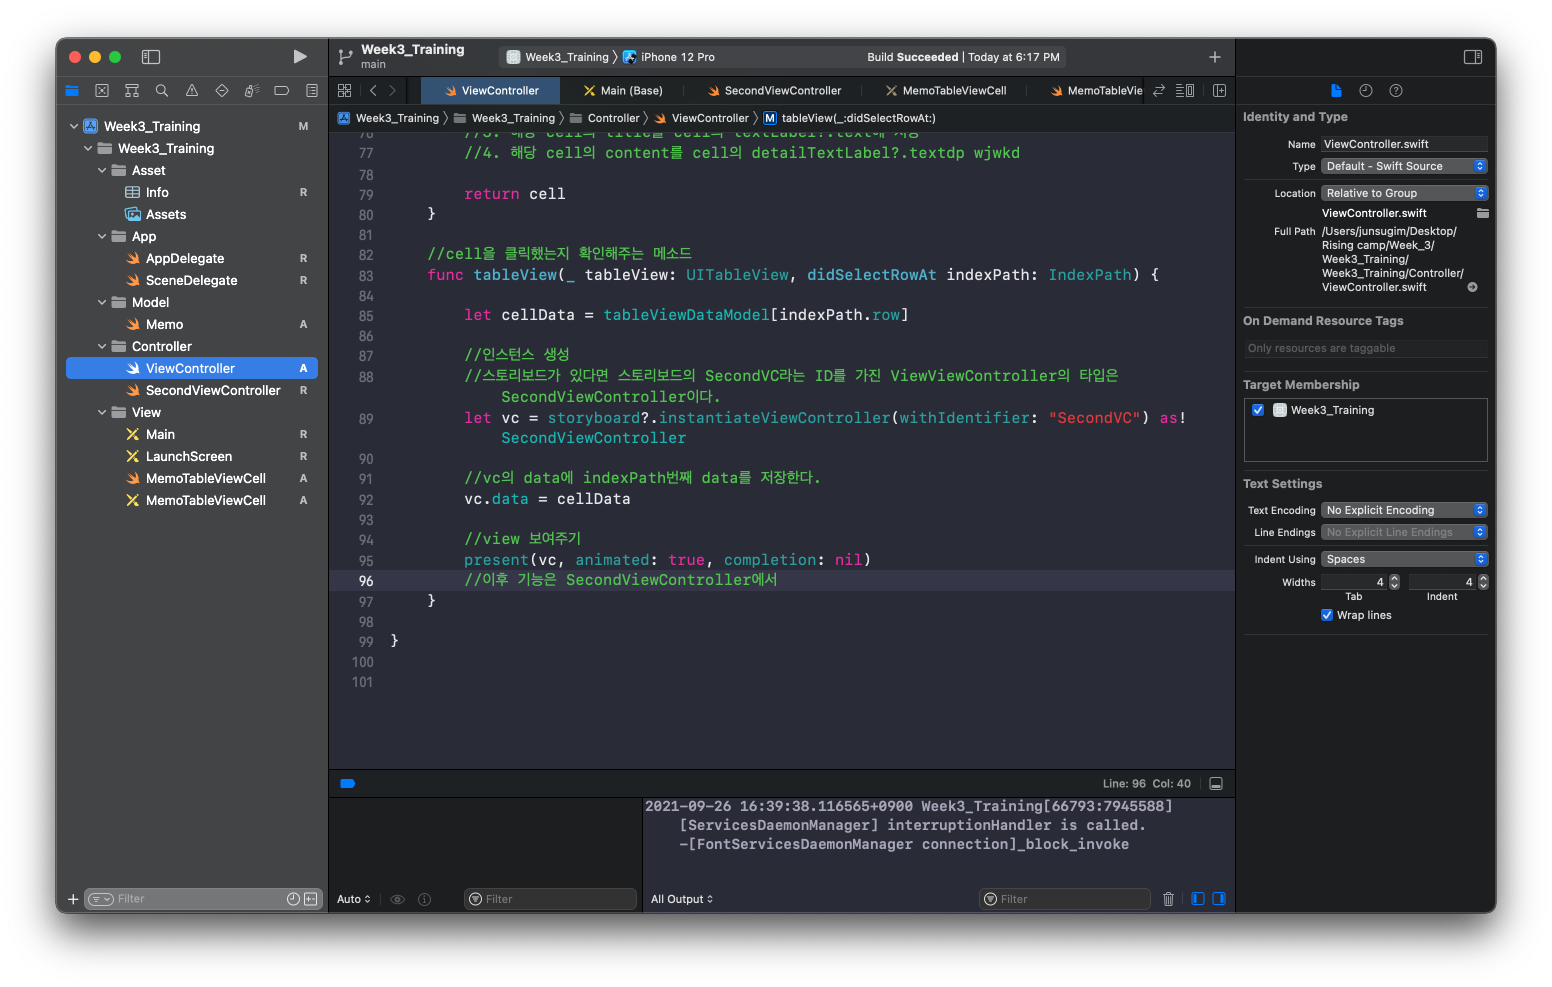
8. cellForRowAt메소드를 통해서 Cell 구성하기 - 참고: https://zeddios.tistory.com/54
func tableView(_ tableView: UITableView, cellForRowAt indexPath: IndexPath) -> UITableViewCell {

        let cellData = tableViewDataModel[indexPath.row]
        //ID가 cellID인 cell에 tableViewDataModel[indexPath.row]를 넣어라!
        //즉, tableView의 행을 식별하는 인덱스 경로의 행에 위치를 인덱스로 가지는 tableViewDataModel의 원소를 cellData에 넣어라.
        //indexPath는 [0, 0] [0, 1] [0, 2] [0, 3] [0, 4] 이와 같은 형식인데 여기서 indexPath.row를 뽑아내면 0, 1, 2, 3, 4가 된다. 따라서 tableViewDataModel[indexPath.0]을 cellData 상수에 저장한다.
        // 더하기) 위의 indexPath의 colunm은 Section이다. 따라서 우리가 출력한 indexPath의 Section은 0이다.


        let cell = tableView.dequeueReusableCell(withIdentifier: cellID, for: indexPath) as! MemoTableViewCell
        //dequeueReusableCell이란 지정된 재사용 식별자에 대한 재사용 가능한 테이블 뷰 셀 객체를 반환하고 이를 테이블에 추가하는 메소드입니다.
        //1. withIdentifier: string형 identifier는 재사용할 객체를 나타냄
        //2. for: 셀의 위치를 지정하는 인덱스 패스
        //3. indexPath: tableView 메소드가 받은 매개변수를 indexPath라고 한 것 / tableView의 행을 식별하는 인덱스 경로
        //equeueReusableCell을 사용하는 이유: cell을 재사용해서 메모리를 줄이기 위해서
        //as! MemoTableViewCell: 여러 class중에서 MemoTableViewCell에만 효과를 내겠다.

        cell.textLabel?.text = cellData.title
        //cell의 textLabel의 text에 cellData의 title을 넣어라.

        cell.detailTextLabel?.text = cellData.content
        //cell의 detailTextLabel의 text에 cellData의 content을 넣어라.

        //textLabel, detailTextLabel은 우리가 추가하지 않아도 자동으로 cell에 있는 프로퍼티이다.

        //요약하자면
        //1. cellData에 cell의 위치를 저장하고
        //2. cell재사용
        //3. 해당 cell의 title을 cell의 textLabel?.text에 저장
        //4. 해당 cell의 content를 cell의 detailTextLabel?.textdp wjwkd

        return cell
    }
9. 두번째 ViewController과 Swift 파일도 함께 만들어준다.

10. 이제 우리는 TableView에서 해당 cell을 클릭하면 SecondViewController로 화면이 넘어가는 것과 동시에 Label에 해당 cell의 제목이 나오도록 구현할 것이다.
-
Storyboard ID 설정 & Class 연결해주기

-
IBOutlet연결해주기
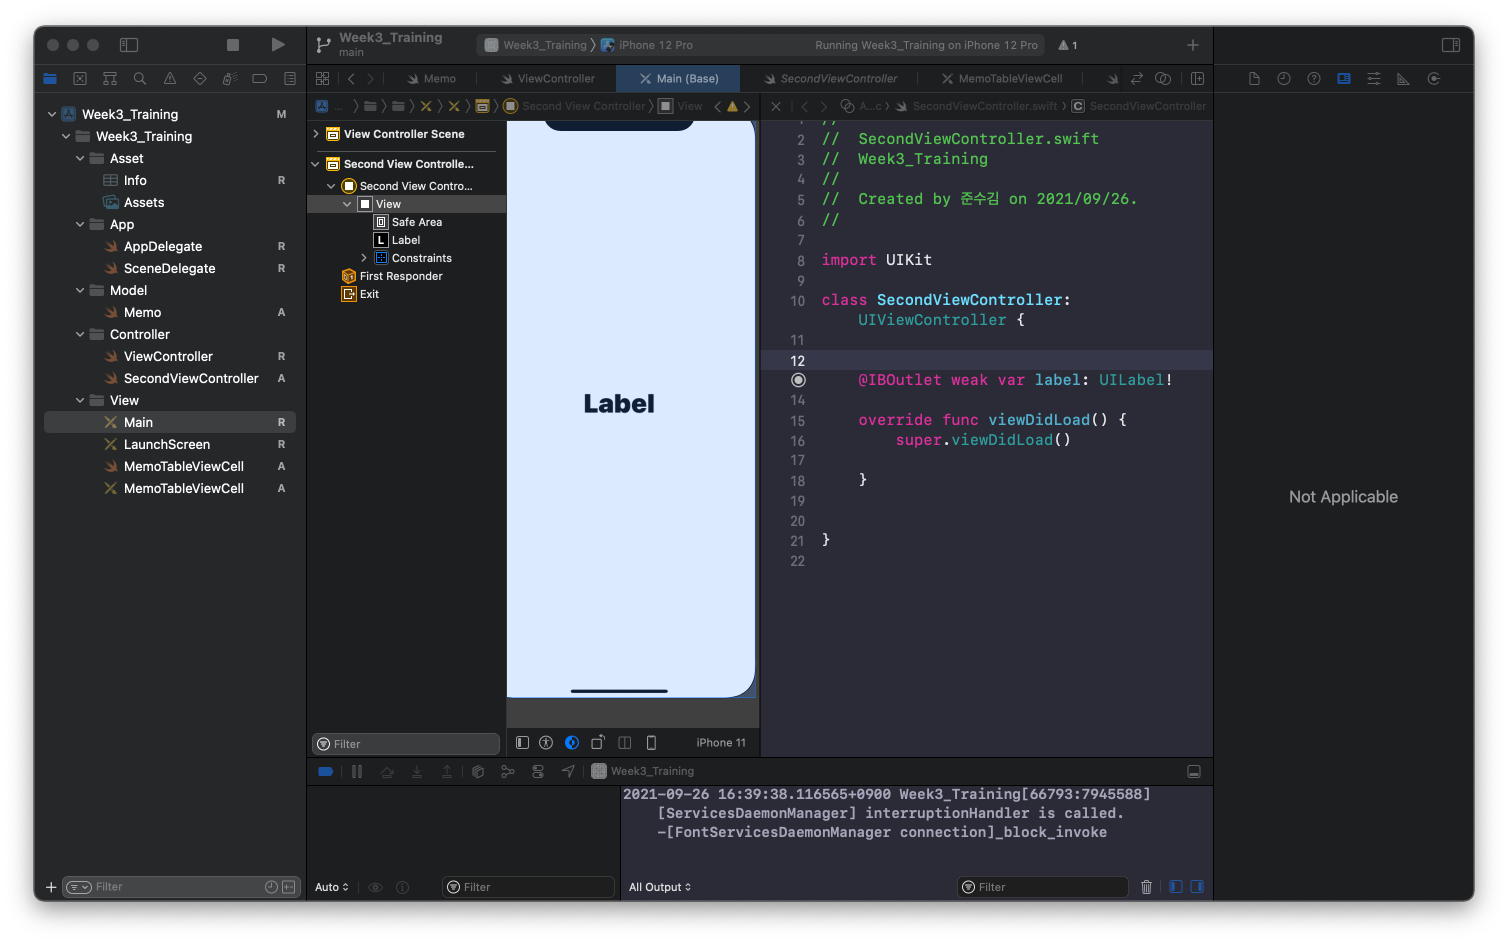
-
클릭했을 때의 메소드 이용하기

보통은 ViewController에
self.label.text = data?.title위의 코드를 작성하려고 하지만 우리는 현재 ViewController에 title을 넘기는게 아니라 SecondViewController에 넘기는 것이기 때문에 SecondViewController에 넘어가서 코드를 작성해주어야한다.

애플을 좋아하는 비전공생